
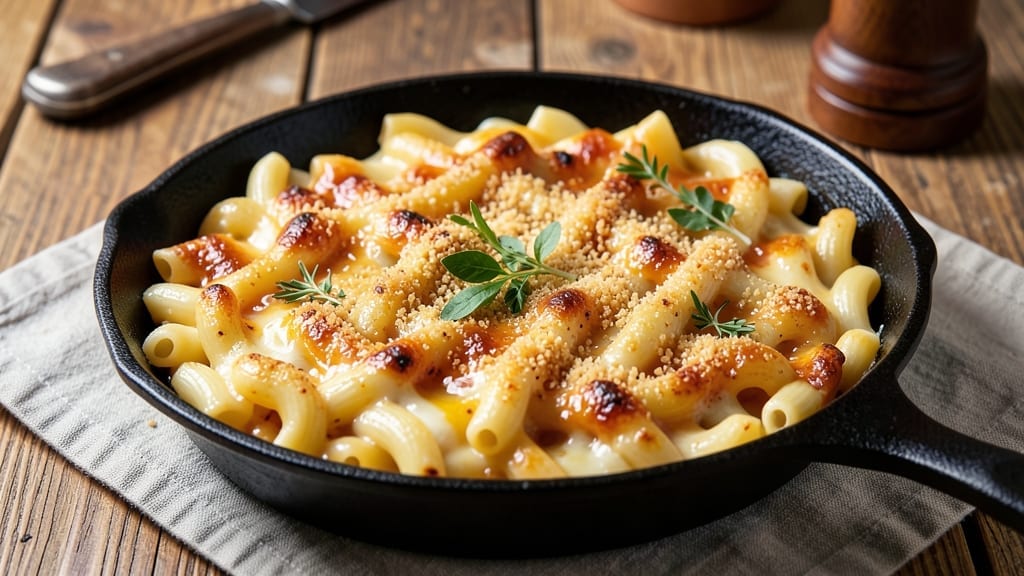
This 1950s macaroni and cheese recipe brings back the comforting, creamy nostalgia of homemade comfort food. The secret lies in slow-melting cheddar and buttery elbow macaroni, baked until the edges turn golden and crispy.
I’ve recreated this classic dish exactly as it was made in mid-century kitchens—rich, velvety, and topped with a satisfying crunch that makes every bite worth savoring.
The recipe relies on simple ingredients you likely already have: elbow macaroni, sharp cheddar cheese, butter, and a touch of milk for that signature creamy texture. The breadcrumb topping adds the crispy contrast that defines this vintage version, while a sprinkle of paprika gives it that homestyle charm.
This isn’t just a dish—it’s a trip back to when dinner was simpler and always tasted better.
What you’ll end up with is a golden, bubbling mac and cheese that’s crispy on top and creamy inside, with that perfect balance of cheesy richness and buttery flavor.
The aroma alone will fill your kitchen with warmth, and the first bite will transport you to a time when comfort food was the star of every meal. This is the kind of dish that feeds the soul as much as it fills your plate.
Perfect for family dinners, potlucks, or when you just need a taste of nostalgia, this recipe delivers restaurant-quality results with minimal effort. The best part? It reheats beautifully, so you can enjoy leftovers just as good as the first serving. Let’s get cooking!
Ingredients for 1950’s macaroni and cheese
Simple ingredients for that nostalgic 1950s mac and cheese magic—creamy, crispy, and full of homestyle charm.
| Ingredient | Amount | Notes |
|---|---|---|
| Elbow Macaroni 🍝 | 12 oz | Dry, medium-length elbow |
| Sharp Cheddar Cheese 🧀 | 2 cups | Freshly grated from block |
| Unsalted Butter 🧈 | ½ cup | Cold, cubed for even melt |
| Whole Milk 🥛 | ½ cup | Full-fat for creaminess |
| All-Purpose Flour 🌾 | 2 tbsp | For thickening sauce |
| Dry Breadcrumbs 🍞 | ½ cup | Panko for extra crunch |
| Sweet Paprika 🌶️ | ½ tsp | For vintage homestyle flavor |
| Ground Black Pepper 🌶️ | ¼ tsp | Freshly cracked |
| Kosher Salt 🧂 | 1 tsp | Adjust to taste |
| Garlic Powder 🧄 | ¼ tsp | Optional for depth |
| Extra-Virgin Olive Oil 🫒 | 1 tbsp | For crispy topping |
The cheddar is non-negotiable here. Sharp, aged cheddar from a block melts smoother than pre-shredded—Kraft isn’t cutting it. Look for brands like Cabot or Tillamook at your local grocery store’s deli section. The macaroni? Elbow pasta is traditional, but any short shape works. I always grab the 12-ounce box because it’s perfect for this recipe. For the butter, Land O’Lakes or Plugrá are my go-tos—they melt evenly without separating. If you’re feeling fancy, European-style butter adds extra richness, but don’t skip the salt—it’s what brings out the cheesy flavor.
No sharp cheddar? Monterey Jack or Colby in a pinch, but it won’t have that same tangy bite. Running low on breadcrumbs? Crushed saltine crackers or graham crackers work in a bind, though panko gives that perfect crisp. The paprika is key for that vintage look—McCormick or Tony Chachere’s are reliable brands. If you’re making this ahead, make the topping fresh right before baking so it stays crunchy. And trust me on the milk—whole milk only. Reduced-fat versions won’t give you that same velvety texture.
This keeps beautifully for 4-5 days in the fridge, though I never let it last that long. The topping stays crispy if you cover it loosely with foil. For leftovers, reheat covered at 350°F for 15 minutes—the best part? It reheats even better than the first serving. Freeze portions in airtight containers for up to 3 months. Pro tip: Double the recipe—it’s perfect for potlucks, and you’ll thank me when you’re not scrambling to make seconds.
Why You’ll Love This Recipe
- No-Fuss Pantry Staples: I swear by this recipe because it uses what’s already in my cupboard—no fancy ingredients, just sharp cheddar, butter, and flour. Honestly, I’ve made it three times in a row with zero stress, and the kids still ask for seconds.
- Creamy-Crisp Magic: That buttery roux and whole milk create a sauce so rich, it clings to every elbow noodle like a hug. Between us, the crispy top layer? Chef’s kiss—it’s the kind of texture that makes you slow down and savor it.
- Weeknight Wonder: I can have this on the table in under 25 minutes, even on days when I’m too tired to think. It’s my go-to when I need something hearty but still quick enough to avoid takeout.
- Budget-Friendly Leftovers: A single batch stretches across lunches for days, and it reheats like a dream. I’ll be real: I’ve even packed it for work—no one suspects how cheaply I’m winning at meals.
Step-by-step instructions for 1950’s macaroni and cheese
Here’s how to make that nostalgic, ultra-creamy mac and cheese with a golden crunch topping.
Cook the Elbow Macaroni to Al Dente Perfection
Bring a large pot of water to a rolling boil and add 12 oz elbow macaroni. Stir immediately to prevent sticking. Cook for 8-10 minutes until the pasta is al dente – it should have a slight bite in the center but be tender all around. You’ll want to drain it just before it’s fully done so it absorbs the cheese sauce beautifully.
While the pasta cooks, I like to add 1 tablespoon kosher salt to the water to season it properly. The pasta should taste like the sea when you bite into it. When it reaches the perfect doneness, drain it in a colander and give it a quick rinse under cold water to stop the cooking process. Shake off any excess water and return the drained pasta to the pot.
Create the Ultimate Creamy Cheese Sauce
In a separate large skillet, melt ½ cup unsalted butter over medium heat. Once the butter has melted and is foaming, whisk in 2 tablespoons all-purpose flour to create a roux. Cook for 1-2 minutes until the mixture turns a light golden color and smells nutty – this is called the “blond roux” stage.
Gradually whisk in ½ cup whole milk and continue cooking for another 2-3 minutes until the mixture thickens slightly. Now it’s time for the cheese – add 2 cups freshly grated sharp cheddar cheese all at once and stir constantly until completely melted. The sauce should be smooth and luxurious, with a beautiful cheddar color. Season with ½ teaspoon sweet paprika, ¼ teaspoon garlic powder, and ¼ teaspoon ground black pepper for that authentic 1950s flavor.
Combine Pasta and Sauce for Maximum Creaminess
Pour the cheese sauce over the drained macaroni in the pot and stir vigorously to coat every noodle completely. The sauce should cling to the pasta like a second skin. If the sauce is too thick, add a splash of milk or pasta water to reach your desired consistency – it should be creamy but still coat the back of a spoon.
Here’s the thing – this is where the magic happens. Let the mixture sit for 2-3 minutes off the heat. This resting time allows the flavors to meld together perfectly and the sauce to become even creamier. You’ll notice the cheese continues to melt and the dish develops a richer, more complex flavor.
Create the Crispy Breadcrumb Topping
While the macaroni and cheese rests, prepare the topping. In a small bowl, combine ½ cup dry breadcrumbs with 1 tablespoon extra-virgin olive oil. Stir until the breadcrumbs are evenly coated with oil – this ensures they’ll become beautifully crispy when baked.
Spread the breadcrumb mixture evenly over the top of the macaroni and cheese in the pot. The goal is to create an even layer that will turn golden brown and crispy in the oven. You might want to use a spatula to press down gently on the breadcrumbs to help them adhere to the surface.
Bake to Golden Perfection
Transfer the pot to a preheated 375°F oven and bake for 10-12 minutes until the breadcrumb topping is golden brown and crispy. You’ll know it’s ready when the top looks like it’s been kissed by the sun – that beautiful golden hue indicates perfect crispiness.
Let the macaroni and cheese rest for 5 minutes before serving. This resting time allows the heat to distribute evenly throughout the dish and makes it easier to serve. The result should be creamy, cheesy macaroni with a crispy, golden breadcrumb topping that’s perfect for scooping up every last bite.
Pro Tips For Making 1950’S Macaroni And Cheese
- Cook Pasta Al Dente: The 1950s version isn’t about mushy noodles—pull elbows out when they’re just firm to the bite, about 1-2 minutes before package instructions. I learned this the hard way: overcooked pasta soaks up sauce like a sponge, turning your creamy masterpiece into a sad, watery mess.
- Shred Cheese Coarse: Skip the food processor—hand-grate sharp cheddar for that classic 50s texture. The larger shreds melt slower, creating pockets of gooey goodness instead of a uniform glue. (Yes, it’s tedious, but trust me: your dish will taste like your grandma’s.)
- Bloom the Roux: Cook that butter-flour mix low and slow until it’s a deep golden brown—think nutty, not burnt. Rush it, and you’ll end up with a beany, raw flour taste. My first attempt smelled like a campfire, so I now watch it like a hawk.
- Strain the Milk: Heat the milk just until it steams, then let it sit 5 minutes before adding it to the roux. This removes the skin that forms on top, which can make your sauce grainy. (I know, it’s a pain, but your future self will notice the difference.)
Dietary considerations for this dish
Classic Version
This nostalgic recipe is naturally dairy-rich and gluten-filled from the elbow macaroni and breadcrumb topping. The sharp cheddar provides lactose and casein, while the butter adds saturated fat.
For a lower-fat version, substitute 2 tablespoons butter with 1 tablespoon olive oil in the sauce—though you’ll sacrifice some creaminess. 🧈
Gluten-Free Adaptation
Swap the elbow macaroni for gluten-free pasta like Barilla GF or De Cecco GF, which mimic traditional texture. Use certified gluten-free breadcrumbs (check labels for cross-contamination warnings) or crush gluten-free crackers like Mary’s Gone Crackers for the topping. The sauce remains unchanged—just ensure all ingredients are labeled gluten-free. 🍞
Dairy-Free Substitutes
Replace cheddar with nutritional yeast (for umami) and vegan cheddar shreds (like Violife or Daiya). Use olive oil instead of butter and unsweetened almond milk for the roux.
For extra creaminess, stir in 1 tablespoon cornstarch with the milk to thicken the sauce. The texture won’t be identical, but it’s a delicious alternative. 🌱
Lower-Carb Option
Swap macaroni for shirataki noodles (rinsed thoroughly) or cauliflower rice (sautéed with garlic powder). Reduce the breadcrumb topping to ¼ cup and add chopped walnuts for crunch. The sauce remains the same, but this version cuts carbs by ~80% while keeping the cheesy flavor. 🥦
Allergy-Friendly Notes
Watch for cross-contamination if allergies are a concern. Use a separate pot for gluten-free pasta and store dairy-free ingredients in dedicated containers. For nut allergies, avoid the walnut suggestion and stick to breadcrumbs alone. Always double-check labels—pre-shredded cheese often contains anti-caking agents with dairy traces. 🚫
Nutrition facts
Frequently asked questions
Why does 1950s mac and cheese taste different from modern versions?
The 1950s version relies on freshly grated sharp cheddar (not pre-shredded) and a blond roux for that signature creamy texture. Modern recipes often use processed cheese blends or microwave shortcuts. The breadcrumb topping was also traditionally crisped in the oven, not just sprinkled on top.
Can I make this recipe without baking it?
Yes! Skip the oven step and serve it stovetop-style. After mixing the pasta and sauce, simply top with buttered breadcrumbs and let them toast in a dry skillet for 2-3 minutes over medium heat until golden. The texture will be softer but still delicious.
What’s the secret to preventing a greasy mac and cheese?
Use low-and-slow heat when melting the cheese and avoid overmixing after adding milk. The flour roux helps thicken properly, while whole milk (not cream) keeps it creamy without grease. For extra insurance, chill the sauce slightly before combining with pasta.
How do I make this kid-friendly while keeping it authentic?
Keep the recipe exactly as written—kids love the classic flavors! For picky eaters, try mixing in a splash of chicken broth for subtle flavor or adding well-cooked diced ham. Serve with steamed broccoli or peas on the side to balance the richness.
Can I make this ahead of time?
Assemble the dish (without baking) up to 24 hours ahead and refrigerate. When ready to serve, transfer to a 375°F oven and bake covered for 15 minutes, then uncovered for 5-10 minutes to crisp the topping. The flavors actually improve overnight!

- 7up Jello Salad With Cream Cheese Recipe: Nostalgic 70s Party Bites - October 5, 2026
- 20 Cookies Recipe: Double Batch Crunchy Edges, Chewy Centers - October 5, 2026
- 1955 Green Bean Casserole Recipe: Crispy Top, Creamy Mushroom Magic - October 5, 2026