
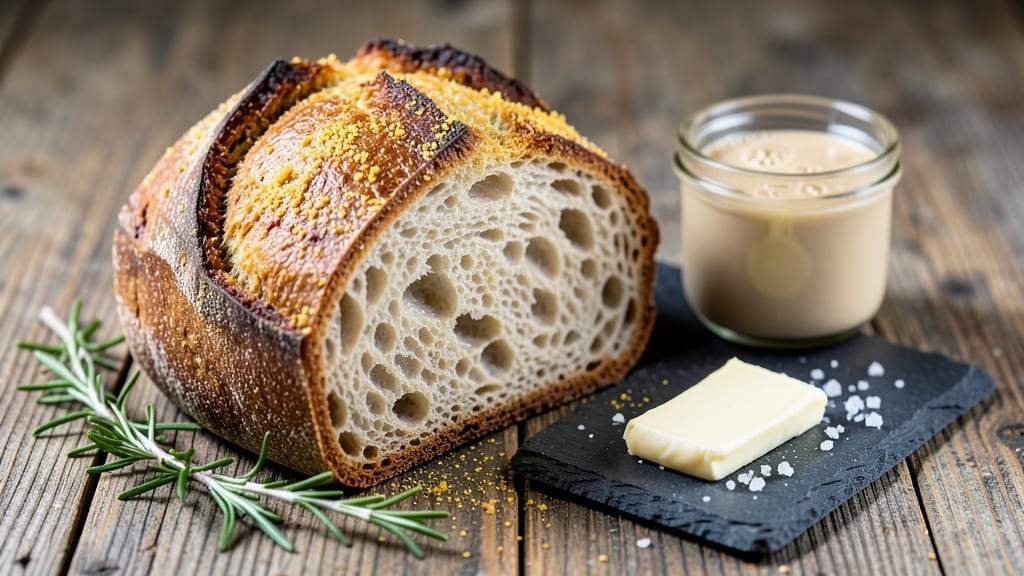
Mastering the 2-day sourdough bread recipe transforms simple flour into artisanal perfection with a tangy depth that rivals any bakery. ✨ The secret lies in patience—letting nature do the work through careful fermentation and temperature control.
This method builds flavor slowly, creating a crust that crackles with crispness while the interior remains light and airy, all without yeast or dairy.
The process begins with maintaining an active starter, then mixing dough that develops complexity over 24 hours of bulk fermentation. Stretch-and-folds strengthen gluten, while precise shaping and proofing ensure an open crumb structure. Temperature becomes your ally, guiding fermentation at just the right pace for optimal rise and flavor development.
By the time you slide this loaf into a hot oven, you’ll achieve a golden-brown crust with those coveted deep crevices and a crumb so tender it practically melts in your mouth.
The tangy notes from fermentation elevate every bite, making this bread perfect for toast, sandwiches, or simply enjoying with butter and jam.
This recipe isn’t just about baking—it’s about understanding the science behind fermentation and how small adjustments can transform your results. Whether you’re a beginner or seasoned baker, the key is attention to detail and respect for the process. Let’s get started on creating your perfect loaf.
Ingredients for 2 day sourdough bread
Artisanal sourdough flourishes with just these nine ingredients—no yeast needed.
| Ingredient | Amount | Notes |
|---|---|---|
| Unbleached All-Purpose Flour 🌾 | 4 cups | King Arthur or Bob's Red Mill preferred |
| Active Sourdough Starter 🍞 | ½ cup | 100% hydration, bubbly and active |
| Filtered Water 💧 | 2 ½ cups | Room temperature, 75°F |
| Fine Sea Salt 🧂 | 1 ½ tsp | Diamond Crystal preferred |
| Vegan Butter 🧈 | 2 tbsp | Miyoko's or Earth Balance for brushing |
| Cornmeal 🌽 | ¼ cup | For dusting proofing basket |
| Olive Oil 🫒 | 1 tbsp | Extra-virgin for dough enrichment |
| White Vinegar 🍶 | 1 tbsp | For starter maintenance (optional) |
| Rice Flour 🌾 | ½ tbsp | For dusting final shaping |
| Maple Syrup 🍁 | 1 tbsp | For scoring and crust enhancement |
The flour is non-negotiable here. King Arthur or Bob’s Red Mill are your best bets—their high protein content develops gluten beautifully during fermentation. For the starter, maintain it at 75°F (use a seedling mat if needed) and feed it a 1:1:1 ratio of flour, water, and starter every 12 hours for 24 hours before baking. Whole Foods or local grain mills often carry premium organic flours with better flavor profiles. If you’re short on time, King Arthur’s sourdough mix can jumpstart your starter, but building your own from scratch yields richer results.
No vegan butter? Coconut oil or olive oil work in a pinch, though butter adds that signature richness. Running low on cornmeal? Semolina flour makes a great substitute for dusting. The maple syrup can be swapped for agave nectar or date syrup if preferred. For scoring, a lame or razor blade creates those perfect deep crevices—if you don’t have one, a sharp knife works too. The white vinegar is optional but helps maintain starter acidity if your kitchen runs warm.
Starter and flour should be stored in airtight containers at room temperature, with the starter fed daily. The mixed dough keeps 24 hours in the fridge before shaping, and the final loaf stays fresh for 3-4 days wrapped in a towel. For longer storage, freeze fully cooled loaves for up to 3 months. I like to slice and freeze portions for quick toast—just reheat in a toaster or oven. The crust gets crunchier the longer it sits, so slice just before serving.
Why You’ll Love This Recipe
- I’ll be real: this bread requires zero arm work. Just mix the unbleached flour, active starter, and filtered water—no punchy dough, no frustration—then let it do its thing. That vegan butter in the lamination? Pure cheat code for a tender crumb.
- No-Knead Magic: I’ll be real: this bread requires zero arm work. Just mix the unbleached flour, active starter, and filtered water—no punchy dough, no frustration—then let it do its thing. That vegan butter in the lamination? Pure cheat code for a tender crumb.
- Tangy Crust, Soft Core: The sea salt cuts through the wild yeast funk, but the real star is that crispy, caramelized crust with a pillowy interior. Honestly, it’s the kind of bread that makes you pause mid-bite, even when you’re in a rush.
- Weeknight MVP: Between us, this bread is my lazy dinner’s best friend. Tear it for sandwiches, toast it for breakfast, or freeze slices for toast later. Two days of effort = a week of effortless meals.
Step-by-step instructions for perfect 2-Day sourdough bread
Here’s how to craft artisanal sourdough with that signature tangy depth and crispy crust.
👨🍳 Step 1: Mix the Dough and Begin First Fermentation
In a large mixing bowl, combine the 4 cups unbleached all-purpose flour and 0.5 cup active sourdough starter. Create a well in the center and add the 2.5 cups filtered water and 1.5 tsp fine sea salt. Using a wooden spoon or your hands, stir until a shaggy dough forms—it’ll be sticky, but that’s perfect for sourdough.
Add the 1 tbsp olive oil and mix until fully incorporated. The dough should come together into a cohesive mass that pulls away from the bowl sides. Cover the bowl with a damp kitchen towel or plastic wrap and let it rest at room temperature for 30 minutes. This initial rest allows the gluten to relax and the flour to hydrate properly.
After the rest, perform a series of stretch-and-folds every 30 minutes for 2 hours. To do this, wet your hands slightly, grab one side of the dough, stretch it upward, and fold it over itself. Rotate the bowl and repeat on all four sides. This builds strength in the gluten structure, which is crucial for that open crumb we’re after. By the final fold, the dough should feel smoother and more elastic.
⏰ Step 2: Bulk Ferment Overnight in the Fridge
After the final stretch-and-fold, shape the dough into a loose ball and place it back in the bowl. Cover it again and refrigerate for 12-16 hours. This cold fermentation slows yeast activity, allowing more flavor development and better gluten relaxation. The dough will rise slowly but noticeably—you’ll see it puff up and develop small bubbles on the surface.
I like to give it a gentle shake every 4-6 hours to redistribute the gases. The ideal dough at this stage should feel jiggly when shaken and have visible bubbles when you press your finger into it. If it’s not rising after 16 hours, it’s still okay—just let it ferment a little longer until it shows signs of activity.
Here’s the thing—this overnight cold proof is where the magic happens. The slow fermentation builds complex flavors and creates that perfect open crumb structure. Don’t rush it, even if you’re eager to bake. Patience here makes all the difference in the final texture and taste.
🍳 Step 3: Shape and Final Proof
Remove the dough from the fridge and let it sit at room temperature for 30-60 minutes to soften slightly. While it’s warming, dust a clean work surface with 0.25 cup cornmeal—this prevents sticking when we shape the dough. Divide the dough into 4 equal portions (about 1 pound each) and shape each into a round boule.
To shape a boule, cup your hands over the dough and gently pull the edges toward the center, rotating as you go. The goal is to create surface tension that will help the dough hold its shape during baking. Place each shaped boule seam-side up in a well-floured proofing basket or a bowl lined with a floured kitchen towel. Cover loosely and let them proof at room temperature for 1-2 hours or until they’ve risen by about 30-50%.
You’ll know they’re ready when they spring back slowly when poked with a finger. If they’re rising too quickly, return them to the fridge for 30 minutes to slow things down. The dough should feel firm but still slightly yielding—like the top of your head when you press it gently.
🔥 Step 4: Preheat and Prepare for Baking
Preheat your oven to 450°F with a Dutch oven inside for at least 45 minutes. The Dutch oven creates steam, which is essential for developing that beautiful crust and oven spring. While it’s heating, score the tops of your boules with a sharp razor or lame. Dip the blade in water first to help it glide through the dough.
Make a deep cross on the top of each boule—this controls where the dough expands and prevents it from cracking unpredictably. Brush the tops lightly with a mixture of 1 tbsp maple syrup and 1 tbsp water (this creates a shiny crust and adds subtle sweetness). Carefully transfer each boule to the hot Dutch oven using a peel or parchment paper.
Bake covered for 20 minutes, then remove the lid and bake for another 20-25 minutes until the crust is deep golden brown and sounds hollow when tapped on the bottom. The internal temperature should reach 205-210°F when measured with an instant-read thermometer. This two-stage baking ensures both a crispy crust and a perfectly baked interior.
🍞 Step 5: Cool and Enjoy Your Sourdough
Remove the bread from the Dutch oven and transfer it to a wire rack. Let it cool completely before slicing—this allows the steam to escape and prevents a gummy crumb. I know it’s tempting to cut into that warm loaf immediately, but trust me, waiting 2 hours makes all the difference in texture.
Once cooled, slice and serve with 2 tbsp vegan butter melted on top or alongside your favorite jam. The crust should be crispy and crackly, with a beautiful caramelized color. Each slice should reveal an open, airy crumb with those characteristic tangy notes from the long fermentation. Store any leftovers wrapped in a bread bag at room temperature for up to 3 days, or freeze for longer storage.
Pro Tips For Making 2 Day Sourdough Bread
- Weigh Your Flour: Skip the scooping—use a kitchen scale for the flour. I learned this the hard way after my first batch came out dense; sourdough is unforgiving with volume measurements. A 1% difference in hydration (like 55% vs. 56%) changes everything, and scooping adds unpredictable air.
- Salt the Water: Dissolve the fine sea salt directly in the filtered water before mixing with flour and starter. This ensures even distribution—no clumpy salt pockets ruining your knead. (Yes, even if you’re impatient like me, resist the urge to add it later.)
- Bulk Ferment at Room Temp: Keep your dough in a glass jar or bowl at a consistent 72–75°F (22–24°C) for the bulk ferment. I used to eyeball it and end up with dough that either underproved or overproofed. A simple thermometer on the counter saves guesswork—your oven with the light on works too.
- Score Deep and Fast: Use a razor blade or sharp lame to cut into the dough just before baking—don’t pre-score. A quick, confident slash (about ½ inch deep) lets the bread expand properly. Hesitate, and you’ll get a weak ear or uneven rise. (Your future self will thank you.)
Common mistakes when making this dish
Overproofed Dough
One of the most common mistakes is letting your dough ferment too long, which leads to an overproofed loaf. When dough overproofs, it loses its structure, resulting in a dense crumb and flat loaf. To avoid this, keep a close eye on your dough during bulk fermentation.
A properly proofed dough should feel slightly springy when poked gently—if it springs back slowly, it’s ready. If it springs back quickly or leaves an indentation, it’s overproofed. For cold fermentation, I recommend checking your dough every 4-6 hours and adjusting the time based on your kitchen temperature. 🌡️
If you accidentally overproof your dough, don’t panic. You can still salvage it by shaping it quickly and baking it immediately. The texture won’t be as open, but it will still taste delicious.
For future attempts, consider using a proofing basket or a bowl lined with a floured towel to help contain the dough and prevent overproofing during final proof.
Weak Gluten Structure
Another frequent issue is a weak gluten structure, which leads to a dense or gummy loaf. This often happens when stretch-and-folds aren’t performed correctly or when the dough isn’t rested long enough between folds. To build strong gluten, perform stretch-and-folds every 30 minutes for 2 hours during the first fermentation.
Wet your hands slightly to prevent sticking, and stretch the dough upward while folding it over itself. Rotate the bowl and repeat on all four sides. By the final fold, your dough should feel smoother and more elastic.
If your dough still feels weak, try adding an extra 1 tbsp olive oil to help strengthen the gluten.
If you’re using a lower-protein flour, like whole wheat, the gluten structure can be even more challenging. In this case, consider adding 1 extra tablespoon of vital wheat gluten per 4 cups of flour to improve elasticity.
Also, ensure your dough is hydrated properly—too much or too little water can weaken the gluten structure. Aim for a dough that’s sticky but not wet.
Incorrect Temperature Control
Temperature plays a crucial role in sourdough fermentation, and getting it wrong can lead to uneven fermentation or a flat loaf. The ideal temperature for bulk fermentation is between 75-78°F. If your kitchen is too cold, your dough will ferment slowly, leading to weak gluten and a dense crumb.
If it’s too warm, your dough will rise too quickly, risking overproofing. To maintain the right temperature, use a proofing box or place your dough in a warm oven with the light on. I also recommend using a digital thermometer to monitor your kitchen temperature.
If your kitchen is consistently too warm, try fermenting your dough in the fridge for the first 12 hours before moving it to room temperature for final proof. This slows down fermentation and gives you more control over the process.
Conversely, if your kitchen is too cold, you can place your dough on top of your fridge or near a warm spot in your home to speed up fermentation slightly.
Skipping the Rest Period
Many beginners skip the initial 30-minute rest after mixing the dough, which is a critical step for developing gluten. This rest allows the flour to hydrate fully and the gluten to relax, making it easier to handle during stretch-and-folds.
Without this rest, your dough will be tough to work with, and the gluten won’t develop properly, leading to a dense loaf. Always give your dough this initial rest before starting stretch-and-folds. It’s a small step that makes a big difference in the final texture.
If you’re short on time, you can reduce the rest period to 20 minutes, but don’t skip it entirely. For even better results, let the dough rest for 45 minutes before starting stretch-and-folds.
This extra time helps the dough become more cohesive and easier to handle. Think of it as giving your dough a chance to “breathe” before you start working it.
Improper Scoring
Scoring your dough incorrectly can lead to uneven baking or unsightly cracks. The goal of scoring is to control where the dough expands during baking and to create those beautiful crevices. Use a sharp razor or lame to make a deep cross on the top of your loaf.
Dip the blade in water first to help it glide through the dough smoothly. Press firmly but not too hard—you want to cut through the top crust but not into the dough underneath.
If you score too lightly, the dough may not expand as expected, leading to a flat or uneven loaf. If you score too deeply, you risk tearing the dough and creating an uneven surface.
Practice makes perfect here. If you’re unsure about your scoring technique, start with a small test cut on a separate piece of dough. This way, you can adjust your pressure and angle before committing to your loaf.
A well-scored loaf not only looks impressive but also bakes more evenly, giving you that perfect open crumb structure. 💫
Nutrition facts
Frequently asked questions
Why does my sourdough need 2 days to ferment?
The extended 2-day fermentation develops complex flavors and a better crumb structure. The first 24 hours at room temperature builds gluten, while the overnight cold proof slows yeast activity, creating deeper tanginess and a lighter texture. This slow process is what gives artisanal sourdough its signature taste and texture.
Can I use whole wheat flour instead of all-purpose?
Yes, but replace 25% of the all-purpose flour with whole wheat for a nuttier flavor. The gluten structure will be weaker, so add 1 tbsp vital wheat gluten and reduce water by 1 tbsp to compensate. Expect a denser crumb but with more complex flavor notes.
How do I know when my starter is ready for baking?
Your starter should float in water (like a boat) and have bubbles throughout when poked. It should also double in size within 4-6 hours after feeding. For this recipe, feed it 1:1:1 (flour:water:starter) twice daily for 24 hours before using.
What if my kitchen is too cold for proper fermentation?
Place your dough on top of your fridge or near a warm spot (like a sunny window). Use a proofing box or warm oven (75-78°F) with the light on. If your kitchen is below 68°F, extend bulk fermentation to 24-36 hours to compensate.
Can I make this recipe without a Dutch oven?
Yes! Use a baking sheet with a metal bowl inverted over the loaf to trap steam. For extra crispiness, preheat a pizza stone or cast iron skillet. The crust won’t be as dramatic, but the flavor will still be excellent. Bake 10 minutes longer uncovered to develop color.

- 12 Bean Chili Recipe: Hearty Slow-Cooked Depth With 12 Legumes - October 17, 2026
- 5 Seed Bread Recipe: Nutty Crunch and Artisan Flavor in One Loaf - October 17, 2026
- 1 Lb Macaroni Salad Recipe: Bold, Crunchy, and Crowd-Pleasing - October 17, 2026