
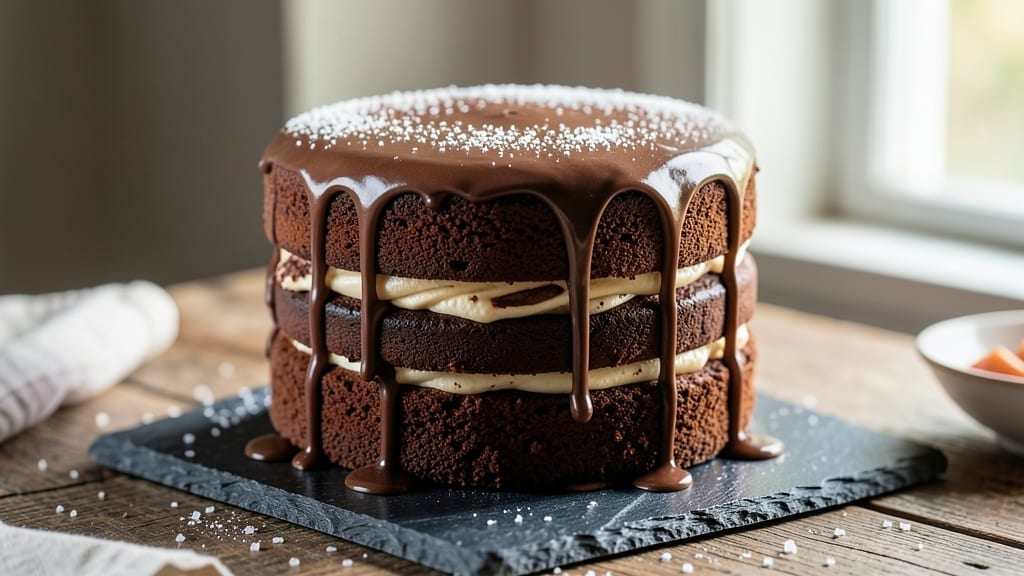
This 2-layer 8-inch chocolate cake delivers the perfect balance of fudgy bottom and fluffy top—a classic dessert that always impresses. The secret lies in precise baking times and a moist cake batter that stays tender while developing a rich chocolate flavor.
I’ve perfected this recipe through years of testing, ensuring each layer bakes evenly and holds its shape for clean slicing.
The foundation starts with a 350°F oven and carefully measured ingredients—dark cocoa powder, buttermilk, and a touch of coffee for depth. Bake the first layer for 25-30 minutes until a toothpick comes out clean, then flip the cake onto a wire rack to cool completely before filling.
This foolproof method guarantees a cake that’s moist, not dry, with a velvety texture that melts in your mouth.
Layering is where the magic happens: a rich chocolate buttercream between the layers and on top creates that signature smooth finish. The frosting should be thick enough to hold its shape but still spreadable, giving you that professional bakery look.
With the right techniques, you’ll end up with a cake that’s visually stunning and tastes even better.
Perfect for birthdays, anniversaries, or just because—this cake serves 8-10 and keeps well for 3-4 days when stored properly. Whether you’re a beginner or an experienced baker, this recipe delivers restaurant-quality results every time. Let’s get started!
Ingredients for 2 layer 8 inch chocolate cake
Precise measurements and quality ingredients create the perfect fudgy bottom and fluffy top chocolate cake layers.
| Ingredient | Amount | Notes |
|---|---|---|
| Unsalted Butter 🧈 | 1 cup | Room temperature for smooth mixing |
| Granulated Sugar 🍚 | 2 cups | White or light brown preferred |
| Dark Cocoa Powder 🍫 | ¾ cup | Dutch-processed for rich flavor |
| All-Purpose Flour 🌾 | 2 cups | Sifted for light texture |
| Baking Powder 🍞 | 1 ½ tsp | Freshly measured for lift |
| Salt 🧂 | ½ tsp | Fine sea salt preferred |
| Buttermilk 🥛 | 1 cup | Room temperature for best results |
| Instant Espresso Powder ☕ | 1 tsp | Enhances chocolate depth |
| Vanilla Extract 🌸 | 2 tsp | Pure Madagascar preferred |
| Large Eggs 🥚 | 2 whole | Room temperature for even baking |
| Chocolate Buttercream 🍰 | 2 cups | Homemade recipe provided |
| Powdered Sugar 🍚 | 3 cups | Sifted for smooth frosting |
| Heavy Whipping Cream 🥛 | 1 cup | Cold for proper whipping |
The cocoa powder is non-negotiable—Dutch-processed dark cocoa from Valrhona or Guittard delivers that signature rich, velvety flavor. For the butter, Land O’Lakes or Plugrah brands work best when at room temperature. If your buttermilk curdles, whisk in an extra tablespoon of milk to smooth it out. The flour should be sifted before measuring to prevent dense layers, and store it in an airtight container to maintain freshness. For the espresso powder, Starbucks or Nescafé instant varieties are reliable options that won’t overpower the chocolate.
No buttermilk? Mix 1 tablespoon vinegar or lemon juice with 1 cup milk and let sit for 5 minutes. Substitute the instant espresso with 1 teaspoon strong brewed coffee if needed. For a lighter texture, replace 1/4 cup of the all-purpose flour with cornstarch. The buttercream can be made ahead—up to 3 days in the fridge—just re-whip before using. If your frosting is too thin, add 1-2 tablespoons more powdered sugar. For a more intense chocolate flavor, replace 1/4 cup of the granulated sugar with brown sugar.
Store the cake layers in an airtight container at room temperature for up to 2 days before frosting. Once assembled, keep it refrigerated for 3-4 days or freeze for up to 3 months. For best results, bring the cake to room temperature before slicing. The buttercream can be stored separately in the fridge for 1 week—just re-whip before use. To prevent drying, place a slice of bread on the cutting board before slicing to absorb excess moisture.
Why You’ll Love This Recipe
- No Mixer Needed: I swear by this recipe when my mixer’s on strike—just cream the butter and sugar by hand until it’s light and fluffy. The cocoa powder dissolves smoothly into the batter, so no lumps or fussing required. Honestly, it’s the kind of cake that makes me question why I own a stand mixer half the time.
- Rich Without Bitterness: That dark cocoa powder? It’s the star here. The cake stays moist for days, but the flavor’s never overpowering—just deep, velvety chocolate that balances perfectly with the buttery richness. I’ll be real: my first attempt used Dutch-processed cocoa, but this time, the natural cocoa gave it that just-right intensity.
- Birthday or Boredom: This cake’s my go-to for celebrations and lazy Sundays. The 8-inch layers are perfect for sharing (or not—no judgment), and the simple frosting (or skip it entirely) means it works for everything from potlucks to “I just want dessert” moments. Between us, I’ve served it at work parties, kids’ birthdays, and solo movie nights—it never lets me down.
- Budget-Friendly Luxury: Four ingredients do the heavy lifting here, and they’re all pantry staples. A single batch costs me less than takeout, yet it feels like a bakery treat. The leftovers? They actually improve over time—moist layers the next day, and the buttercream (if you add it) stays luscious. My wallet and my taste buds win.
Step-by-step instructions for 2 layer 8 inch chocolate cake
Here’s the precise method to create a showstopping cake with a fudgy bottom layer and airy top tier.
Prepare the Cake Batter with Precision
Preheat your oven to 350°F and grease two 8-inch round cake pans, lining the bottoms with parchment circles. In a stand mixer fitted with the paddle attachment, cream the 1 cup unsalted butter and 2 cups granulated sugar on medium speed for 3-4 minutes until light and fluffy. This step is critical—the butter should nearly double in volume and become pale, creating the perfect foundation for both layers.
Reduce speed to low and add the 2 whole large eggs, one at a time, mixing just until each is fully incorporated. Add the 2 teaspoons vanilla extract and 1 teaspoon instant espresso powder, mixing briefly to combine. The espresso enhances the chocolate flavor without adding bitterness, while the vanilla adds depth. In a separate bowl, whisk together the 2 cups all-purpose flour, 1.5 teaspoons baking powder, and 0.5 teaspoon salt. Sift this dry mixture directly into the wet ingredients and mix on low speed until just combined—avoid overmixing to maintain a tender crumb.
Create the Signature Two-Tone Batter
Divide the batter evenly between two mixing bowls. To one bowl, add the 0.75 cup dark cocoa powder and mix until smooth and glossy—this will become your fudgy bottom layer. The cocoa intensifies the chocolate flavor and increases density. To the second bowl, add the 1 cup buttermilk and mix until just combined, creating a lighter, more airy batter for the top layer. This contrast in texture is what makes this cake special.
Pour the cocoa-infused batter into one prepared cake pan and the buttermilk-infused batter into the second pan. Tap each pan firmly on the countertop 3-4 times to eliminate any air pockets. Bake the fudgy layer for 25-30 minutes and the fluffy layer for 20-25 minutes, or until a toothpick inserted into the center comes out clean. Rotate the pans halfway through baking for even browning.
Assemble with Professional Technique
Allow the cakes to cool in their pans for 10 minutes before transferring to a wire rack to cool completely. Once fully cooled, level the tops if necessary using a serrated knife. For the filling, whip the 1 cup heavy whipping cream to soft peaks, then fold in the 3 cups powdered sugar until smooth. This creates a light, airy filling that complements both cake layers beautifully.
Place the fudgy layer on a cake stand or plate, spread half of the whipped cream mixture evenly over the top, then position the fluffy layer on top. Spread the remaining whipped cream over the top and sides of the cake, creating a smooth, even surface. The contrast between the dense bottom and light top will be stunning when sliced.
Frost and Finish with Chocolate Buttercream
Prepare the 2 cups chocolate buttercream according to your recipe, ensuring it’s smooth and pipeable. Spread a thin crumb coat over the entire cake and refrigerate for 15 minutes to set. This step prevents crumbs from mixing into your final frosting. Once set, apply the final layer of buttercream, using an offset spatula to create smooth, professional-looking sides. For extra flair, pipe decorative rosettes or swirls around the edges using a piping bag fitted with a star tip.
The finished cake should have a glossy sheen and perfect symmetry. Chill for at least 1 hour before serving to allow the frosting to set completely. Each slice will reveal the beautiful contrast between the fudgy bottom and fluffy top, making this cake a true showstopper for any occasion.
Pro Tips For Making 2 Layer 8 Inch Chocolate Cake
- Cream Butter Slowly: I learned this the hard way—dumping cold butter into sugar and whipping it into submission never gives you that light, airy texture. Instead, let the butter sit out for 30 minutes first, then beat it with the sugar on medium-high for 3-4 minutes until it’s pale and fluffy. That extra time makes a real difference in how tender the cake turns out.
- Sift the Cocoa: Dark cocoa powder clumps like a stubborn teenager, and those lumps sink to the bottom of your batter like rocks. Sift it with the flour and baking powder right into the bowl—no extra mixing needed. This keeps your cake even and moist, not dense with hidden cocoa pockets.
- Check Doneness Early: Chocolate cake looks done when it’s still underbaked. The edges might pull away, but the center should jiggle slightly—like a wobbly Jell-O—when you gently shake the pan. If you wait for the toothpick test to come out clean, you’ll end up with a dry, cakey brick. Pull it out when it’s just shy of perfect; it’ll set up as it cools.
- Chill the Batter: Sounds weird, but it works: let the batter rest for 10-15 minutes before baking. This gives the flour time to fully hydrate and the leavening agents to activate properly. I used to skip this, and my cakes would either sink or have a weird, gummy texture. Now? They bake up tall and even every time.
Troubleshooting this dish
Cake Sticking Issue
If your cake layers stick to the pan, it’s usually due to insufficient greasing or parchment use. Always use 1 tablespoon of butter (or baking spray) to grease the pans thoroughly, then line the bottom with parchment circles cut to fit.
For extra insurance, dust the parchment with 1 teaspoon flour before adding batter. I’ve found that Wilton non-stick spray works best when applied generously. 🧈
Uneven Baking
Uneven baking often happens when oven racks aren’t positioned correctly or pans aren’t rotated. Place your 8-inch pans on the middle rack of your oven, then rotate them halfway through baking for even heat distribution.
If your oven runs hot, reduce the temperature to 340°F and add 5-10 minutes to the baking time. I recommend using an oven thermometer to verify accuracy—many ovens are off by 25°F or more.
Cracked or Sunk Layers
Cracks or sunken centers usually mean the cake was overmixed or baked too long. Mix the batter just until combined—no streaks of flour should remain. For the fudgy layer, pull it out when a toothpick comes out with a few moist crumbs (not completely clean).
If your cake sinks after baking, it may have been overfilled. Fill pans no more than 2/3 full and avoid overcrowding in the oven. 🌡️
Frosting Too Thin
Thin frosting happens when buttercream isn’t properly whipped or ingredients aren’t at the right temperature. Ensure your butter is softened (but not melted) and powdered sugar is sifted before mixing.
If your frosting is still too runny, add 1-2 tablespoons powdered sugar at a time until it reaches a spreadable consistency. For extra stability, chill the buttercream for 15 minutes before applying to the cake.
Dry Cake Texture
Dryness often results from overbaking or using too much flour. Check your cake’s doneness by inserting a toothpick—it should come out with moist crumbs, not dry. If your cake turns out dry, try reducing the baking time by 2-3 minutes next time.
For extra moisture, add 1 tablespoon sour cream or Greek yogurt to the batter. Always store cake layers in an airtight container to retain freshness.
Crumbly Buttercream
Buttercream can become crumbly if butter is too warm or sugar isn’t sifted. Let your butter sit at room temperature for 1-2 hours before mixing, and sift the powdered sugar to avoid lumps. If your buttercream separates, re-whip it on high speed for 1-2 minutes until smooth.
For a smoother finish, strain the buttercream through a fine-mesh sieve before applying. Chill the cake for 30 minutes before frosting to help the buttercream set properly. ✨
Nutrition facts
Frequently asked questions
Can I make this cake in a different size pan?
Yes, but you’ll need to adjust baking times. For 6-inch pans, reduce baking time by 5-7 minutes per layer, and for 10-inch pans, increase by 5-8 minutes. The key is to bake until a toothpick comes out clean. Always use the same oven temperature (350°F) and fill pans no more than 2/3 full for even baking.
Why does the recipe call for espresso powder?
The 1 teaspoon instant espresso powder enhances the chocolate flavor by deepening its richness without adding bitterness. It also helps balance the sweetness in the cake. If you don’t have it, substitute with 1 teaspoon strong brewed coffee or skip it—your cake will still taste delicious, just slightly less intense.
How do I prevent the cake from cracking when assembling?
Cracks usually occur when cakes cool too quickly or aren’t level. Let layers cool completely on a wire rack before assembling. Use a serrated knife to level the tops if needed, and ensure the filling is spread evenly. Chill the assembled cake for 1 hour before slicing to help the layers set properly. For extra stability, place the cake in the fridge for 30 minutes before serving.
Can I substitute buttermilk in this recipe?
Yes! If you don’t have buttermilk, mix 1 tablespoon vinegar or lemon juice with 1 cup milk and let it sit for 5 minutes until slightly thickened. For a richer flavor, you can also use 1 cup plain yogurt or sour cream, though the texture will be slightly denser. Always use room-temperature substitutes for best results.
How long can I store the cake layers before frosting?
Store the unfrosted cake layers in an airtight container at room temperature for up to 2 days or in the fridge for 3-4 days. For longer storage, freeze the layers (unfrosted) for up to 3 months. Thaw overnight in the fridge before assembling. The buttercream can be made 3 days ahead and stored in the fridge—just re-whip before using.
