
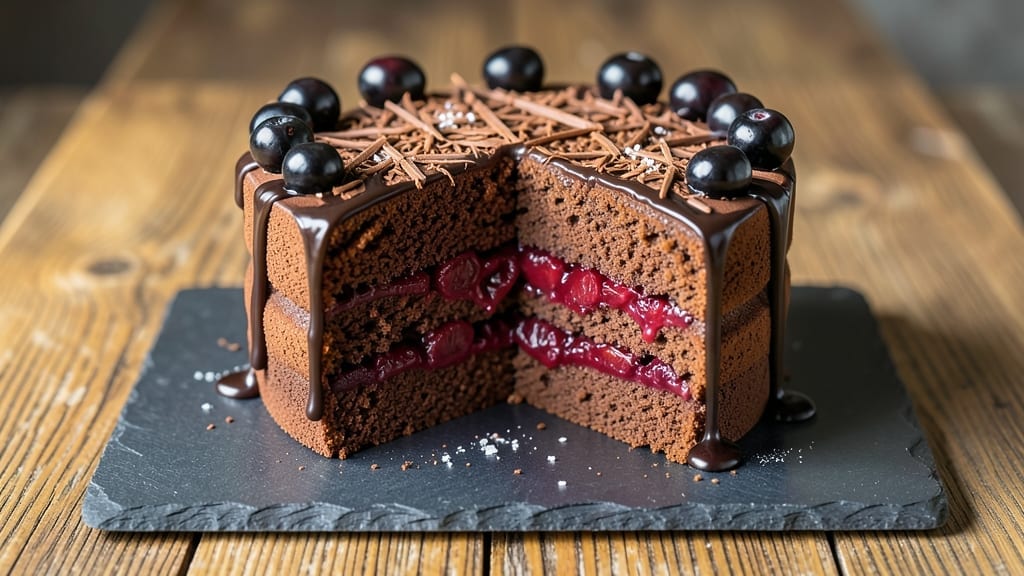
This 2-layer Black Forest cake recipe delivers the perfect balance of rich chocolate layers, tangy cherry filling, and velvety whipped cream—all without requiring advanced baking skills. The secret lies in precise oven temperatures and chilling times that ensure moist layers and stable assembly.
I’ve perfected this version after years of testing, and it consistently yields a cake that looks stunning and tastes even better.
The foundation starts with a foolproof chocolate cake batter that bakes to a tender yet sturdy texture, ideal for holding up to the cherry filling. Between the layers, a homemade cherry compote made from pitted cherries, sugar, and a splash of brandy adds that signature Black Forest tang.
The whipped cream topping isn’t just decorative—it’s light enough to contrast the dense cake while adding a refreshing finish.
By the time you’re done, you’ll have a decadent dessert with layers of chocolate, bursts of cherry, and a dusting of cocoa powder that makes it look like it came from a patisserie. The chilling steps are critical—they prevent the cake from collapsing and let the flavors meld beautifully.
This recipe is perfect for special occasions or when you want to impress without the fuss of professional techniques.
Whether you’re serving it at a celebration or treating yourself, this cake delivers restaurant-quality results with a fraction of the effort. The key is patience—letting the cake cool completely before assembly ensures clean slices and a stable structure. Let’s get baking!
Ingredients for 2 layer black forest cake
Foolproof chocolate cake, tangy cherry filling, and velvety whipped cream—all you need for restaurant-quality Black Forest cake.
| Ingredient | Amount | Notes |
|---|---|---|
| All-Purpose Flour 🌾 | 3 cups | Sifted for even texture |
| Unsweetened Cocoa Powder 🍫 | ¾ cup | High-quality Dutch-processed |
| Granulated Sugar 🍚 | 2 cups | White or light brown |
| Light Brown Sugar 🍚 | ½ cup | Packed firmly |
| Large Eggs 🥚 | 4 whole | Room temperature preferred |
| Unsalted Butter 🧈 | 1 ½ cups | Cold, cubed for creaming |
| Whole Milk 🥛 | 1 cup | Room temperature |
| Vanilla Extract 🌿 | 2 tsp | Pure Madagascar preferred |
| Baking Soda 🧂 | 1 tsp | Pure, no aluminum |
| Salt 🧂 | ½ tsp | Fine sea salt |
| Pitted Dark Cherries 🍒 | 1 ½ cups | Fresh or frozen, pitted |
| Cherry Brandy 🍷 | ¼ cup | Or sub 2 tbsp brandy + 2 tbsp water |
| Granulated Sugar 🍚 | ½ cup | For cherry compote |
| Heavy Whipping Cream 🥛 | 3 cups | Cold for whipping |
| Powdered Sugar 🍚 | 1 cup | Sifted for smooth texture |
| Unsweetened Cocoa Powder 🍫 | 2 tbsp | For dusting layers |
The cocoa powder is non-negotiable for that deep chocolate flavor. Hershey’s Special Dark or Valrhona are my go-tos—they dissolve smoothly and don’t taste bitter. For the cherries, Trader Joe’s frozen pitted cherries save time, but fresh pitted cherries from a local market add that gourmet touch. The butter? Plugrá or Land O’Lakes work perfectly, but avoid ultra-salted varieties—they’ll throw off your cake’s flavor balance. Room temperature eggs are crucial—they emulsify better, giving you that tender crumb. If your kitchen’s cold, let them sit in warm water for 10 minutes.
No brandy? Cherry juice concentrate works in a pinch—just reduce it by half before adding to the compote. Substituting cherries? Raspberry jam (reduced) or blackberry compote gives a similar tangy contrast. For the whipped cream, if you can’t find heavy whipping cream, cool full-fat coconut cream works surprisingly well (though it has a different texture). The cocoa powder for dusting? Don’t skip this step—it’s what makes it look like a bakery cake. Pro tip: Sift it through a fine-mesh sieve to avoid clumps. And if you’re making this ahead, store the cake layers and compote separately—they keep beautifully in the fridge for up to 3 days.
The cake layers need 24 hours in the fridge to fully set before assembly—that’s non-negotiable for clean slices. The whipped cream? Stabilize it with 1 tsp cornstarch if you’re worried about over-whipping. Cherry compote keeps for 5 days in the fridge, so make extra for topping individual slices. For presentation, chocolate shavings or fresh mint leaves elevate it instantly. And if you’re freezing? Wrap each layer individually—it keeps for 2 months that way. The cake actually improves after a day or two as the flavors meld.
Why You’ll Love This Recipe
- No Mixing Madness: I swear by this recipe because the dry ingredients—just flour, cocoa, and sugars—get whisked together in seconds. No sifting, no weird lumps, just smooth batter that behaves like a dream. Honestly, my first attempt had me nervous about the cocoa, but it dissolves right into the melted butter.
- Chocolate Cherry Magic: That first bite? Rich, fudgy layers with the perfect tang of cherry filling cutting through. Between us, the brown sugar in the batter adds this subtle caramel depth that makes it taste like a bakery secret. (Yes, even on a Tuesday night.)
- Party-Ready in Hours: You can bake the layers ahead, freeze them, and assemble when guests arrive. No one will guess it wasn’t made yesterday—especially when you top it with whipped cream and fresh cherries. My go-to for birthdays or just because.
- Pantry Staple Power: All the key ingredients—flour, cocoa, sugar—are things I already have. The eggs? Versatile enough to use up extras. And if you make a big batch? Slices reheated with a sprinkle of powdered sugar taste just as good the next day. Budget-friendly and foolproof.
Step-by-step instructions for decadent chocolate-cherry layers
Here’s how to build this showstopper with rich chocolate layers and luscious cherry filling.
Prepare the Cherry Compote and Chocolate Cake Batter
Begin by creating the cherry compote that will fill between your layers. In a saucepan, combine the 1.5 cups pitted dark cherries, 0.5 cup granulated sugar, and 0.25 cup cherry brandy. Bring to a gentle simmer over medium heat and cook for 10-12 minutes until the cherries soften and the mixture thickens slightly. You’ll know it’s ready when the cherries release their juices and the sauce coats the back of a spoon. Let this cool completely before using.
While the compote simmers, prepare the cake batter. Preheat your oven to 350°F and grease two 9-inch round cake pans with butter, then line the bottoms with parchment paper. In a large mixing bowl, sift together the 3 cups all-purpose flour, 0.75 cup unsweetened cocoa powder, 1 tsp baking soda, and 0.5 tsp salt. Set aside. In a separate bowl, cream together the 1.5 cups unsaltened butter and 2 cups granulated sugar until light and fluffy, about 3-4 minutes. Add the 4 whole large eggs one at a time, beating well after each addition. Mix in the 1 cup whole milk and 2 tsp vanilla extract. Gradually fold in the dry ingredients until just combined—don’t overmix.
Bake the Chocolate Layers to Perfect Doneness
Divide the batter evenly between the prepared cake pans. Bake for 25-30 minutes or until a toothpick inserted into the center comes out clean. The edges should be set but the tops should still look slightly moist—this indicates a tender crumb. Let the cakes cool in the pans for 10 minutes, then transfer to a wire rack to cool completely. Here’s the thing—cooling completely prevents the layers from becoming soggy when you add the filling later.
While the cakes cool, prepare your work surface. You’ll want to level the tops of the cakes for even filling. Using a serrated knife, trim the domed tops of both cakes to create flat surfaces. This step ensures your filling distributes evenly and your cake stands straight when assembled.
Assemble the Layers with Cherry Filling
Place the first cake layer on a serving plate or cake stand. Spread the cooled cherry compote evenly over the top, leaving about ½-inch border uncovered. This border prevents the filling from oozing out during slicing. Dust the top lightly with 2 tbsp unsweetened cocoa powder to create a beautiful contrast with the cherry filling.
Place the second cake layer on top and gently press down to create a clean edge. The weight of the second layer will help the filling adhere properly. Wrap the entire cake in plastic wrap and refrigerate for at least 2 hours—this chilling time allows the filling to set and makes slicing much cleaner. I know it’s tempting to serve immediately, but patience here makes all the difference in presentation.
Create the Whipped Cream Topping
Just before serving, prepare the whipped cream topping. In a chilled mixing bowl, whip the 3 cups heavy whipping cream until soft peaks form. Gradually add the 1 cup powdered sugar and continue whipping until stiff peaks form. The cream should hold its shape when the whisk is lifted. Fold in 2 tbsp unsweetened cocoa powder to give it that classic Black Forest color.
Spread the whipped cream evenly over the top and sides of the chilled cake. Use an offset spatula to create smooth, even coverage. For extra flair, pipe additional whipped cream around the edges or create decorative rosettes on top. The contrast between the dark chocolate layers and light cream topping creates a stunning visual effect that’s almost too pretty to eat.
Serve and Enjoy Your Masterpiece
Slice the cake with a sharp, warm knife (dip the knife in hot water and wipe dry between cuts) for clean, professional-looking slices. The warm knife helps prevent crumbs and makes each cut smooth. Serve immediately while the whipped cream is still fluffy and the cake is at its best texture.
Each slice should reveal layers of rich chocolate cake, vibrant cherry filling, and airy whipped cream. The combination of textures—tender cake, juicy cherries, and light cream—makes this cake truly irresistible. Store any leftovers in the refrigerator for up to 3 days, though I doubt there will be any left!
Pro Tips For Making 2 Layer Black Forest Cake
- Sift That Cocoa: I learned this the hard way—skipping the sift with cocoa powder leaves lumps that ruin the texture. Use a fine-mesh sieve and tap it hard against the bowl to break up clumps before mixing with flour. The extra effort keeps your layers light, not dense.
- Room-Temp Eggs Only: Cold eggs from the fridge won’t blend smoothly into your batter, and that means uneven mixing. Pop them in warm water for 10 minutes first—your cake will rise more evenly, and the texture stays tender. (Yes, even if you’re impatient like me.)
- Don’t Overbake the Layers: The second the toothpick comes out clean is when you pull them from the oven—no waiting. Overbaking dries out the chocolate layers, and nobody wants a cake that cracks when sliced. Set a timer for 2-3 minutes after the toothpick test to be safe.
- Whip Cream Early: Whipping the cream for the filling too close to serving time means it collapses by dessert hour. Make it 2 hours ahead and store it in the fridge—it’ll hold its shape perfectly, and you won’t be frantically rewhipping while guests wait. (Your future self will thank you.)
Troubleshooting great 2 layer black forest cake
Cake Layers Too Dry
If your cake layers emerge dry or crumbly, the issue is likely overbaking or insufficient fat in the batter. First, check your oven temperature—350°F is critical. If your oven runs hot, reduce the temperature to 325°F and add 2-3 minutes to your baking time.
For extra moisture, replace ¼ cup of the milk with ¼ cup sour cream or Greek yogurt—this adds richness without altering texture. Always use a toothpick test: it should come out with a few moist crumbs, not completely clean. 💫
Filling Oozes Out
Excessive cherry filling leakage usually means the cake layers weren’t cooled properly or the compote wasn’t thick enough. Let the cakes cool completely before assembly—at least 2 hours on a wire rack. For the compote, simmer it for an extra 2-3 minutes until it reaches a thicker consistency.
When spreading, leave that ½-inch border uncovered to prevent overflow. If you’re still having issues, chill the assembled cake for 4 hours instead of 2 to give the filling time to set fully.
Whipped Cream Collapses
Collapsed whipped cream is almost always due to over-whipping or warm ingredients. Use a chilled mixing bowl and ensure your heavy whipping cream is ice cold before whipping. Add the powdered sugar gradually while whipping to stabilize the peaks.
If you accidentally over-whip, try adding 1 tsp cornstarch and whipping again—it helps restore structure. For extra insurance, whip the cream at room temperature (not warm) and fold in the cocoa powder last to maintain stability. ✨
Cake Won’t Hold Shape
A cake that collapses or loses structure during slicing typically hasn’t been chilled long enough. The 2-hour minimum chill time is non-negotiable—this allows the filling to set and the layers to firm up. If you’re short on time, place the assembled cake in the freezer for 30 minutes before serving.
Also, ensure your cake pans are properly greased and lined with parchment paper to prevent sticking, which can cause uneven baking and structural weakness.
Cherries Too Tart
If your cherry filling tastes overly acidic, you likely used too much brandy or underripe cherries. For a balanced flavor, reduce the brandy to 2 tbsp and add 1 tsp vanilla extract to the compote. If using frozen cherries, thaw them first and pat dry to remove excess moisture.
For a sweeter balance, add 1 tbsp cornstarch to the compote while simmering to thicken it further. This helps mellow the tartness while adding body. 🍒
Uneven Layers
Uneven layers often result from uneven cake baking or improper leveling. Always level the tops of your cakes with a serrated knife before assembling—this ensures the filling distributes evenly. If one cake layer is thicker than the other, trim the thicker layer slightly to match the thinner one.
For extra stability, place the cake on a cake stand or sturdy plate before assembling. If the layers still don’t align, chill the cake for an additional 1 hour to help the filling settle into place.
Nutrition facts
Frequently asked questions
Can I make this cake without brandy in the cherry filling?
If you don’t have brandy, substitute with 2 tablespoons cherry juice concentrate mixed with 2 tablespoons water for the same depth of flavor. For a non-alcoholic option, add 1 teaspoon vanilla extract to the compote instead—it enhances the cherry flavor beautifully. The key is balancing the tartness with sweetness, so adjust the sugar to taste.
How do I keep the whipped cream from melting too quickly?
Use cold heavy whipping cream straight from the fridge and a chilled mixing bowl to prevent melting. Add the powdered sugar gradually while whipping to stabilize the peaks. For extra insurance, fold in the cocoa powder last and serve the cake in a cool room or refrigerate it for 30 minutes before serving. Avoid placing it near heat sources or direct sunlight.
Can I bake this cake in a convection oven?
Yes, but reduce the temperature by 25°F (to 325°F) and check for doneness 2-3 minutes early. Convection ovens circulate hot air more efficiently, which can dry out the cake faster. If your convection oven has a fan setting, use it on “bake” mode. Always use an oven thermometer to confirm accuracy—many convection ovens run hotter than standard ovens.
What’s the best way to store leftovers?
Store the cake in an airtight container in the refrigerator for up to 3 days. To refresh the whipped cream topping, rewhip it lightly with a splash of cold milk before serving. For longer storage, freeze the cake (without whipped cream) for up to 2 months. Thaw it overnight in the fridge and add fresh whipped cream before serving. Avoid freezing with whipped cream—it won’t recover well.
Why does my cake have a crack down the middle?
A vertical crack usually means the cake baked too long or the oven was too hot. Check your oven temperature with a thermometer—it should read 350°F accurately. If your oven runs hot, reduce the temperature to 325°F and bake for 25 minutes maximum. Also, avoid opening the oven door during baking, as temperature fluctuations cause cracks. For future bakes, tap the pans gently on the counter before baking to release air bubbles.

- Pea Soup Instant Pot Recipe: Velvety Green Smoothness in 20 Minutes - November 1, 2026
- Pork Loin Pulled Pork Crock Pot Recipe: Slow-Smoked Tenderness With Zero Dryness - November 1, 2026
- Baked Potatoes in Crock Pot Recipe: Buttery Interiors and Crispy Top Magic - November 1, 2026