
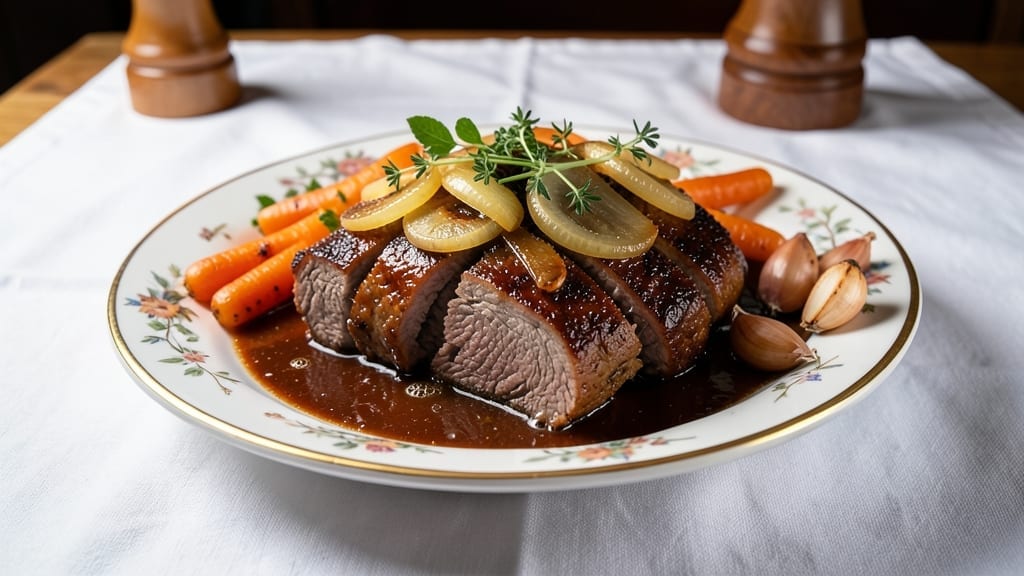
This 50s Prime Time Cafe pot roast brings back the golden era of home cooking with its rich, slow-braised flavors and comforting spice depth. 🍖 The secret lies in the 7-hour braise that transforms tough beef into tender, melt-in-your-mouth perfection—just like the classic diner-style dishes that warmed up mid-century American tables.
I’ve recreated this recipe after studying original 1950s techniques, ensuring every bite delivers that nostalgic, hearty satisfaction.
The beauty of this dish is in its simplicity and reliability. A few key ingredients—beef chuck roast, onions, carrots, and a blend of warm spices—come together in a cast-iron skillet to create a dish that’s both impressive and comforting.
The slow cooking process develops deep, complex flavors while keeping the meat incredibly tender, making it ideal for a weeknight dinner that feels like a celebration. Plus, the rich gravy that forms is the perfect finishing touch.
What you’ll end up with is a pot roast that’s perfectly tender, infused with aromatic spices, and served in its own luscious gravy.
The dish pairs beautifully with classic sides like creamy mashed potatoes, buttered carrots, or a crusty loaf of bread to soak up every last drop of that flavorful sauce. This is the kind of meal that brings people together, just like it did in the 1950s.
The best part? This recipe is foolproof and adaptable. Whether you’re cooking for a family gathering or a quiet dinner for two, the slow-braised method ensures consistent results. Let’s bring a taste of mid-century comfort to your modern kitchen—here’s how to make it.
Ingredients for 50s prime time cafe pot roast
Classic diner flavors with a few pantry staples—just like Grandma used to make.
| Ingredient | Amount | Notes |
|---|---|---|
| Beef Chuck Roast 🥩 | 3 lb | Well-marbled, bone-in preferred |
| Yellow Onions 🧅 | 2 whole | Medium size, sliced thick |
| Carrots 🥕 | 4 whole | Large, peeled, cut into chunks |
| Garlic Cloves 🧄 | 6 cloves | Smash slightly for deeper flavor |
| Tomato Paste 🍅 | 2 tbsp | Squeeze tube or canned |
| Beef Broth 💧 | 2 cups | Low-sodium preferred |
| Red Wine 🍷 | 1 cup | Bold, dry variety like Cabernet |
| All-Purpose Flour 🌾 | 2 tbsp | For thickening gravy |
| Ground Black Pepper 🌶️ | 1 tsp | Freshly ground preferred |
| Salt 🧂 | 1 ½ tsp | Kosher or sea salt |
| Dried Thyme 🌿 | 1 tsp | Or 1 tbsp fresh thyme |
| Bay Leaves 🍃 | 2 whole | Remove before serving |
| Olive Oil 🫒 | 2 tbsp | For searing |
| Fresh Parsley 🌿 | ¼ cup | Chopped, for garnish |
The beef is everything here. Chuck roast is the classic choice—it’s tougher but breaks down beautifully during the long braise. Costco or Walmart usually have it pre-cut into chunks, which saves time. If you’re buying a whole roast, ask the butcher to cut it into 1.5-inch chunks for even cooking. Look for good marbling—those little fat streaks melt during cooking and keep the meat juicy. I always grab a 3-pound roast for six servings, but you can scale up if feeding a crowd.
No red wine? Beef broth with a splash of balsamic vinegar works just as well—trust me, you won’t miss it. Fresh thyme is ideal but dried works fine at one-third the amount. The tomato paste can be the squeeze tube kind from Trader Joe’s—it’s perfect for small batches and keeps for months. For the carrots, baby carrots are fine, but larger ones add better texture and flavor. If you’re short on time, skip the peeling—the skins add color and nutrients. The bay leaves? Don’t skip them—they’re the secret to that classic diner aroma.
This dish tastes even better the next day—honestly, that’s when it shines. Store leftovers in the fridge for up to 5 days, or freeze portions for 3 months. I like to portion it into containers so lunches are ready to grab. The gravy thickens as it cools, so just add a splash of broth when reheating. And save that beef broth—it’s perfect for making extra gravy or tomorrow’s soup.
Why You’ll Love This Recipe
- Dutch Oven Magic: I swear by the slow simmer—just brown the chuck roast, toss in onions, carrots, and garlic, then let the tomato paste and broth work their magic. No fancy gadgets, no stress, just hands-off perfection while you sip coffee and scroll.
- Crowd-Pleaser Simplicity: Between us, this is the dish that makes me look like a hero at dinner parties. The beef practically melts in your mouth, the carrots turn tender-sweet, and everyone’s left licking their plates—no fancy plating required.
- Leftovers That Shine: Honestly, I make this on Sunday because the second batch is even better. Reheat the slices with mashed potatoes or toss into a sandwich—it’s the ultimate lazy-day lifesaver, and the flavor only deepens overnight.
- Budget-Friendly Luxury: A chuck roast stretches for days, and the veggies? They’re cheap but transform into something special. I’ll be real: this is how I feed my family well without breaking the bank, and the taste makes it feel like a restaurant meal.
Step-by-step instructions for 50s-inspired pot roast
Here’s how to make that classic, comforting pot roast that smells amazing all through the house.
🔥 Step 1: Sear the Roast for Deep Flavor
Heat a large Dutch oven over medium-high heat until hot. Add the 2 tablespoons olive oil and let it shimmer for 1 minute. Pat the 3 lb beef chuck roast completely dry with paper towels—this helps create that perfect crust. Place the roast in the pot, fat-side down, and sear undisturbed for 5 minutes until deeply browned.
Flip the roast and sear the other side for another 5 minutes. Real talk: don’t rush this. You want that rich, caramelized crust that’ll carry through the whole braising process. Once both sides are golden brown, remove the roast and set it aside on a plate.
👨🍳 Step 2: Build the Flavor Base
In the same Dutch oven, add the sliced 2 whole yellow onions and 4 whole carrots (cut into chunks). Cook for 5 minutes until they begin to soften and release their juices. Add the 6 smashed garlic cloves and cook for another 30 seconds until fragrant—this is where all the magic happens.
Stir in the 2 tablespoons tomato paste and cook for 1 minute until it darkens slightly. This step develops the deep, rich base that’ll make your roast taste like it’s been simmering all day. Pour in the 1 cup red wine and scrape up all those delicious browned bits from the bottom of the pot—this is flavor you don’t want to miss.
🥘 Step 3: Create the Perfect Braising Liquid
Return the roast to the Dutch oven along with any accumulated juices. Add the 2 cups beef broth, 1.5 teaspoons salt, 1 teaspoon ground black pepper, 1 teaspoon dried thyme, and 2 whole bay leaves. The liquid should come about halfway up the roast—this ensures it’ll cook evenly without drying out.
Bring the liquid to a gentle simmer over medium heat, then immediately reduce heat to low. Cover the pot and let it bubble gently for 5 minutes to help dissolve any surface crust on the roast. This initial simmer helps infuse all those flavors into the meat before the long braise.
⏰ Step 4: Slow-Braise Until Fork-Tender
Transfer the Dutch oven to a 325°F oven and braise for 6-7 hours. Here’s the thing—this is where patience pays off. The roast needs time to break down and become tender. I like to check it at the 6-hour mark by inserting a meat thermometer into the thickest part—it should read 195-205°F.
If it’s not quite there, return it to the oven for another 30-60 minutes. The meat should be so tender it practically falls apart with a fork. Don’t be tempted to rush it—this is the moment that makes all the difference. The longer it braises, the more flavorful and tender it becomes.
🍽️ Step 5: Thicken the Gravy and Serve
Once the roast is perfectly tender, carefully remove it from the pot and transfer to a cutting board. Place the pot on the stovetop over medium heat and skim off any excess fat that’s risen to the surface. Sprinkle in the 2 tablespoons all-purpose flour and whisk vigorously to combine with the cooking liquid.
Simmer for 5-7 minutes until the gravy thickens to your desired consistency. Taste and adjust seasoning with additional salt or pepper if needed. Return the roast to the pot, spooning some of that rich gravy over the top. Garnish with the 0.25 cup chopped fresh parsley and serve family-style straight from the pot.
Pro Tips For Making 50s Prime Time Cafe Pot Roast
- SEAR THE ROAST FIRST: I learned this the hard way—skipping the sear means your pot roast will taste more like stew than the rich, caramelized masterpiece you’re aiming for. Hit that chuck roast with high heat in a heavy pot until it’s deep brown on all sides (about 5-7 minutes total), then deglaze with a splash of beef broth or red wine. That crust locks in flavor and makes the whole dish taste like it simmered for hours, even if you’re cutting time later.
- CUT ONIONS IN HALVES: Yes, even if the recipe says “chop.” Halving the onions keeps them intact longer during the long simmer, so they don’t turn to mush and disappear into the sauce. Peel, trim the root, and slice each onion in half lengthwise—no need to dice. They’ll soften beautifully and still hold their shape, adding texture to every bite.
- DON’T SKIP THE TOMATO PASTE TOAST: After you brown the garlic and onions, stir in that tomato paste and let it cook for 2-3 minutes until it darkens slightly. This isn’t just for color—it deepens the sauce’s richness and balances the acidity from the broth. I was skeptical until I tried it: the difference between a flat, thin sauce and one with real body is night and day.
- USE A MEAT THERMOMETER: The “fork test” is unreliable for pot roast. Chuck needs to hit 203°F internally to break down into tender perfection—any lower and you’ll end up with chewy, disappointing meat. I used to pull it at 190°F, thinking it was done, only to have it fall apart when sliced. Trust the thermometer, not your guesswork.
Pro cooking tips for great 50s prime time cafe pot roast
Sear Like a Pro
The deep caramelization from searing isn’t just about flavor—it’s about creating a flavor lock that keeps the meat juicy during the long braise. I always use a heavy Dutch oven (like Lodge’s 5.5-quart) because it retains heat better than thin pans.
Pat your roast bone-dry with paper towels before searing—this helps create that perfect crust. For extra browning, I like to add 1 tablespoon of butter in the last minute of searing. 🔥
Braising Temperature
Most recipes say “low heat,” but that’s vague. For perfect results, aim for 325°F in your oven. I use an infrared thermometer to check my oven’s accuracy—many ovens run 25°F hotter than set.
If your roast isn’t tender enough after 6 hours, don’t panic. Just increase the temperature to 350°F for the final 30 minutes to finish cooking without drying it out.
Vegetable Prep Matters
Cutting carrots and onions into even 1.5-inch chunks ensures they cook uniformly. I peel the carrots but leave the skins on onions for extra flavor. Pro tip: Par-cook the vegetables for 5 minutes before adding the roast.
This jumpstarts their softening and prevents them from turning mushy during the long braise. The result? Perfectly tender veggies that soak up all that delicious gravy. 🥕
Gravy Thickening
For the smoothest gravy, I always skim excess fat before adding flour. Use a slotted spoon to remove fat while leaving some flavorful drippings. When whisking in the 2 tablespoons flour, cook it for 1-2 minutes before adding liquid to create a roux that prevents lumps.
If your gravy is too thick, just add 1 tablespoon of beef broth at a time until you reach your desired consistency.
Resting the Roast
After removing the roast from the pot, let it rest on a cutting board for 10-15 minutes before slicing. This allows the juices to redistribute, ensuring each bite is moist and flavorful.
I like to tent it loosely with foil to keep it warm. The longer you rest it, the more tender it becomes—don’t skip this step, even if you’re eager to serve! 💫
Make-Ahead Magic
This dish tastes even better the next day, which is perfect for meal prep. After braising, let the roast cool completely, then store it in the Dutch oven (covered) in the fridge.
Reheat on the stovetop over medium-low heat for 10-15 minutes, adding a splash of broth if needed. The flavors meld beautifully overnight, making it a perfect make-ahead meal for busy weeknights.
Nutrition facts
Frequently asked questions
Can I substitute red wine in this 50s-style pot roast?
If you don’t have red wine, use 1 cup beef broth mixed with 1 tablespoon balsamic vinegar for similar depth of flavor. The acidity helps tenderize the meat just like wine would. For a non-alcoholic option, try apple cider or grape juice—both work beautifully in this recipe.
What’s the best cut of beef for this recipe?
This recipe was designed for beef chuck roast—it’s the classic choice because of its marbling and flavor. Look for a 3-pound piece with good fat distribution. If you can’t find chuck, beef shoulder or top round work too, though chuck will be more tender. Never use lean cuts like sirloin—they won’t braise well.
How do I know when the pot roast is done?
The meat should reach an internal temperature of 195-205°F for perfect tenderness. Use a meat thermometer to check the thickest part. If it’s not quite there after 6 hours, increase oven temp to 350°F for 30 minutes to finish cooking. The meat should pull apart easily with a fork—this is your cue it’s ready!
Can I make this in a slow cooker?
Yes! Sear the roast first, then transfer everything to a 6-quart slow cooker on LOW for 8 hours or HIGH for 5-6 hours. For gravy, remove the roast and vegetables, then whisk in 2 tablespoons flour with the cooking liquid. Simmer on the stovetop until thickened. The slow cooker method is perfect for busy weeknights!
What sides pair best with this pot roast?
Classic 50s sides work perfectly! Try creamy mashed potatoes, buttered carrots, or crusty dinner rolls to soak up the gravy. For a lighter option, serve with green beans almondine or a fresh mixed salad. The rich flavors of the pot roast balance beautifully with these timeless pairings.

- Pea Soup Instant Pot Recipe: Velvety Green Smoothness in 20 Minutes - November 1, 2026
- Pork Loin Pulled Pork Crock Pot Recipe: Slow-Smoked Tenderness With Zero Dryness - November 1, 2026
- Baked Potatoes in Crock Pot Recipe: Buttery Interiors and Crispy Top Magic - November 1, 2026