
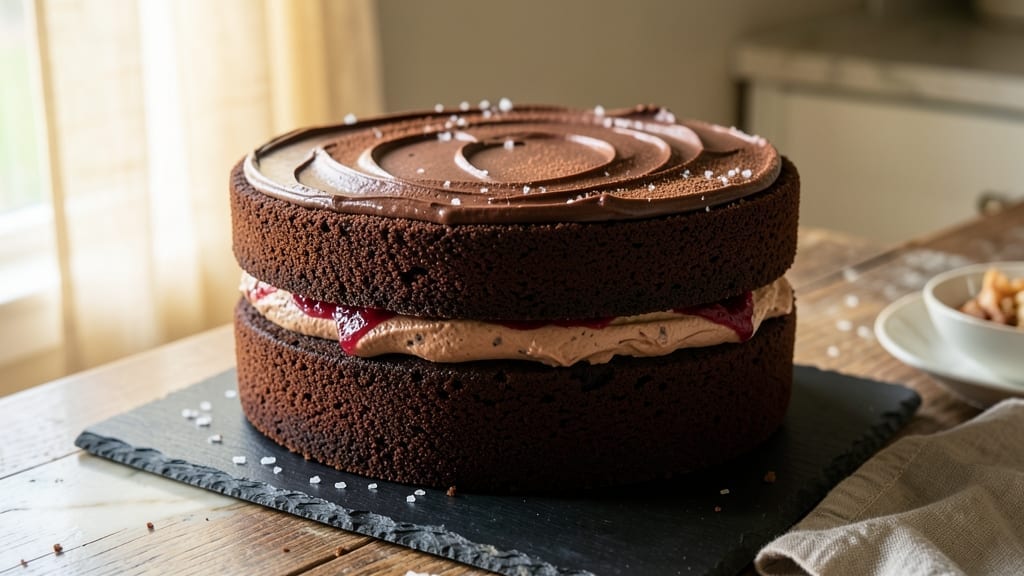
A moist chocolate cake with two distinct layers—fudgy at the bottom and silky on top—is the ultimate showstopper for any celebration. This recipe delivers that perfect balance of density and airiness, using time-tested techniques like buttermilk and oil to lock in moisture.
The secret lies in precise baking temperatures and a filling that binds the layers without making them soggy. What sets this cake apart is the two-tiered texture: the first layer bakes into a rich, dense fudgy base, while the second rises just enough for a tender, cloud-like finish.
No one will guess it’s not from a bakery. The recipe also includes adaptable ingredients for gluten-free or vegan versions, so you can customize it without sacrificing flavor.
By the time you’re done, you’ll have a restaurant-quality dessert that stays moist for days, with a glossy finish that looks as good as it tastes. The filling—a velvety chocolate ganache or whipped cream—adds the perfect contrast to the cake’s layers. Ready to bake?
The foolproof method starts with mixing dry ingredients separately to avoid overmixing, which keeps the cake tender. Oil-based moisture retention ensures a crumb that’s rich but not greasy, while the buttermilk adds subtle tanginess.
Baking times are carefully timed to prevent overbrowning, so you get golden edges with a perfectly set interior. Assembling the cake is where the magic happens: a thin layer of filling between the tiers prevents leaks while keeping each bite moist.
The final frosting seals everything together, creating a professional finish that’s both elegant and indulgent. This is the kind of cake that disappears fast—so make a backup slice.
Ingredients for 2 layer moist chocolate cake
Fudgy bottom, silky top—these 14 ingredients create a showstopping two-tiered chocolate masterpiece.
| Ingredient | Amount | Notes |
|---|---|---|
| All-Purpose Flour 🌾 | 2 ½ cups | Sifted for even texture |
| Unsweetened Cocoa Powder 🍫 | ¾ cup | Natural or Dutch-processed |
| Granulated Sugar 🍚 | 2 cups | White or light brown |
| Packed Brown Sugar 🍚 | ½ cup | Light or dark preferred |
| Buttermilk 🥛 | 1 cup | Room temperature for best results |
| Vegetable Oil 🫒 | 1 cup | Light or canola preferred |
| Large Eggs 🥚 | 2 whole | Room temperature for even baking |
| Vanilla Extract 🌿 | 2 tsp | Pure, high-quality preferred |
| Baking Soda 🧂 | ½ tsp | Freshly opened for potency |
| Salt 🧂 | ½ tsp | Fine sea salt preferred |
| Hot Water 💧 | ½ cup | For activating cocoa powder |
| Dark Chocolate Chips 🍫 | 1 cup | Semi-sweet for fudgy texture |
| Powdered Sugar 🍚 | 1 cup | For final dusting |
| Heavy Whipping Cream 🥛 | 1 cup | Cold for stable whipping |
The cocoa powder is your secret weapon here. Valrhona or Ghirardelli are worth the splurge for that velvety, professional finish—regular grocery store brands work but won’t have the same depth. The buttermilk needs to be room temperature (that’s why it’s not in the fridge), and the eggs should be too. King Arthur flour or Gold Medal are my go-tos for consistent results, but any all-purpose will do. Pro tip: measure your flour by weight if you can—2.5 cups is about 315g. The chocolate chips? Ghirardelli or Guittard melt perfectly without seizing. Store your cocoa powder in an airtight container away from heat to prevent clumping.
No buttermilk? Mix 1 cup milk + 1 tsp vinegar and let sit 5 minutes. Running low on vanilla? Almond extract at half the amount adds complexity. The baking soda must be fresh—if it’s more than 6 months old, it loses potency. For a gluten-free version, swap the flour for 1:1 gluten-free baking flour (like Bob’s Red Mill). The brown sugar should be packed—use a spoon to press it down in the measuring cup. If you’re making this ahead, the cake layers keep 3 days wrapped at room temperature, but the filling is best made fresh.
This cake is a marvel of patience—assemble it 12 hours before serving so flavors meld. The frosting (whipped cream or ganache) should be spread 1 hour before serving to set properly. Store leftovers in the fridge for 5 days, but bring to room temperature before serving. The layers freeze beautifully too—wrap tightly in plastic wrap and foil for 3 months. For that restaurant-quality finish, dust with powdered sugar right before serving. And trust me—make a backup slice.
Why You’ll Love This Recipe
- No Mixing Madness: I swear by this recipe because it’s one bowl—just toss everything together, fold in the buttermilk, and bake. No separate batter, no stressing over overmixed flour or lumps. The cocoa powder and brown sugar blend so smoothly, you’ll wonder why you ever did it the hard way.
- Birthday to Brunch: Between us, this cake handles everything. Frost it with whipped cream for a birthday, slice it into squares for a potluck, or serve it warm with vanilla ice cream on a lazy Sunday. The buttermilk keeps it moist enough to reheat—yes, even on a Tuesday night.
- Leftovers That Win: I make this on purpose just to have slices later. The flour and cocoa combo keep it from drying out, and the sugar crust stays crisp even after a day. It’s my go-to for when I need dessert but don’t want to bake twice—or spend $15 on a slice from the café.
Step-by-step instructions for 2 layer moist chocolate cake
Here’s how to create that perfect contrast—dense, fudgy layers with a silky top tier that stays moist for days.
Prepare the Cake Batter for Maximum Moisture
Preheat your oven to 350°F and grease two 6-inch round cake pans thoroughly with vegetable oil, then line the bottoms with parchment paper. This ensures easy release and prevents sticking—trust me, you don’t want to fight with your cake later.
In a large mixing bowl, whisk together the 2.5 cups all-purpose flour, 0.75 cup unsweetened cocoa powder, 0.5 tsp baking soda, and 0.5 tsp salt. Sift these dry ingredients through a fine-mesh sieve directly into the bowl to eliminate any lumps. This step is crucial for a light, airy texture rather than dense, heavy layers.
In a separate bowl, combine the 2 cups granulated sugar and 0.5 cup packed brown sugar. Add the 1 cup vegetable oil, 2 whole large eggs, and 2 tsp vanilla extract, mixing until smooth and fully incorporated. The reason we mix the sugars first is to create a stable emulsion with the oil—this prevents the cake from becoming greasy while maintaining moisture.
Activate the Cocoa and Combine Wet Ingredients
Pour the 0.5 cup hot water over the dry ingredients and stir vigorously with a whisk for 1 minute until the mixture becomes smooth and dark. This step activates the cocoa powder, ensuring maximum flavor and preventing any gritty texture. The batter should look like thick pudding at this stage.
Gradually add the wet ingredients to the dry mixture, alternating with the 1 cup buttermilk. Start and end with the buttermilk to ensure even distribution. Mix on low speed with an electric mixer until just combined—you should still see small streaks of flour. Overmixing develops gluten, which leads to a tough cake rather than the tender crumb we want.
Fold in the 1 cup dark chocolate chips by hand using a silicone spatula. Make sure they’re evenly distributed throughout the batter. The chocolate chips will melt slightly during baking, creating pockets of rich, fudgy goodness in every bite. Divide the batter evenly between the two prepared cake pans.
Bake the Layers for Perfect Texture
Place the cake pans in the preheated oven and bake for 25-30 minutes, or until a toothpick inserted into the center comes out clean with just a few moist crumbs clinging to it. The edges should be set but the center should still have a slight wobble—this ensures maximum moisture retention. Rotate the pans halfway through baking for even heat distribution.
I know it’s tempting to open the oven door early to check, but resist! Every time you open the oven, you lose heat and moisture. The cake needs that steady, even heat to develop its structure properly. Let it bake until it passes the toothpick test—this is your guarantee of a moist, tender crumb.
Create the Silky Top Tier
While the cakes are still warm (but completely cooled), prepare the whipped cream topping. In a chilled metal bowl, whip the 1 cup cold heavy whipping cream until soft peaks form. Gradually add the 1 cup powdered sugar and continue whipping until the cream is thick and glossy. This topping should hold its shape when piped but still be light enough to create that cloud-like texture we want between the layers.
Level the cooled cake layers if necessary, then place one layer on a serving plate. Spread a generous layer of the whipped cream mixture on top, then place the second cake layer on top. Cover the entire cake with the remaining whipped cream, creating a smooth, even surface. The contrast between the dense, fudgy cake and the light, airy whipped cream is what makes this cake truly special.
Chill and Serve for Optimal Moisture
Refrigerate the assembled cake for at least 4 hours, or preferably overnight. This chilling time is essential for several reasons: it allows the flavors to meld together, prevents the whipped cream from melting too quickly, and most importantly, it helps maintain that perfect moisture level in the cake layers. When you’re ready to serve, dust the top with additional powdered sugar if desired.
The cake should be served at room temperature for the best texture—this allows the whipped cream to soften slightly while keeping the cake moist. Each slice should reveal that beautiful contrast: a dense, fudgy base that gives way to a lighter, more tender top layer. And here’s the best part—this cake stays moist for days when stored properly in the refrigerator, making it perfect for special occasions or when you want to bake ahead.
Pro Tips For Making 2 Layer Moist Chocolate Cake
- SIFT THE COCOA: I learned this the hard way—dumping cocoa powder directly into dry ingredients creates lumps that ruin texture. Use a fine-mesh sieve to sift it over the flour and sugar first. This also prevents that dreaded “sandy” bite in every slice.
- WHISK THE BUTTERMILK: Don’t just pour buttermilk into your wet ingredients—give it a quick whisk first. The curds settle at the bottom, and if you scoop straight from the jug, you’ll end up with a lumpy batter. A 10-second stir guarantees smooth layers.
- BAKE UNTIL SPRINGY: Your cake’s done when the edges pull away from the pan and a toothpick comes out with moist crumbs, not wet batter. Overbaking turns it dry; underbaking leaves it gummy. Check at 2-3 minutes before the recipe’s suggested time.
- COOL INVERSELY: Sounds weird, but it works—flip the cake onto a wire rack immediately after pulling it from the oven. Let it cool upside-down for 10 minutes before unmolding. This keeps the layers from absorbing moisture and collapsing like a sad soufflé.
Common mistakes when making your 2 layer moist chocolate cake
Overmixing the Batter
I’ve ruined more cakes than I’d like to admit by overmixing the batter, and this recipe is no exception—stop mixing as soon as you see small streaks of flour. Overmixing develops gluten, which turns your tender cake into a tough, dense brick.
Mix just until combined (about 30 seconds after the flour disappears), then fold in the chocolate chips by hand to preserve that silky texture. 💫
Skipping the Hot Water Step
The hot water activates the cocoa powder, dissolving it completely for a smooth, velvety batter. If you skip this step, you’ll end up with gritty texture and uneven flavor distribution.
Pour the water over the dry ingredients and whisk vigorously for 1 full minute—don’t rush it! This ensures maximum cocoa flavor and prevents clumps.
Uneven Baking Temperatures
Baking at 350°F is critical, but rotating your pans halfway through is just as important. Without rotation, one side of the cake can bake faster, leading to uneven texture—dry edges with a raw center.
Set a timer to rotate pans at 15 minutes, and resist peeking! Every time you open the oven, you lose heat and moisture, throwing off your bake.
Overfilling Between Layers
Too much filling between layers can cause soggy cake or leaks. Use only ¼ to ½ cup of whipped cream or ganache per layer—just enough to hold them together without overwhelming the structure.
Spread it evenly with an offset spatula, then press the top layer gently to create a clean edge. This keeps your cake stable and professional-looking. ✨
Not Cooling Properly
Let cakes cool in pans for 10 minutes before transferring to a wire rack—this prevents cracking. Then, cool completely before assembling. Rushing this step can cause the layers to collapse or the whipped cream to melt too quickly.
Patience here ensures your cake holds its shape and stays moist for days. Trust me, the 4-hour chill is worth it!
Using Room-Temperature Ingredients
Cold eggs and buttermilk can cause uneven baking, while warm ingredients (like oil) help create a smoother batter. Let eggs sit at room temperature for 30 minutes before using, and use room-temperature buttermilk (not straight from the fridge).
Cold ingredients can lead to dense, uneven layers—this is a game-changer for texture! 🔥
Nutrition facts
Frequently asked questions about 2-Layer chocolate cake
Can I make this cake in a different pan size?
Yes, but adjust baking times accordingly. For 8-inch pans, bake 20-25 minutes at 350°F, while 9-inch pans need 25-30 minutes. The key is to use the toothpick test—it should come out with moist crumbs, not wet batter. Always rotate pans halfway through for even baking.
What’s the best way to store leftovers?
Wrap each layer tightly in plastic wrap, then place them in an airtight container. Store in the fridge for up to 5 days, or freeze for 3 months. To serve, let the cake sit at room temperature for 30 minutes before slicing—this prevents the whipped cream from melting too quickly.
Can I substitute buttermilk?
Mix 1 cup milk + 1 tsp vinegar or lemon juice, then let sit for 5 minutes until thickened. For vegan versions, use 1 cup coconut milk + 1 tsp vinegar. The acidity activates the baking soda, creating that perfect rise while keeping the cake moist.
Why did my cake crack?
Cracking usually happens from sudden temperature changes. Let cakes cool in pans for 10 minutes before transferring to a wire rack, and avoid opening the oven door during baking. If cracks appear, cover them with extra whipped cream or chocolate ganache—they won’t affect the flavor!
How do I make this gluten-free?
Replace the all-purpose flour with a 1:1 gluten-free baking flour blend (like Bob’s Red Mill). Add ½ tsp xanthan gum if your blend doesn’t include it. Reduce baking soda to ¼ tsp to prevent over-rising. The texture will be slightly denser but still moist and delicious.
