
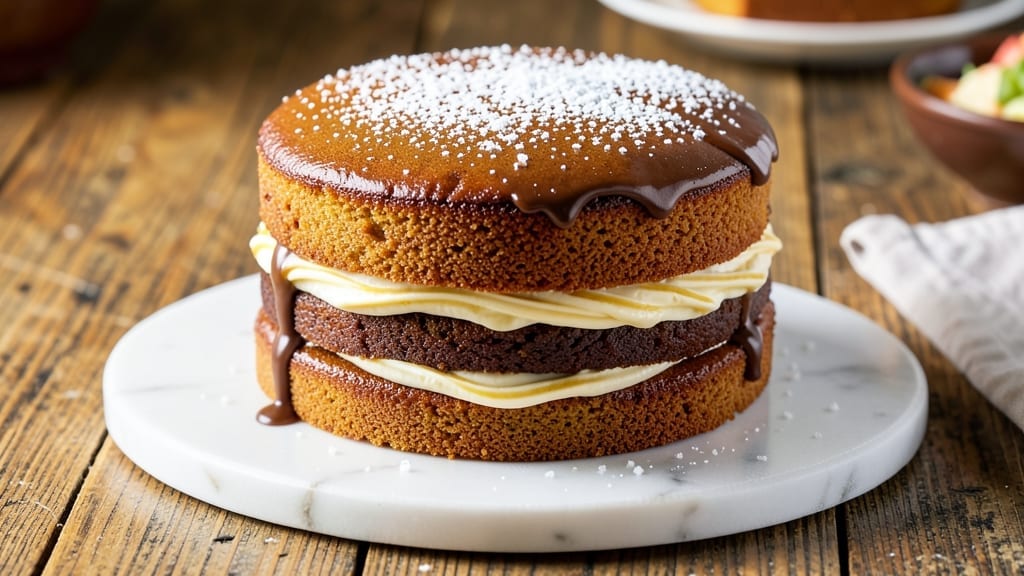
This 2-layer pound cake recipe delivers the perfect balance of rich, buttery texture and delicate vanilla swirls—every slice is a celebration of classic baking. The secret lies in precise measurements and a gentle folding technique that creates those signature marbled layers without cracking.
I’ve baked this version for holidays and special occasions, and it never fails to impress. What sets this recipe apart is the foolproof method for achieving even layers and a tender crumb.
You’ll need a stand mixer, springform pans, and patience for the slow cooling process (trust me, it’s worth it). The cake bakes up golden and moist, with a subtle vanilla aroma that fills your kitchen and makes the wait worthwhile.
By the time you’re done, you’ll have a showstopping dessert with a buttery frosting layer that complements the vanilla swirls perfectly. The texture is light yet rich, with just the right amount of sweetness that makes it ideal for birthdays, anniversaries, or any celebration.
This is the kind of cake that makes guests ask for the recipe. The best part? It’s beginner-friendly once you master the folding technique. Let’s get started—your cake awaits.
Ingredients for 2 layer pound cake
Classic ingredients transformed into a showstopping vanilla swirl cake with buttery layers.
| Ingredient | Amount | Notes |
|---|---|---|
| All-Purpose Flour 🌾 | 4 cups | Sifted for even texture |
| Unsalted Butter 🧈 | 2 cups | Cold, cubed for creaming |
| Granulated Sugar 🍚 | 2 ½ cups | Superfine preferred for smoothness |
| Vanilla Extract 🌿 | 2 tbsp | Pure Madagascar vanilla |
| Vanilla Bean Paste 🌿 | 1 tbsp | For authentic vanilla swirls |
| Large Eggs 🥚 | 6 whole | Room temperature |
| Whole Milk 🥛 | 1 ½ cups | Room temperature |
| Baking Powder 🧂 | 1 tbsp | Aluminum-free preferred |
| Salt 🧂 | ½ tsp | Fine sea salt |
| Vanilla Bean Seeds 🌿 | 1 whole | Scraped from 1 pod |
| Powdered Sugar 🍚 | 3 cups | For buttercream frosting |
| Unsalted Butter 🧈 | 1 cup | Softened for frosting |
| Heavy Cream 🥛 | ½ cup | Chilled for frosting |
The butter matters here—European-style or Plugrá is ideal for that rich, tender crumb. Buy it in 1-pound blocks from Whole Foods or Wegmans for the best flavor. Vanilla bean paste is worth the splurge—Madagascar beans give the most aromatic swirls. I always grab extra vanilla extract too; it’s one of those ingredients you’ll use again. The flour? King Arthur or Bob’s Red Mill are my go-tos for consistent baking.
No vanilla bean paste? Pure vanilla extract plus a pinch of sugar mimics the swirl effect. Short on butter? Vegetable shortening works in a pinch, but the cake won’t be as flavorful. Room temperature eggs are non-negotiable—cold eggs cause cracks. For the frosting, powdered sugar from a canister (not the clumpy kind) makes all the difference. The heavy cream should be cold when you whip it—never use warm cream or it won’t hold its shape.
Store cake layers wrapped in plastic at room temp for 2 days or refrigerate for 5 days. The frosting keeps 3 days in the fridge, but add a little milk to soften before re-whipping. Freeze fully frosted cakes for 1 month—thaw overnight at room temperature. Pro tip: Make the frosting first and let it chill while you bake; it’ll be easier to spread.
Why You’ll Love This Recipe
- Here’s what sold me: it uses basic pantry staples (hello, butter and sugar) but tastes like you slaved over it. A single batch feeds six, and leftovers? They last a week in the fridge—perfect for when you’re too tired to bake again. (No guilt, just cake.)
- No Mixer Needed: I swear by this recipe because it’s the only pound cake I’ve ever made that doesn’t require a stand mixer. Creaming the butter and sugar by hand? Totally doable—just a little elbow grease—and the result is that signature tender crumb. (Yes, even when I’m in a hurry.)
- Vanilla Bomb: That split vanilla—extract and paste—takes this cake from “nice” to “I’ll drive 20 minutes for seconds.” The paste adds these little specks of depth, while the extract keeps it bright. Honestly, it’s the kind of flavor that makes you pause mid-bite just to appreciate it.
- Layered for Any Occasion: Between us, this cake is my go-to for birthdays, brunch, or even a lazy Sunday. The two layers mean you can stack it with jam, frost it lightly, or serve it plain—no judgment. And because it’s not overly sweet, it’s the one dessert that won’t clash with savory meals.
Step-by-step instructions for vanilla bean swirl pound cake
Here’s how to create a perfectly moist cake with rich vanilla swirls and velvety buttercream.
Prepare the Cake Pans and Mix Dry Ingredients
Preheat your oven to 350°F and grease two 9-inch round cake pans with butter, then line the bottoms with parchment paper. I like to use a pastry brush to coat the sides with melted butter for easy release later.
In a medium bowl, whisk together the 4 cups all-purpose flour, 1 tablespoon baking powder, and ½ teaspoon salt. Sift the mixture twice through a fine-mesh sieve to remove any lumps and aerate the flour. This ensures your cake will have a light, even texture rather than dense pockets.
Set aside the dry ingredients and scrape the seeds from the 1 whole vanilla bean using the tip of a knife. Add these seeds to the dry mixture and stir gently to distribute them evenly. The vanilla seeds will infuse the entire cake with their signature aroma and flavor.
Cream Butter and Sugar for Maximum Fluffiness
In a stand mixer fitted with the paddle attachment, beat the 2 cups cold, cubed unsalted butter on medium speed for 1-2 minutes until smooth and creamy. This step is crucial—cold butter creates air pockets that make the cake rise beautifully.
Gradually add the 2.5 cups granulated sugar and mix on medium-high speed for 3-5 minutes until the mixture is light, fluffy, and pale in color. You’ll know it’s ready when it nearly doubles in volume and leaves a ribbon trail when the beaters are lifted. This creaming process is what gives pound cake its signature tender crumb.
Incorporate Wet Ingredients and Create the Swirl
Add the 6 whole large eggs, one at a time, mixing on low speed after each addition until fully incorporated. Then add the 1.5 cups whole milk, 2 tablespoons vanilla extract, and 1 tablespoon vanilla bean paste. Mix on low speed until just combined—overmixing develops gluten and makes the cake tough.
With the mixer running on low speed, gradually add the dry ingredients to the wet mixture. Mix just until combined—you should still see small streaks of flour. This is where the magic happens: the batter should be thick and smooth, like a rich cookie dough.
Here’s the secret to those beautiful vanilla swirls: divide the batter evenly between two mixing bowls. To one bowl, add an extra 1 tablespoon vanilla bean paste and mix well. Pour half of the regular batter into one prepared cake pan, then spoon half of the vanilla-infused batter on top. Swirl gently with a spatula to create marbled patterns, then repeat with the remaining batter.
Bake Until Golden and Set
Bake the cakes for 30-35 minutes, or until a toothpick inserted into the center comes out clean with just a few moist crumbs. The cakes should be golden brown on top and slightly domed in the center. I like to rotate the pans halfway through baking to ensure even cooking.
Let the cakes cool in their pans for 10 minutes before transferring them to a wire rack to cool completely. This gradual cooling prevents cracking. While they cool, I like to make the buttercream so it’s ready to assemble when the cakes are completely set.
Make the Buttercream and Assemble
In a stand mixer fitted with the paddle attachment, beat the 1 cup softened unsalted butter on medium speed until smooth and creamy. Gradually add the 3 cups powdered sugar and mix on low speed until combined. Increase the speed to medium-high and beat for 2-3 minutes until light and fluffy.
Add the ½ cup chilled heavy cream and mix until smooth. Finally, add the remaining 1 tablespoon vanilla extract and mix until fully incorporated. The buttercream should be thick enough to hold peaks but still spreadable. If it’s too thick, add 1 teaspoon milk at a time until you reach the desired consistency.
Once your cakes are completely cool, level the tops if needed. Spread a thin layer of buttercream on the bottom cake, then place the second cake on top. Apply the remaining buttercream to the sides and top of the cake, smoothing with a spatula. For extra decoration, pipe swirls of buttercream on top or around the sides using a star tip.
Pro Tips For Making 2 Layer Pound Cake
- Cream Butter Slowly: Use a stand mixer with the paddle attachment and start on low speed—around 2 minutes at speed 2—before gradually increasing to medium. I learned this the hard way after making butter splatter everywhere when I cranked it up too fast; you want smooth, fluffy butter-sugar mix, not a greasy mess.
- Sift Flour Twice: Sift the flour before adding it to the batter, then sift it again after mixing the dry ingredients. This prevents lumps and ensures even distribution—no one wants dense, uneven layers just because you skipped this step.
- Don’t Overmix Layers: Stop folding the batter into the second layer as soon as it’s just combined—no streaks, no overworking. Overmixing adds gluten and makes the cake tough; think “marble swirl,” not “pancake batter.”
- Ice Bath for Cooling: After baking, transfer the cake to a wire rack and let it cool for 10 minutes, then invert it onto a plate and slide it into an ice bath (bowl of ice water) for 5 minutes. This firms up the layers faster than room cooling—critical for clean slicing and frosting.
Essential equipment for 2 layer pound cake
Stand Mixer Essentials
Your stand mixer is the heart of this recipe—it creates the light, airy texture that makes pound cake so special. I recommend a KitchenAid Artisan Series for its power and durability, but any 5-quart mixer with a paddle attachment will work.
The paddle helps incorporate air during the creaming stage, while the bowl’s depth ensures you can mix all the ingredients without spills. 🌟
For the buttercream, switch to the whisk attachment to whip the powdered sugar and butter into fluffy peaks. If your mixer struggles with the volume, divide the buttercream into two batches—this prevents overheating and ensures smooth, creamy results.
Pro tip: Chill your mixing bowl for 10 minutes before whipping the buttercream to keep it stable longer.
Cake Pans Matter
Use 9-inch round springform pans with removable sides for easy release and perfect layer separation. I prefer Wilton Perfect Results pans—they have a nonstick coating that reduces the need for excessive greasing.
Grease the pans thoroughly with unsalted butter, then line the bottoms with parchment paper circles to prevent sticking. Don’t skip this step, or you’ll spend more time prying the cake loose than baking it!
If you don’t have springform pans, standard round cake pans work too, but remove the sides immediately after baking to cool the cakes. For extra insurance, dust the pans with flour after greasing—this creates a barrier that makes unmolding effortless.
Just tap the pan gently on the counter before releasing the sides to avoid cracks.
Vanilla Tools
A vanilla bean scraper or the tip of a sharp knife is essential for extracting seeds from your vanilla pod. I love Madagascar vanilla beans for their rich, floral notes—they’re worth the splurge for this recipe.
Store any leftover seeds in a small airtight container in the freezer to preserve their flavor for up to 6 months. For the vanilla bean paste, a small offset spatula helps spread it evenly into the batter for those signature swirls.
No vanilla bean? No problem! Mix 1 tablespoon vanilla extract with ½ teaspoon sugar to mimic the paste’s intensity. The sugar helps distribute the flavor evenly in the batter.
If you’re feeling fancy, infuse ½ cup milk with a scraped vanilla bean while it warms—this adds an extra layer of aroma to the cake itself.
Buttercream Basics
For the buttercream, powdered sugar is non-negotiable—it dissolves smoothly and creates a stable frosting. I use Domino brand for its fine texture and consistent quality. A small hand mixer works in a pinch, but a stand mixer’s paddle attachment gives you the lightest, fluffiest results.
Chill your bowl and beaters for 5 minutes before whipping to prevent the butter from melting too quickly.
To test consistency, dip a spoon into the buttercream—it should hold its shape but still be spreadable. If it’s too thick, add milk 1 teaspoon at a time; if too thin, whip in 1 tablespoon powdered sugar.
For extra stability, fold in 1 tablespoon cornstarch mixed with 1 teaspoon cold water—this thickens the frosting without altering the flavor.
Pro Tips for Success
A digital kitchen scale ensures precise measurements, especially for butter and sugar—this is key for a tender crumb. I also keep a small offset spatula and bench scraper handy for folding batter and spreading frosting.
For the swirl technique, a long, flexible spatula (like those used for cake decorating) makes it easier to create clean, even patterns without overmixing.
Don’t forget a wire cooling rack—it’s critical for even cooling and prevents soggy bottoms. If you’re short on time, place the pans on a rack set over a baking sheet to catch any drips.
For extra shine on the frosting, brush the top of the cake with a pastry brush dipped in milk before decorating—this gives it a professional, glossy finish.
Nutrition facts
Frequently asked questions
Why does this pound cake recipe use vanilla bean paste instead of just extract?
The vanilla bean paste creates those signature marbled swirls that make this cake visually stunning. The paste contains real vanilla seeds that infuse the batter with intense flavor and create beautiful patterns when folded in. While vanilla extract works in a pinch, the paste gives you both flavor and presentation—plus, it’s more aromatic than extract alone.
Can I make this cake in a different pan size?
Yes, but you’ll need to adjust baking times. For 8-inch pans, bake 25-30 minutes and for 10-inch pans, bake 35-40 minutes. The key is to use the same batter volume—just divide it evenly between your pans. Always check doneness with a toothpick test. The cake should be golden and spring back when gently pressed.
How do I prevent cracks in my pound cake layers?
Cracks usually happen from overmixing or uneven cooling. Mix just until combined (you should still see flour streaks) and let the cake cool gradually in the pan for 10 minutes before transferring to a rack. Also, make sure your oven is fully preheated and the batter is at room temperature when baking. Room-temperature eggs are especially important—they prevent cracks better than cold ones.
What’s the best way to store leftover pound cake?
Wrap individual layers tightly in plastic wrap, then place them in an airtight container. Store at room temperature for 2 days or refrigerate for 5 days. For longer storage, freeze the unfrosted layers for up to 3 months. Thaw overnight in the fridge before frosting. The frosting keeps separately for 3 days in the fridge—just add a splash of milk to soften before re-whipping.
Can I substitute any ingredients in this recipe?
Most ingredients are flexible, but some matter more than others. You can use vegetable shortening instead of butter (though flavor suffers), or almond milk for regular milk. For vanilla, 1 tbsp extract + ½ tsp sugar mimics the paste. The only non-negotiable is the baking powder—it’s essential for that light, airy texture. Always measure flour by weight for best results.

- Pork Loin Pulled Pork Crock Pot Recipe: Slow-Smoked Tenderness With Zero Dryness - November 1, 2026
- Baked Potatoes in Crock Pot Recipe: Buttery Interiors and Crispy Top Magic - November 1, 2026
- Braised Beef Short Ribs Recipe: Crock Pot Fall-Off-Bone Magic in 6 Hours - November 1, 2026