
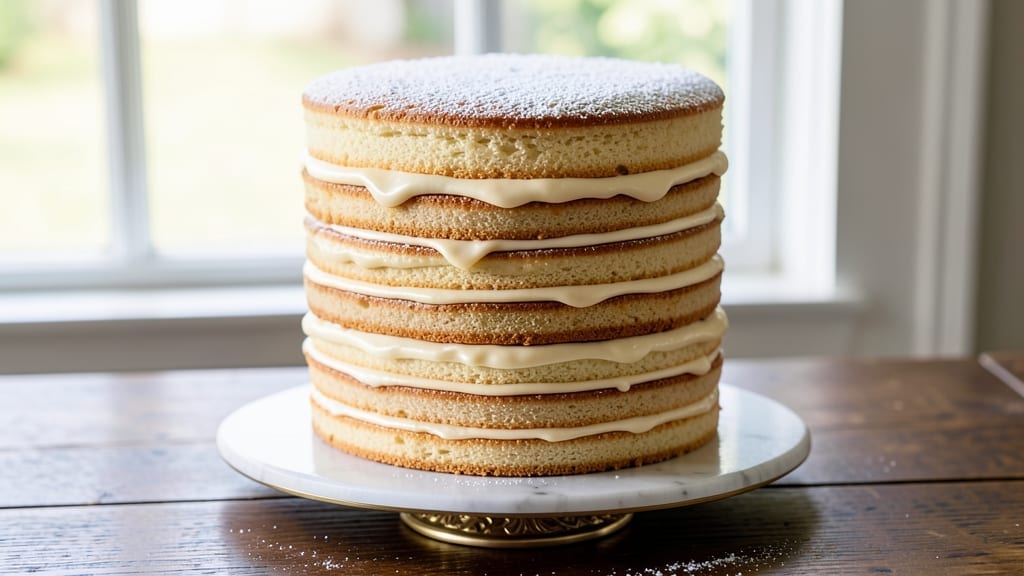
Creating a 100-layer cake with its signature buttery swirls and towering height requires precision and patience—but the results are worth every minute. This classic dessert transforms simple ingredients into a showstopping masterpiece, where thin, flaky layers and vanilla bean swirls create a delicate balance of texture and flavor.
The secret lies in rolling the dough paper-thin, chilling each layer before stacking, and letting the butter melt into perfect ribbons when baked.
What sets this recipe apart is the foolproof technique for achieving those signature swirls without a fancy cake stand. We’ll use a simple rolling and folding method that creates even layers, while vanilla bean paste infuses each one with rich, aromatic depth.
The cake bakes in a single sheet pan, eliminating the need for complicated assembly—just bake, layer, and chill before slicing into perfect, uniform pieces.
By the time you’re done, you’ll have a towering cake that’s as impressive to look at as it is to eat—each bite offering tender, buttery layers with pockets of vanilla bean swirls.
The texture is light yet sturdy, holding its shape even when sliced, and the aroma of vanilla will fill your kitchen long before the first piece is served. This is the kind of dessert that makes any occasion feel special.
Whether you’re baking for a celebration or simply indulging in a classic, this method delivers restaurant-quality results at home. The best part? You can adapt it to any flavor—chocolate, lemon, or even matcha—while keeping the signature layering technique intact. Let’s get started on creating your own edible masterpiece.
Ingredients for 100 layer cake
Twelve ingredients that transform into a showstopping masterpiece of buttery layers and vanilla swirls.
| Ingredient | Amount | Notes |
|---|---|---|
| All-Purpose Flour 🌾 | 8 cups | Sifted for light texture |
| Unsalted Butter 🧈 | 4 cups | Cold, cubed for rolling |
| Granulated Sugar 🍚 | 2 cups | Superfine preferred for smoothness |
| Vanilla Bean Paste 🌿 | 2 tbsp | High-quality for rich flavor |
| Large Eggs 🥚 | 6 whole | Room temperature for blending |
| Vanilla Extract 🌸 | 1 tbsp | Pure extract for depth |
| Baking Powder 🧂 | 2 tsp | Fresh for proper rise |
| Salt 🧂 | ½ tsp | Fine sea salt preferred |
| Powdered Sugar 🍚 | 2 cups | For dusting layers |
| Heavy Cream 🥛 | 1 cup | Cold for swirls |
| Vanilla Bean Seeds 🌿 | 1 whole | Scraped from 1 bean |
| Confectioners' Glaze 🍰 | ½ cup | Optional for final shine |
The butter is non-negotiable here—European-style or Land O’Lakes unsalted gives the best flavor. Grab it cold from the fridge, still in chunks, because room-temperature butter will make rolling impossible. King Arthur flour is my go-to for baking—it’s finely milled and gives that signature tender crumb. If you’re using regular flour, sift it twice for the lightest texture possible. The vanilla bean paste? Look for Madagascar bourbon beans if you’re buying whole—split one open and scrape the seeds directly into your dough. That’s where the magic happens.
No vanilla bean paste? Pure vanilla extract plus a pinch of ground vanilla bean seeds works in a pinch. Running short on powdered sugar? Superfine sugar blended in a food processor does the trick. The heavy cream for swirls needs to be cold—if it’s warm, whip it with a splash of ice water. For the confectioners’ glaze, Wilton’s brand is foolproof, but you can make your own with powdered sugar and water if you’re feeling ambitious. The baking powder must be fresh—if it’s more than six months old, toss it and buy a new can. And trust me on the powdered sugar dusting—it’s what makes those layers shine.
This cake keeps beautifully for 3 days in an airtight container at room temperature, but honestly, it’s best served fresh. If you’re prepping ahead, assemble the cake up to 24 hours before serving—just cover it tightly with plastic wrap. The butter layers will soften slightly at room temperature, which is perfect for serving. For a showstopper presentation, chill the cake for 1 hour before slicing—it holds its shape better that way. Leftovers? Store them in the fridge for up to 5 days, but they won’t last that long with this crowd-pleaser.
Why You’ll Love This Recipe
- No-Fuss Layers: I swear, the trick is just folding—no piping bags, no stress. You mix the batter, let it set in the fridge, then stack and repeat. That’s it. Even my toddler could handle the buttercream spread.
- Vanilla Magic: That vanilla bean paste? Chef’s kiss. It’s rich but not overpowering, and the buttercream stays silky smooth—no grainy shortcuts here. Every bite tastes like a bakery, not a box mix.
- Party in a Box: Birthday? Shower? Done. This cake cuts into perfect squares, feeds a crowd, and still looks impressive. Honestly, I’ve used it for everything from potlucks to my kid’s soccer team snacks—no one ever guesses it’s this easy.
- Budget Buster: Four ingredients, zero waste. The butter and sugar stretch across multiple layers, and leftovers? They freeze like a dream. I’ve had slices from last week’s batch taste just as good as day one—yes, even on a Tuesday night.
Step-by-step instructions for vanilla bean swirl cake
This is where the magic happens—building layers of buttery vanilla perfection with swirling cream.
Prepare the Cake Batter
In a stand mixer fitted with the paddle attachment, cream the 4 cups unsalted butter and 2 cups granulated sugar on medium speed for 5-7 minutes until light and fluffy. You’ll know it’s ready when the mixture nearly doubles in volume and leaves ribbons when the beaters are lifted. This step is crucial for that tender, airy texture we’re after.
Add the 6 whole large eggs, one at a time, mixing well after each addition. Then stir in the 2 tbsp vanilla bean paste, 1 tbsp vanilla extract, and scrape the seeds from the 1 whole vanilla bean directly into the bowl. Mix until fully combined. In a separate bowl, whisk together the 8 cups all-purpose flour, 2 tsp baking powder, and 0.5 tsp salt. Gradually add the dry ingredients to the wet, mixing on low speed just until combined—don’t overmix or your cake will be dense.
Bake the Cake Layers
Preheat your oven to 350°F and grease 12 round 8-inch cake pans (or use parchment rounds). Divide the batter evenly among the pans—you’ll need about ⅔ cup batter per pan. Bake for 12-15 minutes or until a toothpick inserted in the center comes out clean. The layers should be golden on top but still slightly springy to the touch.
Let the cakes cool in their pans for 5 minutes, then transfer to a wire rack to cool completely. This cooling step is essential—warm layers won’t stack properly and will create a soggy cake. While they cool, prepare your filling by whipping the 1 cup heavy cream and 2 cups powdered sugar together until soft peaks form. Fold in the remaining 1 tbsp vanilla extract for extra flavor.
Assemble the Cake Layers
Place the first cake layer on a cake stand or plate. Spread a generous layer of the cream filling over the top, leaving a ½-inch border uncovered. Place the second layer on top and repeat the process. Continue stacking all 12 layers, making sure each one is level. This is where precision matters—use a cake leveler if needed to keep everything even.
Once all layers are stacked, spread the remaining cream filling over the entire top and sides of the cake. Use an offset spatula to create smooth, even swirls. Chill the cake in the refrigerator for at least 2 hours—this allows the filling to set and prevents the layers from shifting. The longer you chill, the more stable your tower will be.
Final Decoration and Serving
Once chilled, carefully remove the cake from the refrigerator and dust the top and sides generously with powdered sugar using a fine-mesh sieve. For extra shine, brush the 0.5 cup confectioners’ glaze (mixed with 1-2 tbsp heavy cream) over the top. This step is optional but gives that professional bakery finish. Let the glaze set for 10 minutes before serving.
Slice with a long, serrated knife that’s been dipped in hot water and wiped dry—this ensures clean cuts through all those layers. Serve immediately while the cream filling is still cool and creamy. Each slice should reveal those beautiful swirls of vanilla bean paste and buttery cake layers stacked high—just like a true 100-layer masterpiece!
Pro Tips For Making 100 Layer Cake
- Cream Butter Properly: Beat the butter and sugar until it’s pale yellow and fluffy—about 3-5 minutes with a stand mixer. I used to rush this, and the cake turned dense. This step adds air, which is half the battle for that light, airy texture.
- Room-Temp Eggs Matter: Let your eggs sit out for 30 minutes before mixing. Cold eggs can curdle the batter, and you’ll end up with a grainy texture. Trust me, the extra wait makes a real difference.
- Don’t Overmix the Batter: Mix just until combined—overmixing develops gluten, and your cake will turn tough. Stop when the flour is barely incorporated. Yes, it’ll look lumpy, but that’s how you get tender layers.
- Rotate Pans Mid-Bake: Swap the cake pans halfway through baking to even out browning. I learned this after one side of my first attempt came out dark while the other stayed pale. A quick pan swap fixes it every time.
Best sauces and condiments for 100 layer cake
Vanilla Bean Cream Filling
The star of this cake is the vanilla bean cream filling, where 1 cup heavy cream whipped to soft peaks meets 2 cups powdered sugar for that signature light, airy texture.
I like to add an extra 1 tablespoon vanilla extract here to amplify the flavor—it’s the secret to that professional bakery taste. For extra richness, fold in 1 tablespoon vanilla bean paste or scrape seeds from a fresh vanilla bean.
Chill the filling for 30 minutes before assembling to help it set properly between layers. 🌸
Buttercream Swirls
For a showstopping presentation, replace the cream filling with a vanilla buttercream made from 2 cups softened butter, 4 cups powdered sugar, and 2 tablespoons vanilla extract. Whip it until smooth, then pipe or spread between layers.
The buttercream adds a firmer structure, making the cake easier to slice cleanly. Use a piping bag with a star tip to create decorative swirls on the top before dusting with powdered sugar. This version holds up better in warm weather too! 🎨
Chocolate Ganache Drizzle
Add a decadent twist by drizzling dark chocolate ganache between layers and on top. Melt 8 ounces dark chocolate with ½ cup heavy cream, then let it cool slightly before drizzling. The ganache adds a deep, velvety contrast to the buttery cake layers.
For a chocolate-vanilla fusion, fold 1 tablespoon cocoa powder into the cream filling. This works especially well if you’re serving the cake at room temperature. 🍫
Citrus Curd Swirls
Brighten up the classic with lemon or orange curd swirls. Make a simple curd by simmering 3 egg yolks, ½ cup sugar, ⅓ cup lemon juice, and ¼ cup butter until thickened. Let it cool, then spread between layers or pipe decorative swirls on top.
The tangy citrus cuts through the richness of the butter and vanilla, creating a refreshing balance. Use 1 cup curd total for the entire cake. 🍋
Caramel Drizzle Finish
Elevate your cake with a salted caramel drizzle on top. Heat 1 cup granulated sugar in a saucepan until melted, then slowly add ½ cup heavy cream while whisking. Simmer for 5 minutes, then stir in 2 tablespoons butter and ½ teaspoon flaky salt.
Let it cool slightly before drizzling over the assembled cake. The caramel adds a sweet, gooey contrast that pairs perfectly with the buttery layers. 🍯
Whipped Cream Frosting
For a lighter option, replace the cream filling with whipped cream frosting. Whip 2 cups heavy cream with 2 cups powdered sugar and 1 tablespoon vanilla extract until stiff peaks form. This frosting is perfect for a lighter, airier cake that’s still rich and delicious.
Pipe rosettes or swirls on top for a whimsical touch. Store the cake in the fridge for up to 3 days to keep the whipped cream from melting. ❄️
Nutrition facts
Frequently asked questions
Can I make a 100-layer cake with fewer layers?
The magic is in the technique, not the exact number. Use 6-8 layers for a smaller crowd or 15-20 layers for a more dramatic presentation. Just maintain the same ratio of batter to filling—about ⅔ cup batter per 8-inch layer. The key is chilling between layers to prevent collapsing.
Why does my cake collapse when assembling?
Collapsing usually happens when layers aren’t fully cooled or the filling is too warm. Always let cake layers cool completely before stacking, and chill the filling for 30 minutes before using. Also ensure your cake pans are properly greased or lined with parchment to prevent sticking.
How do I get the signature swirls without a special tool?
No fancy equipment needed! After stacking all layers, spread the remaining filling over the top with an offset spatula. Use the back of a spoon or a butter knife to create gentle swirls in a circular motion. For extra drama, pipe decorative swirls with a piping bag and star tip before dusting with powdered sugar.
Can I substitute vanilla bean paste?
Yes! Use 1 tablespoon pure vanilla extract plus ½ teaspoon ground vanilla bean seeds for the same flavor impact. For a budget option, blend 1 vanilla bean pod in 2 tablespoons water and use the liquid in place of the paste. The key is maximizing vanilla flavor—don’t skimp on this step!
How long does this cake keep?
At room temperature, this cake stays fresh for 3 days in an airtight container. For longer storage, refrigerate up to 5 days (bring to room temperature before serving). The butter layers soften slightly when chilled, which actually makes slicing easier—just let it sit at room temperature for 30 minutes before serving.

- 6 Bean Chili Recipe: Hearty, Smoky Depth That Gets Richer Over Time - September 26, 2026
- 2 Gallon Red Sangria Recipe: Bold Spice and Fruit Fusion for Crowds - September 26, 2026
- 5 Star Apple Bread Recipe: Spiced Apple Swirl With Buttery Crust - September 26, 2026