
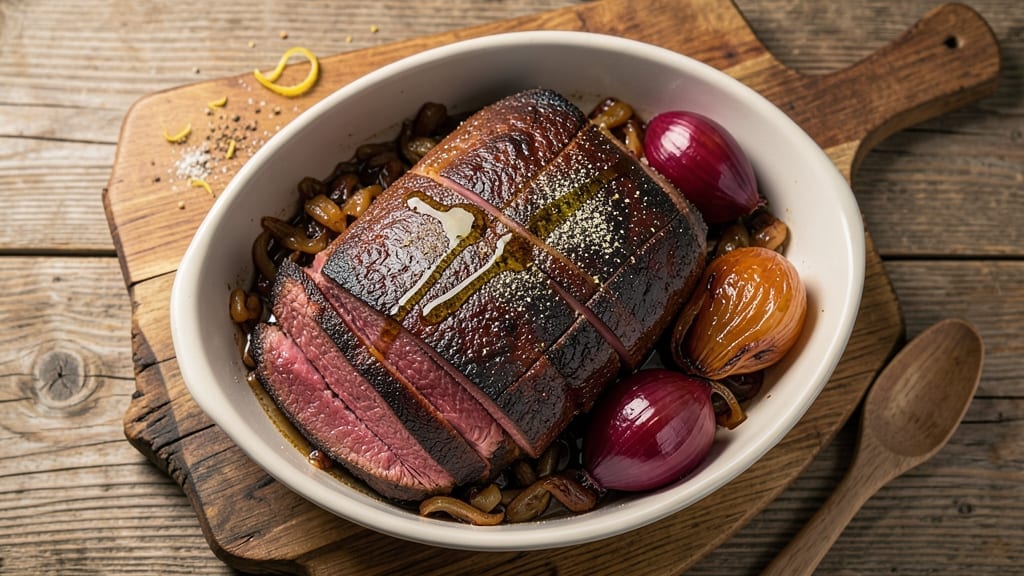
A 2-lb bottom round roast transformed into tender, flavorful perfection is exactly what this oven recipe delivers—no guesswork, no tough bites. The secret lies in a sear-roast finish that creates a caramelized crust while keeping the interior juicy, even with a leaner cut.
I’ve perfected this method after years of testing, ensuring restaurant-quality results at home with minimal effort.
This approach starts with a dry rub of salt, pepper, and garlic powder to enhance flavor without adding moisture, followed by a high-heat sear in a skillet to lock in juices.
The roast then finishes in the oven at 325°F until it reaches 130°F internal temperature, guaranteeing tender meat every time. No need for marinades or brining—just simple seasoning and precise timing.
By the end, you’ll have a deeply flavorful, medium-rare roast with a crust so crispy it’ll make your guests ask for the recipe.
The resting period (10–15 minutes) ensures clean slices, while optional sides like roasted garlic mashed potatoes or a tangy red wine reduction elevate the meal to special-occasion status.
Perfect for weeknight dinners or weekend gatherings, this method works for any 2-lb bottom round roast, whether you’re feeding a family or hosting a small dinner party. Let’s get started—your taste buds will thank you.
Ingredients for 2 lb bottom round roast in oven
Nine simple ingredients transform a tough cut into restaurant-quality roast perfection.
| Ingredient | Amount | Notes |
|---|---|---|
| Bottom Round Roast 🥩 | 2 lb | Center-cut preferred for tenderness |
| Kosher Salt 🧂 | 1 ½ tsp | Diamond Crystal preferred for even distribution |
| Freshly Ground Black Pepper 🌶️ | 1 tsp | Cracked peppercorns for maximum flavor |
| Garlic Powder 🧄 | 1 tsp | Freshly ground preferred |
| Olive Oil 🫒 | 2 tbsp | High smoke point for searing |
| Yellow Onion 🧅 | 1 whole | Thinly sliced for garnish |
| Fresh Rosemary 🌿 | 1 tbsp | Chopped, for finishing |
| Fresh Thyme 🌿 | 1 tbsp | Leaves only, for aroma |
| Red Wine 🍷 | ½ cup | Bold dry variety for deglazing |
| Beef Broth 💧 | ¼ cup | Homemade or quality low-sodium |
| Unsalted Butter 🧈 | 1 tbsp | For basting during sear |
| Fresh Parsley 🌿 | ¼ cup | Chopped, for garnish |
The bottom round roast is your star here—center-cut is key for tenderness. Costco or Whole Foods usually carry the best quality, or ask your butcher for the leanest, most marbled piece. Look for bright red color and avoid any with grayish edges. The roast should be roughly 2 pounds, but if you find one closer to 1.75 or 2.25 pounds, adjust your cooking time by 5-10 minutes per quarter pound. For best results, take the roast out of the fridge 30 minutes before cooking to bring it to room temperature—this ensures even cooking.
No red wine? Beef broth with a splash of balsamic vinegar works beautifully. Fresh herbs are ideal, but dried rosemary and thyme at half the amount will do in a pinch. The olive oil matters here—avoid extra-light varieties as they won’t withstand the high heat. For the garlic powder, Penzeys or McCormick brands are reliable, but if you’re using fresh garlic, 4 cloves minced would be equivalent. The onion is purely decorative, so use whatever’s on hand—yellow, red, or even shallots all work. And trust me on the butter—full-fat, unsalted is non-negotiable for that perfect crust.
This roast reheats beautifully—3-5 minutes at 325°F brings it back to perfection. Store leftovers in an airtight container for up to 4 days, or freeze for 3 months by wrapping tightly in plastic wrap then foil. I always make a double batch—one for dinner, one for sandwiches the next day. For extra flavor, pour the red wine reduction from the pan over the sliced roast before serving. The herbs keep best in the fridge for 1 week—wrap them in damp paper towels and store in a sealed container.
Why You’ll Love This Recipe
- Here’s what sold me: that perfect contrast where the outside gets a deep, savory crust from the garlic and pepper, but the inside stays juicy and melt-in-your-mouth. I’ll be real—it’s the kind of texture that makes you close your eyes and take a second bite without thinking.
- Crispy Edge, Tender Core: Here’s what sold me: that perfect contrast where the outside gets a deep, savory crust from the garlic and pepper, but the inside stays juicy and melt-in-your-mouth. I’ll be real—it’s the kind of texture that makes you close your eyes and take a second bite without thinking.
- Weeknight or Weekend: This roast works everywhere. Too tired for dinner? Toss it in the oven while you chop veggies for a side salad. Hosting a game day? It’s hearty enough to feed a crowd but simple enough you won’t stress. Even my picky uncle—who once complained about “dry meat”—asked for seconds. (Yes, even on a Tuesday night.)
- Budget Hero with Leftovers: Bottom round is my secret weapon for stretching dollars without sacrificing flavor. A 2 lb roast feeds four for dinner and gives me two more lunches for work—no sad, wilted leftovers here. Slice it thin for sandwiches or dice it into pasta sauce, and suddenly you’ve got a week’s worth of meals covered with almost no extra effort.
Step-by-step instructions for sear-roast bottom round roast
This method delivers restaurant-quality beef with a perfect crust and tender interior—no fancy equipment required.
Prep the Roast for Maximum Flavor
Remove the 2 lb bottom round roast from the refrigerator and let it sit at room temperature for 30 minutes. This ensures even cooking. Pat the roast dry with paper towels—removing all moisture is critical for that golden sear. In a small bowl, combine the 1.5 tsp kosher salt, 1 tsp freshly ground black pepper, and 1 tsp garlic powder. Rub this generously over the entire roast, pressing the spices into the meat so they adhere well.
Here’s the thing—bottom round can be tough if not handled properly. The salt and garlic powder create a flavor barrier while the dry surface helps develop that coveted crust. Don’t skip the drying step; it makes all the difference in the final texture. Let the seasoned roast rest uncovered on a wire rack for another 15 minutes while you prepare your oven.
Sear the Roast for Deep Flavor
Preheat your oven to 425°F. Heat a large oven-safe skillet over high heat until it’s screaming hot. Add the 2 tbsp olive oil and 1 tbsp unsalted butter, swirling to coat the bottom evenly. Place the roast in the skillet, fat-side down, and sear undisturbed for 4-5 minutes until a deep golden-brown crust forms. You’ll see the fat begin to render and sizzle—this is when all the magic happens.
Flip the roast and sear the other side for another 3-4 minutes. The key here is patience—don’t rush the searing process. If you notice the butter starts to smoke excessively, reduce the heat slightly to medium-high. This initial sear locks in juices and builds that incredible crust that separates good beef from great beef. Transfer the skillet to the preheated oven.
Roast with Aromatics for Rich Depth
Carefully place the whole yellow onion, 1 tbsp chopped fresh rosemary, and 1 tbsp fresh thyme leaves around the roast in the skillet. Pour the 0.5 cup red wine into the bottom of the skillet, then add the 0.25 cup beef broth. The liquid should come about halfway up the sides of the roast. Cover the skillet tightly with foil.
Roast for 1 hour and 15 minutes total, or until the internal temperature reaches 135°F (medium-rare). Here’s why this temperature works best: bottom round benefits from this lower finish temperature to remain tender while developing that perfect pink center. The wine and broth create a self-basting liquid that infuses the meat with incredible depth of flavor. Don’t peek or open the oven during this time—every time you do, you lose heat and moisture.
Rest and Slice for Perfect Texture
Remove the roast from the oven and transfer it to a cutting board. Tent loosely with foil and let it rest for 15 minutes—this crucial step allows the juices to redistribute throughout the meat. While it rests, carefully remove the skillet from the oven and place it on a stovetop burner over medium heat. Spoon the accumulated juices and aromatics from the skillet into a small saucepan and reduce by half to make a quick pan sauce.
Slice the roast against the grain into ½-inch thick slices. The grain direction will be visible as you cut—this is where the meat’s natural fibers run. Each slice should be tender enough to pull apart with gentle pressure, with a beautiful pink center and that gorgeous crust you worked so hard to create. Serve immediately with the reduced pan sauce spooned over the top and garnished with the 0.25 cup chopped fresh parsley. The parsley adds a bright finish that cuts through the richness of the beef.
Pro Tips For Making 2 Lb Bottom Round Roast In Oven
- SEAR FIRST, THEN SLOW: Take that roast out of the fridge 30 minutes before cooking—cold meat steams instead of browns. Sear it hard in a screaming-hot pan with olive oil for 2-3 minutes per side before transferring to the oven at 400°F. That crust locks in flavor and keeps the lean bottom round from drying out.
- SALT LIKE IT’S 1950: Bottom round needs serious salt—start with 1.5 teaspoons kosher salt before searing, then add another teaspoon after. The first layer penetrates while it rests, and the second builds that crust. (Yes, it’ll taste salty raw, but it mellows out.)
- DON’T CUT CORNERS ON TEMP: Use a meat thermometer—aim for 130°F for medium-rare (140°F for medium). Bottom round is lean; if you pull it at 135°F, it’ll turn rubbery by the time it rests. Let it ride at 325°F after the initial sear—patience here makes the difference.
- UPGRADE WITH GARLIC OIL: Skip the dry garlic powder rub—make a quick garlic oil by simmering 3 minced garlic cloves in 2 tablespoons olive oil until fragrant. Brush it on after searing. (Pro move: Strain out the garlic bits before brushing.) The fat renders into the meat, adding depth without overpowering.
Perfect pairings for 2 lb bottom round roast in oven
Classic Side Pairings
Start with creamy garlic mashed potatoes—mash 2 lbs Yukon Gold potatoes with ½ cup butter, ½ cup warm milk, and 4 minced garlic cloves.
The richness balances the lean beef beautifully. I like to finish them with a sprinkle of fresh chives for a pop of color and freshness. 🥔
For a lighter option, serve with roasted baby carrots tossed in 1 tbsp olive oil, 1 tsp honey, and a pinch of smoked paprika. Roast at 400°F for 20 minutes until caramelized. The natural sweetness contrasts the savory beef perfectly.
Sauce Elevations
Use the red wine reduction from the pan to drizzle over slices—simply reduce the cooking juices with 1 tbsp butter and ½ tsp Dijon mustard until thickened.
For a richer sauce, stir in 2 oz cream cheese at the end. This adds a velvety texture that guests will rave about. 🍷
For a tangy twist, make a horseradish cream by mixing ¼ cup sour cream with 1 tbsp prepared horseradish and a pinch of salt. Serve as a side sauce for dipping slices. The sharpness cuts through the richness, creating a perfect balance.
Beverage Harmony
A bold Cabernet Sauvignon from Napa Valley pairs perfectly with the roast’s rich flavors. Look for a wine with 14-15% ABV and notes of blackcurrant and vanilla. The tannins complement the beef’s crust, while the fruitiness keeps the palate fresh. 🍷
For a non-alcoholic option, serve sparkling mineral water with a splash of lemon juice and a few ice cubes. The effervescence cleanses the palate between bites, making each slice taste even more luxurious. The slight citrus brightness also enhances the roast’s garlic and herb notes.
Global Twists
Transform your meal into a Mexican-inspired feast by serving with charro beans (pinto beans cooked with bacon, jalapeños, and cumin) and corn tortillas. Add a side of pico de gallo for acidity. The spices in the beans mirror the roast’s seasoning while adding a fun, unexpected twist. 🌶️
For an Italian touch, pair with creamy polenta and a side of sautéed mushrooms in garlic and white wine. The earthy mushrooms and buttery polenta create a cozy, comforting contrast to the seared beef. Finish with a sprinkle of grated Parmesan for extra depth.
Nutrition facts
Frequently asked questions
Why does the recipe call for resting the roast before slicing?
Resting the roast for 10-15 minutes after cooking is crucial because it allows the juices to redistribute throughout the meat. When you cut into beef immediately, all the flavorful juices escape, leaving you with dry slices. This step ensures every bite stays moist and delicious. Think of it like letting a cake cool slightly before serving—patience pays off!
Can I cook this recipe with a smaller or larger roast?
Yes, but adjust the cooking time accordingly. For every 0.25 lb difference, add or subtract 5-10 minutes from the total roasting time. A 1.75 lb roast would cook about 50-60 minutes, while a 2.5 lb roast might need 1 hour 30 minutes. Always use a meat thermometer to check for 135°F internal temperature for medium-rare.
What if I don’t have red wine for the recipe?
No problem! You can substitute with 0.5 cup beef broth and 1 tbsp balsamic vinegar for similar depth of flavor. The acidity from the vinegar helps tenderize the meat while the broth adds richness. For extra umami, add 1 tsp Worcestershire sauce to the pan juices. The result will still be delicious—promise!
How do I know when the roast is done without a meat thermometer?
For medium-rare, the roast should reach 135°F internal temperature, but if you don’t have a thermometer, use the finger test. Press your finger firmly on the meat: if it feels like it would be medium-firm (between your first knuckle and second knuckle), it’s done. For a rough estimate, 1 hour 15 minutes at 325°F usually works for a 2 lb roast. Always let it rest before slicing!
Can I make this recipe ahead of time?
Cook the roast as directed, then let it cool completely before refrigerating in an airtight container. It reheats beautifully—slice it and warm in a skillet with a splash of beef broth for 3-5 minutes at 325°F. For best results, reheat only what you need and keep the rest refrigerated. The flavors actually improve overnight!

- 12 Bean Chili Recipe: Hearty Slow-Cooked Depth With 12 Legumes - October 17, 2026
- 5 Seed Bread Recipe: Nutty Crunch and Artisan Flavor in One Loaf - October 17, 2026
- 1 Lb Macaroni Salad Recipe: Bold, Crunchy, and Crowd-Pleasing - October 17, 2026