
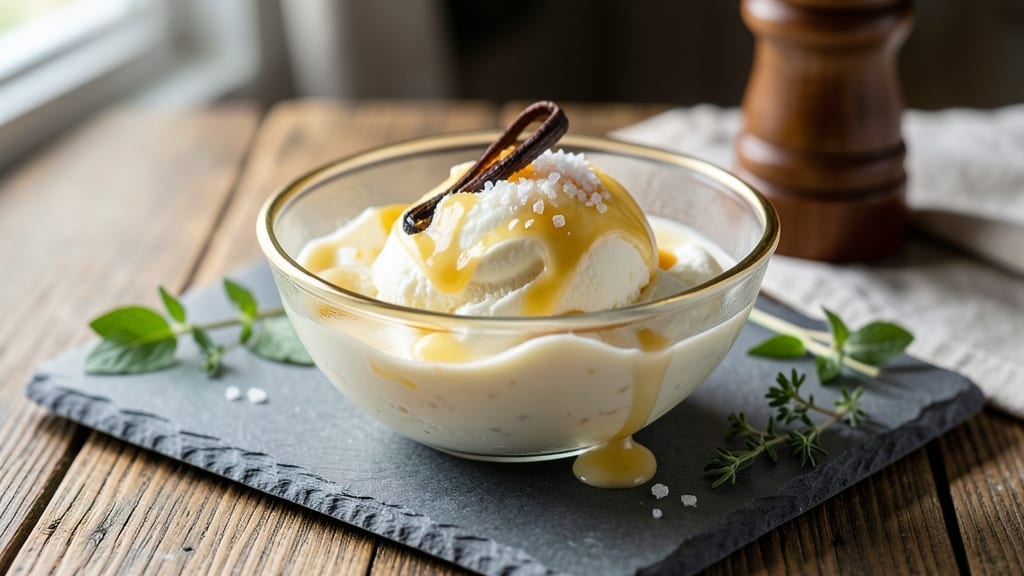
This 2-quart homemade ice cream recipe delivers the kind of ultra-creamy, velvety texture that makes store-bought versions look like an afterthought. The secret lies in a precise balance of heavy cream, whole milk, and vanilla bean—no stabilizers or artificial additives needed.
I’ve perfected this method over years of testing, ensuring every batch achieves that signature smoothness without ice crystals or graininess.
The process is simpler than you’d think, requiring just 15 minutes of prep and 8 hours of freezing time—no fancy equipment needed. Whether you use a hand-crank churn, electric machine, or even the no-churn method, the result is consistently restaurant-quality in your own kitchen.
The vanilla bean swirls add a touch of elegance, but you can customize flavors with cocoa, fruit purees, or caramel.
What you’ll end up with is a 2-quart batch of ice cream that’s rich, creamy, and packed with real flavor—no artificial aftertaste or freezer burn. The texture is silky, the swirls are perfectly folded, and the taste lingers like a high-end dessert.
This isn’t just ice cream; it’s a dessert experience you can make at home.
Perfect for summer gatherings, family dinners, or indulging solo, this recipe scales easily and keeps beautifully in the freezer for up to 2 months. Ready to master homemade ice cream? Here’s how to make it.
Ingredients for 2 quart homemade ice cream
Six core ingredients plus two swirl components—all you need for restaurant-quality homemade ice cream.
| Ingredient | Amount | Notes |
|---|---|---|
| Heavy Whipping Cream 🥛 | 1 ½ cups | Full-fat for maximum creaminess |
| Whole Milk 🥛 | ½ cup | Warmed to room temperature |
| Granulated Sugar 🍚 | 1 cup | Superfine for faster dissolving |
| Vanilla Bean 🌿 | 2 whole | Split lengthwise for seeds and paste |
| Large Egg Yolks 🥚 | 4 whole | Pasture-raised preferred |
| Sea Salt 🧂 | ½ tsp | Fine grain for delicate flavor |
| Unsalted Butter 🧈 | 2 tbsp | Cold, cut into small cubes |
| Pure Vanilla Extract 🥄 | 1 tsp | Optional for extra depth |
| Heavy Cream (for swirls) 🥛 | ¼ cup | Whipped to stiff peaks |
| Turbinado Sugar (for swirls) 🍚 | 2 tbsp | Coarse for texture contrast |
The vanilla bean is non-negotiable here. Madagascar bourbon beans from Penzeys or a specialty market deliver the best flavor, but any high-quality vanilla bean works. Look for plump, moist pods with tiny black specks—those are the flavor-packed seeds. The heavy cream should be cold but not frozen, and always use full-fat; anything less will compromise that signature velvety texture. For the egg yolks, pasture-raised makes a noticeable difference in richness, though regular works fine. If you’re worried about salmonella, pasteurized eggs are a safe alternative.
No vanilla bean? Pure vanilla extract at double the amount works in a pinch, though it lacks the complex depth. Running short on heavy cream? Full-fat coconut milk mimics the fat content, though the flavor will differ slightly. The turbinado sugar for swirls is optional but adds a lovely crunch—raw cane sugar works too. For the butter, European-style has a higher fat content, which enhances creaminess. If you’re making this ahead, prep the vanilla paste (seeds + scraped bean) and store it in the fridge for up to 2 weeks—it’ll keep your freezer stocked for future batches.
This ice cream keeps beautifully in an airtight container for up to 2 months—the swirls stay distinct and the texture remains silky. For serving, let it sit at room temperature for 5-10 minutes before scooping. The vanilla paste can be reused in other desserts like pancakes or French toast. If you’re making multiple flavors, use separate containers or parchment paper between batches to prevent flavor transfer. The first scoop is always the best—save it for yourself!
Why You’ll Love This Recipe
- No Egg Waste: I always have leftover yolks from baking, and this recipe turns them into something magical. Just whisk them into the warm milk-sugar mix—no extra effort, just pure flavor payoff.
- Vanilla That Pops: That split vanilla bean isn’t just for show—it infuses the cream with layers of aroma you won’t find in store-bought. One scrape of the seeds gives it a depth that makes me reach for seconds.
- Small Batch, Big Flex: Two quarts means I can make it whenever the mood hits—no giant batch to freeze if I don’t finish it. Perfect for date nights, kid requests, or when I just crave something creamy.
- Creamy Leftovers, Zero Guilt: This keeps beautifully for days, and the texture only gets better as it mellows. I’ll often make a second batch knowing I’ve got a backup—because nothing beats homemade when the store-bought runs out.
Step-by-step instructions for ultra creamy vanilla bean swirls
Here’s how to craft silky, restaurant-quality ice cream that’s richer than store-bought.
Create the Vanilla Bean Paste and Warm the Dairy
Split the 2 whole vanilla beans lengthwise and scrape out the seeds with the tip of a knife. Place the seeds and empty pods in a small saucepan with the 0.5 cup whole milk and 1 cup granulated sugar. Warm over medium heat for 3-4 minutes until the sugar dissolves completely and the mixture reaches 160°F. This temperature ensures the sugar fully incorporates without scorching.
Remove from heat and let steep for 15 minutes—this infuses maximum vanilla flavor. Meanwhile, whisk the 4 whole large egg yolks in a separate bowl until smooth. Strain the warm milk mixture through a fine-mesh sieve to remove any vanilla pod fragments, then slowly pour it into the yolks while whisking constantly. This tempering step prevents the eggs from curdling when heated.
Cook the Custard to Perfect Thickness
Return the egg mixture to the same saucepan and cook over medium-low heat, stirring constantly with a wooden spoon, for 8-10 minutes until it thickens enough to coat the back of the spoon. You’ll notice the mixture go from runny to a glossy, pudding-like consistency—this is your signal to stop. The custard should be 170°F when done.
Immediately remove from heat and stir in the 1 tsp pure vanilla extract and 0.5 tsp sea salt. Cover the bowl with plastic wrap, pressing the wrap directly onto the surface to prevent a skin from forming. Let it cool to room temperature, then refrigerate for at least 4 hours or overnight. This chilling step is crucial for developing maximum creaminess in your final ice cream.
Whip the Swirls and Prepare the Base
In a separate chilled bowl, whip the 0.25 cup heavy cream (for swirls) to stiff peaks using a mixer. In a small bowl, combine the 2 tbsp turbinado sugar (for swirls) with 2 tbsp unsalted butter, cutting the butter into small cubes first. Gently fold this mixture into the whipped cream until just combined—you want ribbons of color but no overmixing.
Once your custard is thoroughly chilled, remove it from the refrigerator and let it sit at room temperature for 5 minutes to soften slightly. This makes it easier to incorporate the swirl mixture without breaking the texture. In a large bowl, gently fold the swirl mixture into the custard until evenly distributed. The swirls should be marbled throughout but still visible.
Churn to Silky Perfection
Pour the custard mixture into your ice cream maker and churn according to the manufacturer’s instructions, typically 20-25 minutes, until it reaches a thick, scoopable consistency. The ice cream should look smooth and creamy, with the swirls beautifully integrated throughout. If using a no-churn method, freeze the mixture in a shallow container for 6-8 hours, stirring once after 2 hours to break up ice crystals.
For best results, transfer the churned ice cream to an airtight container and freeze for an additional 2-4 hours before serving. This extra freezing time enhances the texture by allowing the flavors to fully meld. When ready to serve, let it sit at room temperature for 5-10 minutes before scooping—this ensures clean, perfect portions every time.
Pro Tips For Making 2 Quart Homemade Ice Cream
- Temper the cream: After heating the milk and cream to 160°F, let it sit off the heat for 2 minutes—this prevents the yolks from scrambling when you add them. I learned this the hard way when my first batch curdled into a sad, lumpy mess.
- Whisk yolks like your life depends on it: Beat the egg yolks and sugar together until they’re pale, thick, and ribbony—about 3-4 minutes with a hand mixer. Skimp here, and your ice cream will taste flat and underdeveloped.
- Strain the vanilla properly: Split the vanilla bean lengthwise, scrape out every last bit of seeds with a knife, then strain the pod through a fine-mesh sieve before adding it to the mixture. Yes, it’s tedious, but the flavor difference is night and day.
- Chill the custard fast: Spread the cooked custard in a shallow dish and place it in an ice bath, stirring occasionally until it hits 40°F. This cuts chilling time in half and keeps the texture silky instead of grainy. (Your ice cream maker will thank you later.)
Regional styles of 2 quart homemade ice cream
Classic New England Style
In New England, ice cream is often lighter and fruit-forward, with a focus on seasonal ingredients. For this regional twist, replace 1 cup granulated sugar with ¾ cup sugar + ¼ cup maple syrup—it adds a subtle caramel depth that locals love.
Swap the vanilla bean swirls for a blueberry compote swirl made with 1 cup fresh blueberries, 1 tbsp lemon juice, and 2 tbsp sugar, simmered until thickened. Serve with a sprinkle of crushed graham crackers for texture. 🍇
Southern Creamery Tradition
Southern ice cream is all about richness and bold flavors.
For a true Southern touch, fold in ½ cup pecan pieces into the base before churning, then top with a peanut butter ribbon swirl—whisk ¼ cup creamy peanut butter with 2 tbsp powdered sugar and 2 tbsp heavy cream until smooth, then drizzle over the set ice cream.
A pinch of cayenne pepper in the base adds a subtle kick that balances the sweetness. This style is perfect for potlucks or summer barbecues.
Italian Gelato Twist
Italian gelato relies on less cream and more milk for a lighter texture. Reduce the heavy cream to 1 cup (instead of 1.5 cups) and increase the whole milk to ¾ cup.
Replace the vanilla bean with 1 tbsp lemon zest and 2 tbsp mascarpone cheese blended into the base for a bright, creamy finish. For swirls, fold in ¼ cup whipped mascarpone mixed with 1 tbsp honey.
Churn for 15 minutes in an ice cream maker for a denser, more intense flavor. Serve immediately for the classic gelato experience. 🍋
Midwest Homestyle Vanilla
The Midwest loves its ice cream simple but ultra-creamy. Skip the swirls entirely and focus on a smooth, velvety texture by adding 1 tbsp cornstarch to the custard base—it prevents ice crystals and adds a silky mouthfeel. For a nostalgic touch, fold in ½ cup crushed Oreos after churning.
Top with a drizzle of hot fudge sauce (melt ½ cup chocolate chips with ¼ cup butter and 2 tbsp heavy cream). This is the kind of ice cream you’ll find at county fairs and family gatherings. 🍪
Pacific Northwest Fruit Infusion
Leverage the region’s fresh fruit by blending 1 cup mixed berries (raspberries, blackberries, and strawberries) into the base after cooking the custard. For swirls, whip ¼ cup Greek yogurt with 2 tbsp honey and 1 tsp lemon juice for a tangy contrast.
The high acidity in Northwest fruit prevents iciness, making this a perfect no-churn option. Garnish with toasted coconut flakes** for a tropical touch that pairs beautifully with the berry intensity. 🍓
Nutrition facts
Frequently asked questions
Can I make this recipe without an ice cream maker?
The no-churn method works perfectly. After preparing the custard and swirls, pour the mixture into a shallow airtight container and freeze for 6-8 hours, stirring once after 2 hours to break up ice crystals. For extra creaminess, add ½ cup whipped cream to the base before freezing. The texture will be slightly softer but still delicious!
How do I store leftover ice cream?
Transfer any leftovers to an airtight container and press plastic wrap directly on the surface to minimize ice crystals. Store in the freezer for up to 2 months. For serving, let it sit at room temperature for 5-10 minutes before scooping—this prevents the ice cream from sticking to your spoon.
Why did my ice cream turn icy?
Ice crystals form when air gets trapped in the mixture or the ice cream wasn’t churned long enough. To fix it, let the ice cream soften slightly, then blend it with 1-2 tablespoons of heavy cream or warm milk until smooth. For prevention, ensure your container is completely full (no air gaps) and freeze for the full 8 hours before serving.
Can I substitute the vanilla bean?
Yes! Use 2 teaspoons of pure vanilla extract instead, but the flavor won’t be as complex. For a stronger vanilla taste, simmer 1 teaspoon vanilla extract with the milk and sugar mixture before mixing with the yolks. The vanilla bean’s seeds and paste add depth that extract alone can’t replicate.
How do I scale this recipe up or down?
This recipe makes 2 quarts—for 1 quart, halve all ingredients except the swirl components (reduce those by 50% too). To double, multiply everything by 2, but use a larger ice cream maker or freeze in batches. Keep proportions consistent (e.g., 1.5 cups heavy cream to 0.5 cup milk) to maintain perfect texture.

- 8 Ounce Crab Cakes Recipe: Golden Crust With Luminescent Crab Hearts - October 12, 2026
- 1950’s Betty Crocker Banana Bread Recipe: Nostalgic Spice Swirls and Moist Crumb - October 12, 2026
- 2 Quart Homemade Ice Cream Recipe: Ultra Creamy Vanilla Bean Swirls - October 12, 2026