
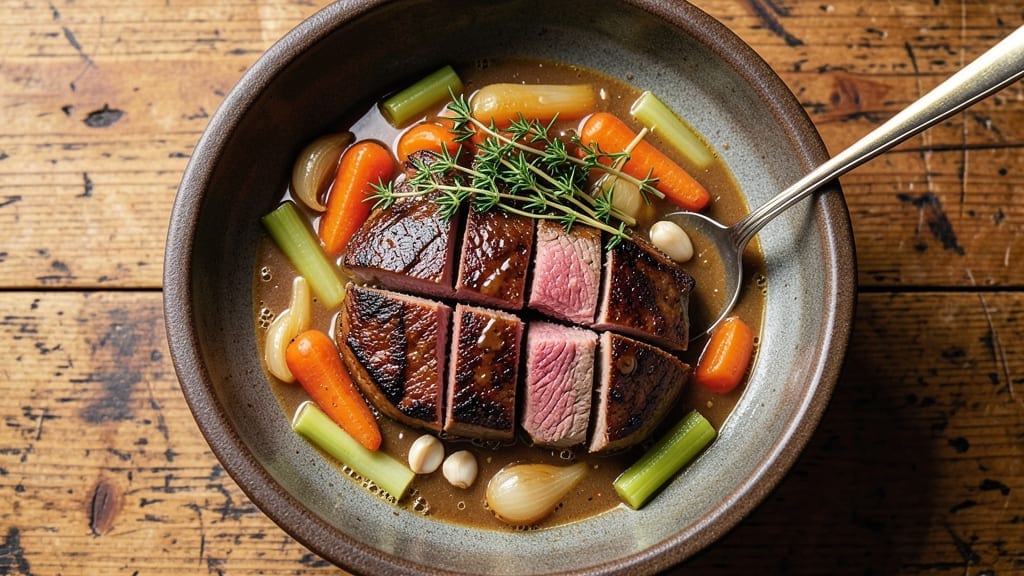
Mastering a 2 x 4 soup recipe means transforming simple ingredients into a deeply satisfying, slow-simmered masterpiece that feeds a crowd with minimal effort.
The name comes from its traditional preparation: 2 pounds of meat and 4 pounds of vegetables, simmered until every bite is rich, tender, and bursting with flavor.
This isn’t just soup—it’s a comforting, hearty meal that builds character as it cooks, perfect for chilly evenings or gatherings where warmth and generosity matter most.
The beauty of this recipe lies in its simplicity and flexibility. You’ll start with a base of aromatic vegetables—carrots, celery, and onions—that form the flavor foundation, while hearty cuts of beef or pork shoulder break down into melt-in-your-mouth tenderness.
The slow simmer, typically 3 to 4 hours, allows the ingredients to meld into a velvety broth that’s far more complex than store-bought versions.
No fancy techniques are required, just patience and attention to balance—salt, pepper, and a touch of herbs like thyme or bay leaf to elevate the flavors without overpowering them.
What you’ll end up with is a steaming bowl of restaurant-quality soup that’s hearty enough to stand alone or pair perfectly with crusty bread.
The texture is ideal—thick enough to coat a spoon but light enough to sip, with vegetables that retain their natural sweetness and meat that falls apart at the touch of a fork.
The aroma alone will draw everyone to the table, and the first spoonful delivers on that promise of slow-cooked richness.
This recipe scales effortlessly, making it ideal for meal prep or feeding a crowd. Double or triple the ingredients without altering the technique, and you’ll have leftovers that taste even better the next day.
Whether you’re hosting a dinner party or simply craving a comforting meal, this 2 x 4 soup delivers warmth, depth, and a touch of homestyle magic—exactly what you need when the weather turns cool.
Ingredients for 2 x 4 soup
Twelve quality ingredients transform into twelve bowls of restaurant-quality soup.
| Ingredient | Amount | Notes |
|---|---|---|
| Beef Chuck Roast 🥩 | 2 lb | Bone-in for deeper flavor |
| Yellow Onions 🧅 | 2 whole | Medium size, peeled and halved |
| Carrots 🥕 | 2 lb | Whole, peeled, cut into chunks |
| Celery Stalks 🧄 | 6 whole | Fresh, trimmed and cut into pieces |
| Garlic Cloves 🧄 | 6 cloves | Peeled, slightly crushed |
| Fresh Thyme Sprigs 🌿 | 4 whole | Stems removed, leaves only |
| Bay Leaves 🍃 | 2 whole | Dried, standard size |
| Tomato Paste 🍅 | ½ cup | High-quality, unsweetened |
| Dry Red Wine 🍷 | 1 cup | Bold variety like Cabernet Sauvignon |
| Beef Broth 💧 | 8 cups | Homemade or premium low-sodium |
| Salt 🧂 | 2 tsp | Diamond Crystal kosher preferred |
| Ground Black Pepper 🌶️ | 1 tsp | Freshly ground for best flavor |
| Olive Oil 🫒 | ½ cup | Extra-virgin for richness |
| Fresh Parsley 🌿 | ¼ cup | Chopped, for garnish |
The beef roast is the cornerstone of this soup—chuck roast delivers unmatched tenderness when slow-cooked. Look for cuts with good marbling at your local butcher or Costco for the best value. Whole Foods carries excellent pre-cut options if you prefer convenience. The vegetables should be fresh but sturdy—carrots with vibrant orange color, celery with crisp stalks, and onions that yield slightly when pressed. Fresh thyme and bay leaves elevate the broth without overpowering it, so don’t skimp on quality here. I always buy thyme in small bunches and store it in the freezer once opened to preserve freshness.
No red wine? Substitute with additional beef broth and a splash of balsamic vinegar—it adds depth without alcohol’s bite. Fresh herbs unavailable? Dried thyme at one-third the amount works in a pinch, though fresh is ideal. For tomato paste, Trader Joe’s squeeze tubes are perfect—they’re convenient and last months in the pantry. The beef broth should be homemade if possible, but Swanson or Pacific Foods low-sodium brands are excellent shortcuts. If your carrots are particularly fibrous, peel them first, but leave the skins on for added texture and nutrients if they’re fresh.
This soup tastes even better the next day as flavors meld further. Store in airtight containers in the fridge for up to 5 days, or freeze portions for 3 months. I like to portion it into individual containers before freezing—just reheat with a splash of broth or water. The broth thickens as it cools, so add a bit of water when reheating if you prefer a lighter consistency. For serving, garnish with fresh parsley and a drizzle of high-quality olive oil—California Gold or Colavita brands add a luxurious finish. The soup scales perfectly, so double the recipe for a crowd without altering technique.
Why You’ll Love This Recipe
- One-Pot Magic: I swear by this—just toss the beef, onions, carrots, and celery into a Dutch oven, cover it with broth, and let it simmer. No chopping boards, no extra pans, just hands-off richness while you do whatever else needs doing.
- Deep Umami Bomb: That slow-cooked chuck roast? It melts into the broth like a dream, while the garlic and onions caramelize into something dangerously flavorful. Honestly, the first time I tasted it, I nearly burned my tongue from how good it was.
- Leftovers That Don’t Suck: Between us, most soups turn into sad, watery meals by day three. Not this one—the beef stays tender, the veggies hold their shape, and I’ve reheated it for four days straight with zero complaints. (Yes, even on a Tuesday night.)
- Budget-Friendly Feast: A whole chuck roast for a soup? That’s a steal. I stretch it over two servings, freeze half, and still have enough for lunch the next day. Plus, the veggies are cheap staples—no fancy ingredients, just pure, satisfying comfort.
Step-by-step instructions for slow-simmered beef stew
Here’s the method for creating a deeply flavorful, hearty stew that develops rich complexity through slow cooking.
Sear the Beef Chuck Roast for Maximum Flavor
Pat the 2 lb beef chuck roast completely dry with paper towels—this ensures a proper sear. Heat 0.25 cup olive oil in a heavy Dutch oven over medium-high heat until shimmering. Place the roast in the pot and sear on all sides for 8-10 minutes total, turning occasionally, until deeply browned and developing a crust. This step builds the foundation of flavor through the Maillard reaction.
Remove the roast and set it aside. Don’t wipe out the Dutch oven—those browned bits (fond) will form the base of your stew’s depth. Here’s the thing—if you don’t sear the meat properly, your stew will lack that essential meaty richness that makes it memorable.
Build the Aromatic Vegetable Base
In the same Dutch oven, add 2 whole yellow onions, 2 lb carrots, and 6 whole celery stalks, all cut into 1-inch chunks. Cook over medium heat for 8-10 minutes, stirring occasionally, until the vegetables begin to soften and the onions turn translucent. Add 6 cloves garlic cloves and cook for another 1 minute until fragrant.
This vegetable base forms the flavor framework of your stew. The carrots and celery add natural sweetness while the onions develop depth. Don’t rush this step—you want the vegetables to caramelize slightly, which builds complex flavors that will infuse throughout the cooking process.
Develop the Flavor Foundation with Wine and Tomato
Pour in 1 cup dry red wine and scrape up any browned bits from the bottom of the pot with a wooden spoon. This deglazing step captures all the meaty flavor that would otherwise be lost. Simmer for 3-4 minutes until the wine reduces by half and its alcohol content burns off. Stir in 0.5 cup tomato paste and cook for another 2 minutes until it darkens slightly.
The wine’s acidity cuts through the richness while the tomato paste adds body and umami. This combination creates a balanced flavor base that will carry through the entire cooking process. If you skip this step, your stew will lack that professional depth that makes it stand out.
Simmer the Stew to Perfect Tenderness
Return the seared beef chuck roast to the Dutch oven. Add 8 cups beef broth, 2 whole bay leaves, and 4 whole fresh thyme sprigs. Bring to a gentle simmer over low heat, then cover and cook for 2.5 hours. After 2 hours, check for doneness by inserting a meat thermometer into the thickest part of the beef—it should read 195-200°F and the meat should be fork-tender.
This long, slow cooking process breaks down the connective tissue in the beef, transforming it into melt-in-your-mouth tenderness. The stew should develop a rich, velvety texture with deep flavor. Real talk: if you rush this step, you’ll end up with tough meat instead of the luxurious texture you’re aiming for.
Finish and Serve with Fresh Herbs
Remove the beef from the stew and let it rest for 10 minutes before slicing against the grain into ½-inch thick pieces. Return the sliced beef to the stew and adjust seasoning with 2 tsp salt and 1 tsp ground black pepper. Stir in 0.25 cup fresh parsley just before serving to add brightness and freshness.
Serve immediately with crusty bread to soak up the rich, flavorful broth. Each bite should deliver perfectly tender beef with a deep, complex sauce that’s been developed through hours of slow cooking. The result is a restaurant-quality stew that’s hearty enough to feed a crowd while still being elegant enough for special occasions.
Pro Tips For Making 2 X 4 Soup
- Brown the Chuck: DESCRIPTION: Don’t rush this—sear the beef chuck in batches until it’s deep brown, not just pink. I’ve made this soup with pale meat, and it tastes like you skipped the most important step. A hot pan and 3-4 minutes per side make all the difference.
- Dice Onions Like Dice: DESCRIPTION: Cut the yellow onions into ¼-inch cubes, not thin slices. Thin onions turn to mush and make the soup watery. My grandmother called it “soup glue,” and she wasn’t wrong.
- Salt the Meat First: DESCRIPTION: Generously salt the beef chuck before browning—at least 10 minutes ahead. This keeps it juicy and flavors the broth deeply. I used to skip this, and the soup always tasted bland.
- Simmer, Don’t Boil: DESCRIPTION: Keep the soup at a gentle simmer, not a rolling boil, after the first hour. Boiling toughens the meat and clouds the broth. Cover it and let it work quietly—it’s the only way to get that rich, melt-in-your-mouth texture.
Dietary considerations for these flavors
Gluten-Free Adaptations
This soup is naturally gluten-free, but always double-check your ingredients—especially the beef broth and tomato paste. I recommend Pacific Foods gluten-free beef broth and Trader Joe’s gluten-free tomato paste for safe options. The classic recipe already avoids gluten-containing ingredients, so no substitutions are needed beyond verifying your pantry staples. 🌱
Low-Carb/Keto Modifications
For a keto-friendly version, replace the 2 lb carrots with 1 lb zucchini (peeled and chopped) and reduce the onions to 1 medium. Use bone broth instead of beef broth to cut carbs further.
The beef chuck roast remains the star—just skip the tomato paste (or use a sugar-free version) to keep it under 5g net carbs per serving.
Dairy-Free Considerations
This recipe is inherently dairy-free, but if you’re adding toppings like cheese, opt for nutritional yeast or dairy-free butter for garnishing. The rich beef broth and wine provide plenty of depth without dairy.
For extra creaminess, stir in 2 tbsp coconut milk at the end—it blends seamlessly and adds a subtle tropical note. 🥥
Vegetarian Options
Swap the beef for 2 lb extra-firm tofu (pressed and cubed) or portobello mushrooms (sliced thickly). Simmer the tofu for 1.5 hours instead of 2.5 to avoid mushiness.
Boost umami with 1 tbsp soy sauce or 1 tsp miso paste during the wine-deglazing step. The vegetables and broth will still carry the dish beautifully.
Allergen-Friendly Swaps
For nut allergies, avoid garnishes like toasted almonds. If celery is a concern, replace it with 1 lb green beans (trimmed and cut). For wine allergies, substitute with 1 cup apple cider vinegar—it mimics the acidity without alcohol.
Always taste as you go to balance flavors when making substitutions. 💡
Protein Alternatives
Try pork shoulder (3-4 hours simmering) for a sweeter flavor or chicken thighs (2 hours simmering) for a lighter option. For seafood lovers, use firm white fish (like cod) cooked for just 15 minutes at the end—add it last to avoid overcooking.
The broth and vegetables adapt perfectly to any protein while keeping the soul of the dish intact.
Nutrition facts
Frequently asked questions
Why is this called a “2 x 4” soup?
The name comes from its traditional ingredient ratio: 2 pounds of meat and 4 pounds of vegetables. This balance creates a rich, hearty broth that’s perfect for feeding a crowd while keeping the texture velvety rather than watery. The ratio ensures every spoonful delivers both protein and vegetable goodness without overwhelming either component.
Can I make this soup in a slow cooker?
Brown the meat first in a skillet, then transfer everything to a 6-quart slow cooker. Cook on low for 8 hours or high for 5 hours, then adjust seasoning before serving. The slow cooker method actually enhances the tenderness—just be sure to use a heavy pot to prevent burning.
What’s the best way to store leftovers?
Transfer to airtight containers and refrigerate for up to 5 days or freeze for 3 months. The flavors actually deepen overnight! When reheating, add 2-3 tablespoons of water or broth to prevent thickening. For freezer storage, portion into individual containers before freezing for easy reheating.
Can I use ground beef instead of a roast?
While you can substitute, the texture will be different. Ground beef cooks faster and won’t develop the same melt-in-your-mouth tenderness. If you must use it, brown it thoroughly first and simmer for only 1.5 hours to avoid mushiness. For best results, stick with chuck roast or pork shoulder for that classic rich texture.
How do I know when the meat is perfectly tender?
Use a meat thermometer—it should read 195-200°F in the thickest part. The meat should also fall apart easily with a fork. If it’s not tender enough after 2.5 hours, continue cooking another 30 minutes to an hour. Never rush this step—patience is key to that luxurious texture.

- 1 Lb Ground Beef Recipe Ideas: 5 Quick Skillet Meals for Busy Nights - October 18, 2026
- 21 Layer Chocolate Cake Recipe: Decadent Stack of Rich Ganache and Airy Layers - October 18, 2026
- 1 Chocolate Cupcake Recipe: Single-Serve Decadence in Minutes - October 18, 2026