
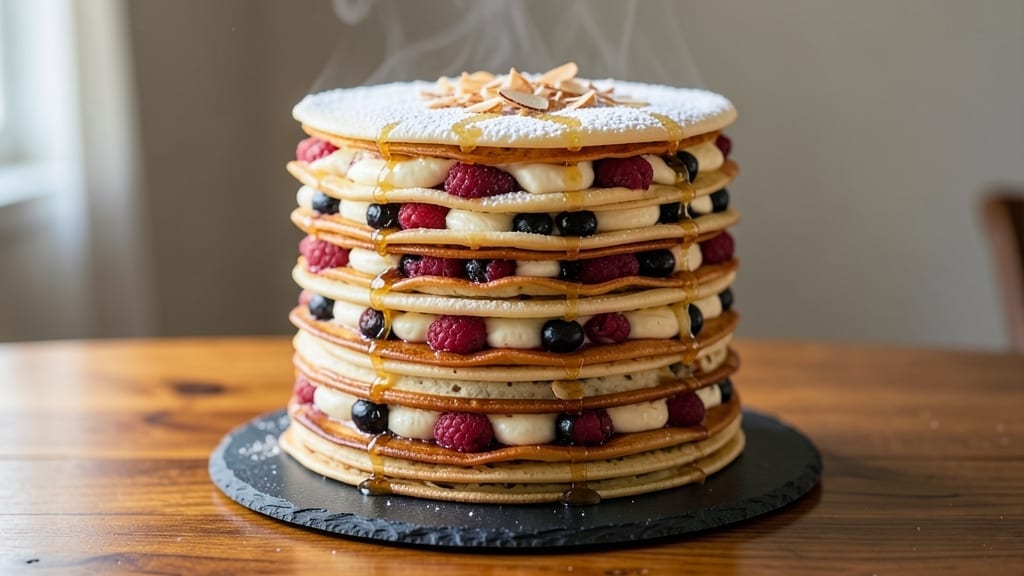
A 20-layer crepe cake with vanilla bean buttercream swirls and perfectly crisp edges is the showstopper dessert that will make you the star of any gathering. This recipe transforms delicate crepes into a towering masterpiece that balances flaky layers with creamy, fragrant fillings—no pastry skills required.
The secret lies in a light-as-air batter that yields tender crepes with just enough structure to hold their shape, and a buttercream so rich it swirls effortlessly between layers without collapsing the stack.
What sets this recipe apart is the methodical layering technique that ensures every crepe stays crisp at the edges while remaining tender inside. You’ll work in batches to maintain freshness, folding each crepe with precision before assembling the cake in a staggered pattern for stability.
The vanilla bean buttercream isn’t just a filling—it’s the glue that binds the layers together, its silky smoothness cutting through the delicate crepes with every bite. Even better? This cake can be made ahead of time, giving flavors the chance to meld while keeping the texture perfect.
By the time you’re done, you’ll have a dessert that looks like it came from a high-end bakery, complete with golden-brown edges, swirling buttercream, and a light, airy crumb that melts in your mouth.
The key to success is patience—letting the batter rest, layering carefully, and chilling between stages—but the result is worth every minute. This isn’t just a dessert; it’s a centerpiece that will have your guests asking for the recipe.
Whether you’re celebrating a birthday, holiday, or just craving something extraordinary, this 20-layer crepe cake delivers restaurant-quality results with a touch of homemade magic. Let’s get started—your cake awaits.
Ingredients for 20 layer crepe cake
Light-as-air crepes and velvety buttercream transform into a towering masterpiece with just 14 ingredients.
| Ingredient | Amount | Notes |
|---|---|---|
| All-Purpose Flour 🌾 | 2 ½ cups | Sifted for lightness, no substitutes |
| Granulated Sugar 🍚 | 1 ½ cups | Fine white sugar preferred |
| Large Eggs 🥚 | 8 whole | Room temperature for even batter |
| Unsalted Butter 🧈 | 1 cup | Cold, cubed for crepe crispness |
| Whole Milk 🥛 | 2 cups | Full-fat for crepe tenderness |
| Vanilla Extract 🌿 | 2 tbsp | Pure vanilla bean extract |
| Salt 🧂 | ½ tsp | Fine sea salt preferred |
| Vanilla Bean Paste 🌸 | 1 tbsp | For authentic vanilla flavor |
| Unsalted Butter 🧈 | 2 cups | Softened for buttercream, not melted |
| Powdered Sugar 🍚 | 4 cups | Sifted for silky texture |
| Heavy Whipping Cream 🥛 | 1 cup | Cold for stable buttercream |
| Vanilla Bean Seeds 🌸 | 1 whole | Scraped from 1 vanilla bean |
| Lemon Juice 🍋 | 1 tsp | Freshly squeezed for brightness |
| Powdered Sugar 🍚 | ½ cup | Extra for dusting layers |
The flour is non-negotiable—King Arthur or Gold Medal brands yield the lightest crepes. Sift it twice for that professional bakery texture. Room-temperature eggs are crucial; they blend smoother and create a more stable batter. For the butter, Land O’Lakes or Plugrá work best—avoid salted unless you adjust the recipe. The vanilla bean paste from Lake Champlain or Madagascar beans adds depth that extract alone can’t match. Pro tip: Whisk the wet ingredients first to avoid lumps—no substitutions here if you want that signature crisp edge.
No vanilla bean paste? Double the extract and add a pinch of vanilla sugar for depth. Short on heavy cream? Whipped coconut cream works, though the texture will be slightly lighter. The buttercream calls for powdered sugar sifted twice—this prevents graininess. If you’re gluten-free, swap the flour for a 1:1 gluten-free blend (like Bob’s Red Mill), but expect slightly denser crepes. The lemon juice brightens the buttercream, so fresh is non-negotiable—bottled won’t cut it. For extra stability, chill the buttercream 30 minutes before assembling.
Store crepe batter in an airtight container in the fridge for up to 2 days, but make fresh for best results. The buttercream keeps 5 days refrigerated or 3 months frozen—portion into ice cube trays for single layers. Assemble the cake 4 hours ahead for flavors to meld; cover tightly with plastic wrap. To serve, dust with extra powdered sugar and slice with a hot knife for clean edges. Leftovers? Reheat slices in a 200°F oven for 5 minutes to restore crispness.
Why You’ll Love This Recipe
- No-Fuss Layers: The batter’s just flour, sugar, eggs, butter, and milk—no fancy mixers or weird ratios. I’ve made this while chatting on the phone, and the only measuring I do is eyeballing the butter-to-milk ratio. That crispy edge on every layer? Pure magic from a hot pan and a quick flip.
- Sweet Crispy Magic: The sugar caramelizes into a golden crust with each fold, while the inside stays tender—like a cross between a crêpe and a cake. Honestly, the first time I bit into one, I nearly dropped the whole thing. (Yes, even on a Tuesday night.)
- Party in a Pan: This feeds a crowd without stress—just stack, layer, and slice. I’ve served it at brunch with whipped cream, as dessert with berries, or even breakfast with Nutella. The batter’s forgiving, so I double it when company’s coming. No one leaves hungry.
- Budget-Friendly Luxury: Five ingredients, one pan, zero waste. That butter and milk combo makes it rich without breaking the bank, and leftovers reheat beautifully. My daughter picks out the “best” slices, but we’re all back for seconds. (Between us, it’s my secret weapon for “I have nothing” nights.)
Step-by-step instructions for creating a 20-Layer crepe cake
Here’s how to build the perfect tower of delicate crepes and luscious buttercream.
Prepare the Crepe Batter
In a large mixing bowl, whisk together the 2.5 cups all-purpose flour and 1.5 cups granulated sugar until completely combined. Create a well in the center and add the 8 whole large eggs, one at a time, whisking vigorously after each addition. This ensures the eggs are fully incorporated and the batter becomes smooth.
Next, add the 1 cup cold cubed unsalted butter, 2 cups whole milk, 2 tbsp vanilla extract, 0.5 tsp salt, and 1 tbsp vanilla bean paste to the bowl. Using an electric mixer on medium speed, blend everything together until the batter is perfectly smooth and free of lumps. The batter should have a thin, pourable consistency similar to heavy cream. Let it rest at room temperature for 30 minutes before using—this allows the flour to fully hydrate and the batter to reach ideal pouring temperature.
Make the Vanilla Bean Buttercream
In a stand mixer fitted with the paddle attachment, beat the 2 cups softened unsalted butter on medium speed until light and fluffy, about 3-4 minutes. Gradually add the 4 cups powdered sugar, mixing on low speed to avoid a sugar storm. Once incorporated, increase the speed to medium and beat for another 2-3 minutes until the mixture is smooth and creamy.
In a separate small bowl, whisk together the 1 cup cold heavy whipping cream, 1 tsp lemon juice, and the seeds scraped from 1 whole vanilla bean. Gradually pour this mixture into the buttercream while mixing on low speed. Increase the speed to medium and beat for another 2 minutes until fully combined and airy. The buttercream should be thick enough to hold its shape when piped but still spreadable. Cover and refrigerate until ready to use.
Cook the Crepes
Heat an 8-inch non-stick skillet over medium-high heat. Lightly grease with a small amount of butter or oil. Pour about ¼ cup of the crepe batter into the center of the skillet, immediately tilting and swirling to coat the bottom evenly. Cook for 30-45 seconds until the edges begin to lift and the bottom is lightly golden. Flip carefully and cook for another 20-30 seconds until golden brown on the other side.
Transfer the crepe to a clean kitchen towel and cover with another towel to keep it warm and pliable. Repeat with the remaining batter, stacking the cooked crepes on top of each other as you go. You should have about 20 crepes total—each one should be thin, tender, and just slightly crisp at the edges. Keep the cooked crepes covered with a clean towel while you assemble the cake to prevent them from drying out.
Assemble the Crepe Cake
Place one crepe on a clean work surface and spread a thin layer of the vanilla bean buttercream over it, leaving a ½-inch border uncovered. Top with another crepe and repeat the process, building a stack of 10 crepes total. Wrap the stack tightly in plastic wrap and refrigerate for 30 minutes to help it set.
Unwrap the stack and place it on a cake stand or plate. Spread a layer of buttercream over the top of the stack, then use an offset spatula to create a swirl pattern across the surface. Dust the top with the 0.5 cup powdered sugar for a beautiful finish. Repeat the process with the remaining 10 crepes, building another stack and decorating it identically. For a true 20-layer cake, you can either place the two stacks side by side or carefully layer them on top of each other for a single tower.
Chill and Serve
Cover the assembled crepe cake with plastic wrap and refrigerate for at least 4 hours, or preferably overnight. This chilling time allows the layers to fully set and the flavors to meld together. When ready to serve, slice the cake with a sharp, hot knife—dipping the knife in hot water and wiping it dry between slices ensures clean cuts through the delicate layers.
Serve the crepe cake at room temperature for the best texture and flavor. Each slice should reveal layers of tender crepes interspersed with swirls of rich vanilla buttercream. The cake is best enjoyed within 2-3 days, stored in the refrigerator between servings. For an extra touch, garnish with fresh berries or a sprinkle of powdered sugar just before serving.
Pro Tips For Making 20 Layer Crepe Cake
- Whisk Butter First: Melt the unsalted butter first and whisk it into the warm milk before adding eggs and sugar—this keeps the batter smoother and prevents lumps. I learned this the hard way after scraping gummy chunks off my crepe layers for three batches.
- Chill the Batter: Let the crepe batter rest for at least 30 minutes after mixing—this relaxes the gluten and makes the layers thinner and more consistent. Sounds boring, but it’s the thing that matters most for even cooking.
- Skip the Overfilling: Fill each crepe with just enough filling to avoid soggy layers—think 1-2 teaspoons per crepe, not a spoonful. I was skeptical until I tried it; the cake stays sturdy, and the texture is perfect.
- Use a Nonstick Skillet: A well-seasoned nonstick pan is non-negotiable for 20-layer cakes—it keeps the crepes from sticking and lets you flip them cleanly without tearing. (Yes, even if you’re impatient like me, resist the urge to use stainless steel.)
Troubleshooting perfect results
Crepes Too Thick?
If your crepes are coming out thicker than paper-thin, your batter is likely too thick or your pan isn’t hot enough. For the perfect ¼-inch thickness, ensure your 8-inch non-stick skillet is preheated to medium-high heat before pouring.
Use a measuring cup to pour exactly ¼ cup batter per crepe—no more, no less. If the batter still seems too thick after resting, whisk in 1-2 tablespoons of milk at a time until it reaches a pourable consistency, similar to heavy cream. 🌡️
Buttercream Not Holding Shape?
Your buttercream might be too warm or under-mixed if it’s spreading like syrup instead of holding its shape. Always use cold heavy whipping cream and softened (not melted) butter—room temperature ingredients are the enemy of stability. Beat the buttercream for a full 5-6 minutes total, including the sugar incorporation.
If it’s still too soft, chill it for 30 minutes before assembling. Pro tip: Add 1 tsp cornstarch to the powdered sugar if you’re struggling with consistency. ✨
Layers Collapsing During Chill?
This usually happens when the buttercream is too warm or the crepes aren’t crisp enough at the edges. Let your buttercream rest in the fridge for 1 hour before assembling to firm it up.
For extra stability, brush the edges of each crepe with a tiny bit of milk before layering—this creates a slight seal. If your crepes are too soft, cook them a few seconds longer on each side until they’re just barely crisp at the edges.
Wrap each stack tightly in plastic wrap before chilling to prevent air from getting in. 💪
Soggy Bottom Layers?
Soggy layers are almost always caused by condensation from chilling too quickly or not letting the buttercream set properly. After assembling, place your cake in the fridge uncovered for the first 30 minutes to let excess moisture evaporate. Then, cover it and chill for the remaining 4 hours.
For an extra insurance policy, dust each layer with ½ cup powdered sugar before stacking—this creates a barrier against moisture. If you’re in a hurry, pop the cake in the freezer for 1 hour before serving to firm up the layers. ❄️
Crepes Sticking to Pan?
Even with non-stick pans, crepes can stick if the heat isn’t consistent or the pan isn’t properly greased. Always use medium-high heat** and wait until the pan is ripping hot before pouring batter. Lightly grease with a paper towel dipped in melted butter—just a thin, even coat.
If your pan is old or scratched, switch to a ceramic non-stick skillet like GreenPan or Cuisinart. Never reuse butter for greasing between crepes—it burns and creates stickiness. 🔥
Buttercream Too Sweet?
If your buttercream tastes like sugar overload, you might have over-mixed or used too much powdered sugar. The recipe calls for 4 cups powdered sugar, but if you prefer a milder sweetness, reduce it to 3.5 cups and add ½ cup whipped cream to maintain volume.
For depth, scrape the seeds from 1 extra vanilla bean and fold them into the buttercream at the end. If it’s already mixed, balance the sweetness by adding 1 tsp lemon zest or a pinch of freshly grated nutmeg**. 🌿
Nutrition facts
Frequently asked questions
Can I make this crepe cake with fewer layers?
The magic of this recipe lies in the delicate balance of layers, but you can absolutely scale it down! For a 10-layer version, halve the batter and buttercream quantities. The key is maintaining the same 1:1 ratio of crepes to buttercream layers—just adjust the stack size. A 10-layer cake serves 6-8 people beautifully, while 15 layers works for 10-12 guests. The assembly technique remains identical!
How do I store leftover crepe cake?
Store your crepe cake in an airtight container in the fridge for up to 3 days. To refresh slices, warm them in a 200°F oven for 5 minutes to restore crispness. For longer storage, freeze individual layers (wrapped in plastic) for up to 1 month. Thaw overnight in the fridge before reassembling with fresh buttercream. Pro tip: Label layers with the date to track freshness!
Can I substitute vanilla bean paste?
Yes! If you don’t have vanilla bean paste, use 2 tbsp pure vanilla extract plus 1 tsp vanilla sugar for depth. For an alternative, scrape seeds from 1 vanilla bean and mix with 1 tbsp water, then add to the batter. The paste adds authentic flavor, but extract works in a pinch. Just remember: vanilla extract alone lacks the complex notes of the bean.
Why does my crepe cake need to chill so long?
The 4-hour minimum chill is crucial for two reasons: First, it lets the buttercream fully set, preventing soggy layers. Second, it allows flavors to meld—vanilla and buttercream develop deeper richness when given time. Think of it like a flavor infusion. If short on time, chill for 2 hours, but expect slightly softer layers. For extra stability, freeze the assembled cake for 1 hour before serving.
What’s the best way to transport a crepe cake?
Assemble the cake in a sturdy cake carrier or large box, then wrap it tightly in plastic wrap followed by a towel to prevent shifting. Keep it refrigerated until serving. For transport, place a tray under the base to catch any drips. If traveling long distances, freeze the cake (unassembled) and transport layers separately in a cooler with ice packs. Reassemble at your destination and chill as usual.

- 6 Oz Chocolate Chip Cookie Recipe: Perfectly Balanced Crispy Edges and Chewy Hearts - September 25, 2026
- 6-Inch Coffee Cake Recipe: Vanilla Bean Swirls and Buttery Streusel Topping - September 25, 2026
- 1 Hour Soup Recipe: Velvety Richness Without the Wait - September 25, 2026