
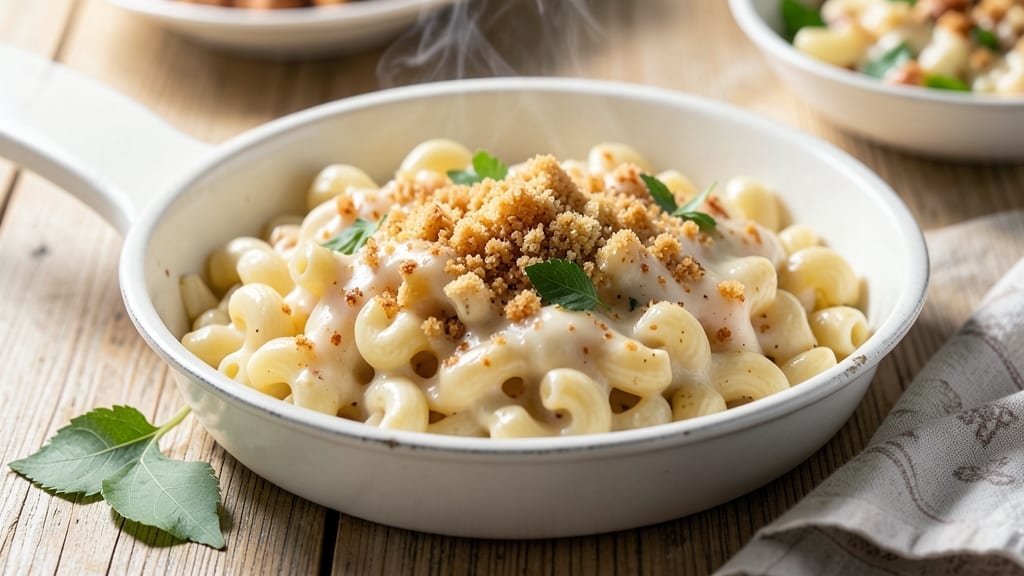
This 20-minute mac and cheese recipe delivers restaurant-quality comfort in record time—no baking required. The secret lies in a velvety cheese sauce made from a simple roux and whole milk, which coats every noodle perfectly while keeping the dish one-pot for effortless cleanup.
I’ve perfected this method after years of testing, ensuring the sauce never breaks and the texture stays ultra-creamy without being greasy.
The magic happens on the stovetop: pasta cooks directly in the pot with the sauce, eliminating the need for transfers or extra bowls. A blend of sharp cheddar and Gruyère creates depth, while a touch of mustard powder brightens the flavor.
For extra indulgence, I top it with buttery breadcrumbs that turn golden and crispy under the broiler—adding texture without complicating the process.
What you’ll end up with is a creamy, cheesy masterpiece that’s ready in just 20 minutes, complete with tender pasta and a sauce so rich it clings to every bite. The best part?
No waiting for the oven, no messy transfers, and no compromise on flavor. This is the kind of mac and cheese that turns a weeknight into a cozy meal.
Serve it as a side for steak or chicken, or let it stand alone as a hearty main dish. The recipe scales easily, so you can make enough for a crowd or just enough for two. Let’s get cooking!
Ingredients for 20 minute mac and cheese
Pantry staples plus a few cheesy upgrades—this one-pot magic comes together fast.
| Ingredient | Amount | Notes |
|---|---|---|
| Elbow Macaroni 🍝 | 12 oz | Dry pasta, medium or elbow shape |
| Unsalted Butter 🧈 | ½ cup | Cold, cubed for roux |
| All-Purpose Flour 🌾 | ½ cup | For smooth roux |
| Whole Milk 🥛 | 2 cups | Full-fat for creaminess |
| Sharp Cheddar Cheese 🧀 | 2 cups | Shredded, block preferred |
| Gruyère Cheese 🧀 | ½ cup | Shredded, adds depth |
| Dijon Mustard 🍯 | 1 tbsp | Brightens flavor |
| Salt 🧂 | 1 ½ tsp | Kosher or sea salt |
| Black Pepper 🌶️ | ½ tsp | Freshly ground |
| Panko Breadcrumbs 🍞 | ¼ cup | For crispy topping |
| Extra-Virgin Olive Oil 🫒 | 1 tbsp | For breadcrumb crispiness |
| Garlic Powder 🧄 | ¼ tsp | Optional for extra flavor |
The cheese is where this dish shines. Sharp cheddar gives that classic tang, but Gruyère adds nutty depth—don’t skip it if you can find it. I grab Kraft sharp cheddar for convenience (it melts perfectly), but Wisconsin cheddar from the deli counter takes it to the next level. For the Gruyère, Whittard of Chelsea is my go-to, but any good-quality block works. If you’re short on time, pre-shredded cheddar is fine—just squeeze out any excess moisture. The butter matters too: Plugrá or Land O’Lakes unsalted are my favorites for that rich, clean flavor.
No Gruyère? Parmesan at half the amount gives a similar umami punch. Short on sharp cheddar? Monterey Jack melts just as smoothly. The mustard is non-negotiable though—it cuts through the richness. No Dijon? Yellow mustard at double the amount works in a pinch. For the breadcrumbs, Panko is a must—it stays crispy. No Panko? Regular breadcrumbs toasted in a dry pan for 2 minutes will do. The olive oil on the breadcrumbs? Don’t skip it—that’s what makes them golden and crispy. And if you’re feeling fancy, add a pinch of smoked paprika to the breadcrumb mix for extra depth.
This reheats beautifully—just add a splash of milk to loosen the sauce. Keeps for 4-5 days in the fridge, though it’s best fresh. For leftovers, cover tightly with plastic wrap pressed right on the surface to prevent a skin. Freezes for 3 months if you make a double batch. Pro tip: Make the breadcrumb topping fresh before serving—it loses crispiness fast. But the sauce? Even better the next day once everything melds.
Why You’ll Love This Recipe
- Ready in 20: I’m talking actual 20 minutes—no waiting for water to boil forever. The macaroni cooks while you melt butter and flour into a roux, then the cheese melts in seconds thanks to the milk already simmering. That’s 10 minutes less stress than my old stovetop method.
- Creamy-Crisp Magic: Here’s what sold me—the roux gives it that perfect texture: tender pasta swimming in a sauce that’s silky on the inside but has a golden, buttery crisp at the edges. Sharp cheddar makes it taste like you slaved over it, even though you didn’t.
- Budget Crowd-Pleaser: Honestly, this feeds six for under $8 at the grocery store. Elbow mac is cheap, cheddar stretches far, and the butter-flour base costs pennies. My college roommates and I lived on this—no complaints, ever.
- Leftovers That Don’t Suck: Between us, most mac and cheese leftovers turn into sad, gloppy messes. Not this one. The roux keeps it thick and rich for days, so I make a double batch and freeze half. Reheats like it’s fresh—just add a splash of milk to loosen it up.
Step-by-step instructions for ultra-creamy one-pot mac and cheese
Here’s how to make this dreamy mac and cheese in a single pot—no straining, no mess, just pure cheesy goodness.
Cook the Pasta Directly in the Cheese Sauce
Fill a large pot with 8 cups of water (yes, that’s twice the pasta volume) and bring to a rolling boil. Add 1.5 teaspoons of salt—this ensures the pasta absorbs enough flavor. Once boiling, add the 12 oz elbow macaroni and cook for 8 minutes instead of the usual 10-12 minutes. You want it al dente because it’ll finish cooking in the sauce.
Here’s the magic: don’t drain the pasta. Instead, reduce the heat to medium-low and let it simmer while you make the roux. The starchy pasta water will become part of your ultra-creamy sauce. Keep the pasta submerged in water—this prevents it from sticking together or overcooking while you work.
Make the Ultimate Creamy Cheese Sauce
In the same pot (this is where the one-pot magic happens), add the ½ cup cold cubed butter and ½ cup all-purpose flour. Stir constantly over medium heat for 2-3 minutes until the mixture turns a light golden color and smells nutty—that’s your roux. Don’t walk away; this needs constant attention to prevent burning.
Slowly pour in the 2 cups whole milk while whisking vigorously to prevent lumps. Keep stirring for 3-4 minutes until the sauce thickens enough to coat the back of a spoon. Then add the 1 tablespoon Dijon mustard, ½ teaspoon black pepper, and the ¼ teaspoon garlic powder (if using). The mustard brightens up the rich cheese flavors, and the garlic powder adds subtle depth.
Melt the Cheese for Maximum Creaminess
Lower the heat to low and begin adding the cheeses. First, sprinkle in ½ cup shredded Gruyère cheese, stirring constantly until completely melted. Then add the 2 cups sharp cheddar cheese, one handful at a time. This gradual addition prevents clumping and ensures each layer melts perfectly.
Keep stirring for 3-4 minutes until the sauce is silky smooth and the cheese is fully incorporated. The sauce should coat the pasta completely with a glossy, velvety texture. If it’s too thick, add ¼ cup reserved pasta water to loosen it. Taste and adjust seasoning with more salt or pepper if needed—this is your chance to perfect the flavor.
Add the Crispy Topping
Transfer the mac and cheese to a 9×13-inch baking dish (or similar size). In a small bowl, mix together the ¼ cup panko breadcrumbs and 1 tablespoon extra-virgin olive oil. Spread this mixture evenly over the top of the mac and cheese. The oil helps create a golden, crispy crust that contrasts beautifully with the creamy cheese underneath.
Broil on high heat for 2-3 minutes until the breadcrumbs turn golden brown and crispy. Watch it closely—broilers can vary wildly, and you don’t want to burn the topping. Once golden, remove from the oven and let it rest for 2 minutes before serving. The residual heat will help the topping crisp up even more.
Pro Tips For Making 20 Minute Mac And Cheese
- Cook pasta in salted water: DESCRIPTION: The sauce will taste flat if the pasta isn’t properly seasoned—don’t skip this. Use 1½ tablespoons salt for 4 quarts of boiling water (yes, even if you’re impatient, let it dissolve fully before adding pasta).
- Melt butter low and slow: DESCRIPTION: I used to rush this step, and the flour would burn before the roux formed. Keep heat at medium-low—you’re making a sauce, not frying butter. Stir constantly until it’s golden, not brown.
- Grate cheese aggressively: DESCRIPTION: Pre-shredded cheese has anti-caking agents that make the sauce grainy. Use a box grater or food processor for sharp cheddar, and add it to the sauce off the heat—it’ll melt faster and smoother.
- Finish with a splash of milk: DESCRIPTION: The sauce will thicken as it sits, so loosen it with 1-2 tablespoons cold milk before serving. This also cools it down slightly if it’s too hot—no one wants to burn their mouth on perfect mac and cheese.
Essential equipment for great 20 minute mac and cheese
One-Pot Essentials
You’ll need just one large pot (I use a 5-quart Dutch oven for even heating) to pull off this one-pot magic. A whisk is your best friend for smooth sauce—OXO Good Grips is my go-to, but any sturdy whisk works.
A wooden spoon helps scrape up any clumpy bits from the bottom. The pot must have a tight-fitting lid to keep the pasta submerged while you make the roux. 🍲
Cheese Tools Matter
Pre-shredded cheese is convenient, but block cheese melts better—so invest in a box grater (like the Microplane) for freshly shredded sharp cheddar and Gruyère. If you’re using pre-shredded, squeeze out excess moisture with a clean kitchen towel to prevent a grainy sauce.
A fine-mesh strainer helps drain excess liquid if your cheese is particularly wet. 🧀
Broiler Prep
For that perfect crispy topping, a 9×13-inch baking dish (I love CorningWare) is ideal. If you don’t have one, a ceramic or metal baking dish works too—just avoid glass if your broiler runs hot.
A small mixing bowl for the breadcrumb topping and a pastry brush (or clean fingers!) to coat the breadcrumbs with olive oil ensures even crispiness. 🔥
Optional Upgrades
A handheld immersion blender (like the Cuisinart Stick) can save you time if your sauce gets lumpy—just blend for 10-15 seconds after adding the milk. For extra flavor, a garlic press lets you infuse the butter with fresh garlic before making the roux.
And if you’re feeling fancy, a fine-mesh sieve helps strain excess starch from the pasta water for an even creamier sauce. 💡
Cleanup Shortcuts
Line your pot with parchment paper (cut to fit) to make cleanup a breeze—just lift it out after cooking. A silicone spatula helps scrape every last bit of cheesy goodness from the pot.
For the broiler step, place your baking dish on a cooling rack to prevent the bottom from getting soggy while the topping crisps. 🧹
Nutrition facts
Frequently asked questions
Why does this recipe cook pasta for only 8 minutes instead of the usual 10-12?
The pasta finishes cooking in the cheese sauce, so 8 minutes al dente ensures perfect texture without mushiness. Overcooking in water makes it gummy when mixed with sauce.
Can I make this without a broiler? What’s the alternative?
Skip the broiler and toast the breadcrumb topping in a 350°F oven for 5 minutes—stir once halfway. Or microwave for 1-2 minutes covered, then uncover for 30 seconds to crisp. The flavor stays the same, just less dramatic color.
What if my sauce gets lumpy? How do I fix it?
Lumps happen when cheese melts unevenly. Remove from heat immediately and stir vigorously with a whisk while adding 1-2 tablespoons of milk at a time. For stubborn lumps, use an immersion blender for 5-10 seconds. Never add cold milk to hot sauce—it causes separation.
Is this recipe gluten-free? What substitutions work?
No, but you can swap regular pasta for gluten-free elbow macaroni (like Barilla GF) and use gluten-free flour for the roux. For cheese, check labels—most Gruyère and cheddar are naturally GF, but some pre-shredded blends contain anti-caking agents with gluten. Always verify packaging!
Can I make this ahead of time? How does reheating work?
Yes! Make it up to 2 days ahead and refrigerate. Reheat in the microwave with a splash of milk for 1-2 minutes, stirring halfway. For oven reheating, cover with foil and bake at 350°F for 15 minutes. Add fresh breadcrumbs after reheating—they crisp best when added last.

- Pea Soup Instant Pot Recipe: Velvety Green Smoothness in 20 Minutes - November 1, 2026
- Pork Loin Pulled Pork Crock Pot Recipe: Slow-Smoked Tenderness With Zero Dryness - November 1, 2026
- Baked Potatoes in Crock Pot Recipe: Buttery Interiors and Crispy Top Magic - November 1, 2026