
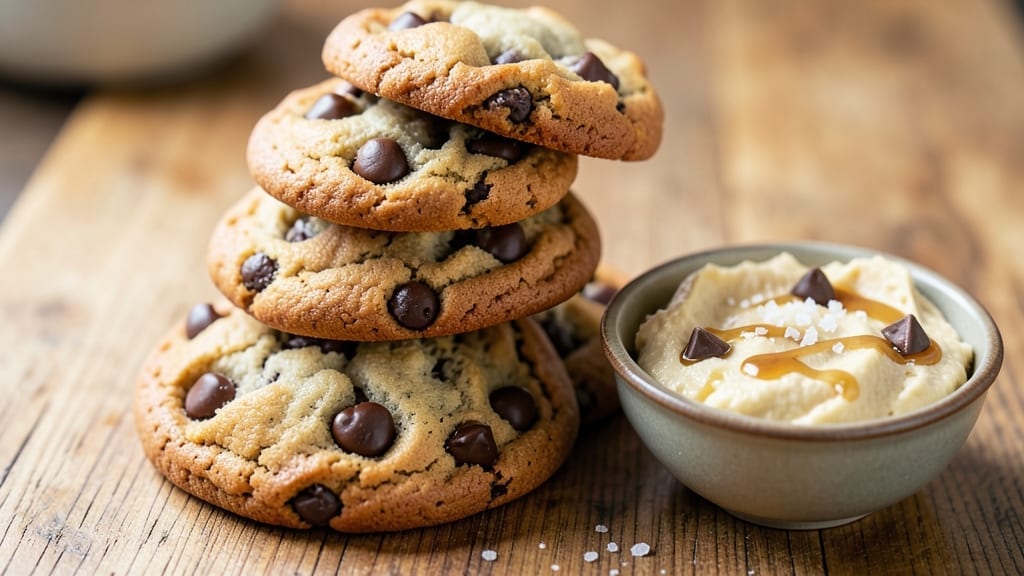
A 24-hour chocolate chip cookie recipe transforms ordinary cookies into something extraordinary—deeply browned edges with gooey, caramelized centers that rival any bakery. The secret lies in letting the dough rest overnight, allowing flavors to meld and gluten to relax for perfect texture.
This isn’t just a recipe; it’s a patience-rewarded masterpiece that’ll have everyone asking for seconds.
The 24-hour process isn’t just about time—it’s about flavor development. As the dough rests, the butter softens, the flour hydrates, and the chocolate chips soften slightly, creating a cookie with a rich, complex taste that’s impossible to achieve with quick recipes.
The result? A cookie that’s crisp at the edges, tender in the middle, and packed with melty chocolate in every bite.
Once baked, these cookies are best served warm with a scoop of vanilla ice cream or a drizzle of salted caramel. The contrast of warm, gooey cookies against cold ice cream makes them irresistible.
Whether you’re baking for a holiday gathering or just treating yourself, this recipe delivers restaurant-quality results with minimal effort after the initial wait.
Ready to elevate your cookie game? The 24-hour wait is worth it—trust the process, and you’ll never go back to quick cookies again. Let’s get started on creating cookies that taste like they came from a bakery, not your kitchen.
Ingredients for 24 hour chocolate chip cookie
Just ten ingredients, but the magic happens after the initial wait.
| Ingredient | Amount | Notes |
|---|---|---|
| Unsalted Butter 🧈 | 1 cup | Cold, cubed for even mixing |
| Granulated Sugar 🍚 | ¾ cup | White or light brown |
| Packed Brown Sugar 🍚 | ¾ cup | Dark brown preferred |
| Large Eggs 🥚 | 2 whole | Room temperature |
| Vanilla Extract 🍯 | 2 tsp | Pure, not imitation |
| All-Purpose Flour 🌾 | 2 ½ cups | Spooned and leveled |
| Baking Soda 🧂 | 1 tsp | Freshly opened |
| Salt 🧂 | 1 tsp | Kosher or sea salt |
| Chocolate Chips 🍫 | 2 cups | Semi-sweet or milk |
| Flaky Sea Salt 🧂 | 1 tbsp | For finishing (optional) |
The butter is everything here—use cold, unsalted sticks straight from the fridge. Cut them into small cubes so they distribute evenly through the dough. Land O’Lakes or Plugrah are my go-tos, but any good-quality brand works. For the sugars, light brown gives that classic chewy texture, while white keeps things crisp. The eggs? Room temperature is key—cold eggs can cause the butter to seize up. Chocolate chips? Semi-sweet is traditional, but milk works too. Just don’t skimp—these cookies are all about that melty chocolate experience.
No vanilla extract? Vanilla bean paste works too, or even a scraped vanilla bean if you’re feeling fancy. Short on brown sugar? White sugar plus 1 tsp molasses gets you close. The flour matters—King Arthur or Gold Medal are my picks for consistent results. If you’re gluten-free, swap in a 1:1 blend, but expect a slightly different texture. And that flaky sea salt? Maldon is the gold standard, but any gourmet flake salt does the trick.
This dough is best made a day ahead—cover tightly and refrigerate. The longer it rests, the better. Scoop cookies onto a parchment-lined sheet and chill for 10 minutes before baking. They’ll keep in an airtight container for 5 days at room temp, or freeze the dough balls for 3 months. Pro tip: Underbake slightly—they firm up as they cool, and you want that gooey center.
Why You’ll Love This Recipe
- Deep Caramel Crunch: That brown sugar and granulated sugar combo? It’s magic. The edges get this perfect crackly crust while the center stays soft—like a hug from a cookie. Honestly, I’ve tried fancier recipes, but these taste like my grandma’s, just easier.
- Party-Proof Any Day: Whether it’s a last-minute potluck or a lazy Sunday, these cookies are my go-to. Double the batch, freeze half, and you’ve got dessert covered for weeks. (Yes, even on a Tuesday night.)
- Budget Baking Wins: Five ingredients, zero weird shortcuts. Butter, sugar, eggs, vanilla—stuff you already have. No expensive add-ins, no food waste. And leftovers? They last days in an airtight container, begging for seconds.
Step-by-step instructions for 24-Hour chocolate chip cookies
Here’s the method that delivers bakery-style cookies with perfect texture every time.
Cream the Butter and Sugars Thoroughly
In a stand mixer fitted with the paddle attachment, beat the 1 cup unsalted butter (cold and cubed) with the 0.75 cup granulated sugar and 0.75 cup packed brown sugar on medium speed for 3-4 minutes. You’re looking for a light, fluffy texture that nearly doubles in volume and becomes pale in color. This creaming process incorporates air, which creates those beautiful crackly tops and helps the cookies spread just right.
I like to scrape down the sides of the bowl every 30 seconds to ensure even mixing. The butter should be softened but not melted—this is why we use cold cubes. If it looks too soft after mixing, chill the bowl in the refrigerator for 10 minutes before proceeding. This step is non-negotiable for achieving that perfect cookie texture.
Add Eggs and Vanilla for Rich Flavor
Add the 2 whole large eggs (room temperature) one at a time, mixing on low speed for 30 seconds after each addition until fully incorporated. Then add the 2 teaspoons vanilla extract and mix for another 10 seconds. The mixture might look slightly curdled after adding the eggs, but don’t worry—it will come together when we add the dry ingredients.
I always use pure vanilla extract here because imitation won’t give you that authentic depth of flavor. If you’re using eggs straight from the fridge, let them sit in warm water for 5 minutes first to help them blend smoothly. This step ensures your cookies have that rich, custard-like base that makes them so irresistible.
Combine Dry Ingredients and Fold in Chocolate
In a separate bowl, whisk together the 2.5 cups all-purpose flour, 1 teaspoon baking soda, and 1 teaspoon salt. Add this mixture to the wet ingredients and mix on low speed for 30-45 seconds until just combined—you should still see a few flour streaks. Over-mixing develops gluten and makes cookies tough, so be gentle here.
Remove the bowl from the mixer and fold in the 2 cups chocolate chips by hand using a silicone spatula. I like to use a mix of semi-sweet and milk chocolate chips for that perfect balance of sweetness. Make sure they’re evenly distributed throughout the dough. If you’re using a mix, save a few chips for sprinkling on top before baking for extra visual appeal.
Chill the Dough for Perfect Texture
Cover the bowl with plastic wrap and refrigerate for at least 24 hours (or up to 72 hours). This long chilling time is what makes these cookies exceptional. The cold dough solidifies the butter, which prevents excessive spreading in the oven. It also allows the flour to fully hydrate, creating a better texture and more intense flavor.
I know it seems like a long wait, but trust me—this step makes a MASSIVE difference. The cookies will hold their shape better, have crispier edges, and maintain that gooey center. You can actually make the dough up to 3 days in advance, which is perfect for meal prep. Just keep it refrigerated until you’re ready to bake.
Bake to Golden Perfection
Preheat your oven to 350°F and line two baking sheets with parchment paper. Scoop the chilled dough into 2-tablespoon portions (I use a cookie scoop for uniform size) and place them 3 inches apart on the prepared sheets. Sprinkle a pinch of the 1 tablespoon flaky sea salt on each cookie if desired—this adds a beautiful contrast to the sweetness.
Bake for 12-14 minutes until the edges are golden brown but the centers still look slightly underdone. They’ll continue cooking on the hot pan after you remove them from the oven. Let them cool on the baking sheet for 5 minutes before transferring to a wire rack. The centers should be soft and gooey, with crisp edges that give way to that perfect chewy texture.
Pro Tips For Making 24 Hour Chocolate Chip Cookie
- Chill the Dough Properly: After mixing, spread the dough into a single layer on a tray and refrigerate for at least 24 hours—no shortcuts. I learned this the hard way: skipping the full chill leads to cookies that spread like pancakes and bake unevenly. Cover loosely with plastic wrap to prevent drying.
- Use Cold Butter: Pull the unsalted butter straight from the fridge and cut it into chunks before mixing—no softening first. Cold butter creates pockets of fat that melt slowly, giving you chewy centers and crisp edges. Trust me, your cookies will thank you.
- Don’t Overbake: Pull cookies from the oven when the edges are golden but the centers still look slightly underdone—about 10-12 minutes total in a 350°F (175°C) oven. Overbaking turns them into hockey pucks, and nobody wants that. A toothpick should have moist crumbs, not dry ones.
- Measure Brown Sugar Right: Pack the brown sugar tightly into your measuring cup—no fluffing—so it weighs the same as granulated sugar. Too much air means your dough will be dry and crumbly. I used to eyeball it, and the cookies always turned out like sad hockey pucks. Now I use a spoon to press it down hard.
Serving suggestions for this dish
Warm Ice Cream Pairing
Serve these cookies warm with a scoop of vanilla bean ice cream for the ultimate contrast—the cold ice cream melts slightly against the gooey centers. I love Blue Bell or Ben & Jerry’s for that creamy, rich texture.
For a gourmet touch, try Häagen-Dazs vanilla with flecks of real vanilla bean. 🍦
Caramel Drizzle Finish
Drizzle warm cookies with salted caramel sauce right after baking for an extra-luxurious touch. Heat ½ cup caramel sauce (like Smucker’s or homemade) with 1 tsp heavy cream until smooth, then drizzle over cookies. The salt in the caramel enhances the chocolate flavor beautifully.
Milk or Coffee Dip
Set out a small pitcher of warm milk or strong black coffee for dipping—classic pairings that take these cookies to the next level. For a twist, try chai latte or espresso to complement the chocolate. The warmth of the drink balances the cookie’s richness perfectly.
Garnish with Nuts
Add a sprinkle of toasted pecans or walnuts on top before baking for extra crunch. Toast ½ cup chopped nuts in a dry pan for 3-4 minutes until fragrant, then fold into the dough or sprinkle on baked cookies.
This adds a sophisticated nutty depth that pairs wonderfully with the chocolate.
Party Platter Presentation
For gatherings, arrange cookies on a wooden board or marble slab with alternating sizes for visual appeal. Add a few chocolate-dipped pretzels or shortbread cookies as companions. A dusting of powdered sugar or crushed candy canes (seasonal) elevates the presentation instantly.
Make-Ahead Serving
Store baked cookies in an airtight container at room temperature for up to 5 days—they’ll keep their texture beautifully. Reheat in a 300°F oven for 2-3 minutes** to restore that warm, gooey center. For parties, bake just before serving to maximize freshness and aroma.
Nutrition facts
Frequently asked questions
Why does the dough need to rest for 24 hours?
The overnight rest transforms these cookies from good to extraordinary! The cold temperature solidifies the butter, preventing excessive spreading, while allowing the flour to fully hydrate for a better texture. It also lets flavors meld and the chocolate chips soften slightly, creating that perfect balance of crisp edges and gooey centers. Think of it as flavor development on steroids!
Can I use a different type of chocolate besides chips?
Try chocolate chunks, chopped bars, or even white chocolate for variety. For extra decadence, fold in toasted nuts or sea salt caramel bits. Just remember that chunks melt faster than chips, so they’ll create more pockets of molten chocolate in your cookies.
What if my cookies spread too much?
This usually happens if the dough isn’t chilled enough or the butter gets too soft. For next time, chill the dough balls for 10 minutes before baking and use 1 tablespoon portions instead of 2. Also, make sure your oven is fully preheated to 350°F—a hot oven prevents excessive spreading. If they’re already baked, serve them as-is—they’ll still taste amazing!
How do I store these cookies to keep them fresh?
Store in an airtight container at room temperature for up to 5 days—they’ll maintain their texture beautifully. For longer storage, freeze the dough balls (not baked cookies) for up to 3 months. To reheat, bake at 300°F for 2-3 minutes until warm and gooey. The secret to perfect texture is keeping them protected from air!
Can I make these cookies gluten-free?
Yes, but expect a slightly different texture. Use a 1:1 gluten-free flour blend (like Bob’s Red Mill) and add ½ teaspoon xanthan gum if your blend doesn’t contain it. You may need to adjust the baking time—gluten-free cookies often bake faster. For best results, use a gluten-free chocolate chip brand too. The flavor will still be amazing!

- Pea Soup Instant Pot Recipe: Velvety Green Smoothness in 20 Minutes - November 1, 2026
- Pork Loin Pulled Pork Crock Pot Recipe: Slow-Smoked Tenderness With Zero Dryness - November 1, 2026
- Baked Potatoes in Crock Pot Recipe: Buttery Interiors and Crispy Top Magic - November 1, 2026