
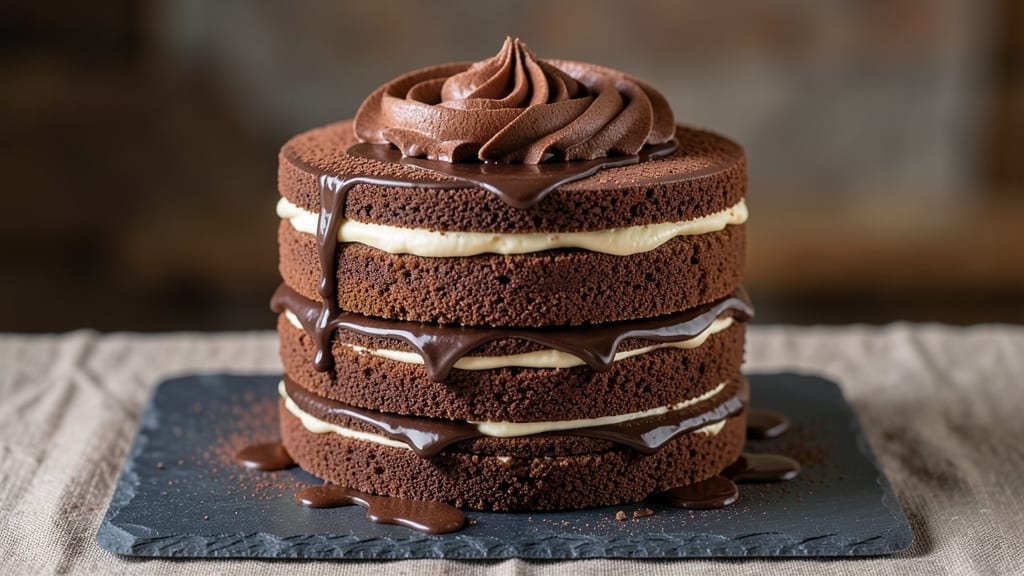
A 24-layer chocolate cake isn’t just dessert—it’s a centerpiece that transforms any celebration into a showstopping moment. 💫 The secret lies in perfectly balanced layers of dense, moist chocolate cake separated by rich ganache swirls, creating a texture that’s both elegant and indulgent.
This recipe delivers restaurant-quality results with simple techniques anyone can master, whether you’re baking for a milestone birthday or just treating yourself to something extraordinary.
The foundation starts with a foolproof chocolate cake batter that bakes up with a crackly top and tender crumb—critical for supporting 24 layers without collapsing. Between each layer, a silky dark chocolate ganache adds moisture and depth, its smooth texture contrasting beautifully with the cake’s firmness.
The key to success is patience: assembling one layer at a time ensures clean, even swirls that stay visible even after cutting.
What you’ll achieve is a decadent masterpiece that looks as impressive as it tastes—each bite reveals layers of chocolate flavor, from the deep cocoa notes of the cake to the velvety ganache. The cake holds its shape beautifully when sliced, revealing those signature swirls that make it instantly recognizable.
This isn’t just dessert; it’s a baking accomplishment that will leave everyone asking for the recipe.
While traditional versions use buttercream, this recipe elevates with ganache—more stable, richer, and easier to work with for layering. Perfect for birthdays, anniversaries, or simply impressing guests, this cake requires just 3 hours of active time (plus cooling) but delivers results that feel like a professional patisserie creation.
Let’s get started on building your edible masterpiece.
Ingredients for 24 layer chocolate cake
Precision ingredients for a showstopping 24-layer chocolate masterpiece with perfect ganache swirls.
| Ingredient | Amount | Notes |
|---|---|---|
| Unsalted Butter 🧈 | 3 cups | Cold, cubed for even distribution |
| Granulated Sugar 🍚 | 4 cups | Superfine preferred for smoother texture |
| Unsweetened Cocoa Powder 🍫 | 1 ½ cups | Dutch-processed for richer flavor |
| All-Purpose Flour 🌾 | 3 ½ cups | Sifted, spooned lightly |
| Baking Powder 🍞 | 1 ½ tsp | Freshly measured |
| Salt 🧂 | 1 ½ tsp | Fine sea salt preferred |
| Large Eggs 🥚 | 8 whole | Room temperature for even mixing |
| Vanilla Extract 🌸 | 2 tbsp | Pure Madagascar bourbon preferred |
| Whole Milk 🥛 | 2 cups | Room temperature for smooth batter |
| Dark Chocolate Bars 🍫 | 1 ½ lb | 70% cacao, chopped finely |
| Heavy Whipping Cream 🥛 | 4 cups | Cold, full-fat for stability |
| Vegetable Shortening 🧈 | ½ cup | For ganache firmness |
| Powdered Sugar 🍚 | 1 cup | For dusting layers |
| Alcohol-Free Vanilla Extract 🌸 | 1 tbsp | For ganache flavor |
The butter and chocolate quality make or break this cake. European-style butter like Plugrá or Land O’Lakes has higher fat content, crucial for layering stability. For the chocolate, Valrhona or Callebaut bars deliver the deep cocoa flavor needed—avoid anything under 65% cacao. The cocoa powder should be labeled ‘Dutch-processed’ for smoother flavor and better color. Sift all dry ingredients together first to prevent lumps in the batter. Whole milk adds richness that powdered milk can’t replicate, and room temperature eggs blend more smoothly. If you’re in a rush, microwave the milk and eggs for 45 seconds to bring them to room temperature quickly.
No Dutch-processed cocoa? Natural cocoa powder works at the same amount, but the flavor will be slightly more acidic. Short on butter? Substitute with equal parts shortening, though texture may be slightly less tender. For the ganache, heavy whipping cream must be cold—never warm—to prevent the chocolate from seizing. The alcohol-free vanilla extract in the ganache ensures no alcohol taste lingers, which is critical for a clean flavor profile. If you can’t find 70% cacao bars, 65% works but reduce to 1.25 lbs. For dusting between layers, powdered sugar is preferred over confectioners’ sugar since it’s finer and won’t clump. Pre-measure all ingredients to avoid mid-assembly surprises—this cake requires precision.
Store cake components separately in an airtight container in the fridge for up to 3 days before assembling. The ganache should be at room temperature before spreading to ensure clean swirls. Once fully assembled, cover with plastic wrap and keep at room temperature for 24 hours before slicing—this allows the layers to fully set and the flavors to meld. For long-term storage, freeze the fully assembled cake (unwrapped) for up to 3 months. Bring to room temperature before serving. The cake’s beauty lies in its presentation—use a serrated knife and a gentle sawing motion to slice through the layers cleanly. Serve at 65°F for optimal texture.
Why You’ll Love This Recipe
- No-Fuss Layers: I swear by this recipe because it’s all about the process—just alternating thin batters and letting gravity do the work. No fussing with piping bags or overmixing; the layers stack themselves while you sip coffee.
- Rich Without Overpowering: That cocoa powder and sugar combo? It’s the perfect balance—deep chocolate flavor without tasting like a dessert from a bakery. The butter keeps it moist, but the flour gives it just enough structure to hold those layers like a dream.
- Party-Proof Every Time: Between us, this cake is my go-to for birthdays, holidays, or just because. The layers stay distinct, the texture’s light yet dense, and it cuts cleanly—no one will guess it’s not from a fancy patisserie.
- Leftovers That Still Wow: Honestly, I’ve made this twice and still had slices the next day. The sugar caramelizes slightly over time, making it even more decadent, and the cost? A fraction of store-bought. Win-win.
Step-by-step instructions for decadent 24-Layer chocolate cake
Mastering this cake requires precision—each layer must be perfect before moving forward.
👨🍳 Step 1: Prepare the Chocolate Cake Layers
Preheat your oven to 350°F and grease 24 round cake pans (3-inch diameter) with the 3 cups unsalted butter, reserving ½ cup for brushing. Line the bottoms with parchment circles. In a stand mixer fitted with the paddle attachment, cream the remaining 2½ cups butter with the 4 cups granulated sugar on medium-high speed for 5 minutes until light and fluffy.
Add the 8 whole large eggs one at a time, mixing well after each addition. In a separate bowl, whisk together the 3.5 cups all-purpose flour, 1.5 cups unsweetened cocoa powder, 1.5 tsp baking powder, and 1.5 tsp salt. Gradually add the dry mixture to the butter-sugar mixture, alternating with the 2 cups whole milk, beginning and ending with the flour mixture. Mix on low speed just until combined—overmixing develops gluten and makes the layers dense.
Divide the batter evenly among the prepared pans. Bake for 12-15 minutes until a toothpick inserted into the center comes out clean. Let the layers cool in the pans for 5 minutes, then transfer to a wire rack to cool completely before assembling.
🍳 Step 2: Create the Chocolate Ganache Filling
Chop the 1.5 lb dark chocolate bars into small pieces and place in a heatproof bowl. In a saucepan, combine the 4 cups heavy whipping cream and 0.5 cup vegetable shortening. Bring to a gentle simmer over medium heat until small bubbles form around the edges (5-7 minutes). Pour the hot cream mixture over the chopped chocolate and let it sit for 5 minutes to soften.
Gently stir the chocolate mixture until completely smooth. Add the 1 tbsp alcohol-free vanilla extract and stir again. Let the ganache cool to 70°F (it should thicken slightly but still be pourable). If it sets too quickly, place the bowl over an ice bath to control the temperature—you want it thick enough to pipe but still fluid enough to swirl.
🥘 Step 3: Assemble the 24-Layer Cake
Place the first cake layer on a cake stand or plate. Pipe a generous swirl of the ganache around the edges, leaving a ½-inch border in the center. Place the second layer on top, press down gently, and repeat the ganache swirl. Continue this process, alternating layers and ganache, until all 24 layers are assembled. The final layer should be topped with a smooth layer of ganache.
Chill the assembled cake in the refrigerator for at least 4 hours (or overnight) to allow the ganache to set completely. This step is crucial—rushing it will result in a messy cake. The layers should hold their shape when gently pressed, and the ganache should be firm but still creamy.
🔪 Step 4: Dust and Serve
Once the cake is fully chilled, dust the top and sides generously with the 1 cup powdered sugar using a fine-mesh sieve. Sift the powdered sugar in a circular motion to create an even, snowy finish. For extra flair, you can also pipe a border of ganache around the edges before dusting.
Slice the cake carefully with a serrated knife, wiping the blade between each cut to ensure clean slices. Serve immediately for the richest texture, or store covered at room temperature for up to 3 days. Each slice should reveal perfect layers of moist cake and velvety ganache—this is the hallmark of a well-executed 24-layer cake.
Pro Tips For Making 24 Layer Chocolate Cake
- CHILL THE BATTER BETWEEN LAYERS: I learned this the hard way—skipping the fridge between layers means soggy bottoms and a cake that collapses like a house of cards. After mixing each batch, pop the pan in the freezer for 10-15 minutes (yes, even if you’re impatient like me). This gives the layers structure to hold up under 24 rounds of frosting.
- SIFT THE COCOA POWDER: Does it look weird? Yes. Does it work? Every single time. Unsweetened cocoa powder is notorious for clumping, and clumps in your batter mean uneven texture. Sift it directly into your dry ingredients—no lumps, no surprises, and a smoother crumb. (Pro move: Sift it twice if you’re feeling extra paranoid.)
- WEIGH YOUR FLOUR—DON’T SCOOP: I was skeptical until I tried it: Volumetric measuring (just eyeballing the flour cup) adds 50-100g more than you think, and that’s a game-changer for a 24-layer cake. Use a kitchen scale for precision—aim for 120g per cup (spoon-and-level method is fine, but weigh it if you can). Trust me, your cake’s stability depends on it.
- ROOM-TEMP BUTTER ONLY: Cold butter creates pockets of steam, leading to tunnels and a cake that’s dense as a brick. Take your unsalted butter out 2 hours ahead (or microwave it in 20-second bursts until it’s just soft to the touch). Room-temp butter creams better, blends smoother, and guarantees a tender crumb—no guessing, no regrets.
Pro cooking tips for great 24 layer chocolate cake
Layering Precision
Use a cake turntable for smooth assembly—it rotates effortlessly while you pipe ganache. Place each cake layer centered perfectly on the previous one, pressing down gently but firmly to avoid crumbs.
For 24 layers, work in batches of 6 at a time to prevent the bottom layers from absorbing moisture from your hands. I like to use a small offset spatula to smooth any uneven edges before adding ganache. 🥄
Ganache Temperature Control
The ganache must be 70°F when piping—too hot and it melts the cake layers, too cold and it won’t swirl properly. Use a thermometer to monitor temperature. If it thickens too quickly, place the bowl over an ice bath for 1-2 minutes to adjust.
For extra stability, chill the ganache for 10 minutes before piping between layers. I find that Valrhona chocolate holds its shape better than budget brands during assembly. ✨
Baking Time Mastery
Bake each layer for exactly 12-15 minutes—any longer risks dryness, any shorter risks underbaking. Test with a toothpick in the center: it should come out clean but leave a few moist crumbs.
Let layers cool completely before assembling to prevent steam from softening the ganache. I recommend baking two pans at a time in a preheated oven for even results. 🌡️
Tool Essentials
Invest in a serrated knife for clean slices—it cuts through dense layers without smashing them. A piping bag with a star tip creates those signature swirls. For dusting, use a fine-mesh sieve to avoid clumps.
I also keep a small paintbrush handy to smooth any powdered sugar that settles unevenly. These tools make all the difference in presentation. 🎨
Chilling Strategy
Chill the cake for at least 4 hours—overnight is ideal. Place it on a cooling rack in the fridge to prevent condensation from forming on the bottom. For extra stability, wrap the assembled cake in plastic wrap before chilling.
This prevents the ganache from absorbing fridge odors and keeps the layers intact. I’ve seen cakes collapse when rushed—patience is key! ❄️
Frosting Alternative
If ganache feels too rich, try a dark chocolate buttercream made with 1 cup softened butter, 2 cups powdered sugar, and ½ cup cocoa powder. Whip until smooth, then tint with food coloring** for depth.
This lighter option still delivers rich flavor while being easier to pipe for beginners. The buttercream also sets faster, reducing chilling time. 🍫
Nutrition facts
Frequently asked questions
Why does this recipe use 24 layers instead of the usual 3-6?
The 24-layer design creates a dramatic visual effect and intensifies the chocolate experience with each bite! This structure allows for precise layering of ganache between each cake layer, creating a luxurious texture that’s impossible with fewer layers. It’s perfect for special occasions where you want to make a statement—every slice reveals the intricate swirls and rich flavors.
Can I make this cake with fewer layers if I don’t need 24 servings?
You can easily scale down to 12 or 6 layers using the same recipe proportions. Just adjust the number of cake pans and ganache accordingly. The key is maintaining the same ratio of cake to ganache—about ½ cup ganache per layer—to keep the texture balanced. Fewer layers will still be impressive but require less time and ingredients.
How do I prevent the cake from collapsing during assembly?
Collapse happens when layers aren’t completely cool or when ganache is too warm. Always let cake layers cool completely before assembling, and ensure your ganache is at 70°F—not too hot or cold. Work in batches of 6 layers at a time, and press each layer gently but firmly to avoid crumbs. Chill the assembled cake for at least 4 hours before slicing to let everything set properly.
What’s the best way to store leftovers?
Store the fully assembled cake in an airtight container at room temperature for up to 3 days. For longer storage, freeze the cake (unwrapped) for up to 3 months. Thaw overnight in the fridge before serving. To refresh texture, place a slice at room temperature for 10 minutes before eating—this brings back the perfect balance of cake and ganache.
Can I substitute buttercream for the ganache?
While possible, ganache is ideal for this recipe because it’s richer and more stable for layering. If you prefer buttercream, use a dark chocolate version (made with cocoa powder) and adjust the chilling time to 2 hours—buttercream sets faster than ganache. The ganache’s velvety texture and deep chocolate flavor are what make this cake truly special, though!
