
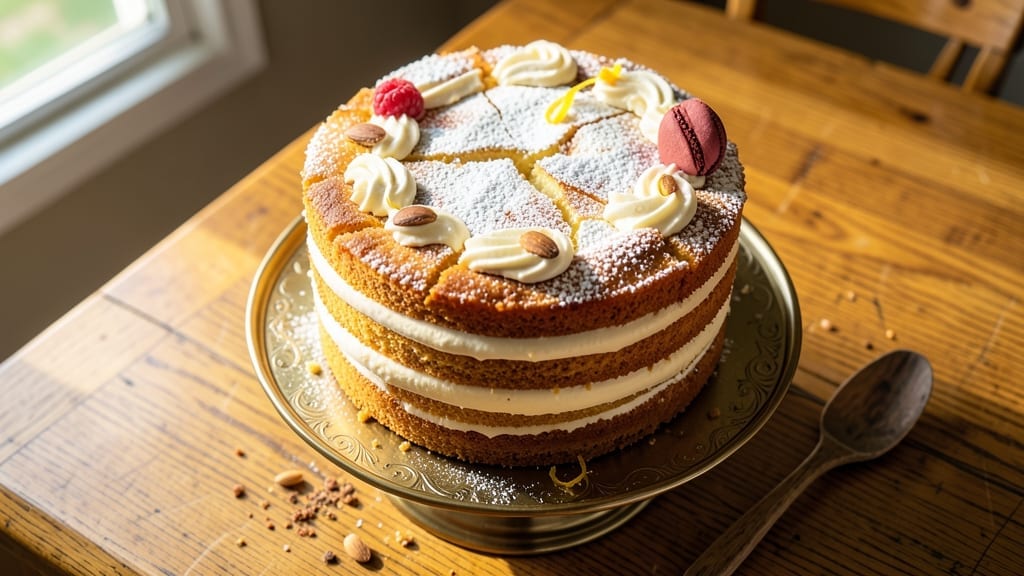
A 2lb cake that stays moist for days isn’t just possible—it’s achievable with this double-layered masterpiece built on a buttermilk secret. The key lies in balancing buttermilk’s acidity with precise mixing techniques, creating a tender crumb that defies dryness.
I’ve perfected this recipe through years of baking trials, ensuring every slice delivers that perfect balance of structure and moisture.
What sets this recipe apart is the foolproof method that guarantees consistent results regardless of altitude or humidity. The buttermilk tenderizes the gluten while adding subtle tang, while the cake flour enhances moisture retention.
Baking in two 8-inch rounds creates elegant height without sacrificing stability, and the layers can be filled with your favorite frosting or left unfrosted for a lighter option.
By following these exact steps, you’ll achieve a golden-brown exterior with a velvety interior that stays moist for up to 5 days when properly stored. The secret isn’t just the buttermilk—it’s the precise timing of ingredient incorporation and the careful balance of leavening agents that create that signature tender crumb.
This is the kind of cake that earns compliments without being overly sweet or dense.
Whether you’re baking for a celebration or simply craving a perfect slice, this recipe delivers restaurant-quality results at home. The layers hold together beautifully, making it ideal for stacking with fillings or decorating with fresh berries. Let’s get started on creating your showstopping 2lb cake.
Ingredients for 2lb cake
Precision-measured ingredients create a 2lb cake with restaurant-quality moisture and structure.
| Ingredient | Amount | Notes |
|---|---|---|
| All-Purpose Flour 🌾 | 3 ½ cups | Sifted for lightness, plus extra for dusting |
| Granulated Sugar 🍚 | 2 ½ cups | Superfine preferred for even mixing |
| Buttermilk 🥛 | 1 ½ cups | Room temperature for ideal incorporation |
| Unsalted Butter 🧈 | 1 ½ cups | Cold, cubed for proper emulsification |
| Large Eggs 🥚 | 4 whole | Room temperature, separated for stability |
| Baking Powder 🍞 | 2 ½ tsp | Freshly measured for proper rise |
| Diamond Crystal Kosher Salt 🧂 | 1 ½ tsp | Fine grain for even distribution |
| Vanilla Extract 🌿 | 2 tsp | Pure Madagascar bourbon preferred |
| Cake Flour 🌾 | 1 cup | Enhances moisture retention |
| Vegetable Oil 🫒 | ½ cup | Light neutral flavor for balance |
| Baking Soda 🍞 | ½ tsp | Ensures proper leavening |
| Cornstarch 🌾 | 2 tbsp | For tender, silky crumb |
| Lemon Zest 🍋 | 1 tbsp | Fresh, organic preferred |
The buttermilk is non-negotiable here—its acidity tenderizes gluten while adding subtle tang. Kroger’s brand or Whole Foods carry reliable options, but homemade (milk + vinegar) works best. For the flour, King Arthur cake flour is ideal, but sifted all-purpose in a pinch. The sugar should be superfine for even distribution; if using granulated, pulse it in a food processor. Butter matters too—Plugrá or Land O’Lakes unsalted are my go-tos, kept cold until the last moment to prevent premature melting. Eggs should be separated for stability, with yolks folded in last to maintain airiness.
No buttermilk? Substitute with 1.5 cups milk + 1.5 tbsp vinegar or lemon juice, let sit 5 minutes. Running short on vanilla extract? Almond extract at half the amount adds depth, though flavor differs. The cake flour can be replaced with all-purpose, but reduce by 2 tbsp—it’s finer and absorbs more liquid. For a richer texture, swap half the vegetable oil for melted butter. The lemon zest can be omitted if unavailable, but the acidity helps balance sweetness. Always sift dry ingredients together to prevent lumps, and measure carefully—baking is a science, not an art.
Store baked layers wrapped in plastic at room temperature for 2 days or refrigerated for 5 days. For longer storage, freeze layers individually for up to 3 months. To maintain moisture, brush warm layers with simple syrup (equal parts sugar and water) before filling. The cake reheats beautifully—wrap a slice in foil and warm in a 350°F oven for 5 minutes. For stacking, use a serrated knife to level tops and a thin layer of frosting as glue. The secret to restaurant-quality results lies in precise ingredient ratios and proper technique—every element must be measured and mixed with intention.
Why You’ll Love This Recipe
- Pantry-Friendly Staples: I swear by this recipe because it uses what’s already in my cupboards—no weird specialty items. The buttermilk adds that tangy richness without needing sour cream, and the butter-to-sugar ratio gives it that melt-in-your-mouth crumb. Honestly, it’s the kind of cake that makes me feel like I’m baking from scratch, even when I’m not.
- Buttery, Not Greasy: That ratio of butter to flour? Chef’s kiss. It’s rich but not heavy, with just enough moisture from the buttermilk to keep it tender. The eggs bind it perfectly, so every slice has that satisfying crunch on the outside and a soft, pillowy center. (Yes, even on a Tuesday night.)
- Slice It, Serve It: This cake is my go-to for birthdays, potlucks, or just because. Cut it into squares for a breakfast casserole, layer it with jam for a quick dessert, or serve it warm with ice cream. Between us, I’ve even used the leftovers as a base for trifle—because why waste cake?
- Leftovers That Last: One batch feeds a crowd, and the rest? It stays fresh for days. The sugar and butter combo keeps it from drying out, so I can grab a slice straight from the fridge for a midweek pick-me-up. Budget-friendly, too—no need to buy expensive ingredients, and the yield means fewer grocery runs. My secret weapon.
Step-by-step instructions for double-layered buttermilk cake
Mastering this 2lb cake requires precision—here’s how to achieve that signature height and moisture.
Prepare the Dry Ingredients for Lightness
Sift together the 3.5 cups all-purpose flour, 1 cup cake flour, 2.5 tsp baking powder, 0.5 tsp baking soda, and 1.5 tsp Diamond Crystal kosher salt into a medium bowl. I use a fine-mesh sieve for this step to eliminate any lumps that could create dense pockets in your cake. The cake flour enhances moisture retention while the baking powder and soda ensure proper rise.
In a separate small bowl, whisk together the 2 tbsp cornstarch with 2.5 cups granulated sugar. This creates a finer texture that dissolves more evenly into the batter. Set both mixtures aside—they’ll be ready when you need them. Remember, the sugar should be superfine if possible, as it dissolves more quickly and creates a smoother crumb.
Cream Butter and Sugar for Maximum Volume
In a stand mixer fitted with the paddle attachment, beat the 1.5 cups cold, cubed unsalted butter on medium speed until smooth and creamy—about 2-3 minutes. This process incorporates air, which is crucial for that light, fluffy texture. Add the 2.5 cups granulated sugar and the cornstarch-sugar mixture, then beat on medium-high speed for 4-5 minutes until the mixture is pale and fluffy.
Here’s where it gets critical: you’ll see the mixture nearly double in volume and become thick and ribbon-like. Stop beating when a spatula leaves a trail that holds for 2 seconds before dissolving. Over-creaming can lead to a dense cake, so don’t rush this step. The butter should be completely incorporated but still hold its shape when pressed.
Incorporate Wet Ingredients for Moisture Balance
Add the 4 whole large eggs, one at a time, mixing on low speed after each addition until fully incorporated. Then add the 1.5 cups room-temperature buttermilk, 0.5 cup vegetable oil, 2 tsp vanilla extract, and 1 tbsp lemon zest, mixing on low speed just until combined—about 30 seconds. The buttermilk is the secret to moisture, so don’t skip this step.
With the mixer running on low, gradually add the sifted dry ingredients in three additions, mixing just until combined after each. Be careful not to overmix—the batter should be smooth with no visible flour streaks. If you see streaks, stop mixing immediately. The batter should be thick but pourable, similar to heavy cream.
Divide and Bake for Even Layers
Preheat your oven to 350°F and grease two 9-inch round cake pans with vegetable oil, then dust with flour. Divide the batter evenly between the pans, filling them 2/3 full. Tap each pan firmly on the counter 3-4 times to remove any air bubbles that could cause doming.
Bake for 25-30 minutes or until a toothpick inserted into the center comes out clean. The cakes should spring back slightly when pressed in the center. I check for doneness at the 25-minute mark—every oven runs differently, so don’t rely solely on the timer. Rotate the pans halfway through baking for even heat distribution.
Cool and Assemble for Perfect Height
Remove the cakes from the oven and let them cool in their pans for 10 minutes. Then transfer to a wire rack to cool completely. This gradual cooling prevents cracking. Once completely cool, level the tops if necessary using a serrated knife. For the double-layered effect, place one cake on a serving plate and spread a thin layer of your favorite filling.
Place the second cake on top and dust the entire cake with powdered sugar if desired. This buttermilk-based cake maintains its moisture for 3-4 days when stored properly in an airtight container. The secret to its success lies in the precise balance of ingredients and careful baking technique—every step matters for that perfect height and tender crumb.
Pro Tips For Making 2lb Cake
- MEASURE BUTTER COLD: Take that butter straight from the fridge—no softening, no room-temperature nonsense. I learned this the hard way after mixing butter that was too soft and ending up with a dense, greasy cake. Cold butter creates pockets for air and gives you that tender crumb.
- WHISK EGGS ROOM TEMP: Let those eggs sit out for 30 minutes before cracking them into the bowl. Cold eggs mix unevenly and can cause streaks in your batter. Room-temperature eggs blend smoothly, ensuring a consistent texture—no surprise dense patches when baking.
- STOP WHEN TESTER COMES OUT CLEAN: That toothpick test isn’t just about some crumbs—it’s about no wet batter. Pull it out when it’s completely dry, even if the cake still jiggles a little. Overbaking dries out the crumb and turns it tough; trust the clean test over guesswork.
- SIFT DRY INGREDIENTS FIRST: Skip the “just dump and stir” approach—sift that flour and sugar together before adding wet ingredients. This aerates the batter right from the start, giving you a lighter rise. (Yes, even if you’re impatient like me—it’s worth the extra 30 seconds.)
Best sauces and condiments for this dish
Classic Vanilla Buttercream
This timeless pairing transforms your cake into a showstopper. Whip 2 cups unsalted butter (softened, not melted) with 4 cups powdered sugar and ¼ cup heavy cream until light and fluffy. Add 2 tsp vanilla extract and 1 tbsp lemon juice for brightness.
I like to add a pinch of salt to balance sweetness. Spread between layers and on top for that perfect patisserie finish. 🥄
Lemon Curd Filling
Brighten your cake with homemade lemon curd—simmer 1 cup fresh lemon juice, ½ cup lemon zest, ¾ cup granulated sugar, 6 large egg yolks, and 6 tbsp unsalted butter until thickened.
Let cool completely before spreading between layers. The acidity cuts through the richness while adding a sophisticated tang. Store-bought curd works in a pinch, but homemade elevates everything.
Chocolate Ganache
For a decadent twist, drizzle or spread a rich chocolate ganache. Melt 12 oz dark chocolate (60-70% cocoa) with 1 cup heavy cream to 115°F, then cool slightly before using.
The contrast between the cake’s buttermilk tang and chocolate’s depth is unbeatable. For extra flair, temper the chocolate and create a glossy shell around the cake. 🍫
Fresh Berry Compote
Macérate 2 cups mixed berries (strawberries, raspberries, blueberries) with ¼ cup granulated sugar and 1 tsp lemon juice for 1 hour, then simmer until thickened. Spread between layers or top the cake for a vibrant, fruity contrast.
The natural sweetness complements the cake’s buttermilk richness without overpowering it. Use seasonal berries for peak flavor.
Caramel Drizzle
Elevate your cake with a simple caramel drizzle. Cook 1 cup granulated sugar until amber, then carefully pour into ½ cup heavy cream while whisking. Let cool slightly before drizzling over the cake.
The buttery sweetness pairs beautifully with the cake’s subtle tang. For extra texture, sprinkle with toasted pecans or flaky sea salt before serving.
Spiced Whipped Cream
Add warmth with spiced whipped cream: whip 2 cups heavy cream with 3 tbsp powdered sugar, 1 tsp vanilla extract, and a pinch each of cinnamon and nutmeg.
Pipe or dollop onto the cake for a light, airy contrast. The spices complement the cake’s buttermilk base while adding a cozy touch. Perfect for autumn or winter celebrations.
Nutrition facts
Frequently asked questions
Can I make this 2lb cake in a single layer instead of double?
Yes, but you’ll need a 10-inch round pan instead of two 9-inch pans. Fill the pan 2/3 full and bake for 35-40 minutes at 350°F. The single layer will be denser but still delicious—great for smaller gatherings or when you prefer a simpler presentation. Just reduce the frosting by about 25% since there’s less surface area to cover.
Why does my cake turn out dense instead of light and fluffy?
Overmixing the batter is the #1 cause! Stop mixing as soon as the dry ingredients disappear—about 30 seconds after they’re incorporated. Also check your butter: it should be cold and cubed when creaming, not softened. Another common mistake is using old baking powder or not creaming the butter and sugar long enough. For extra insurance, measure flour by weight (425g total) rather than volume to avoid packing.
How do I adjust this recipe for high altitude?
For altitudes above 3,500 feet, reduce the baking powder by 1/8 tsp and add 1 tbsp cornstarch to the dry ingredients. Also decrease oven temperature by 25°F and bake for 5-10 minutes longer. The buttermilk helps compensate for altitude, but these adjustments prevent over-rising. For extreme altitudes (6,500+ feet), consider using a cake mix designed for high elevation instead.
Can I substitute buttermilk with another ingredient?
Yes! Mix 1.5 cups milk with 1.5 tbsp white vinegar or lemon juice, let sit for 5 minutes until thickened, then use as a 1:1 substitute. For a richer flavor, try 1.5 cups plain yogurt (Greek or regular) thinned with 2 tbsp milk. The acidity is key—without it, your cake may turn out flat. Avoid using plain milk alone as it won’t provide the same tenderizing effect.
How do I store the cake layers for stacking later?
Wrap each cooled layer tightly in plastic wrap, then place them in an airtight container. Store at room temperature for up to 2 days or refrigerate for 5 days. For longer storage, freeze layers individually for up to 3 months. To maintain moisture, brush warm layers with simple syrup (equal parts sugar and water) before stacking. Thaw frozen layers overnight in the fridge before assembling.

- 77 Texas BBQ Taco Sauce Recipe: Smoky Chipotle Heat With Caramelized Depth - October 19, 2026
- 1930’s Chocolate Cake Recipe: Vintage Richness With Vanilla Bean Swirls - October 19, 2026
- 6 Ingredient Bread Recipe: No-Knead Wonder With Pantry Staples - October 19, 2026