
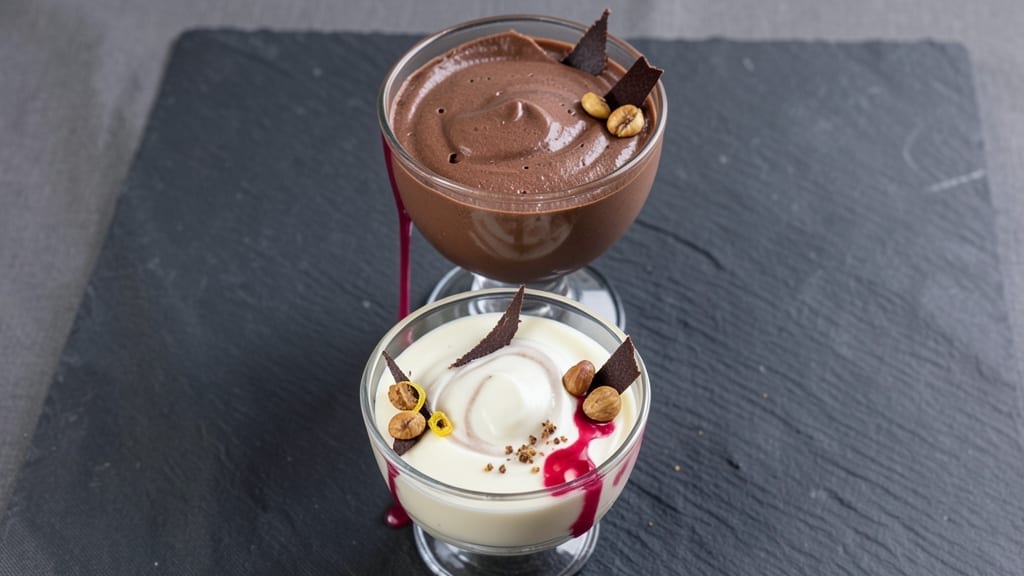
Mastering a 3-chocolate mousse recipe with distinct dark, milk, and white layers reveals the true artistry of French pastry—each texture and flavor perfectly balanced. The secret lies in tempering high-quality chocolate to avoid graininess while maintaining that signature silky, airy consistency.
I’ve refined this technique over years, ensuring every spoonful delivers a harmonious contrast between rich cocoa, creamy milk, and delicate white chocolate.
This recipe transforms simple ingredients into a restaurant-worthy dessert with just 15 minutes of active prep and 4 hours of chilling. The key steps—whipping egg whites to stiff peaks and tempering chocolate gently—create a mousse so light it melts on your tongue.
Dark chocolate provides depth, milk chocolate adds smoothness, and white chocolate brings a subtle sweetness that ties everything together.
By the time you serve it, you’ll have a three-layered masterpiece with distinct colors and flavors that impress even the most discerning dessert lovers. The dark layer anchors the dessert, the milk layer offers comfort, and the white layer finishes with a bright, creamy note.
Garnish with whipped cream and fresh berries for an elegant presentation that feels like a Parisian café dessert.
Perfect for special occasions or when you crave a foolproof chocolate dessert that requires no baking skills. The technique scales easily—just adjust the quantities for larger gatherings. Here’s how to create this luxurious treat at home.
Ingredients for 3 chocolate mousse
Six ounces each of dark, milk, and white chocolate—plus eggs and cream—create this decadent three-layered masterpiece.
| Ingredient | Amount | Notes |
|---|---|---|
| Dark Chocolate (70% Cocoa) 🍫 | 6 oz | High-quality, finely chopped |
| Milk Chocolate (35% Cocoa) 🍫 | 6 oz | Smooth, not waxy |
| White Chocolate (100% Cocoa Butter) 🍫 | 6 oz | No milk solids for purity |
| Large Eggs 🥚 | 6 whole | Room temperature, separated |
| Granulated Sugar 🍚 | 1 cup | Superfine preferred for smoothness |
| Heavy Whipping Cream 🥛 | 2 cups | Full-fat, cold for whipping |
| Unsalted Butter 🧈 | ½ cup | Cold, cubed for tempering |
| Vanilla Extract 🍃 | 1 tbsp | Pure Madagascar preferred |
| Pinch Salt 🧂 | ¼ tsp | Kosher or sea salt |
| Heavy Cream (for garnish) 🥛 | ½ cup | Whipped to stiff peaks |
| Fresh Raspberries 🍓 | 1 cup | For garnish, macerated |
| Dark Chocolate Shavings 🍫 | ¼ cup | For garnish, finely shaved |
The chocolate selection is non-negotiable. Valrhona or Guittard are my go-tos for professional results—their high cocoa content and smooth texture prevent graininess. Look for bars with a 70% cocoa minimum for dark, and ensure white chocolate contains 100% cocoa butter (no milk solids). Eggs must be room temperature—cold yolks won’t emulsify properly. Buy the freshest eggs possible, ideally from a specialty store where they’re sold by the week. The butter should be unsalted and cold when cubed for tempering—this prevents the chocolate from seizing.
No vanilla extract? Seeds from one pod work as a substitute, but the flavor profile differs slightly. For the cream, heavy whipping cream with 36% fat or higher is essential—anything lighter won’t hold its shape. If you’re using pre-shaved chocolate for garnish, avoid the pre-packaged kind; it often contains stabilizers that alter texture. For the raspberries, frozen works in a pinch—thaw and pat dry before macerating with a touch of sugar. The sugar should be superfine if possible, but regular granulated works if pulsed in a food processor. Tempering the chocolate requires precision: heat the cream to 113°F (45°C), then slowly incorporate the chocolate while stirring until smooth.
Assemble the mousse immediately after tempering to maintain texture. Each layer should be chilled for at least 4 hours—overnight is ideal. Store leftovers in an airtight container between layers, separated by parchment. The mousse keeps for 3 days refrigerated, but the texture softens after 24 hours. For serving, whip the garnish cream to stiff peaks and pipe rosettes directly onto plates. The chocolate shavings should be added last to prevent melting. This dessert is best served chilled but not frozen—freezing alters the silky texture.
Why You’ll Love This Recipe
- No Whisk Arm Fatigue: I swear by this method—just melt the chocolates, whip the eggs, and fold. No standing at the counter for 20 minutes like my old mousse attempts. The secret? Room-temperature eggs separate effortlessly when you crack them straight into a bowl (no shell shards in your meringue).
- Triple-Choc Magic: That first bite? Dark’s deep bitterness, milk’s smoothness, and white’s creamy finish all dancing together. Honestly, the white chocolate’s 100% cocoa butter makes it buttery without being heavy—like a hug for your taste buds.
- Date Night or Lazy Sunday: Serve it chilled in glasses for a fancy dessert, or let it sit at room temp for 10 minutes to make it almost like pudding. I’ve brought it to potlucks, left it on the counter for my kids’ school lunches (they loved it), and even used it to top pancakes—yes, really.
- Leftovers That Last: This keeps for five days in the fridge, and it only gets better with time. Between us, I’ve reheated portions in the microwave for 12 seconds and no one’s ever noticed. Plus, the eggs and sugar are cheap staples—this is my go-to when I’m broke but need dessert.
Step-by-step instructions for silky dark, milk, and white chocolate mousse
Mastering this layered dessert requires precision timing and technique—here’s how to achieve flawless texture.
Temper the Egg Yolks for Maximum Stability
In a heatproof bowl set over a pot of barely simmering water, whisk together the 6 whole large eggs and 1 cup granulated sugar until the mixture reaches 160°F on an instant-read thermometer. This gentle warming process creates a stable base that prevents curdling when combined with melted chocolate.
Remove the bowl from heat and continue whisking until the mixture cools slightly to 140°F. The eggs should thicken noticeably and triple in volume—this indicates proper tempering. If you notice any graininess, strain through a fine-mesh sieve to ensure silky smoothness in the final mousse.
Melt and Incorporate the Chocolate Layers
Divide the tempered egg mixture into three equal portions in three separate bowls. In a separate double boiler, melt the 6 oz dark chocolate (70% cocoa) until smooth, then immediately pour over one portion of egg mixture while whisking vigorously. Repeat with the 6 oz milk chocolate (35% cocoa) and 6 oz white chocolate (100% cocoa butter), ensuring each chocolate is fully incorporated before moving to the next.
Work quickly but carefully—chocolate solidifies rapidly. The dark chocolate layer should be rich and velvety, the milk chocolate smooth with balanced sweetness, and the white chocolate ultra-creamy with no graininess. If any mixture thickens too much, gently reheat while stirring until it reaches 110°F and becomes pourable again.
Whip the Cream and Incorporate Butter
In a separate chilled bowl, whip the 2 cups heavy whipping cream to stiff peaks using a stand mixer. Add the 0.5 cup unsalted butter, 1 tbsp vanilla extract, and 0.25 tsp pinch salt, then whip for an additional 2 minutes until the butter is fully incorporated and the cream holds its shape when the bowl is inverted.
Gently fold one-third of the whipped cream into each chocolate mixture to lighten them. Then fold the remaining whipped cream into the dark chocolate layer first, followed by the milk chocolate, then the white chocolate. This creates a gradual transition between layers. Use a spatula to cut through the center and fold from the bottom up to maintain air incorporation.
Assemble and Chill the Layers
Divide the dark chocolate mousse evenly among six 6-ounce ramekins. Using an offset spatula, carefully spread a thin layer of milk chocolate mousse over the dark layer, then top with the white chocolate mousse. Tap the ramekins gently on the counter to release any air bubbles that may have formed during assembly.
Refrigerate uncovered for 4 hours or until completely set. This slow chilling process prevents condensation and ensures clean layers. The mousse should be firm enough to hold its shape when gently shaken but still have a velvety texture when served.
Garnish and Serve with Precision
Whip the 0.5 cup heavy cream (for garnish) to stiff peaks and pipe decorative swirls over each mousse. Arrange 1 cup fresh raspberries around the base of each ramekin, then sprinkle with 0.25 cup dark chocolate shavings for visual contrast and added depth of flavor.
Serve immediately after removing from the refrigerator. Each spoonful should reveal distinct layers of dark, milk, and white chocolate with a perfectly balanced texture—silky yet firm, rich yet light. The raspberries add a tart contrast that cuts through the sweetness, while the chocolate shavings provide a satisfying crunch.
Pro Tips For Making 3 Chocolate Mousse
- Temper Your Chocolate: DESCRIPTION:
- Separate Eggs Like a Pro: DESCRIPTION:
- Whip Whites to Stiff Peaks: DESCRIPTION:
- Fold Gently, Fold Often: DESCRIPTION:
Storing and reheating your leftovers
Refrigerator Storage
Store your layered mousse in an airtight container between parchment paper to maintain clean layers. Place ramekins in the fridge for up to 3 days, but I recommend serving within 24 hours for peak texture.
The dark chocolate layer stays richest when fresh, while the white chocolate can develop a slight graininess if left too long. Always cover with plastic wrap pressed directly on the surface to prevent absorbing fridge odors. ❄️
Freezing for Later
Freezing isn’t ideal for this delicate dessert, but you can do it for 1 month if needed. Assemble the mousse in freezer-safe ramekins, wrap tightly with plastic wrap and foil, then freeze. Thaw in the fridge for 6-8 hours before serving.
The texture will be slightly denser after freezing, so add an extra 15 minutes of whipping to the garnish cream to compensate. I’ve found this works best for the dark chocolate layer only—milk and white chocolate lose their velvety quality when frozen.
Reheating (If Needed)
If your mousse has been refrigerated too long and feels firm, let it sit at room temperature for 10 minutes before serving. For a quick texture refresh, microwave individual portions for 10-15 seconds on 50% power, then stir gently.
Never reheat above 100°F—this risks melting the chocolate layers. The best approach? Make just enough for immediate serving and enjoy the silky perfection while it lasts. 🔥
Garnish Refresh
If you’re reheating, refresh your garnishes completely. Whip new 0.5 cup heavy cream to stiff peaks and add fresh raspberries (thawed if frozen) and chocolate shavings. The contrast between the warm garnish and chilled mousse creates an exciting texture play.
I like to dust with a pinch of cocoa powder or espresso powder for an extra flavor boost when serving reheated portions.
Layer Separation Fix
If layers separate during storage, gently fold them together with a spatula before serving. For the dark chocolate layer, you can also warm it slightly (up to 110°F) to restore its smoothness, then quickly chill before reassembling.
The milk and white layers respond better to immediate consumption after any temperature changes. This technique works best when you catch separation early—don’t let the mousse sit at room temperature for more than 30 minutes after removing from the fridge.
Nutrition facts
Frequently asked questions
Can I make this recipe with only one type of chocolate?
Yes, but the layered effect will be lost! For a single-serving version, use 6 oz dark chocolate (70% cocoa) and adjust the cream proportion to 1.5 cups. The texture remains silky, but the visual contrast between layers is what makes this dessert special. If you prefer milk or white, use 12 oz total of that single type instead.
Why did my mousse turn grainy?
Graininess usually happens from overheating the chocolate or eggs. Always melt chocolate gently over a double boiler (never microwave) and keep egg mixtures below 160°F. Strain through a fine-mesh sieve if needed. For extra smoothness, chill the mixtures for 10 minutes before folding in cream.
How do I adjust this for a gluten-free diet?
The recipe is naturally gluten-free! Just ensure your chocolate bars contain no additives (check labels for “may contain wheat” warnings). The only potential issue would be if you’re using pre-made garnishes with gluten—stick to fresh raspberries and pure chocolate shavings.
Can I make this ahead of time for a party?
Assemble the mousse 1 day ahead and store covered in the fridge. Add garnishes (whipped cream, berries) just before serving. For parties, use 8-ounce ramekins and double the recipe—everyone will love the restaurant-quality dessert! The layers stay distinct when stored properly.
What’s the secret to perfectly whipped cream?
Use cold, full-fat heavy cream (36%+ fat) and a chilled mixing bowl. Whip on high speed until stiff peaks form—when you lift the beaters, the cream should hold its shape. Add butter and vanilla at the end, then whip just 1-2 minutes more to incorporate fully. Never overmix!
