
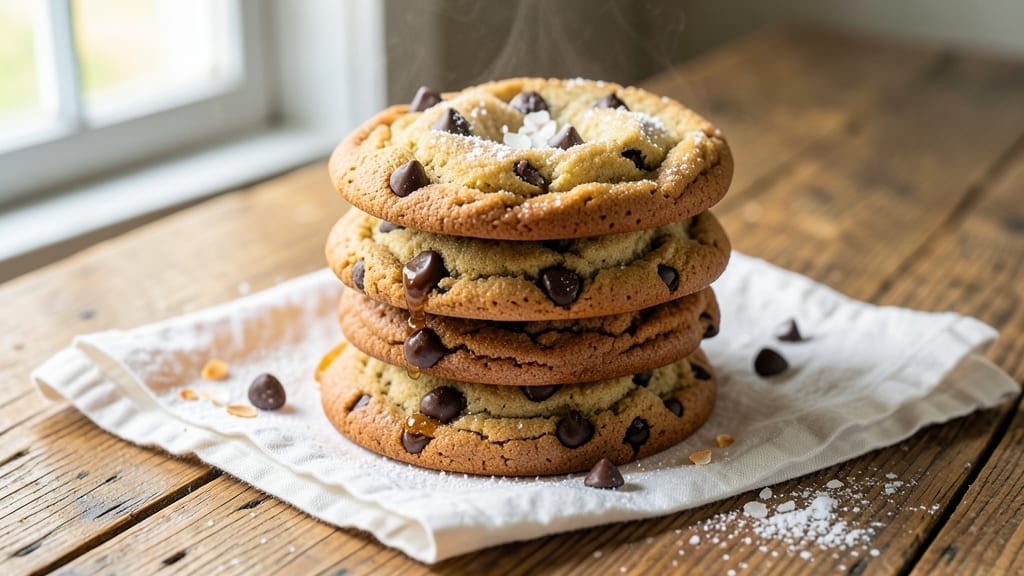
This 3-day chocolate chip cookie recipe transforms ordinary cookies into a decadent experience—crispy edges give way to chewy centers that only get better with time. The secret lies in letting the dough rest for 72 hours, allowing flavors to deepen and moisture to distribute perfectly.
I’ve perfected this method after years of baking, and the results are cookies that taste like they belong in a bakery display case.
The 3-day resting period is what sets these apart—it’s not just about waiting; it’s about letting the flour hydrate fully, the sugar dissolve evenly, and the butter soften just enough to create that signature texture.
You’ll need simple ingredients: all-purpose flour, brown sugar, butter, eggs, and, of course, high-quality chocolate chips. The dough comes together in minutes, but the magic happens during those days of resting in the fridge.
When you bake them, you’ll notice the edges are crispy and golden, while the centers remain soft and fudgy—this balance is what makes them irresistible. The aroma alone will fill your kitchen, and every bite delivers that perfect mix of sweetness and crunch.
These cookies are ideal for holidays, gifts, or treating yourself when you need a little indulgence.
For variations, you can swap out regular flour for gluten-free or use vegan butter and flax eggs, but the 3-day method remains the same—patience pays off. Let’s get started on creating cookies that taste even better the second day.
Ingredients for 3 day chocolate chip cookie
Pantry staples that transform into bakery-quality cookies with just 72 hours patience.
| Ingredient | Amount | Notes |
|---|---|---|
| All-Purpose Flour 🌾 | 4 cups | Spooning and leveling for accuracy |
| Unsalted Butter 🧈 | 2 cups | Cold, cubed for even mixing |
| Packed Light Brown Sugar 🍚 | 1 ½ cups | Moisture-rich for chewiness |
| Granulated White Sugar 🍬 | ½ cup | For crispy edges balance |
| Large Eggs 🥚 | 2 whole | Room temperature for blending |
| Vanilla Extract 🌸 | 2 tsp | Pure, not imitation |
| Sea Salt 🧂 | 1 ½ tsp | Fine grain for even distribution |
| High-Quality Semi-Sweet Chocolate Chips 🍫 | 2 ½ cups | Ghirardelli or Guittard preferred |
| Baking Soda 🧪 | 1 tsp | For proper rise |
The butter makes or breaks these cookies—use European-style butter if you can find it (like Plugrá or President), but regular unsalted works too. I always buy mine in bulk from Costco because it’s cheaper and lasts months. The brown sugar needs to be packed light—tap the cup to settle it, don’t press down. Chocolate chips? Ghirardelli or Guittard are worth the splurge—they melt better and taste richer. If you’re using store brand, look for ‘semi-sweet’ specifically, not ‘sweet’ or ‘bittersweet’. And don’t skip the vanilla—pure extract, not imitation. The difference is noticeable.
No vanilla extract? Vanilla bean paste at half the amount works great, or even 1 tsp vanilla sugar in a pinch. Running low on butter? Coconut oil solidified in the fridge can substitute, but texture will differ slightly. Chocolate chips too expensive? Chop your own chocolate bars—just make sure they’re at least 60% cacao. The baking soda is non-negotiable—it’s what creates that perfect rise. If you’ve got double-acting baking powder, you can use 1.5 tsp instead, but baking soda gives a better texture here. And for the love of cookies, measure your flour properly—spoon it into the cup and level off. Packing it down gives you dense cookies.
This dough needs exactly 72 hours in the fridge—no cutting corners. I portion it into 1.5 oz balls (about 2 tbsp each) and wrap them individually in parchment before freezing. That way I can pull out just what I need. Once baked, they keep 5 days in an airtight container at room temp, or 2 weeks in the fridge. Freeze extras for up to 3 months. Pro tip: reheat in a 350°F oven for 5 minutes to restore that fresh-baked aroma—game changer for leftovers.
Why You’ll Love This Recipe
- No Mixing Madness: I swear by this dough’s lazy charm—just cream butter and sugars until light, toss in eggs, then fold in flour and chips. No stand mixer, no overworking, just a bowl and a spatula. (Yes, even on a Tuesday night.)
- Three-Day Magic: Here’s what sold me—they’re soft at room temp but crisp at the edges by day three. That buttery brown sugar caramelizes just enough to make every bite taste like a hug from your favorite baker.
- Party in a Jar: Honestly, this dough keeps for days in the fridge, so I portion it into jars for my kids’ school bake sales or last-minute potlucks. No one suspects how unfussy it is—until they taste the first bite.
- Budget Baking Wins: A single batch costs me pennies but fills my house with smell for weeks. Brown sugar stretches further than white, and those chocolate chips? I buy the store brand—same melt, half the price. (My wallet thanks me.)
Step-by-step instructions for perfectly evolving chocolate chip cookies
Here’s the magic behind cookies that get better with age—crisp edges and chewy centers that develop over three days.
Cream Butter and Sugars to Peak Fluffiness
In a stand mixer fitted with the paddle attachment, beat the 2 cups unsalted butter (cold and cubed) with the 1.5 cups packed light brown sugar and 0.5 cup granulated white sugar on medium speed for 3-4 minutes. You’re looking for a pale, fluffy mixture that nearly doubles in volume—the sugar should dissolve completely and the butter should look like ribbons pulling away from the bowl.
The light brown sugar adds moisture for chewiness, while the white sugar creates crisp edges. If your butter is too soft, chill the bowl for 10 minutes before continuing. I like to scrape down the sides every 30 seconds to ensure even mixing—this prevents pockets of unmixed sugar that can lead to dense cookies.
Add Eggs and Vanilla for Richness
Add the 2 whole large eggs one at a time, mixing on low speed for 30 seconds after each addition until fully incorporated. Then add the 2 teaspoons vanilla extract and mix for another 10 seconds. The mixture might look slightly curdled, but don’t worry—it will smooth out when you add the dry ingredients.
Here’s the thing—room temperature eggs blend more smoothly and create a lighter texture. If your eggs are straight from the fridge, let them sit in warm water for 5 minutes first. The vanilla extract should be pure, not imitation, for that authentic flavor that develops beautifully over time.
Combine Dry Ingredients for Perfect Texture
In a separate bowl, whisk together the 4 cups all-purpose flour, 1 teaspoon baking soda, and 1.5 teaspoons sea salt. Sift the mixture once to aerate the flour—this creates lighter cookies with better rise. Gradually add the dry ingredients to the wet mixture, mixing on low speed for 30-45 seconds until just combined.
Overmixing develops gluten, which makes cookies tough. You should still see small flour streaks when you lift the paddle. Once combined, remove the bowl from the mixer and gently fold in the 2.5 cups high-quality semi-sweet chocolate chips using a silicone spatula. Make sure they’re evenly distributed—this ensures every bite has that perfect chocolate-to-dough ratio.
Chill the Dough for Maximum Flavor Development
Cover the dough bowl tightly with plastic wrap and refrigerate for at least 24 hours—this is where the magic happens. Chilling allows the flour to hydrate fully, the butter to solidify slightly, and the flavors to meld. The longer you chill (up to 3 days), the more complex the flavor becomes.
I like to press the dough into a flat disk in the bowl before covering—this makes it easier to portion later. The cold dough also prevents excessive spreading in the oven, giving you thicker cookies with those coveted crisp edges and gooey centers that improve with age.
Bake to Golden Perfection and Improve Daily
Preheat your oven to 350°F and line two baking sheets with parchment paper. Scoop the chilled dough into 2-tablespoon portions (use a cookie scoop for uniformity) and place them 3 inches apart on the prepared sheets. The dough will be cold and firm—this ensures even baking.
Bake for 12-14 minutes until the edges are golden brown but the centers still look slightly underdone. They’ll continue cooking on the hot pan after you remove them. Let them cool on the baking sheet for 5 minutes before transferring to a wire rack. The first day, they’ll be soft and chewy, but each subsequent day they’ll develop crispier edges and more complex flavor.
Pro Tips For Making 3 Day Chocolate Chip Cookie
- Chill the Dough Longer: I learned this the hard way—skipping the full 3-day fridge time means softer cookies that spread too much. Pack the dough in a sealed container and let it sit for the full 72 hours. The slow hydration makes them crispier and chewier, not to mention the flavor deepens like magic.
- Cream Butter and Sugars Slowly: Dump everything in the mixer and crank it up? Bad idea. Start the butter and sugars on low, then gradually increase speed as it thickens. This traps air properly—no grainy lumps, and the cookies get that perfect tender crumb. (Yes, even if you’re impatient like me.)
- Measure Brown Sugar Correctly: Packed brown sugar is non-negotiable here, but don’t just scoop and hope. Press it firmly into the measuring cup—like you’re trying to crush it—and level it off. Too loose, and your cookies turn out flat and cakey. Too packed, and they’ll be dense. Aim for a happy medium.
- Use Room-Temp Eggs: Cold eggs from the fridge mix unevenly and can cause the dough to splatter. Let them sit out for 30 minutes before cracking them in. The dough will come together smoother, and the cookies bake more evenly—no surprise raw centers. (Your future self will thank you.)
Creative variations of 3 day chocolate chip cookie
Classic Variations
Start with the base recipe but swap ingredients for a twist. Try white chocolate chips instead of semi-sweet for a sweeter, creamier bite—just reduce to 2 cups to maintain balance. For a nutty crunch, fold in 1 cup chopped walnuts or pecans after mixing the dry ingredients.
I love adding ½ cup dried cranberries for a festive holiday touch—they add tartness that cuts through the sweetness. 🍫
Gluten-Free Adaptation
Replace the 4 cups all-purpose flour with a 1:1 gluten-free baking flour blend like King Arthur Measure for Measure. Add ½ teaspoon xanthan gum if your blend doesn’t contain it—this helps bind the cookies. Chill the dough for the full 3 days since gluten-free dough spreads more.
For extra moisture, reduce the butter to 1.75 cups and add 1 tablespoon milk to the wet ingredients. The texture will be slightly denser but still chewy.
Vegan Version
Use vegan butter (like Miyoko’s or Earth Balance) and replace eggs with 2 tablespoons ground flaxseed mixed with 6 tablespoons water (let sit for 5 minutes to thicken). For vanilla, 1 teaspoon vanilla sugar works well.
Swap chocolate chips for vegan semi-sweet chips (check labels—Enjoy Life brand is reliable). The dough will be softer, so chill it 48 hours for best results. Bake at 325°F instead of 350°F to prevent burning.
Seasonal Twists
For fall flavors, add 1 teaspoon cinnamon and ½ teaspoon nutmeg to the dry ingredients, plus ½ cup caramelized onions folded in at the end. In winter, swap chocolate chips for white chocolate and cranberry—the tartness balances the richness.
For spring, try lemon zest (from 1 lemon) and 1 tablespoon lemon juice in the wet ingredients, plus 1 cup white chocolate chips. The citrus brightens the classic flavor profile. 🌸
Spiced Variations
Add ½ teaspoon cayenne pepper for a subtle kick—it enhances the chocolate flavor without overpowering. For Mexican-inspired cookies, mix in ½ teaspoon ground cumin and ¼ teaspoon smoked paprika with the dry ingredients.
A chili-lime twist works too: add 1 teaspoon lime zest and ¼ teaspoon chili powder to the dough. The heat mellows as the cookies cool, leaving a warm, complex finish.
Protein-Packed Upgrade
Boost nutrition by replacing ½ cup flour with ½ cup oat flour (blend rolled oats in a food processor). Add ¼ cup vanilla protein powder (like Orgain or Premier Protein) to the wet ingredients—it adds richness without altering the texture.
For extra protein, fold in ½ cup chopped almonds or peanut butter chips. These cookies are perfect for post-workout treats—they satisfy sweet cravings while keeping you full longer. 💪
Nutrition facts
Frequently asked questions
Why do these cookies need 3 days to develop flavor?
The 3-day resting period allows the flour to fully hydrate, the butter to soften evenly, and the flavors to meld together. This creates a deeper, more complex taste and that perfect balance of crisp edges with chewy centers. The longer you wait, the richer the flavor becomes!
Can I make these cookies without a stand mixer?
Use a large bowl and hand mixer (or even a sturdy whisk) to cream the butter and sugars. Just work in 30-second bursts to avoid overheating the butter. The key is patience—keep mixing until the mixture lightens in color and feels fluffy.
What’s the secret to getting crispy edges?
The combination of white sugar (for crispness) and brown sugar (for chewiness) creates that perfect texture. Bake at 350°F for 12-14 minutes until edges are golden but centers still look slightly soft. They’ll crisp up as they cool on the baking sheet.
How do I store these cookies to keep them fresh?
Store in an airtight container at room temperature for 5 days or refrigerate for 2 weeks. For longer storage, freeze baked cookies for up to 3 months. To revive stale cookies, warm in a 350°F oven for 5 minutes—they’ll taste fresh again!
What if I don’t have vanilla extract?
Use 1 teaspoon vanilla sugar or ½ teaspoon vanilla bean paste as substitutes. If you’re out of both, a ½ teaspoon almond extract works in a pinch, though the flavor will be slightly different. The vanilla is what enhances the chocolate flavor during the 3-day resting process.

- Baked Potatoes in Crock Pot Recipe: Buttery Interiors and Crispy Top Magic - November 1, 2026
- Braised Beef Short Ribs Recipe: Crock Pot Fall-Off-Bone Magic in 6 Hours - November 1, 2026
- Crock Pot Cocoa Recipe: Velvety Warmth With Hidden Spice Magic - November 1, 2026