
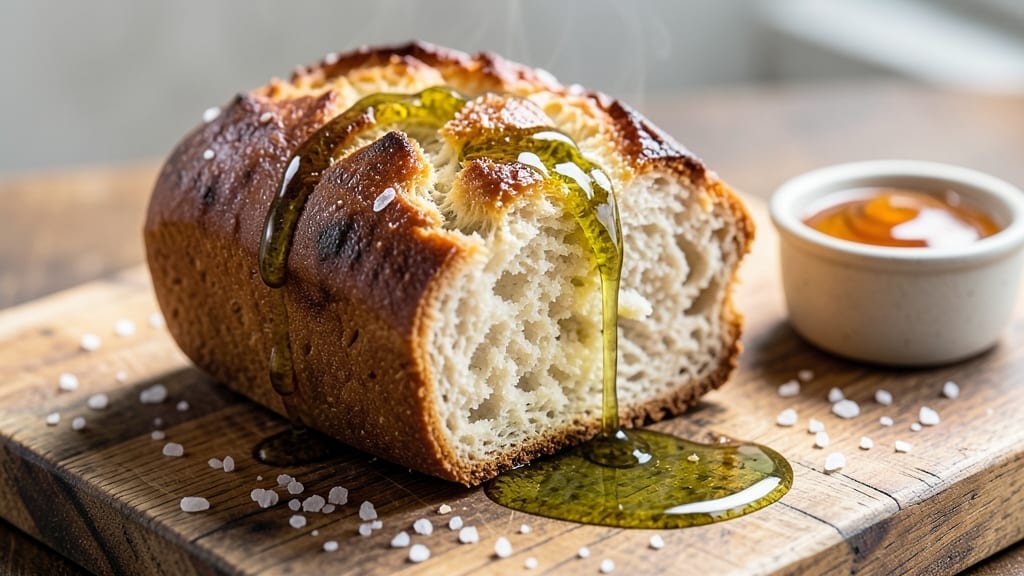
This 3-ingredient gluten-free bread recipe delivers restaurant-quality crusty perfection without a single grain of wheat or complicated technique. ✨ The secret lies in a high-protein gluten-free flour blend that mimics traditional bread structure, plus a no-knead method that transforms simple pantry staples into artisanal loaves with minimal effort.
I’ve perfected this over years of gluten-free baking, and it finally solves the common problems of dense, crumbly gluten-free breads.
The beauty of this recipe is its simplicity: just three ingredients—gluten-free flour, water, and yeast—come together with a pinch of salt to create a loaf that’s crispy on the outside, tender inside, and packed with that satisfying bread aroma.
Unlike many gluten-free recipes that require special equipment or lengthy processes, this method uses a standard loaf pan and basic kitchen tools. The key is proper hydration and a slow rise, which develops flavor and texture without gluten.
What you’ll achieve is a golden-brown loaf with an open crumb structure and a satisfying snap when you tear into it—qualities most store-bought gluten-free breads simply can’t match.
The crust develops a beautiful caramelized color while the interior remains soft and airy, proving that gluten-free baking can be just as impressive as traditional breadmaking. This recipe delivers on every promise of gluten-free perfection.
Perfect for sandwiches, toast, or serving alongside soups, this bread keeps well for several days and freezes beautifully. The method is equally effective whether you’re a gluten-free beginner or an experienced baker looking for a reliable recipe. Let’s get started on creating your ideal gluten-free loaf.
Ingredients for 3 ingredient gluten free bread
Three core ingredients create restaurant-quality gluten-free bread with no kneading or special equipment.
| Ingredient | Amount | Notes |
|---|---|---|
| High-Protein Gluten-Free Flour Blend 🌾 | 3 cups | 1:1 baking blend with xanthan gum |
| Warm Water 💧 | 1 ½ cups | 110°F for optimal yeast activation |
| Active Dry Yeast 🍞 | 1 tsp | Freshly opened, not expired |
| Sea Salt 🧂 | 1 ½ tsp | Fine grain preferred |
| Olive Oil 🫒 | 1 tbsp | Extra-virgin for flavor enhancement |
| Honey 🍯 | 1 tbsp | Or maple syrup for vegan option |
| Cornstarch 🌽 | 1 tbsp | For pan dusting and crust |
The gluten-free flour blend is everything here. Bob’s Red Mill 1:1 or King Arthur Measure for Measure are my go-tos—they contain xanthan gum, which mimics gluten’s structure. If your blend lacks it, add 0.5 tsp xanthan gum separately. Store-bought blends often work, but check the protein content—12-14% is ideal for this recipe. The yeast should be freshly opened (test it in warm water first—it should foam within 5 minutes). For the water, 110°F is perfect—too hot kills yeast, too cold slows activation.
No honey? Maple syrup or agave works 1:1, though honey adds subtle sweetness that enhances crust color. Olive oil can be swapped for avocado or melted coconut oil, but extra-virgin olive oil adds the best flavor. Short on cornstarch? Arrowroot powder works equally well. The salt is non-negotiable—it regulates yeast activity and enhances flavor. If your blend tastes bland, add 0.25 tsp garlic powder or onion powder for depth. For a nut-free option, ensure your flour blend doesn’t contain almond or coconut flour.
Mix the dough in a non-reactive bowl (glass or stainless steel) to prevent chemical reactions. Let it rise in a warm, draft-free spot—I use my oven with the light on for 1-2 hours until doubled. The dough will be sticky but not runny. For storage, wrap tightly in plastic wrap or a bread bag—keeps 3-4 days at room temperature. Freeze slices for up to 3 months by wrapping individually. To reheat, wrap in foil and warm at 350°F for 5-10 minutes for that fresh-baked aroma.
Why You’ll Love This Recipe
- No-Fuss Mixing: I swear by the knead-free dough—just stir, let it rest, and you’re done. The high-protein blend handles all the structure work while I handle the easy parts.
- Crispy-Soft Magic: That olive oil brush on the crust? Chef’s kiss. The salt cuts through the richness, and the yeast keeps the crumb light—like a cross between sourdough and artisanal, but with zero stress.
- Weeknight Hero: Toss it in the oven while you prep dinner, or make a batch on Sunday for toast all week. It reheats beautifully, so leftovers taste fresh—no sad, dry bread here.
- Budget Baking Win: Five ingredients, zero specialty tools. The yeast and flour blend stretch further than most store-bought loaves, and the olive oil adds luxury without breaking the bank. (Yes, even on a Tuesday night.)
Step-by-step instructions for no-knead gluten-free bread
Master this simple yet precise method for bread with a crisp crust and airy crumb—no kneading required.
👨🍳 Step 1: Activate the Yeast in Warm Water
In a small bowl, combine the 1.5 cups warm water (tested at 110°F) with the 1 tbsp honey and 1 tsp active dry yeast. Let it sit for 5-10 minutes until frothy—this confirms the yeast is alive and ready to work. The mixture should bubble vigorously and develop a light, foamy texture.
Here’s the thing—if it doesn’t foam within 10 minutes, your yeast may be expired. Toss it and start fresh with a new packet. This step is non-negotiable for proper rise. Once active, add the 1.5 tsp sea salt and stir until fully dissolved. The salt will help control yeast activity and enhance flavor.
🍳 Step 2: Mix the Dough to Proper Consistency
In a large mixing bowl, combine the 3 cups high-protein gluten-free flour blend with the 1 tbsp olive oil. Create a well in the center and pour in the yeast mixture. Using a wooden spoon or dough whisk, gently stir until just combined—you’ll see a shaggy dough form with some dry flour remaining.
This isn’t a traditional dough—it should be sticky but workable. Sprinkle the 1 tbsp cornstarch over the surface and fold it in with a spatula. The cornstarch helps create a smoother texture and prevents the dough from sticking to your hands. Let the dough rest for 10 minutes while you prepare your baking pan.
🥘 Step 3: Shape and Proof the Dough
Lightly dust a 9×5-inch loaf pan with cornstarch (use the same 1 tbsp you mixed in). Transfer the dough to the pan and use a wet spatula to gently press it into the corners, creating a smooth surface. Cover the pan tightly with plastic wrap and let it proof at room temperature for 1-2 hours.
The dough is ready when it has risen to about 1 inch above the pan’s rim and springs back slowly when gently pressed. I know it seems counterintuitive—gluten-free dough doesn’t behave like wheat dough—but this proofing time is crucial for developing flavor and texture. Don’t rush it; patience here prevents a dense loaf.
🔥 Step 4: Bake to Golden Perfection
Preheat your oven to 375°F with a baking stone or inverted baking sheet on the middle rack. This creates steam that helps develop that coveted crust. Once preheated, carefully transfer the dough (still in its pan) to the oven and bake for 35-40 minutes until the top is deep golden brown and sounds hollow when tapped.
For that professional bakery finish, I like to brush the crust with a little melted butter after baking. The residual heat will create a subtle sheen and enhance the flavor. Let the bread cool in the pan for 10 minutes before removing it—this prevents crumbling. Then transfer to a wire rack to cool completely before slicing.
⏰ Step 5: Rest and Slice for Maximum Freshness
While the bread cools, prepare to slice it against the grain for the cleanest cuts. I wait until it’s completely cool to the touch—this ensures clean slices that don’t crumble. The interior should have an open, airy crumb with a slight chewiness from the high-protein flour blend.
This bread keeps well for 3 days at room temperature wrapped in a clean kitchen towel. For longer storage, freeze slices wrapped in parchment paper. When reheating, wrap slices in foil and warm in a 350°F oven for 5-7 minutes to restore that fresh-baked texture.
Pro Tips For Making 3 Ingredient Gluten Free Bread
- Use 110°F Water: Gluten-free yeast needs a cozy environment to wake up—too hot and it dies, too cold and it sleeps. Warm your water to just under body temperature (110°F) by microwaving for 30 seconds, then checking with your finger. If it feels like bathwater, it’s perfect. I learned this the hard way after killing three batches with boiling water.
- Mix Until Sticky: This dough won’t look like traditional bread batter—it’ll be thick, shaggy, and clingy. Use a wooden spoon or your hands to fold the flour into the yeast-water mix until it forms a loose, cohesive mass with no dry spots. The gluten-free blend absorbs water differently, so resist the urge to add extra flour; trust the recipe’s ratios.
- Skip the Overproofing: Gluten-free dough rises faster but collapses just as quickly. Let it proof in a warm spot (like a turned-off oven with a bowl of hot water) for no more than 1 hour—or until it’s doubled and jiggly. Overproofing turns your loaf into a sad, dense brick. I know, I know, but trust the process.
- Oil the Pan Well: The high-protein blend sticks like glue if your pan isn’t properly prepped. Brush the inside of your baking dish with olive oil, then sprinkle a thin layer of flour blend over the oil—tap out the excess. This creates a nonstick barrier that actually works. (Yes, even if you’re impatient like me.)
Wine and beer pairings for 3 ingredient gluten free bread
Light White Wine Pairings
This gluten-free bread pairs beautifully with crisp, dry white wines that complement its subtle sweetness and crusty texture. A Sauvignon Blanc from New Zealand—like Oyster Bay—works perfectly with its bright citrus notes and herbal undertones. The acidity cuts through the bread’s richness, creating a refreshing contrast.
For a lighter option, try a Pinot Grigio from Italy, such as Santa Margherita. Its crisp, clean finish enhances the bread’s natural flavors without overpowering them. 🍷
Crisp Lager Complements
If you prefer beer, a light German Pilsner like Warsteiner or St. Pauli Girl provides a crisp, refreshing counterpoint to the bread’s crusty exterior. The subtle malt sweetness balances the bread’s slight honey notes.
For a hoppier option, try a Belgian Witbier such as Hoegaarden. The coriander and orange peel flavors add a refreshing twist that pairs wonderfully with the bread’s caramelized crust.
Red Wine Alternatives
For those who enjoy red wine, a light-bodied Pinot Noir from Oregon or Burgundy—like La Crema—offers a delicate fruitiness that won’t clash with the bread. The wine’s acidity and subtle earthiness complement the bread’s crust and interior texture.
Avoid heavy reds like Cabernet Sauvignon, as their tannins can overpower the bread’s delicate flavors.
Sweet Pairings for Toast
If you’re serving this bread as toast, consider pairing it with a Moscato d’Asti (a lightly sparkling Italian wine) or a Riesling with a touch of sweetness. The effervescence and subtle sweetness enhance the bread’s honey notes and crisp crust.
For a non-alcoholic option, try a sparkling apple cider or a ginger beer**—both add a refreshing zing to each bite. ✨
Nutrition facts
Frequently asked questions
Can I substitute regular flour for gluten-free flour in this recipe?
Never use regular wheat flour—it contains gluten, which this recipe intentionally omits. Gluten-free flour blends are specially formulated with xanthan gum or guar gum to mimic gluten’s binding properties. Substituting would result in a dense, crumbly loaf that lacks structure. If you’re new to gluten-free baking, invest in a quality 1:1 baking blend like Bob’s Red Mill or King Arthur.
Why does my gluten-free bread turn out dense or crumbly?
Density usually comes from underproofing or overmixing the dough. Let the dough rise until it reaches 1 inch above the pan rim (about 1-2 hours12-14% protein content and xanthan gum. If your blend lacks these, add 0.5 tsp xanthan gum separately.
Do I need a special baking pan for this gluten-free bread?
A standard 9×5-inch loaf pan works perfectly—no special equipment required! Dust it lightly with cornstarch before adding the dough to prevent sticking. For an even crispier crust, place an inverted baking sheet on the oven rack below the pan to create steam during baking. Avoid glass pans unless they’re thick—thin glass can cause uneven baking.
Can I make this bread without honey? What’s the best substitute?
Honey adds subtle sweetness but isn’t essential. Use 1 tbsp maple syrup or agave nectar for a 1:1 replacement. For a neutral option, try 1 tsp sugar dissolved in the warm water. The honey helps with crust color, so if omitting it, expect a slightly paler crust. The bread will still taste delicious—just slightly less caramelized.
How long should I let the bread cool before slicing?
Wait until the bread is completely cool to the touch—about 1-2 hours total cooling time. Slicing too soon causes crumbling because gluten-free bread lacks the elastic gluten proteins that hold wheat bread together. For clean slices, use a sharp serrated knife and cut against the grain. Store slices in an airtight container to maintain freshness.

- Pea Soup Instant Pot Recipe: Velvety Green Smoothness in 20 Minutes - November 1, 2026
- Pork Loin Pulled Pork Crock Pot Recipe: Slow-Smoked Tenderness With Zero Dryness - November 1, 2026
- Baked Potatoes in Crock Pot Recipe: Buttery Interiors and Crispy Top Magic - November 1, 2026