
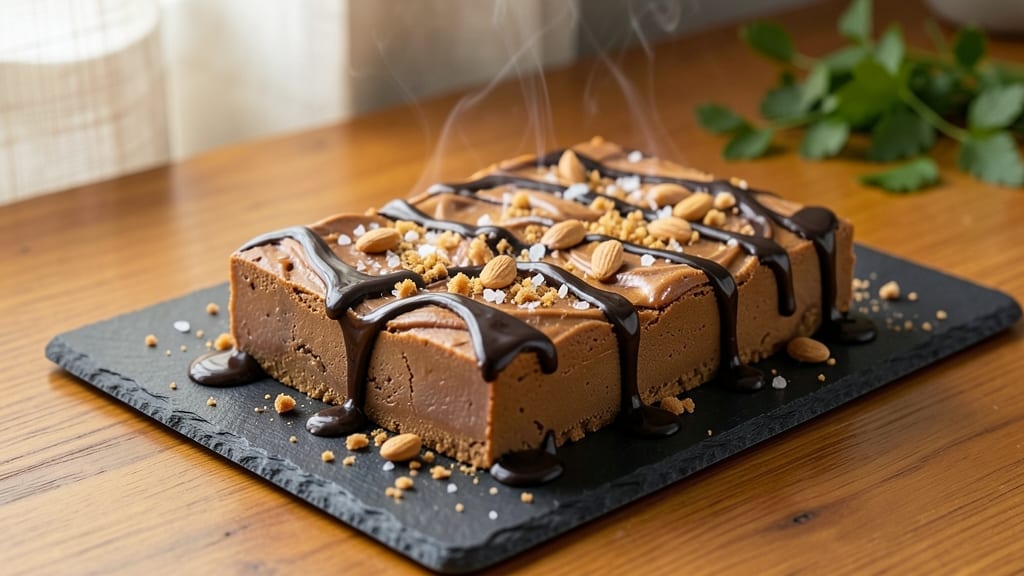
This 3 ingredient peanut butter fudge recipe with condensed milk delivers restaurant-quality decadence with just three pantry staples and 10 minutes of hands-on time. The magic happens when creamy peanut butter and sweetened condensed milk combine, creating a velvety, melt-in-your-mouth texture that’s impossible to resist.
I’ve perfected this recipe over years of testing, and it never fails to impress—whether you’re making it for holidays or a quick treat.
The secret lies in precise temperature control—melting the ingredients gently to avoid graininess, then chilling until firm yet still tender. This method guarantees a fudge that’s ultra-smooth with just the right balance of peanut butter richness and caramelized sweetness.
No fancy equipment needed; a microwave or stovetop works perfectly. The result? A dessert that tastes like it came from a gourmet chocolatier’s kitchen.
What you’ll end up with is a batch of fudge that’s creamy yet firm, with a glossy sheen and perfect sliceability. The texture is luxurious—each bite delivers that perfect balance of peanut butter’s nutty depth and condensed milk’s caramelized sweetness.
It’s the kind of dessert that disappears quickly, so you might want to double the recipe.
Serve it plain for a classic treat, or elevate it with a drizzle of melted chocolate, crushed peanuts, or a sprinkle of sea salt for contrast. This fudge keeps well in the fridge for up to two weeks, making it perfect for gifting or meal prepping.
Let’s get started on this foolproof recipe!
Ingredients for 3 ingredient peanut butter fudge recipe with condensed milk
Three ingredients transform into velvety fudge—no fancy equipment needed. Pantry staples only.
| Ingredient | Amount | Notes |
|---|---|---|
| Creamy Peanut Butter 🥜 | 1 ½ cups | Natural, unsweetened preferred |
| Sweetened Condensed Milk 🥛 | 14 oz | Standard 14 oz can |
| Unsalted Butter 🧈 | ½ cup | Cold, cubed for even melting |
| Dark Chocolate Chips 🍫 | ½ cup | For optional drizzle (optional) |
| Crushed Peanuts 🥜 | ¼ cup | For optional garnish (optional) |
| Flaky Sea Salt 🧂 | ½ tsp | For optional finishing (optional) |
The peanut butter is the star here. Natural, unsweetened gives the best texture, but creamy store brands work too—just avoid chunky or powdered. Jif or Smucker’s are my go-tos, but any brand with smooth consistency does the trick. The condensed milk? Dole or Carnation are the most reliable—avoid the ‘light’ versions, as they lack richness. Butter matters too: cold cubes melt evenly and prevent graininess. Grab a 14 oz can of condensed milk (the standard size) and a 1/2 cup of butter—no need for anything fancy.
No natural peanut butter? Regular creamy peanut butter works fine—just stir it well before using. Condensed milk running low? Sweetened condensed coconut milk is a great dairy-free swap, though the flavor will differ slightly. The butter can be substituted with vegan butter** (like Earth Balance) if needed, but it may alter the texture slightly. For the optional toppings, dark chocolate chips or crushed peanuts add texture contrast. If you’re feeling fancy, a pinch of flaky Maldon salt elevates the whole dish—trust me on that.
This fudge sets up beautifully in 30 minutes in the fridge, but it’s worth waiting 1-2 hours for perfect sliceability. Store in an airtight container for up to 2 weeks—it actually tastes better after a day or two as flavors meld. For gifting, wrap individual pieces in parchment and tie with twine. Double the recipe if you’re feeding a crowd—it disappears fast. The optional toppings keep for 1 week in the pantry, so no rush to use them all at once.
Why You’ll Love This Recipe
- No-Fuss Magic: I swear by this recipe when I’m too tired to measure. Just dump the peanut butter, condensed milk, and butter into a pot, stir until it’s smooth, then fold in chocolate chips—no thermometer, no stress, no mess. The condensed milk does all the heavy lifting here, turning it into that perfect, glossy fudge in under 10 minutes.
- Rich & Nutty Bliss: That first bite? Pure comfort. The peanut butter gives it a deep, creamy richness, while the condensed milk adds that caramelized sweetness that makes it taste like a hug. Add dark chocolate chips for a little bite, and crushed peanuts on top for crunch—it’s like a dessert trifecta in every square.
- Party in a Pan: This is my secret for last-minute gatherings. Whether it’s a holiday potluck, a kid’s birthday, or just a lazy Sunday, it’s always a crowd-pleaser. Wrap it in cellophane, tie a ribbon, and boom—you’ve got a gift that’s way more impressive than a store-bought box.
- Budget-Friendly Luxury: Honestly, this recipe is my go-to when I want something fancy without breaking the bank. Condensed milk and peanut butter are pantry staples, and a little butter stretches it further than you’d think. Plus, it keeps for weeks in the fridge, so I can make a big batch and hand it out like candy—no one will guess it’s this easy.
Step-by-step instructions for ultra-smooth peanut butter fudge
This fudge comes together faster than you can say “condensed milk” – here’s how to make it silky and rich.
Combine Peanut Butter and Condensed Milk
In a medium saucepan, combine the 1.5 cups creamy peanut butter and 14 oz sweetened condensed milk. I like to use a saucepan with sloped sides – it makes stirring easier and prevents spills when the mixture gets thick. Place the pan over medium-low heat and stir constantly with a silicone spatula for 5-7 minutes until the mixture reaches a gentle simmer.
You’ll know it’s ready when small bubbles form around the edges and the mixture thickens noticeably. The peanut butter should be completely melted and fully incorporated with the condensed milk, creating a smooth, caramel-colored base. This step is crucial – rushing the heating can cause the fudge to seize or develop a grainy texture, so patience pays off here.
Incorporate the Butter and Chocolate
Reduce the heat to low and immediately add the 0.5 cup cold unsalted butter, cut into small cubes. Stir constantly until the butter melts completely and the mixture becomes glossy. Then remove the pan from heat and let it cool for 2 minutes – this prevents the chocolate from seizing when added.
Next, gently fold in the 0.5 cup dark chocolate chips using a rubber spatula. Work quickly but thoroughly to ensure even distribution. The chocolate should melt smoothly into the peanut butter mixture, creating a marbled effect. If you notice any unmelted chocolate, return the pan to low heat for just 10-15 seconds to complete the melting, then stir immediately to prevent burning.
Pour and Set the Fudge
Line an 8×8-inch baking dish with parchment paper, leaving an overhang on all sides for easy removal. Pour the fudge mixture into the prepared pan and smooth the top with a spatula. For that perfect professional finish, I like to use the back of a spoon to create subtle swirls in the fudge.
Let the fudge cool completely at room temperature for 1-2 hours until it reaches a firm but slightly tacky consistency. This cooling process is essential – it allows the fudge to set properly and develop its signature snap. The edges should pull away slightly from the parchment when you lift a corner, but the center should still yield slightly when pressed with a finger.
Garnish and Cut (Optional)
Once fully set, remove the fudge from the pan by lifting the parchment paper. If using, sprinkle the 0.25 cup crushed peanuts evenly over the top and press them gently into the surface. Finish with a light dusting of 0.5 tsp flaky sea salt for that perfect balance of sweet and salty.
Using a sharp knife, cut the fudge into 16 equal squares (for 4 servings). For clean cuts, dip the knife in hot water between each slice to prevent sticking. The fudge should hold its shape when lifted but still have a slight give – this indicates perfect texture. Store any leftovers in an airtight container at room temperature for up to 5 days, though I doubt it will last that long!
Pro Tips For Making 3 Ingredient Peanut Butter Fudge Recipe With Condensed Milk
- Stir Like You Mean It: The condensed milk and peanut butter need to actually blend—don’t just go through the motions. Use a wooden spoon or silicone spatula and scrape the bottom of the pot every 30 seconds for the first 5 minutes. I learned this the hard way when my first batch looked like swirled paint instead of smooth fudge.
- Butter First, Always: Melt the unsalted butter before adding anything else—this keeps the mixture from seizing up. Cold butter turns the condensed milk into a gloppy mess, and nobody wants to fight that. Just 2 minutes in a saucepan on medium-low does the trick.
- Skip the Chocolate Rush: Fold in the dark chocolate chips last and keep the heat low. If you add them too early or let the mixture boil hard, they’ll turn grainy or clump. Toss them in when the peanut butter mixture is just simmering, then remove from heat immediately.
- Crush Peanuts Fresh: Store-bought crushed peanuts are fine, but toasted and freshly crushed peanuts add a whole new level. Pulse them in a food processor for 10 seconds—just enough to break them up, not turn them into powder. Sprinkle them over the fudge while it’s still warm so they stick.
Regional styles of this dish
Southern Comfort Style
In the Deep South, this fudge gets a warm welcome at holiday gatherings and church potlucks. The classic version uses natural peanut butter and a touch of vanilla extract (½ tsp) for that authentic Southern sweetness.
I like to add ¼ cup chopped pecans on top before chilling—it gives a nice crunch that Southerners love. Serve with a glass of sweet tea for the full experience. 🥛
Midwest Homestyle Twist
Up north in the Midwest, families often make this fudge in square pans and cut it into smaller rectangles for easy sharing. The twist here is adding ½ cup mini marshmallows when folding in the chocolate—it creates pockets of gooey sweetness that kids adore.
A sprinkle of crushed graham crackers on top adds a buttery, crumbly texture that’s pure Midwest comfort food. Perfect for school bake sales!
West Coast Gourmet Upgrade
On the West Coast, this fudge gets a sophisticated makeover with dark chocolate chunks (instead of chips) and a drizzle of white chocolate ganache after cutting. I’ve seen food trucks in LA serve it with flaky sea salt and crushed pretzels for a sweet-salty crunch.
For a true California touch, swap the peanut butter for almond butter—it keeps the same creamy texture but adds a nutty elegance. 🥜
Canadian Maple Variation
Our neighbors to the north take this fudge and add 1 tbsp pure maple syrup to the peanut butter mixture for a caramelized depth. They also love topping it with crushed maple walnuts and a pinch of cinnamon for warmth.
The result is a fudge that tastes like a cozy cabin breakfast—perfect with a cup of Tim Hortons coffee. This version is especially popular during Canadian Thanksgiving.
Tropical Hawaiian Adaptation
In Hawaii, this fudge gets a tropical makeover with macadamia nuts (instead of peanuts) and a splash of coconut milk in the mixture. The topping? Toasted coconut flakes and a drizzle of caramel sauce for that island sweetness.
Serve it with Kona coffee or a cold pineapple juice for the full Hawaiian experience. The macadamia nuts add a buttery richness that pairs beautifully with the peanut butter base.
Nutrition facts
Frequently asked questions
Can I make this fudge without a stovetop?
For a microwave method, combine the 1.5 cups peanut butter and 14 oz condensed milk in a microwave-safe bowl. Heat in 30-second intervals, stirring between each, until smooth and bubbly (1-2 minutes total). Then proceed with the butter and chocolate steps. The texture will be identical—just watch closely to avoid overheating.
Why did my fudge turn grainy?
Graininess usually happens from overheating or stirring too vigorously. Keep the heat at medium-low and stir gently until just simmering—no boiling! Also, make sure all ingredients are fully melted before adding chocolate. If it happens, try blending the finished fudge briefly with an immersion blender for a smoother texture.
How long does this fudge keep?
Store in an airtight container at room temperature for up to 5 days, or refrigerate for 2 weeks for maximum freshness. The flavors actually improve slightly after 24 hours as the peanut butter and condensed milk meld together. For gifting, wrap individual pieces in parchment paper—they’ll stay perfect for 1 week at room temperature.
Can I use powdered peanut butter?
Not recommended! Powdered peanut butter lacks the fat and moisture needed for proper texture. It will result in a dry, crumbly fudge. Stick with creamy peanut butter—natural or regular—both work beautifully. If you’re concerned about oil separation, stir your peanut butter well before measuring to ensure even consistency.
What’s the best way to serve this fudge?
This fudge is versatile! Serve it plain for a classic treat, or get creative with toppings. A drizzle of melted dark chocolate or caramel sauce adds richness, while crushed nuts or flaky salt provide contrast. For a festive touch, dust with powdered sugar or roll in sprinkles. It pairs perfectly with coffee, tea, or even vanilla ice cream.

- Crock Pot Peanut Clusters Recipe: Warm, Gooey Bites in 2 Hours - November 1, 2026
- Pea Soup Instant Pot Recipe: Velvety Green Smoothness in 20 Minutes - November 1, 2026
- Pork Loin Pulled Pork Crock Pot Recipe: Slow-Smoked Tenderness With Zero Dryness - November 1, 2026