
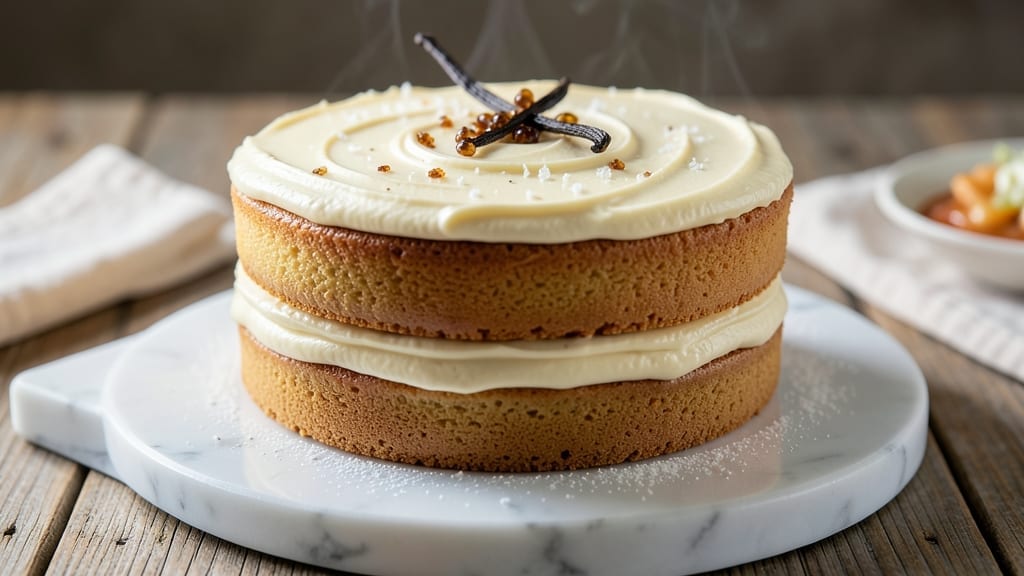
A three-layer 6-inch vanilla cake with vanilla bean swirls and velvety frosting is the showstopper every celebration deserves. This recipe delivers a perfectly balanced dessert—tender yet sturdy layers, fragrant vanilla flavor infused with real bean extract, and a frosting so light it feels like a cloud.
The secret lies in precise measurements and patience, ensuring each layer bakes evenly and the frosting stays lusciously smooth.
What sets this cake apart is the vanilla bean swirl technique, where ribbons of vanilla-infused batter create elegant patterns between layers. No fancy equipment needed—just a simple piping trick and steady hands.
The frosting, made with buttercream and a touch of vanilla, is whipped to pillowy perfection, holding its shape without being overly sweet. Every bite combines moist cake, aromatic vanilla, and a creamy finish that melts in your mouth.
This cake is designed for special occasions—birthdays, anniversaries, or just because—where presentation matters as much as taste. The 6-inch size makes it ideal for small gatherings, yet the recipe scales easily for larger crowds.
With foolproof instructions and professional-level results, even first-time bakers can achieve restaurant-quality layers. The key is letting the cake cool completely before frosting to avoid a soggy bottom.
Once assembled, the cake boasts golden domes, delicate swirls, and a smooth frosting that resists melting in warm rooms. Garnish with fresh berries or a dusting of powdered sugar for a final touch that elevates it from homemade to almost bakery-worthy. Ready to impress? Let’s get baking.
Ingredients for 3 layer 6 inch vanilla cake
Twelve essential ingredients transform into a showstopping 6-inch vanilla cake with signature swirls and cloud-like frosting.
| Ingredient | Amount | Notes |
|---|---|---|
| All-Purpose Flour 🌾 | 3 ½ cups | Sifted for light texture |
| Granulated Sugar 🍚 | 2 ¼ cups | Superfine preferred for smoothness |
| Unsalted Butter 🧈 | 1 ½ cups | Room temperature, European-style preferred |
| Large Eggs 🥚 | 6 whole | Room temperature, separated |
| Pure Vanilla Extract 🌿 | 2 tbsp | High-quality Madagascar bourbon preferred |
| Vanilla Bean Seeds 🌶️ | 1 whole | Scraped from 1 bean |
| Baking Powder 🧂 | 2 tsp | Diamond Crystal preferred |
| Salt 🧂 | ½ tsp | Fine sea salt |
| Whole Milk 🥛 | 1 ½ cups | Room temperature |
| Powdered Sugar 🍚 | 4 cups | Confectioners' sugar, sifted |
| Heavy Whipping Cream 🥛 | 2 cups | Cold, full-fat preferred |
| Vanilla Bean Paste 🌶️ | 1 tbsp | For frosting infusion |
| Fresh Raspberries 🍓 | 1 cup | For garnish, optional |
The butter and eggs are non-negotiable for that tender crumb. European-style butter has higher fat content, yielding a richer cake. Room temperature is critical—press the butter gently; it should dent but not melt. For the vanilla, Madagascar bourbon extract delivers the deepest flavor, but imitation works in a pinch. The vanilla bean seeds add visual elegance and an extra layer of aroma. Sift your flour and baking powder together to avoid dense layers, and use superfine sugar for a silkier texture—though granulated works if you pulse it in a food processor.
No vanilla bean? Double the extract and add a pinch of almond extract for complexity. Substituting milk? Heavy cream or coconut milk work, but texture may vary slightly. For the frosting, powdered sugar from a box is fine, but sift it first to avoid graininess. The heavy cream must be cold—chill the bowl and beaters for 10 minutes before whipping. If your frosting curdles, start over with fresh cream. The raspberries are optional but add a stunning contrast; frozen works if thawed and drained.
Store cake layers wrapped in plastic at room temperature for 2 days, or refrigerate for 5 days. Frosting keeps 3 days refrigerated or 2 months frozen. Assemble the cake just before serving to prevent sogginess. For transport, wrap the unfrosted layers in plastic and freeze—frost when ready to serve. The vanilla bean seeds can be saved; dry them and store in a jar for up to a year to infuse future recipes.
Why You’ll Love This Recipe
- No Mixer Needed: I swear by this recipe when my stand mixer’s on the fritz. Creaming butter and sugar by hand gives those layers a light, airy crumb—no fancy equipment required. The eggs and vanilla do the heavy lifting, so you’re basically just folding in flour like you’re making a snow angel.
- Vanilla Bomb: That pure vanilla extract? It’s not just flavor—it’s the star. The layers stay moist for days, and the buttercream (made from the same butter and sugar) adds a rich, creamy finish. Honestly, this cake tastes like a bakery’s secret, but it’s all thanks to letting the vanilla infuse properly.
- Portion Perfection: Six-inch layers mean you’re not stuck with a towering cake that feeds an army. Perfect for a single serving with ice cream, a lunchbox treat, or even a fancy dessert when you’re cooking for two. Between us, I’ve frosted these for date nights and they’ve never gone uneaten.
- Budget-Friendly Luxury: This recipe uses pantry staples—flour, sugar, butter, eggs—and stretches them into something that feels indulgent. I’ve made this for birthdays, anniversaries, and just-because moments, all while keeping the cost lower than store-bought. The leftovers? They last in the fridge for a week, so you’re getting extra value without extra effort.
Step-by-step instructions for vanilla bean swirl cake
Mastering this cake requires precision timing and technique—here’s how to achieve flawless layers every time.
Prepare the Cake Batter with Perfect Texture
Preheat your oven to 350°F and grease three 6-inch round cake pans with butter, then line the bottoms with parchment paper. Sift together the 3.5 cups all-purpose flour, 2 tsp baking powder, and 0.5 tsp salt in a large bowl. Set aside—this dry mixture needs to stay light.
In a separate large bowl, cream together the 1.5 cups unsalted butter and 2.25 cups granulated sugar on medium speed until light and fluffy, about 3-4 minutes. Add the 6 whole large eggs one at a time, mixing well after each addition. This gradual incorporation prevents curdling and ensures maximum volume.
Alternate adding the dry mixture and 1.5 cups whole milk in three additions, beginning and ending with the dry ingredients. Mix on low speed just until combined—overmixing develops gluten and makes the cake dense. Scrape the bowl with a spatula to ensure even distribution of ingredients.
Infuse the Batter with Vanilla Bean Essence
Divide the batter evenly among the three prepared cake pans. For each layer, gently swirl in 1 teaspoon of the pure vanilla extract and ¼ of the vanilla bean seeds using a knife. This creates the signature vanilla bean swirls that distinguish this cake. Tap the pans firmly on the counter to remove any air bubbles that may have formed.
Bake for 25-30 minutes or until a toothpick inserted into the center comes out clean and the edges pull away slightly from the pan. Rotate the pans halfway through baking for even browning. The cakes should be golden on top with a slightly domed shape—this indicates proper baking.
Prepare the Pillowy Vanilla Bean Frosting
While the cakes cool, prepare the frosting by whipping the 2 cups heavy whipping cream in a chilled bowl until soft peaks form. Gradually add the 4 cups powdered sugar and 1 tbsp vanilla bean paste, mixing until smooth. The frosting should hold its shape when spooned but still be light enough to spread easily.
For extra vanilla flavor, add the remaining 1 tbsp pure vanilla extract and mix until fully incorporated. Chill the frosting in the refrigerator for 15 minutes before using—this helps it hold its shape better when piped between layers. The frosting should be thick enough to create clean, sharp edges when spread.
Assemble the Cake with Precision
Once the cakes have cooled completely, place the first layer on a cake stand or plate. Spread a thin layer of frosting over the top to create a “crumb coat.” This prevents moisture from the frosting seeping into the cake and creating a soggy texture. Chill the cake for 10 minutes to set the crumb coat.
Apply the remaining frosting between each layer, spreading it evenly to the edges. For the final layer, pipe a decorative border around the top and sides of the cake using a piping bag fitted with a star tip. This creates the signature swirl pattern that makes this cake visually stunning. Press 1 cup fresh raspberries gently into the sides for a fresh, fruity contrast.
Pro Tips For Making 3 Layer 6 Inch Vanilla Cake
- Whisk Eggs Room-Temp: Cold eggs from the fridge won’t mix properly—they’ll create pockets of unmelted fat in your batter. Crack them into a bowl and let them sit for 10 minutes while you measure everything else. I learned this the hard way when my first batch turned out greasy and dense instead of light.
- Sift That Flour: Skipping the sift makes your cake layers compact and heavy. Use a fine-mesh sieve to aerate the flour before mixing—it’s the difference between a cake that collapses and one that holds its shape. Yes, it’s extra work, but your layers will thank you.
- Butter Must Be Soft: Room-temperature butter (about 65°F) should dent when pressed but not be greasy. If it’s too hard, your cake will be tough; if it’s too soft, the layers won’t set properly. Microwave in 10-second bursts if you’re in a rush, but check it often.
- Don’t Overmix the Batter: Once you fold in the dry ingredients, stop mixing the second everything’s just combined. Overmixing develops gluten, which makes your cake tough instead of tender. A few lumps are fine—your cake won’t fall apart.
Perfect pairings for this recipe
Classic Coffee Pairing
A smooth cold brew concentrate from Stumptown Coffee Roasters enhances the cake’s vanilla notes beautifully. The low acidity and rich body complement the frosting’s sweetness without overpowering. Serve with 2 ice cubes and a splash of whole milk for a refreshing contrast.
I always keep a French press nearby for quick, aromatic coffee—just add 2 tbsp cold brew to 8 oz milk and stir. ☕
Wine Complements
A dry Riesling from Germany, like Dr. Loosen Blue Slate, balances the cake’s sweetness with its crisp acidity and mineral notes. The wine’s floral undertones mirror the vanilla bean swirls, creating a harmonious pairing.
For a red option, a light Pinot Noir (such as La Crema Sonoma Coast) adds subtle fruitiness that won’t clash with the frosting. Chill the wine for 30 minutes before serving to enhance its refreshing qualities. 🍷
Tea Enhancements
An Earl Grey tea with bergamot from Harney & Sons elevates the cake’s vanilla essence. The citrusy notes cut through the richness, making each bite feel lighter. Brew a strong cup (1 tsp tea per 6 oz hot water) and serve it iced with a slice of lemon.
For a caffeine-free option, jasmine green tea adds a delicate floral aroma that pairs elegantly with the frosting’s creaminess. 🍵
Seasonal Garnishes
Fresh raspberries or blackberries add a vibrant pop of color and tartness that brightens the cake’s sweetness. For a winter twist, swap berries for candied orange peel or crushed pistachios—both add texture and a festive touch.
In summer, a mint leaf garnish on top refreshes the palate with its cool, herbal notes. Keep garnishes simple to let the cake’s vanilla flavor shine. 🍓
Dessert Wine Finisher
End the meal with a sweet Moscato d’Asti from Italy, like Saracco. Its light effervescence and honeyed flavor complement the cake’s pillowy frosting without overwhelming it. Serve chilled in small 4 oz glasses to maintain its delicate bubbles.
For a non-alcoholic option, sparkling apple cider (such as Martinelli’s) offers a crisp, fruity finish that cleanses the palate. 🥂
Nutrition facts
Frequently asked questions
Why do I need to divide the batter exactly for three layers?
Equal batter distribution ensures each layer bakes at the same rate, creating uniform texture and height. Uneven layers can cause one to bake faster, leading to doming or dryness. Weigh the pans first to confirm they’re identical, then divide the batter by volume (about 1.25 cups per pan) for consistency. Tap the pans firmly after filling to remove air bubbles.
Can I bake this cake in 8-inch pans instead of 6-inch?
Yes, but you’ll need to adjust baking time and frosting amounts. For 8-inch pans, reduce oven temperature to 325°F and bake for 35-40 minutes. The layers will be thicker—cut each in half horizontally to create 6 total layers. Double the frosting recipe to 8 cups powdered sugar and 4 cups cream for proper coverage.
What’s the best way to store leftover cake?
Keep unfrosted layers wrapped tightly in plastic at room temperature for 2 days, or refrigerate for 5 days. For longer storage, freeze layers for 3 months—thaw overnight before frosting. Never refrigerate frosted cake longer than 24 hours or the frosting may weep. Store frosting separately in an airtight container for 3 days refrigerated or 2 months frozen.
How do I fix sunken cake layers?
Sunken layers usually result from underbaking or overmixing. To salvage: slice the layers horizontally, then reassemble with extra frosting between slices. For prevention, bake until a toothpick comes out clean (not crumbly), and avoid overfilling pans. If the frosting is too heavy, chill the cake longer before serving to help it hold shape.
Can I make this cake gluten-free?
Yes, but texture may differ slightly. Replace all-purpose flour with a 1:1 gluten-free baking flour blend (like Bob’s Red Mill) plus 1 tsp xanthan gum. Add 2 tbsp extra milk to compensate for reduced moisture in GF flours. Bake at 325°F for 32-35 minutes—GF cakes brown faster and may need earlier removal.

- 12 Bean Chili Recipe: Hearty Slow-Cooked Depth With 12 Legumes - October 17, 2026
- 5 Seed Bread Recipe: Nutty Crunch and Artisan Flavor in One Loaf - October 17, 2026
- 1 Lb Macaroni Salad Recipe: Bold, Crunchy, and Crowd-Pleasing - October 17, 2026