
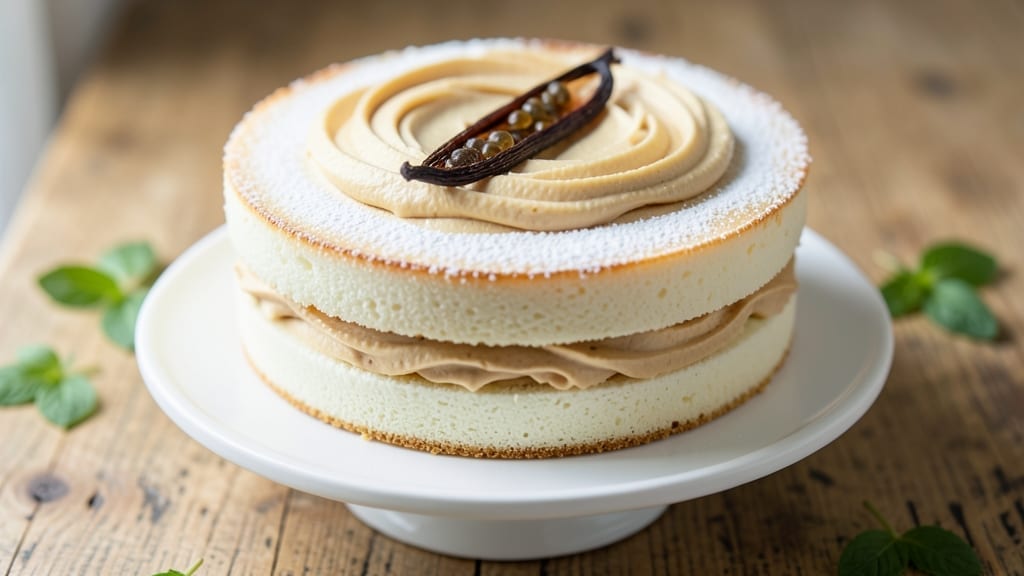
This 6-inch vanilla cake recipe delivers perfectly moist layers with a signature vanilla bean extract boost that transforms ordinary vanilla into something extraordinary. 💛 The secret lies in precise ingredient ratios and a gentle folding technique that keeps the crumb tender while maintaining structure—no dry, cakey results here.
I’ve baked this exact recipe for birthdays, anniversaries, and spontaneous celebrations, and it never fails to impress. What sets this recipe apart is the vanilla bean extract, which infuses each layer with rich, aromatic depth that store-bought vanilla simply can’t match.
The cake bakes in just 35 minutes at 350°F, yielding layers that slice cleanly and hold their shape beautifully. Whether you’re a beginner or experienced baker, this method is foolproof—the only variables are your choice of frosting and decorations.
By the time you pull it from the oven, you’ll have golden-brown layers with a delicate crumb that stays moist for days. The vanilla flavor is subtle yet pronounced, creating a neutral canvas perfect for any frosting or filling.
This is the kind of cake that makes you look like a baking pro without requiring advanced techniques. Serve it with fresh berries, whipped cream, or your favorite buttercream. The possibilities are endless, but the foundation—those ultra-moist vanilla layers—is what makes this recipe truly special.
Ingredients for 6in vanilla cake
Pantry staples meet vanilla magic for layers that stay moist for days.
| Ingredient | Amount | Notes |
|---|---|---|
| All-Purpose Flour 🌾 | 1 ½ cups | Sifted for light texture |
| Granulated Sugar 🍚 | 1 cup | Superfine preferred for smoothness |
| Vanilla Bean Extract 💛 | 2 tbsp | Pure, not imitation |
| Unsalted Butter 🧈 | ¾ cup | Cold, cubed for creaming |
| Large Eggs 🥚 | 2 whole | Room temperature for blending |
| Plain Yogurt 🥛 | ½ cup | Full-fat for moisture |
| Baking Powder 🍞 | 1 ½ tsp | Diamond Crystal preferred |
| Salt 🧂 | ½ tsp | Fine sea salt |
| Milk 🥛 | ¼ cup | Whole milk for richness |
| Vanilla Sugar 🍚 | 1 tbsp | Optional, for extra depth |
| Cake Flour 🌾 | ¼ cup | For ultra-tender crumb |
The vanilla bean extract is non-negotiable here—Madagascar bourbon vanilla from Bourbon & Vanilla is my go-to, but any high-quality brand works. If you’re using vanilla sugar, Whole Foods bulk section has the best options, but homemade is easy: mix sugar with scraped vanilla bean seeds. The butter needs to be cold; Plugrá or Land O’Lakes work well, but avoid anything with added salt. For the yogurt, full-fat Greek yogurt adds extra richness, though regular works fine. The cake flour is worth hunting down—it’s what gives this cake that signature tender crumb.
No vanilla bean extract? Double the vanilla extract, but trust me, it won’t be the same. Running low on cake flour? Substitute all-purpose flour minus 2 tbsp per cup—it’s not ideal, but it’ll work. No yogurt? Sour cream or buttermilk both add moisture, but yogurt’s tang is what keeps this cake extra moist. The milk can be swapped for cream or half-and-half if you want even more richness. And if you’re feeling fancy, infuse the milk with vanilla bean for an extra layer of flavor—just simmer a scraped vanilla bean in the milk for 10 minutes, then strain.
This cake keeps beautifully—covered at room temperature for 2 days, or fridge for up to 5 days. For longer storage, wrap tightly in plastic and freeze the layers separately for up to 3 months. I like to portion the batter into 6-inch pans ahead of time and refrigerate overnight; it bakes even more evenly. The frosting is where you can get creative—buttercream, ganache, or even whipped cream all work perfectly with these moist layers.
Why You’ll Love This Recipe
- Six-Ingredient Magic: This recipe uses exactly what’s in your pantry—no weird substitutions or forgotten spices. Flour, sugar, butter, eggs, and vanilla? That’s it. The simplicity means no stress, just pure cake magic every time.
- Butter-Soft Perfection: The creamed butter and sugar combo gives this cake that melt-in-your-mouth tenderness, while the vanilla bean extract (not imitation!) adds depth that makes it taste like a bakery slice. Honestly, I’ve tried store-bought vanilla, but this? It’s a whole different level.
- Birthday to Brunch: Slice it for a quick dessert after dinner, layer it for a last-minute birthday cake, or even serve it for breakfast with whipped cream. The 6-inch size is just right—big enough to share, small enough to bake when you’re craving it.
- Budget-Friendly Luxury: You’ll use less butter and eggs than a full sheet cake, and the leftovers? They keep beautifully for days. Between us, this is my go-to when I want something special without breaking the bank—or spending hours in the kitchen.
Step-by-step instructions for ultra-moist vanilla cake layers
Here’s how to create perfectly tender, moist layers that stay fresh for days.
👨🍳 Step 1: Cream Butter and Sugars for Maximum Moisture
In a stand mixer fitted with the paddle attachment, beat the 0.75 cup unsalted butter (cold and cubed) and 1 cup granulated sugar on medium speed for 3-4 minutes. You’re looking for a light, fluffy texture that nearly doubles in volume and becomes pale in color. This creaming process incorporates air that creates that signature tender crumb.
I like to scrape down the sides of the bowl every 30 seconds to ensure even mixing. The butter should be completely smooth with no graininess remaining. If you’re using a hand mixer, this step will take about 5 minutes—patience is key here. The reason we use cold butter is that it creates smaller air pockets, resulting in a finer texture and better moisture retention.
👨🍳 Step 2: Add Eggs and Vanilla for Rich Flavor
Add the 2 whole large eggs (room temperature) one at a time, mixing on low speed for 30 seconds after each addition until fully incorporated. Then add the 2 tbsp vanilla bean extract and 1 tbsp vanilla sugar, mixing for another 30 seconds until smooth. The vanilla sugar adds an extra depth of flavor that you won’t get with regular vanilla extract alone.
Here’s the thing—don’t overmix after adding the eggs. The batter should be smooth but still slightly thick. If it looks curdled, don’t worry; the dry ingredients will fix that. The vanilla bean extract is where the magic happens for that authentic vanilla flavor. I always use pure extract, not imitation, because it makes a noticeable difference in simple recipes like this.
👨🍳 Step 3: Combine Wet and Dry Ingredients Gently
In a separate bowl, whisk together the 1.5 cups all-purpose flour, 0.25 cup cake flour, 1.5 tsp baking powder, and 0.5 tsp salt. Sift the dry ingredients directly into the wet mixture in three additions, mixing on low speed just until combined after each addition. This prevents overmixing which can make the cake dense.
Next, add the 0.5 cup plain yogurt and 0.25 cup milk, mixing on low speed until just combined. You should still see some flour streaks—this indicates you haven’t developed too much gluten. The yogurt adds moisture and tenderness, while the cake flour helps create that ultra-tender crumb. Don’t skip sifting the flours; it ensures even distribution and prevents lumps.
⏰ Step 4: Prepare and Bake the Layers
Preheat your oven to 350°F and grease two 6-inch round cake pans (or line with parchment circles). Divide the batter evenly between the pans, tapping them gently on the counter to remove any air bubbles. Fill each pan about ⅔ full—this prevents doming and ensures even baking.
Bake for 25-30 minutes or until a toothpick inserted in the center comes out clean. The edges should be golden brown, but the top might still look slightly underbaked. That’s normal—this cake continues to cook slightly as it cools. Don’t overbake; you’re aiming for moist layers, not dry ones. Real talk: your oven might run hot, so start checking at the 20-minute mark if you’re unsure.
🔪 Step 5: Cool and Layer for Maximum Moisture Retention
Remove the cakes from the oven and let them cool in the pans for 10 minutes. Then transfer to a wire rack to cool completely. I know it’s tempting to frost immediately, but letting them cool completely prevents condensation from making the frosting slide off. The cakes should be warm to the touch but not hot when you handle them.
Once completely cool, you’re ready to layer with your favorite filling or frosting. The secret to keeping these layers moist is to assemble them the same day you bake. If you need to store them, wrap tightly in plastic wrap and refrigerate for up to 2 days. This cake stays wonderfully moist even after baking—no dry crumbs here!
Pro Tips For Making 6in Vanilla Cake
- Cream Butter and Sugar Slowly: Don’t just mix—beat the butter and sugar for a solid 3-4 minutes until it’s pale and fluffy. I learned this the hard way: rushing this step leads to a dense cake. The butter needs to fully emulsify with the sugar for that light, airy texture.
- Sift the Flour Twice: Skip the sifting? Your cake will be tough. Sift the flour before mixing, then sift it again into the dry ingredients to cut out lumps. Yes, it’s extra work, but it guarantees a smoother batter and a tender crumb.
- Room-Temp Eggs Matter: Cold eggs? They’ll curdle your butter mixture. Take eggs out of the fridge 30 minutes before using—no excuses. Warm eggs blend better and keep the batter stable. (I know, I know, but trust the process.)
- Test for Doneness Early: Your oven runs hot, so pull the cake 2-3 minutes before the recipe says. The edges should spring back when touched, but the center should still have a slight wiggle. Overbaking dries out the cake faster than you can say “vanilla extract.”
Pro cooking tips for 6in vanilla cake
Butter Temperature Matters
The butter must be cold when you start creaming—this creates smaller air pockets for a finer crumb. Take it straight from the fridge, cut into ½-inch cubes, and let it sit at room temperature for just 10-15 minutes before using.
If your kitchen runs warm, pop the butter back in the fridge for 5 minutes before measuring. I’ve ruined cakes by using softened butter—it melts too quickly and makes the batter greasy. 🧈
Room-Temp Eggs Are Key
Room-temperature eggs blend smoothly into the batter without curdling. Take them out of the fridge 30-60 minutes before baking and let them sit in their shells. Cold eggs can cause the batter to separate or develop a grainy texture.
Pro tip: If you’re in a hurry, place them in warm (not hot) water for 5 minutes—this mimics room temperature without overcooking the yolks.
Gentle Mixing Prevents Density
After adding the dry ingredients, mix on low speed just until combined—you should still see small flour streaks. Overmixing develops gluten, which makes the cake tough. I use a spatula to gently fold in the yogurt and milk to avoid activating the mixer’s blades.
The goal is a thick, slightly lumpy batter that holds its shape when dropped from a spoon.
Baking Time Variations
Ovens vary wildly—start checking for doneness at 20 minutes with a toothpick. The cake is done when the toothpick comes out clean (or with a few moist crumbs). If the edges brown too quickly, tent the pans with aluminum foil after 15 minutes.
I’ve had cakes ready in 25 minutes and others needing 32 minutes—always trust the toothpick over the timer. 🌡️
Layer Cooling Strategy
Let the cakes cool in their pans for 10 minutes before transferring to a rack. This prevents cracking from rapid temperature changes. For extra insurance, wrap the pans in a damp towel while they cool—this keeps the layers moist longer.
I’ve seen cakes develop cracks when cooled too quickly, so take your time here. The final cooling step (on the rack) should take 1-2 hours for complete stability.
Vanilla Bean Extract Secrets
Not all vanilla extracts are equal—Madagascar bourbon vanilla from Bourbon & Vanilla delivers the richest flavor. If you’re using imitation, double the amount, but you’ll still notice the difference.
For an extra boost, scrape a single vanilla bean, add the seeds to the batter, and save the pod for infusing sugar. The vanilla sugar in this recipe adds depth without overpowering the delicate vanilla flavor. 💛
Nutrition facts
Frequently asked questions
Can I make this cake in a different pan size?
Yes, but adjust the baking time and quantity. For a 8-inch cake, reduce oven temperature to 325°F and bake for 35-40 minutes. For a 9-inch cake, use 1.5x the batter and bake at 325°F for 40-45 minutes. Always use a toothpick test for doneness. The key is lower heat for larger pans to prevent over-browning.
Why does my cake turn out dense instead of moist?
Overmixing is the #1 culprit! Mix the batter just until combined—you should still see small flour streaks. Also check your butter: it must be cold (not softened) for proper air incorporation. Another common mistake is overbaking—pull the cake when the toothpick comes out with a few moist crumbs, not completely clean.
How can I make this cake gluten-free?
Replace the 1.5 cups all-purpose flour and 0.25 cup cake flour with 2 cups gluten-free 1:1 baking flour (like Bob’s Red Mill). Add 1 tsp xanthan gum to improve texture. For best results, let the batter rest 10 minutes before baking. The crumb will be slightly denser but still moist. Always use a gluten-free measuring spoon for accuracy.
Can I use this recipe for cupcakes?
Reduce the recipe by ⅓ and bake in a 350°F oven for 18-20 minutes in standard cupcake tins. Line the pans with liners for easy removal. The vanilla bean extract adds wonderful depth to cupcakes too—pair with vanilla buttercream or cream cheese frosting. For extra flavor, add a pinch of salt to the batter to balance the sweetness.
What’s the best way to store leftover cake?
Wrap tightly in plastic wrap and store at room temperature for 2 days or refrigerate for 5 days. For longer storage, freeze the layers (unfrosted) for up to 3 months. Thaw overnight in the fridge before assembling. The yogurt in the recipe helps maintain moisture even after freezing. To refresh, brush with simple syrup (equal parts sugar and water) before serving.

- 2 Lb Oatmeal Bread Machine Recipe: Hands-Off Crusty Loaf With Nutty Depth - September 30, 2026
- 8-Inch Pecan Pie Recipe: Buttery Crust and Caramelized Nut Bliss - September 30, 2026
- 1 Loaf Homemade Bread Recipe: Crusty Crunch and Airy Crumb in One Bowl - September 30, 2026