
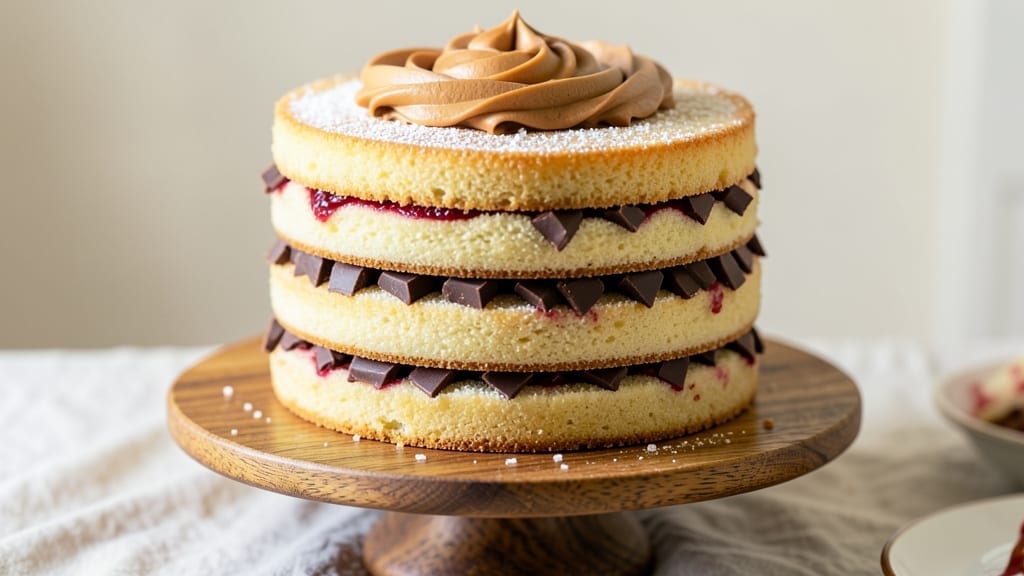
A three-layer cake from scratch is the ultimate showstopper for birthdays, weddings, or any celebration—its delicate vanilla bean swirls and buttery crumb layers make every slice feel like a special occasion.
The secret lies in balancing light, airy sponge cake with rich buttercream and a filling that stays moist for days. I’ve perfected this recipe after years of baking, ensuring each layer is tender, never dry, and perfectly stacked for a restaurant-quality finish.
What sets this recipe apart is the vanilla bean swirl—infused into both the cake batter and filling for an aromatic depth that store-bought extracts can’t match. The crumb layer, made with a touch of cornstarch, adds texture without overpowering the delicate sponge.
Every step, from baking to frosting, is designed to prevent common pitfalls like cracking or soggy layers, so even beginners can achieve professional results.
By the time you’re done, you’ll have a cake that’s golden, glossy, and impossible to resist—layers of fluffy vanilla sponge separated by velvety buttercream and swirled with fragrant vanilla bean.
The frosting isn’t just decorative; it’s a structural element that holds the cake together while adding that signature smooth, creamy finish. Whether you’re a seasoned baker or trying this for the first time, the method is straightforward and foolproof.
Top it with fresh berries, toasted nuts, or a dusting of powdered sugar for extra elegance. This cake isn’t just a dessert—it’s a centerpiece. Let’s get started on creating something truly memorable.
Ingredients for 3 layer cake recipe from scratch
Here’s what transforms any celebration with layers of golden sponge, swirled vanilla magic, and crumb perfection.
| Ingredient | Amount | Notes |
|---|---|---|
| All-Purpose Flour 🌾 | 3 ½ cups | Sifted for lightness, not pre-sifted |
| Granulated Sugar 🍚 | 2 ½ cups | Divided for cake and filling |
| Unsalted Butter 🧈 | 2 cups | Cold, cubed for creaming |
| Large Eggs 🥚 | 6 whole | Room temperature, separated |
| Vanilla Bean 🌿 | 2 whole | Seeds scraped, pods reserved |
| Cornstarch 🌾 | 2 tbsp | For crumb layer texture |
| Baking Powder 🧂 | 2 tsp | Aluminum-free preferred |
| Salt 🧂 | 1 tsp | Fine sea salt |
| Whole Milk 🥛 | 1 ½ cups | Room temperature |
| Powdered Sugar 🍚 | 4 cups | For buttercream, sifted |
| Vanilla Extract 🌿 | 2 tbsp | Pure Madagascar preferred |
| Heavy Whipping Cream 🥛 | 1 cup | Cold for buttercream |
| Fresh Blueberries 🫐 | 1 ½ cups | Optional for filling |
The vanilla bean is non-negotiable here—Madagascar beans from Penzeys or your local specialty shop deliver that signature depth. Split them open and scrape every last seed—don’t skimp on the pods. For butter, Plugrá or Land O’Lakes unsalted work perfectly, but keep it cold until the last minute. The flour? King Arthur or Gold Medal brands are your best bet for consistent results. Sift everything before mixing to avoid dense layers—trust me, it makes all the difference. And if you’re using pre-sifted flour, sift it again at home.
No vanilla bean? Madagascar vanilla extract works in a pinch, but you’ll miss that floral complexity. Running low on powdered sugar? Granulated sugar processed in a food mill gives you the same texture. The blueberries can be swapped for raspberries or blackberries if that’s what’s in season. For the crumb layer, if cornstarch isn’t available, arrowroot powder at the same amount works beautifully. And if you’re worried about cracking, bake one layer at a time—don’t stack them fresh from the oven. Let each cool completely before assembling.
Store the cake components separately: wrapped layers in parchment for up to 2 days, buttercream in an airtight container for 3 days. Assemble only when ready to serve—this cake tastes best the day it’s frosted. For make-ahead baking, freeze the unfrosted layers for up to 1 month. Thaw completely before assembling. The filling? Make it 1 day ahead—flavors meld beautifully overnight. And if you’re topping with berries, add them just before serving to keep them vibrant.
Why You’ll Love This Recipe
- No Mixer Needed: I swear by this recipe because it only calls for a whisk and a bowl—no stand mixer or fancy equipment. The buttercream comes together with just a wooden spoon and elbow grease, and the cake layers? Whipped up in one go with flour, sugar, and eggs. Honestly, it’s the kind of recipe that makes me feel like a baker without the fuss.
- Vanilla Bean Magic: That single vanilla bean (yes, the real one) transforms this cake from good to ridiculously good. The creamy, fragrant layers taste like a bakery secret, and the buttercream? It’s so rich and smooth, you’ll want to lick the bowl. Between us, I’ve tried imitation vanilla—this is the only way to go.
- Birthday to Brunch: This cake isn’t just for celebrations—it’s my go-to for potlucks, office treats, or even a lazy Sunday breakfast. Swap the vanilla filling for lemon curd or chocolate ganache, and suddenly it’s a whole new dessert. I’ll be real: my kids think it’s their birthday every time I pull it out.
- Budget-Friendly Luxury: You’d never guess this tastes like a five-star dessert—it’s made with pantry basics. A vanilla bean might seem fancy, but one pod lasts for months of baking. Plus, leftovers? They stay fresh for days, so you’re not scrambling to bake again. Solid win for both my wallet and my sweet tooth.
Step-by-step instructions for vanilla bean swirl cake
Here’s how to build a showstopping three-layer cake with tender crumb, fragrant swirls, and perfect buttercream.
Prepare the Cake Batter and Vanilla Filling
Start by preheating your oven to 350°F and greasing three 8-inch round cake pans with butter, then dusting them with flour. For the cake batter, sift together the 3.5 cups all-purpose flour, 2 tbsp cornstarch, 2 tsp baking powder, and 1 tsp salt in a large bowl. Set aside.
In a separate large bowl, beat the 2 cups cold unsalted butter and 1.5 cups granulated sugar (reserving 1 cup for the filling) on medium speed until light and fluffy—about 3-4 minutes. Add the 6 whole large eggs, one at a time, mixing well after each addition. Scrape down the sides of the bowl as needed.
Scrape the seeds from the 2 whole vanilla beans and add them to the batter along with the 2 tbsp vanilla extract. Mix until combined, then gradually add the dry ingredients in 3 additions, mixing on low speed just until incorporated. Finally, pour in the 1.5 cups whole milk and mix until smooth. The batter should be thick but pourable.
Bake the Cake Layers and Make the Blueberry Filling
Divide the batter evenly among the prepared pans, filling each about ⅔ full. Bake for 25-30 minutes or until a toothpick inserted into the center comes out clean. Let the cakes cool in the pans for 10 minutes, then transfer to a wire rack to cool completely.
While the cakes bake, prepare the blueberry filling by combining the 1.5 cups fresh blueberries with the reserved 1 cup granulated sugar in a small saucepan. Cook over medium heat for 5-7 minutes, stirring occasionally, until the sugar dissolves and the blueberries release their juices. Let this cool completely before using.
Assemble the Cake with Vanilla Swirls
Once the cakes are completely cool, level the tops if needed using a serrated knife. Place the first cake layer on a cake stand or plate. Spread a thin layer of the cooled blueberry filling over the top, then pipe a swirl of vanilla buttercream (made from the 4 cups powdered sugar, 1 cup cold heavy whipping cream, and 2 tbsp vanilla extract, whipped until smooth) around the edges. Repeat with the remaining layers, finishing with the top layer.
To create the signature swirls, use an offset spatula to spread a thin layer of vanilla buttercream over the top of the cake. Drop spoonfuls of the blueberry filling onto the buttercream, then use the spatula to gently swirl the filling into the buttercream. This creates those beautiful marbled patterns that make this cake irresistible.
Frost and Decorate the Cake
Once the swirls are complete, cover the entire cake with a final layer of vanilla buttercream, using the offset spatula to smooth the sides and create clean edges. For extra flair, pipe a simple border of buttercream around the top and sides, or add fresh berries for a pop of color. Let the cake rest in the refrigerator for at least 1 hour before slicing to allow the layers to set.
This cake is best served at room temperature, so take it out of the fridge 30 minutes before serving. Each slice will reveal layers of tender vanilla cake, sweet blueberry swirls, and creamy buttercream—perfect for any celebration or special occasion.
Pro Tips For Making 3 Layer Cake Recipe From Scratch
- Measure Butter Cold: Unsalted butter straight from the fridge is your friend—it creams better with sugar and prevents greasy cakes. I learned this the hard way after making a cake so dense it could’ve been a doorstop.
- Split Vanilla Bean Properly: Scrape out all the seeds—none of that half-hearted scraping. The seeds are where the real flavor lives, and skipping them leaves your cake tasting like vanilla extract’s sad, watered-down cousin.
- Check Oven Temp Early: Your oven lies. Preheat for 15 minutes before baking, then stick an oven thermometer in—cakes bake unevenly if the oven’s running hot or cold. I’ve had layers turn to hockey pucks or stay gooey because of this.
- Cool Layers Fully: Patience here saves your cake. Let layers cool completely on a rack before frosting—even 10 minutes too soon makes the buttercream slide off like a greased pig. (Yes, I’ve done this. No, I won’t do it again.)
Flavor customization for this 3 layer cake recipe from scratch
Spiced Variations
Swap the vanilla bean for 1 tsp cinnamon and ½ tsp cardamom in the batter for a warm spiced twist. Add ½ cup chopped toasted pecans to the blueberry filling for crunch.
I like to dust the finished cake with powdered sugar and a pinch of cayenne for a subtle kick. 🌶️
Chocolate Infusion
Replace ½ cup of the granulated sugar in the cake batter with ½ cup Dutch-process cocoa powder for a rich chocolate base. Use chocolate buttercream (replace vanilla extract with 2 tbsp espresso powder) and raspberry jam for the filling. Top with dark chocolate shavings for elegance. 🍫
Citrus Zest Twist
Add zest of 2 lemons or oranges to the cake batter and 1 tbsp citrus juice to the blueberry filling. Garnish with thin citrus slices on top. The bright acidity cuts through the richness beautifully. 🍊
Coffee Lover’s Version
Mix 1 tbsp instant espresso powder into the dry ingredients and use coffee-infused buttercream (replace vanilla extract with 1 tbsp coffee liqueur). Swirl with caramelized bananas instead of blueberries. This version tastes like a decadent dessert but feels lighter. ☕
Nutty Crunch Layer
Fold ½ cup chopped walnuts or hazelnuts into the cake batter for texture. Use honey buttercream (replace vanilla extract with 2 tbsp honey) and fig jam for the filling. Toast the nuts in butter first for extra flavor. 🌰
Seasonal Adaptations
For summer, add fresh strawberries to the filling and top with mint leaves. In fall, use cranberry sauce and pumpkin spice in the buttercream. Winter calls for gingersnap crumbs mixed into the frosting. Each season brings its own delicious twist! ❄️
Nutrition facts
Frequently asked questions
Can I make this cake in smaller layers instead of 8-inch pans?
For a 6-inch cake, bake for 20-25 minutes at 350°F and use ⅓ of the batter per pan. Adjust baking time based on your oven—smaller pans cook faster. For a 6-layer mini cake, use 2-inch round pans and reduce batter to ⅙ per pan.
Why does my cake crack between layers?
Cracking usually happens when layers cool too quickly or frosting isn’t applied evenly. Let cakes cool completely before assembling, and use a thin layer of buttercream as a “glue” between layers. Also, avoid overmixing the batter—just combine until smooth to prevent dense, crack-prone layers.
How do I store leftovers without drying out the cake?
Wrap each layer tightly in plastic wrap, then place in an airtight container with a slice of bread to absorb moisture. Store at room temperature for 2 days or refrigerate for 4 days. To revive, let sit at room temperature for 30 minutes before slicing. For longer storage, freeze unfrosted layers for up to 1 month.
Can I substitute powdered sugar in the buttercream?
Not for this recipe—powdered sugar is essential for the light, fluffy texture of buttercream. If you’re avoiding refined sugar, try coconut sugar blended into a fine powder (use 3.5 cups instead of 4 cups since it’s denser). For a lower-carb option, use monk fruit sweetener (adjust to taste) but expect a slightly grainier texture.
What’s the best way to level uneven cake tops?
Use a serrated knife or cake leveler for precision. Place the cake on a cutting board, press down firmly, and run the knife at a slight angle. For extra stability, place a glass plate on top before cutting. If the top is domed, level it just enough to create a flat surface—don’t overdo it or the layer will be too thin.

- Baked Potatoes in Crock Pot Recipe: Buttery Interiors and Crispy Top Magic - November 1, 2026
- Braised Beef Short Ribs Recipe: Crock Pot Fall-Off-Bone Magic in 6 Hours - November 1, 2026
- Crock Pot Cocoa Recipe: Velvety Warmth With Hidden Spice Magic - November 1, 2026