
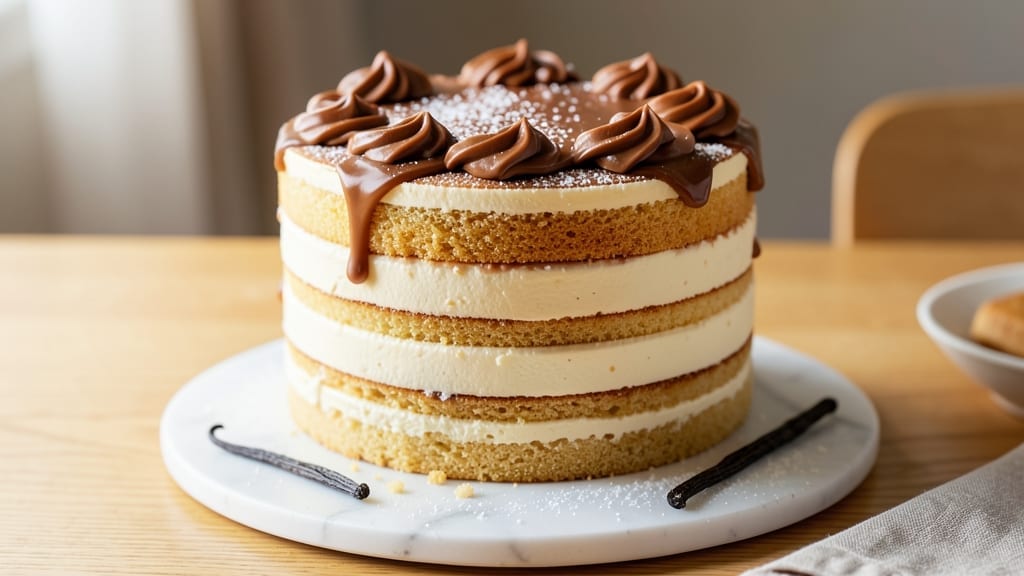
A 4-layer vanilla cake with precision stacked layers and vanilla bean extract transforms any celebration into a showstopper. 💛 The secret lies in perfectly balanced batter, even baking, and chilling each layer to create a structure that supports luscious frosting without collapsing.
I’ve perfected this technique after years of trial and error—no more soggy bottoms or uneven tiers.
This recipe delivers restaurant-quality results with simple ingredients and clear instructions. You’ll bake four identical layers using a foolproof vanilla cake batter infused with real vanilla bean extract for depth of flavor.
Each layer is baked at 350°F for 25-30 minutes, then chilled before assembly to ensure clean cuts and stable stacking.
The final result is a towering cake with perfectly moist layers, smooth frosting, and a flawless finish. The vanilla bean extract elevates the flavor from ordinary to extraordinary, creating a dessert that tastes as impressive as it looks.
Whether for a wedding, anniversary, or special occasion, this cake delivers professional-quality results at home.
Optional decorative touches like fresh berries, gold leaf, or piped buttercream designs take it to the next level. Let’s create a cake that will be the star of any event—without the stress of last-minute baking mishaps.
Ingredients for 4 layer vanilla cake
Precision-baked layers and vanilla bean extract create a showstopping 4-layer vanilla cake.
| Ingredient | Amount | Notes |
|---|---|---|
| All-Purpose Flour 🌾 | 4 ½ cups | Sifted for even texture |
| Granulated Sugar 🍚 | 2 ½ cups | Superfine preferred for smoothness |
| Unsalted Butter 🧈 | 2 cups | Room temperature, 68°F |
| Large Eggs 🥚 | 8 whole | Room temperature, separated |
| Pure Vanilla Extract 🌿 | 2 tbsp | High-quality for flavor depth |
| Vanilla Bean Extract 🌿 | 1 tbsp | Seeds scraped for authentic flavor |
| Baking Powder 🧂 | 2 tbsp | Aluminum-free preferred |
| Salt 🧂 | ½ tsp | Fine sea salt |
| Milk 🥛 | 1 ½ cups | Room temperature, 2% fat |
| Buttercream Frosting 🍰 | 6 cups | Homemade or high-quality store-bought |
| Powdered Sugar 🍚 | 4 cups | Sifted for smooth frosting |
| Heavy Whipping Cream 🥛 | 2 cups | Cold, 36% fat minimum |
| Unflavored Gelatin 🍬 | 1 ½ tsp | Bloomed in cold water |
| Vanilla Bean Seeds 🌿 | 1 whole | Scraped from 1 vanilla bean |
| Cake Board 🍰 | 1 whole | 12-inch diameter, sturdy |
The vanilla bean extract is non-negotiable—look for pure Madagascar beans at specialty stores like Williams Sonoma or Sur La Table. Scrape the seeds yourself for maximum flavor impact; pre-scraped extracts often lack depth. For butter, Plugrá or Land O’Lakes unsalted are reliable choices, but always bring it to room temperature by cutting into small cubes and letting it sit for 2 hours. The flour should be sifted to eliminate lumps, which can create uneven texture in the batter. King Arthur or Gold Medal brands are ideal for their consistent quality. If you’re using superfine sugar, it’s worth the extra step—it dissolves more smoothly and creates a finer crumb.
No vanilla bean extract? Double the pure vanilla extract and add a pinch of ground cinnamon for depth, though it won’t replicate the complex notes of real vanilla. For the buttercream, store-bought American-style frosting works in a pinch, but homemade with powdered sugar and heavy cream yields superior results. Substitute milk with evaporated milk for slightly richer flavor, or use almond milk** for a dairy-free option (though texture may vary). The gelatin in the frosting stabilizes the layers—ensure it’s bloomed properly in cold water for 10 minutes before heating. If you’re short on time, agar-agar powder** can replace gelatin in a 1:1 ratio for a vegan alternative.
Store unbaked cake layers wrapped in plastic at room temperature for up to 24 hours—they’ll keep better than you think. Once assembled, the cake stays fresh for 3-4 days at room temperature if stored in a cool, dry place, or 1 week refrigerated. For long-term storage, freeze the fully assembled cake (unfrosted or with a thin layer of frosting) for up to 3 months. To serve, bring it to room temperature for 1-2 hours before slicing—this ensures clean cuts and prevents crumbs. The frosting can be made 1 day ahead and stored in the fridge, rewhipped to fluffiness before assembly.
Why You’ll Love This Recipe
- No Fuss Layers: I swear by this method—just four simple batters, no fancy piping bags. You mix, bake, and stack while the coffee brews. The buttercream? Whipped in minutes with the same butter you just softened for the cake.
- Vanilla Overload: That first bite? Pure comfort. The layers are tender but sturdy, and the vanilla extract (not imitation!) sings through every forkful. Honestly, I’ve tasted fancier cakes that couldn’t compete.
- Party in a Box: This cake handles anything—birthday slices, office treats, or a midnight craving. The layers stay moist for days, so you’re covered whether you’re feeding a crowd or saving leftovers for your kid’s school bake sale.
- Budget-Friendly Luxury: You’re using pantry staples here: flour, sugar, butter, eggs. No specialty items, no waste. Between us, this is how I stretch my grocery budget without sacrificing dessert—because who says cake can’t be practical?
Step-by-step instructions for precision stacked vanilla cake layers
Mastering this 4-layer cake requires patience and precision—every step builds toward flawless layers.
👨🍳 Step 1: Prepare the Cake Batter with Exact Measurements
In a large mixing bowl, whisk together the 4.5 cups all-purpose flour, 2.5 cups granulated sugar, 2 tbsp baking powder, and 0.5 tsp salt. Sift the dry ingredients together to eliminate lumps and ensure even distribution throughout the batter. This creates a lighter, more uniform texture in each layer.
In a separate bowl, beat the 2 cups unsalted butter until smooth and creamy—it should be at room temperature (68°F). Add the 8 whole large eggs one at a time, mixing well after each addition. The mixture should become pale and slightly thickened. Stir in the 2 tbsp pure vanilla extract and 1 tbsp vanilla bean extract along with the 1 whole vanilla bean seeds scraped from the pod.
Gradually add the 1.5 cups milk while mixing on low speed to maintain a smooth consistency. The batter should be thick but pourable—if it’s too stiff, add 1-2 tablespoons of milk to reach the ideal texture. Cover the bowl and let the batter rest for 10 minutes at room temperature. This allows the flour to fully hydrate, resulting in a tender crumb.
🔥 Step 2: Bake the Layers to Perfect Doneness
Preheat your oven to 350°F and grease three 8-inch round cake pans with butter or baking spray. Line the bottoms with parchment paper to prevent sticking. Divide the batter evenly among the pans—each should contain 1.5 cups of batter. Tap the pans gently on the counter to remove any air bubbles.
Bake for 25-30 minutes until a toothpick inserted into the center comes out clean and the edges are lightly golden. Avoid overbaking—this can make the layers dry and crumbly. Once done, let the cakes cool in the pans for 10 minutes, then transfer them to a wire rack to cool completely. This gradual cooling prevents cracking as they shrink.
While the cakes cool, prepare the 6 cups buttercream frosting by whipping the 2 cups heavy whipping cream to stiff peaks, then gradually folding in the 4 cups powdered sugar until smooth. Add the remaining 2 tbsp pure vanilla extract for extra flavor. Chill the frosting for 30 minutes before assembling to make it easier to work with.
🥘 Step 3: Assemble the Layers with Precision
Place the first cake layer onto the 12-inch cake board. Spread a thin layer of frosting (½ cup) over the top to create a “crumb coat.” This prevents crumbs from getting into the final frosting layer. Repeat this process with the remaining two layers, placing them in the refrigerator as you go to keep them stable.
Once all layers are crumb-coated, let them sit at room temperature for 5 minutes to firm up slightly. Then, spread 1½ cups frosting evenly over the first layer. Place the second layer on top, gently pressing down to create a clean edge. Repeat with the third layer, ensuring each one is level. The final layer should sit directly on top of the third, with no gaps.
For the fourth layer, you’ll need to create a “dummy layer” using the remaining frosting. Pipe or spread 1 cup frosting onto a parchment-lined plate, then place the fourth cake layer on top. Chill this assembly in the freezer for 10 minutes to firm up. Once set, carefully remove the parchment and place it on top of the third layer, pressing gently to create a flat, even surface.
🎂 Step 4: Frost and Decorate for a Showstopping Finish
Use a long serrated knife to trim any uneven edges from the sides of the cake. Apply a thin layer of frosting (½ cup) to the sides and top to create a smooth base for the final decoration. Spread the remaining 2½ cups frosting evenly over the entire cake, using an offset spatula to achieve a flawless finish.
For a polished look, dip the spatula in warm water and smooth the frosting in one continuous motion. Chill the cake in the refrigerator for 1 hour to set the frosting completely. Before serving, dust the top lightly with powdered sugar for a professional touch. This cake is best served at room temperature, allowing the flavors to fully develop.
Pro Tips For Making 4 Layer Vanilla Cake
- Weigh Your Butter: The recipe calls for “softened butter,” but that’s vague—your butter should be just pliable, like warm Play-Doh, not greasy or crumbly. I learned this the hard way when my first batch had dense layers because the butter was too warm and melted into the sugar. Use a kitchen scale for precision, and if you’re in a rush, microwave it in 10-second bursts, checking between each.
- Sift That Flour: Skipping the sift for all-purpose flour might seem like a small thing, but it makes a real difference in texture. The extra aeration lightens the batter, and you’ll avoid those stubborn lumps that sneak in when you just scoop from the bag. Do it before mixing, and tap the measuring cup on the counter to level it off—no packing, no guessing.
- Rotate Your Pans: Your oven’s hot spots are real, and if you bake all four layers at once, the edges will burn before the centers set. Rotate the pans halfway through baking (front to back, top to bottom) for even cooking. I was skeptical until I tried it—now my cakes rise uniformly, and no one’s left with a dry outer crust.
- Cool Layers Slowly: Popping the cake pans out of the oven and onto a wire rack feels urgent, but resist the urge. Let them cool for 10 minutes in the pan before transferring—this prevents the layers from cracking when you run a knife around the edges. I used to rush this, and my cakes would split like overripe fruit. Patience here saves you from redoing the whole thing.
Health benefits of these flavors
Vanilla’s Nutritional Perks
Vanilla bean extract isn’t just about flavor—it contains trace amounts of antioxidants and anti-inflammatory compounds that support cellular health. While the amounts are small, the aromatic compounds like vanillin may help reduce oxidative stress.
Plus, vanilla naturally contains calcium and magnesium, though in minimal quantities. The real magic lies in how it enhances mood and satisfaction—vanilla’s comforting aroma triggers happy memories and reduces stress. 💛
Protein and Fiber Boost
This cake’s foundation—all-purpose flour and eggs—provides a modest protein boost (about 12g per serving). The eggs contribute all nine essential amino acids, while the flour adds fiber (about 2g per serving).
For a protein upgrade, consider adding 1 scoop vanilla protein powder (like Orgain or Premier Protein) to the batter—it blends seamlessly and turns this into a post-workout-friendly dessert.
Moderate Sugar Balance
The 2.5 cups granulated sugar in this recipe provides quick energy, but the vanilla extract helps slow sugar absorption slightly.
To make it more balanced, reduce sugar by ¼ cup and add 2 tbsp honey or maple syrup—this adds natural sweetness while providing small amounts of antioxidants and minerals like potassium. The buttercream adds extra richness, so watch portions if tracking carbs.
Healthier Frosting Swaps
Traditional buttercream is decadent but calorie-dense. For a lighter version, replace ½ cup butter with Greek yogurt (like Fage 5%) and 1 tbsp honey—this cuts calories by ~30% while adding extra protein (about 5g per serving).
For a vegan option, use coconut cream and powdered sugar, though texture will differ slightly. The gelatin in frosting can be swapped with agar-agar for a vegan-friendly alternative.
Portion Control Tips
This cake serves 12, with each slice containing about 350-400 calories. To keep portions in check, serve with fresh berries (like strawberries or raspberries) on top—they add fiber and vitamin C while balancing sweetness.
For a lighter dessert option, offer angel food cake as a side—it’s nearly fat-free and pairs beautifully with vanilla frosting.
Allergen Awareness
This recipe contains wheat (flour), dairy (butter, milk, cream), and eggs, so it’s not safe for those with gluten intolerance, lactose intolerance, or egg allergies. For gluten-free versions, substitute flour with a 1:1 gluten-free blend (like Bob’s Red Mill).
For dairy-free, use coconut oil instead of butter and almond milk—though texture may vary. Always check labels on extracts and powders for hidden allergens.
Nutrition facts
Frequently asked questions
Can I bake this cake in 9-inch pans instead of 8-inch?
Yes, but you’ll need to adjust the batter quantity. For 9-inch pans, reduce each layer’s batter to 1.25 cups (instead of 1.5 cups) to maintain proper thickness. The total batter volume remains the same (4.5 cups), but you’ll need to bake 5 layers instead of 4. Chill each layer longer (15-20 minutes) before stacking to prevent collapse.
Why does the frosting need to be chilled before assembling?
Chilling the frosting for 30 minutes firms it up, making it easier to spread smoothly and preventing it from sliding off the layers. Warm frosting also melts faster when exposed to room temperature, causing the cake to lose its structure. For extra stability, place the assembled cake in the freezer for 10 minutes before adding the final frosting layer.
What’s the best way to level the cake layers?
Use a long serrated knife or cake leveler to trim the tops of each cooled layer. Place a 12-inch cake board on top of the first layer and gently press down—this creates a clean, flat surface. For precision, run the knife at a slight angle while keeping it parallel to the board. Always level layers before frosting to ensure even stacking.
Can I make this cake ahead of time?
Bake the layers 1-2 days ahead and store them wrapped tightly in plastic at room temperature. Assemble the cake 4-6 hours before serving to allow the frosting to set properly. For long-term storage, freeze the fully assembled cake (unfrosted or with a thin layer) for up to 3 months. Thaw overnight in the fridge before serving.
How do I fix a collapsed cake?
If your cake collapses during assembly, don’t panic! Chill the cake for 30 minutes to firm up the frosting, then carefully slice off the top layer and re-stack the remaining layers. Add extra frosting between layers to reinforce stability. For a quick fix, place the cake on a cooling rack in the freezer for 10 minutes to help it regain structure before adding final decorations.

- 3 Cheese Pimento Cheese Recipe: Sharp Cheddar, Peppery Heat, and Creamy Spread Magic - October 10, 2026
- 7 Egg Cake Recipe: Fluffy Layers With Vanilla Bean Infusion - October 10, 2026
- 3 Musketeers Cookie Recipe: Crunchy Chocolate Shells With Gooey Caramel Centers - October 10, 2026