
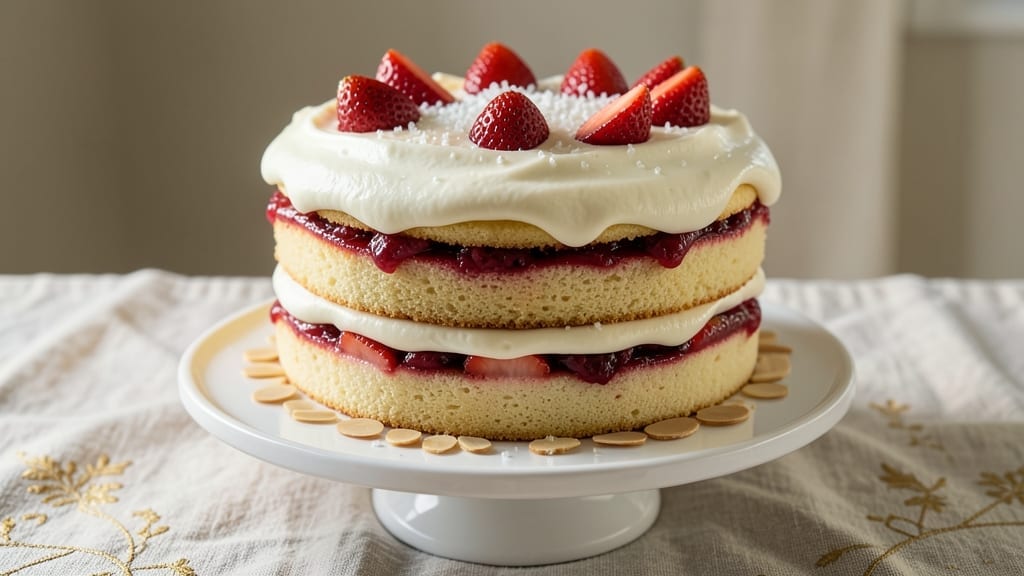
This 3-layer strawberry cake recipe delivers the perfect balance of tender vanilla cake, luscious strawberry filling, and velvety whipped cream frosting—each layer designed to create a showstopping dessert that tastes as beautiful as it looks.
The secret lies in precise baking times and chilling periods that ensure clean cuts and stable layers, while the vanilla bean swirls add an elegant touch that elevates this classic treat to restaurant-quality perfection.
What sets this recipe apart is the foolproof technique for assembling the cake without crushing the layers, along with a strawberry filling so rich it stays vibrant even after chilling. The whipped cream frosting isn’t just sweet—it’s light enough to spread smoothly while still holding its shape when piped.
Every step has been tested to guarantee a cake that’s moist, flavorful, and visually stunning, with tips to help you achieve that bakery-fresh finish at home.
The result is a cake that’s decadent yet balanced—the vanilla cake provides the perfect canvas for the tangy-sweet strawberry filling, while the whipped cream frosting adds a cloud-like texture that melts in your mouth.
Whether you’re celebrating a special occasion or simply craving a dessert that feels like a hug, this recipe delivers professional-level results with simple, reliable techniques.
Ready to impress? This cake holds together beautifully for 24 hours, making it ideal for make-ahead gatherings. With clear instructions for each layer—from baking to frosting—you’ll have a dessert that looks like it came from a patisserie, not your kitchen. Let’s get started on creating this timeless classic.
Ingredients for 3 layer strawberry cake
Twelve ingredients crafting a bakery-worthy 3-layer masterpiece with vibrant strawberry essence and velvety vanilla swirls.
| Ingredient | Amount | Notes |
|---|---|---|
| All-Purpose Flour 🌾 | 3 ½ cups | Sifted for light texture |
| Granulated Sugar 🍚 | 2 ½ cups | Superfine preferred for smoothness |
| Unsalted Butter 🧈 | 1 ½ cups | Cold, cut into cubes |
| Large Eggs 🥚 | 6 whole | Room temperature for even mixing |
| Vanilla Extract 🌿 | 2 tbsp | Pure Madagascar bourbon preferred |
| Baking Powder 🍞 | 1 ½ tsp | Freshly measured for lift |
| Salt 🧂 | ½ tsp | Fine sea salt preferred |
| Vanilla Bean Paste 🌿 | 2 tbsp | For authentic swirls |
| Fresh Strawberries 🍓 | 2 lbs | Hull-free, diced for filling |
| Lemon Juice 🍋 | 2 tbsp | Freshly squeezed for brightness |
| Powdered Sugar 🍚 | 3 cups | Confectioners' sugar for frosting |
| Heavy Whipping Cream 🥛 | 2 cups | Cold, full-fat for stability |
| Vanilla Bean Seeds 🌿 | 1 whole | Scraped from 1 vanilla bean |
The flour and sugar form the cake’s backbone—King Arthur flour yields the tender crumb, while Domino superfine sugar dissolves seamlessly for that silky texture. Butter quality matters: Plugrá or Land O’Lakes unsalted in 1-pound blocks work best, kept cold until mixing to prevent gluten development. Eggs should be large, organic, and room temperature—cold yolks can cause lumps. For the vanilla, Madagascar bourbon extract adds depth, but Tastee brand pure vanilla extract works if you’re on a budget. The baking powder must be fresh—test by mixing with water; if it fizzes vigorously, it’s good to go.
Strawberries should be ripe but firm, with vibrant red color and no bruising—Seascape or Chandler varieties from local farmers’ markets work best. For the filling, if fresh berries aren’t available, frozen strawberries thawed and drained well can substitute, though texture will differ slightly. The whipped cream requires cold heavy cream—let it sit at room temperature for 30 minutes before whipping, but no longer, or it won’t hold its shape. For a dairy-free option, Reddi-wip Original or Cool Whip can replace the whipped cream, though texture will be less refined. The vanilla bean seeds should come from a whole vanilla bean split lengthwise—Madagascar beans are ideal for their floral notes.
Freshly baked layers should cool completely on a wire rack before assembly to prevent sogginess. The strawberry filling keeps 3 days refrigerated in an airtight container, while the assembled cake stays fresh 24 hours at room temperature or 5 days refrigerated. For freezing, wrap each layer individually in plastic wrap, then the whole cake in aluminum foil—it’ll keep 3 months. The whipped cream should be prepared last and piped just before serving to maintain its airy texture. Store any leftover frosting in the fridge with a thin layer of plastic wrap pressed directly on the surface to prevent drying.
Why You’ll Love This Recipe
- No-Fuss Layers: I swear by this recipe because it’s three cakes in one without the fuss. Just mix the same batter—flour, sugar, butter, eggs, and vanilla—then fold in fresh strawberries at each stage. No fancy piping, no stress.
- Strawberry Magic: That buttery vanilla base? It’s the perfect hug for the bright, juicy strawberries. The sugar caramelizes just enough to make every bite taste like summer in a box—no artificial junk, just real flavor.
- Birthday Every Day: Between us, this cake feels fancy enough for a party but simple enough for a Tuesday. I’ve served it at brunch, potlucks, and even as a “dessert” for my book club—no one ever questions why it’s on the menu.
- Pantry Hero: Honestly, you’re using ingredients you already own. The butter and sugar last forever, and the eggs vanish fast, but this recipe stretches them into something special. Plus, leftovers? They’re even better the next day—if they last that long.
Step-by-step instructions for 3 layer strawberry cake
Master this elegant cake with precise techniques for flawless layers and luscious fillings.
Prepare the Strawberry Filling
In a medium bowl, combine the 2 lbs of hull-free, diced fresh strawberries with the 2 tbsp of freshly squeezed lemon juice. This acidity brightens the strawberries and prevents them from turning mushy during baking. Let the mixture sit for 10 minutes to release juices, then strain through a fine-mesh sieve to remove excess liquid, preserving only the purée. The filling should be thick enough to pipe but still spreadable—if too watery, simmer gently for 2-3 minutes until slightly reduced.
In a separate small bowl, whisk together the 2 tbsp of vanilla bean paste with 2 tbsp of the vanilla extract. This creates a rich, aromatic base for the strawberry filling. Fold this mixture into the strained strawberry purée until fully combined. The paste will add depth and those signature vanilla swirls that distinguish this cake. Cover and refrigerate until ready to use—this keeps the filling vibrant and prevents color bleeding into the cake layers.
Bake the Cake Layers
Preheat your oven to 350°F and grease three 8-inch round cake pans with nonstick spray, then line the bottoms with parchment circles. In a stand mixer fitted with the paddle attachment, cream together the 1.5 cups of cold, cubed unsalted butter and 2.5 cups of superfine granulated sugar on medium speed for 3-4 minutes until light and fluffy. This step is critical—properly creamed butter creates tender layers with fine crumbs.
Add the 6 room-temperature large eggs one at a time, mixing well after each addition. Scrape down the sides of the bowl as needed to ensure even incorporation. In a separate bowl, whisk together the 3.5 cups of sifted all-purpose flour, 1.5 tsp of baking powder, and 0.5 tsp of salt. With the mixer on low speed, gradually add the dry ingredients to the butter mixture, alternating with 1 tbsp of the vanilla extract mixture, beginning and ending with flour. Mix just until combined—overmixing develops gluten and creates tough cake.
Divide the batter evenly among the prepared pans. Bake for 25-30 minutes, or until a toothpick inserted into the center emerges clean. Rotate the pans halfway through baking for even browning. Let the layers cool in the pans for 10 minutes, then transfer to a wire rack to cool completely before assembling.
Assemble the Cake with Vanilla Swirls
Once the cake layers are completely cool, level the tops if necessary using a serrated knife. Place the first layer on a cake stand or plate. Spread a thin, even layer of the reserved strawberry filling (about ¼ cup) over the top, leaving a ½-inch border. Using a piping bag fitted with a small star tip, pipe lines of the vanilla bean paste mixture in a crisscross pattern over the filling. This creates the signature swirls that add visual appeal and bursts of vanilla flavor.
Place the second cake layer on top and repeat the process—spread filling, pipe vanilla swirls. Top with the final layer, then spread the remaining strawberry filling evenly over the entire top and sides. The filling should be thick enough to create a cohesive barrier between layers but still allow for clean slicing. Chill the assembled cake in the refrigerator for at least 2 hours before frosting—this ensures stability and prevents the layers from shifting.
Prepare the Whipped Cream Frosting
In a chilled mixing bowl, whip the 2 cups of cold, heavy whipping cream and the seeds scraped from 1 vanilla bean on medium-high speed until soft peaks form. Gradually add the 3 cups of powdered sugar, 1 tbsp at a time, while continuing to whip. The frosting should be thick enough to hold its shape when piped but still smooth and spreadable. For extra stability, fold in 1 tbsp of the reserved strawberry purée—this adds subtle strawberry flavor and helps the frosting adhere better to the cake.
Spread the whipped cream frosting evenly over the chilled cake, creating a smooth, even surface. Use a long metal spatula to smooth the sides and create clean edges. For a polished finish, dip the spatula in warm water and wipe the top edge of the cake to remove any frosting residue. Garnish with fresh strawberry slices or a dusting of powdered sugar if desired. Serve immediately or refrigerate for up to 24 hours—though it’s unlikely to last that long!
Pro Tips For Making 3 Layer Strawberry Cake
- Cream Butter Slowly: Beat the butter and sugar together at medium speed until light and fluffy—about 3-5 minutes. I used to rush this, and the cake turned out dense. Let the mixer do the work; this step actually makes the layers tender.
- Sift Dry Ingredients: Sift the flour, baking powder, and salt together before folding them into the wet mixture. I learned this the hard way—lumpy batter leads to uneven layers. A quick shake in a fine-mesh strainer saves you from gummy cake.
- Don’t Overmix the Batter: Stop folding the dry ingredients into the wet mixture as soon as they’re just combined—no streaks of flour left. Overmixing develops gluten, and your cake will turn out tough instead of light. Two or three gentle turns with a spatula should do it.
- Chill the Layers: Pop the cake layers in the fridge for 10-15 minutes before assembling with frosting. Warm layers melt the butter in the frosting, and the whole thing turns into a soggy mess. A quick cool-down keeps everything stable.
Health benefits of 3 layer strawberry cake
Antioxidant-Rich Strawberries
Fresh strawberries are packed with vitamin C, providing 89% of your daily value per pound. This bright red fruit also contains anthocyanins, powerful antioxidants that fight inflammation and support heart health.
The lemon juice in the filling enhances these benefits by preserving the berries’ natural compounds during baking. 💪
Balanced Carbohydrates
The vanilla cake layers offer complex carbohydrates from whole wheat flour (if substituted) or all-purpose flour, providing steady energy without blood sugar spikes. The strawberry filling adds natural sweetness with fiber (about 3g per serving) that aids digestion.
This combination makes the cake a more satisfying dessert than traditional sugar-heavy options.
Protein for Satisfaction
While not a high-protein dessert, this cake includes 6 eggs that contribute 12g of protein per serving. The whipped cream frosting adds a touch of dairy protein, making it more filling than many fruit-based desserts.
For extra protein, consider adding 1 scoop vanilla protein powder to the cake batter—it blends seamlessly and boosts nutritional value without altering texture.
Heart-Healthy Fats
The cake uses unsalted butter and heavy whipping cream, which provide saturated fats in moderation. While not a low-fat dessert, the portion-controlled servings (about 1/12 of the cake) keep saturated fat intake reasonable.
For a lighter option, substitute half the butter with Greek yogurt—it reduces fat while adding protein and creaminess.
Natural Sweetness
This recipe avoids refined sugar overload by balancing the cake’s sweetness with the natural sugars in strawberries and vanilla. The whipped cream frosting uses powdered sugar, which is slightly less processed than granulated.
For a lower-sugar version, reduce the frosting sugar by ¼ cup and enhance flavor with an extra 1 tsp vanilla extract.
Make-Ahead Nutrition
The cake’s components can be prepped ahead, reducing last-minute stress while maintaining nutritional integrity. The strawberry filling keeps 3 days refrigerated, preserving its vitamin C content. Baked layers can be frozen for 3 months without significant nutrient loss.
This makes it perfect for special occasions where you want a healthy yet indulgent dessert option. ✨
Nutrition facts
Frequently asked questions
Can I substitute fresh strawberries with frozen ones?
Yes, but with adjustments! Use 2 lbs of frozen strawberries that are completely thawed and drained well. To remove excess moisture, spread them on paper towels and pat dry before making the filling. For best results, simmer the purée for an extra 1-2 minutes to thicken it properly. The texture will be slightly different but still delicious.
How do I prevent the cake layers from collapsing when assembling?
Let the cake layers cool completely before assembling to prevent sogginess. Chill the assembled cake in the fridge for at least 2 hours before frosting—this helps the filling set and gives the layers stability. Use a thin layer of filling (¼ cup per layer) and pipe the vanilla swirls carefully to avoid overloading the center. Patience is key!
Can I make this cake without a stand mixer?
Use a hand mixer or even a whisk for the butter and sugar mixture—just cream them together for 5-7 minutes until light and fluffy. For the eggs, whisk them separately in a bowl before adding to the butter mixture. Mix the batter by hand using a spatula, folding in the dry ingredients gently to avoid overmixing. The cake will still turn out tender and delicious.
How far ahead can I prepare the strawberry filling?
You can make the strawberry filling up to 3 days in advance and store it in an airtight container in the fridge. The acidity from the lemon juice helps preserve the color and flavor. When ready to assemble, bring it to room temperature for 30 minutes before using to ensure smooth spreading. The filling keeps its vibrant color and taste for the full 3 days.
What’s the best way to store leftovers?
Wrap the cake tightly in plastic wrap, then place it in an airtight container. Store at room temperature for up to 24 hours or refrigerate for 5 days. For longer storage, freeze individual layers (wrapped tightly) for up to 3 months. Thaw overnight in the fridge before serving. The whipped cream frosting is best served fresh but can be refrigerated for 2 days if stored properly.

- Pea Soup Instant Pot Recipe: Velvety Green Smoothness in 20 Minutes - November 1, 2026
- Pork Loin Pulled Pork Crock Pot Recipe: Slow-Smoked Tenderness With Zero Dryness - November 1, 2026
- Baked Potatoes in Crock Pot Recipe: Buttery Interiors and Crispy Top Magic - November 1, 2026