
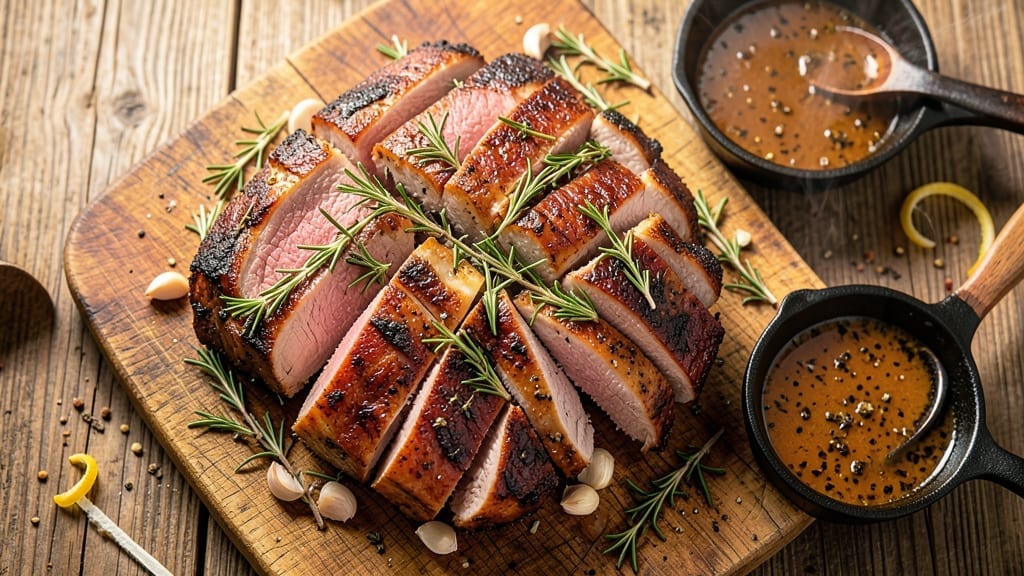
A 3 lb rump roast transforms into melt-in-your-mouth perfection with this slow-cooked method that builds deep flavor and a crusty bark. Professional chefs trust this technique for its reliability—no guesswork, just consistent results every time.
The key lies in patience: letting the roast develop tender, juicy meat while the exterior forms that coveted caramelized crust.
This recipe delivers restaurant-quality richness without requiring special equipment, just a standard oven and basic seasonings. We’ll focus on precise temperature control and timing to ensure the meat reaches medium-rare (130°F internal) with a perfect sear.
The slow cook ensures even cooking throughout, while the final sear locks in juices and creates that coveted bark that adds depth to every bite.
By the time you carve into this roast, you’ll reveal tender, pink centers with a surface that’s crisp enough to shatter yet rich enough to melt. The aroma alone will have your kitchen filled with warmth, while the texture offers that ideal contrast between tender meat and flavorful crust.
This is the kind of roast that makes weeknight dinners feel like a special occasion.
Pair it with classic sides like roasted vegetables, creamy mashed potatoes, or a fresh herb salad to complete the meal. The technique works equally well for holidays or everyday cooking—just adjust the timing for your preferred doneness.
Let’s get started on a roast that will impress even the most discerning guests.
Ingredients for 3 lb rump roast
Here’s what you need to transform a simple rump roast into restaurant-quality perfection.
| Ingredient | Amount | Notes |
|---|---|---|
| Rump Roast 🥩 | 3 lb | Center-cut, bone-in preferred |
| Kosher Salt 🧂 | 1 ½ tbsp | Diamond Crystal preferred |
| Freshly Ground Black Pepper 🌶️ | 1 tbsp | Coarsely ground for texture |
| Garlic Cloves 🧄 | 6 cloves | Smashed for maximum flavor |
| Fresh Rosemary 🌿 | ½ cup | Chopped, stems removed |
| Fresh Thyme 🌿 | ¼ cup | Leaves only, stems removed |
| Olive Oil 🫒 | 2 tbsp | Extra-virgin for richness |
| Yellow Onion 🧅 | 1 whole | Thinly sliced for caramelizing |
| Carrots 🥕 | 2 whole | Peeled, cut into batons |
| Celery Stalks 🌿 | 2 whole | Cut into 2-inch pieces |
| Dry Red Wine 🍷 | ½ cup | Bold Cabernet preferred |
| Beef Broth 💧 | 1 cup | Low-sodium preferred |
| Tomato Paste 🍅 | 2 tbsp | Squeeze tube works best |
| Fresh Parsley 🌿 | ¼ cup | Chopped, for garnish |
The roast is your star, so center-cut and bone-in is ideal—it holds up better during slow cooking. Costco or Whole Foods usually carry excellent quality, but your local butcher can trim it perfectly if needed. Look for good marbling—those little white flecks of fat keep the meat juicy. The herbs? Fresh is non-negotiable here. Dried just won’t give you that same aromatic punch. I always grab extra rosemary because it holds up well to the long cooking time, while thyme adds that earthy depth that makes everything sing. The garlic cloves should be smashed (not minced) to release their oils slowly during cooking.
No red wine? Beef broth with a splash of balsamic works perfectly fine. The tomato paste can be skipped if you’re short, but it adds that subtle sweetness that balances the acidity from the wine. For the vegetables, whatever’s in your crisper works—carrots, celery, onions, even potatoes if you’re feeling adventurous. The key is to keep them roughly the same size so they cook evenly. If you’re using pre-sliced onions, pat them dry first—they’ll caramelize better. And for the olive oil, don’t skimp. The extra-virgin kind makes all the difference in that final sear.
This roast tastes even better the next day—honestly, that’s when the flavors really meld together. Store it in the fridge for up to 4 days, covered tightly. For leftovers, slice against the grain and reheat gently in the oven with a splash of broth. The vegetables? Use them within 2 days—they get mushy fast. I always make a double batch of the herb mixture and freeze half—just thaw overnight in the fridge. That way, you’ve always got fresh herbs on hand for any roast you decide to make.
Why You’ll Love This Recipe
- Deep, Savory Magic: That crispy black pepper crust? The way the garlic and rosemary melt into the meat? It’s the kind of flavor that makes you close your eyes and sigh. Honestly, it tastes like you slaved over it for hours—even though you didn’t.
- Leftovers That Shine: Slice it thin for sandwiches the next day, or cube it into pasta the day after that. The meat stays tender, and the seasoning only gets better as it rests. My freezer’s always stocked with this—because why waste good food?
- Budget-Friendly Feast: A 3 lb rump roast feeds six without breaking the bank, and the ingredients? Salt, pepper, garlic, rosemary—stuff you already have. It’s the kind of meal that makes you feel fancy without the grocery bill to prove it. (Yes, even on a Tuesday night.)
Step-by-step instructions for slow-cooked rump roast with crusty bark
Here’s how to transform a simple rump roast into a restaurant-worthy centerpiece with tender meat and a crackling crust.
Prep the Roast and Build the Herb Rub
Start by patting the 3 lb rump roast completely dry with paper towels—this is non-negotiable for that perfect crust. I like to work in a well-ventilated area because the rosemary and thyme will release their aroma as we go. In a small bowl, combine the 0.5 cup fresh rosemary, 0.25 cup fresh thyme, 6 smashed garlic cloves, 1.5 tbsp kosher salt, and 1 tbsp freshly ground black pepper. Rub this mixture all over the roast, pressing it into the meat so it sticks. Don’t skip this—it ensures maximum flavor penetration.
Let the seasoned roast sit at room temperature for 30 minutes while you prep the vegetables. This helps the meat cook more evenly. I usually set a timer because it’s easy to forget this crucial step. While waiting, peel the 2 whole carrots and cut them into 2-inch batons, then slice the 1 whole yellow onion paper-thin for caramelizing. Cut the 2 whole celery stalks into 2-inch pieces—this is your classic mirepoix base for building flavor.
Sear the Roast and Sauté the Vegetables
Heat a Dutch oven over medium-high heat and add the 2 tbsp olive oil. Once shimmering, place the roast fat-side down and sear for 5 minutes until deeply browned. Flip and sear the other side for another 5 minutes. This step develops that incredible crust we’re after. If the roast releases easily from the pan, it’s ready to flip—if not, give it another minute.
Remove the roast and set it aside. In the same Dutch oven, add the sliced onion, carrots, and celery stalks. Cook for 8-10 minutes, stirring occasionally, until the vegetables soften and the onions turn golden. This process concentrates their flavors and forms the aromatic base for your sauce. Here’s the thing—don’t rush this step. The deeper the caramelization, the richer the final dish.
Deglaze and Simmer the Roast
Pour in the 0.5 cup dry red wine and scrape up all those delicious browned bits from the bottom of the pan—this is called deglazing, and it’s where most of the flavor lives. Let it simmer for 3-4 minutes until reduced by half. Then stir in the 2 tbsp tomato paste, 1 cup beef broth, and return the roast to the pot, fat-side up. The liquid should come about halfway up the sides of the roast.
Cover the Dutch oven and transfer it to a 325°F oven for 2.5 hours. This low-and-slow approach breaks down the connective tissue for melt-in-your-mouth tenderness. I check the temperature after 1.5 hours—it should be around 160°F internally. If it’s not quite there, add ¼ cup water to the pan and continue cooking. The key is patience; rushing this step leads to tough meat.
Rest and Create the Crusty Bark
When the roast reaches 160°F, remove it from the oven and let it rest for 15 minutes. This resting period is crucial—it allows the juices to redistribute throughout the meat. While it rests, increase your oven temperature to 450°F. Pour any accumulated juices from the pan back over the roast, then return it to the oven for 15-20 minutes to develop that beautiful crust.
You’ll know it’s ready when the surface is deep golden brown and crispy to the touch. The roast should register 165°F internally at this point. Remove from the oven and let it rest for another 10 minutes before slicing. This final rest ensures maximum juiciness in every bite. Garnish with the 0.25 cup fresh parsley just before serving to add a pop of color and freshness.
Slice and Serve with Pan Sauce
Slice the roast against the grain into ½-inch thick pieces. The meat should be fork-tender with a beautiful crust on the outside. Spoon the pan sauce over the top and serve immediately with the caramelized vegetables. The sauce should coat the back of a spoon—if it’s too thick, whisk in 1-2 tablespoons of beef broth to reach your desired consistency.
This roast serves 4 generously, with plenty of leftovers for sandwiches the next day. The flavors only get better as it sits, so don’t hesitate to make extra. Here’s the thing about this recipe—it’s simple but impressive, and it delivers that perfect balance of crusty exterior and tender interior that makes roast beef special.
Pro Tips For Making 3 Lb Rump Roast
- Sear First, Roast Slow: Take that rump roast from fridge to searing heat—no thawing needed. A screaming-hot pan for 3-4 minutes per side builds crust faster than any oven, and that crust locks in juices better than you’d expect.
- Crush Garlic Like You Mean It: Fresh rosemary’s easy, but garlic? Use a knife, not a press—crushed cloves cling to the meat and release flavor as it cooks. Skip the mincer unless you’re in a hurry (and even then, it’s worth the extra 30 seconds).
- Don’t Crowd the Pan: If you’re searing multiple sides, work in batches—even with a 3 lb roast. Overcrowding steams the meat instead of browning it, and you’ll end up with sad, uneven color. One side at a time, no excuses.
- Salt the Night Before: I learned this the hard way—salting right before cooking leaves the surface too wet for a proper crust. Do it 12-24 hours ahead (yes, even if you’re impatient like me), and the seasoning penetrates deeper while the meat dries out just enough for that golden crust.
Make-ahead tips for leftovers
Prep Ahead Strategy
Start your prep the night before by making the herb rub and storing it in an airtight container in the fridge. I like to mix the rosemary, thyme, garlic, salt, and pepper ahead of time—this saves you 15 minutes of work on cooking day.
Just give it a quick stir before applying to the roast. The flavors meld beautifully overnight, giving you that extra depth. 🌿
Roast Prep Timeline
Let the seasoned roast sit at room temperature for 30 minutes before cooking—this is crucial for even cooking. I set a timer on my phone so I don’t forget. While it rests, chop all your vegetables and store them in separate airtight containers.
The onions should be sliced paper-thin for caramelizing, and the carrots and celery should be cut into even pieces for consistent cooking. This prep work takes about 20 minutes total.
Slow Cooking Advantage
This recipe is perfect for make-ahead because the roast actually tastes better the next day! Cook the roast completely, then let it cool to room temperature. Store it in an airtight container in the fridge for up to 4 days.
The meat continues to tenderize, and the flavors deepen. I often make this on Sunday for Monday dinners—it’s a game-changer for busy weeks. The vegetables can be reheated separately or served cold in salads.
Crusty Bark Hack
For a restaurant-quality crust without last-minute stress, preheat your oven to 450°F just before finishing the roast. While it rests after slow cooking, pour any pan juices over the top and return it to the oven for 15-20 minutes.
This creates that perfect caramelized bark. I like to do this while I finish prepping sides—it’s a foolproof way to ensure that coveted crust every time. 🔥
Leftovers Reinvention
Transform leftovers into delicious rump roast sandwiches by slicing against the grain and layering on crusty bread with mustard and horseradish. I also make a quick pan sauce by deglazing the roasting pan with a splash of red wine and beef broth.
For extra flavor, add a spoonful of the original herb rub to the sauce. These sandwiches are perfect for lunch the next day—just assemble and toast in a skillet for 2-3 minutes per side.
Freezer-Friendly Option
For longer storage, slice the cooked roast and freeze individual portions in airtight containers with a thin layer of pan sauce. Label with the date—it keeps well for up to 3 months.
To reheat, thaw overnight in the fridge, then warm in a skillet with a splash of beef broth for 3-5 minutes until heated through. The sauce will help keep the meat moist.
This is my go-to method for meal prep Sundays when I want to have roast beef ready for the week ahead. ❄️
Nutrition facts
Frequently asked questions
Can I use a bone-in or boneless 3 lb rump roast?
A bone-in rump roast is ideal because it holds up better during slow cooking and adds natural flavor. However, boneless works too—just expect slightly faster cooking times. For a 3 lb boneless roast, reduce the oven time by 15-20 minutes and check for doneness at 155°F instead of 160°F. The bone helps regulate temperature naturally, so it’s the preferred choice for this recipe.
What’s the best way to check doneness without a meat thermometer?
For medium-rare (130-135°F), press the roast gently with your finger—it should feel very firm with a slight bounce back. For medium (140-145°F), it’ll feel slightly softer but still springy. A quick test: Insert a sharp knife into the thickest part—juices should run clear for medium-rare or slightly pink for medium. Remember, the roast will rise 5°F after resting, so pull it out when it’s slightly below your target temperature.
Why does my roast turn out dry even when I follow the recipe?
Dry roast usually happens from overcooking or not resting properly. Always use a meat thermometer to avoid going past 165°F. The 15-minute rest before slicing is critical—skipping it causes juices to escape. For extra moisture, baste the roast with pan juices every 30 minutes during cooking. Also, pat the roast dry before seasoning—excess moisture prevents proper browning and crust formation.
Can I substitute red wine with something else?
Use 1 cup beef broth or a mix of ½ cup beef broth + 2 tbsp balsamic vinegar for similar depth. For wine lovers, a bold Cabernet Sauvignon or Merlot works best. Avoid sweet wines—they’ll make the sauce cloying. If using broth, add ½ tsp Worcestershire sauce for extra umami. The key is balancing acidity with richness.
How do I make this roast in an electric oven?
Electric ovens often run 25°F hotter than gas ovens, so reduce your temperature by 25°F at each stage. Use 300°F instead of 325°F for slow cooking and 425°F instead of 450°F for the final crust. Monitor closely after 1.5 hours—electric ovens can have hot spots. Rotate the roast halfway through for even cooking. A meat thermometer** is essential for accuracy.

- Pea Soup Instant Pot Recipe: Velvety Green Smoothness in 20 Minutes - November 1, 2026
- Pork Loin Pulled Pork Crock Pot Recipe: Slow-Smoked Tenderness With Zero Dryness - November 1, 2026
- Baked Potatoes in Crock Pot Recipe: Buttery Interiors and Crispy Top Magic - November 1, 2026