
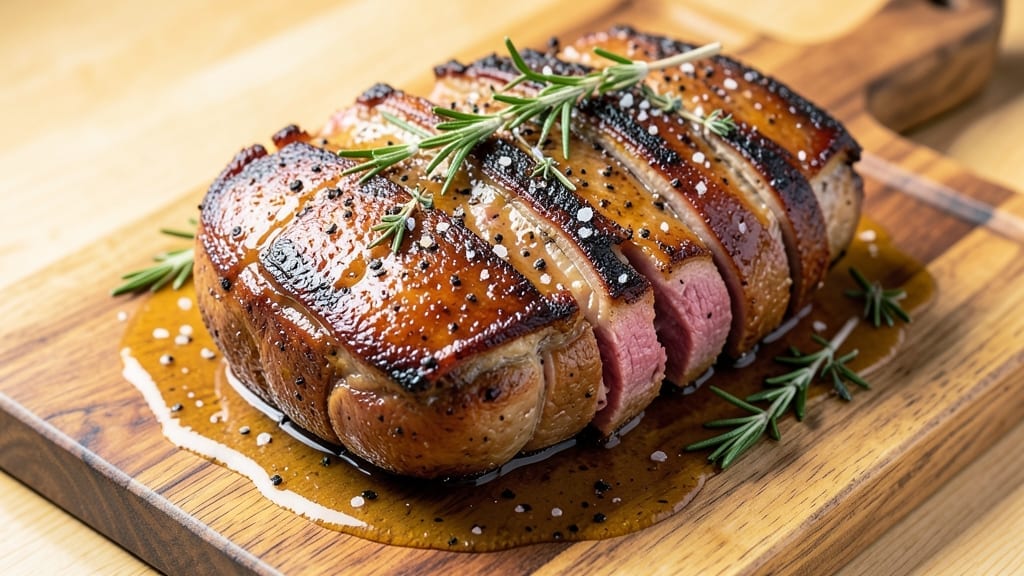
A 3-rib standing rib roast delivers restaurant-quality luxury with bone-in richness and melt-in-your-mouth tenderness—especially when cooked to juicy pink centers. This technique transforms a simple roast into a showstopping centerpiece, where the bone adds depth and the fat cap bastes the meat into perfection.
The secret lies in precise temperature control and a reverse sear approach that ensures even cooking without drying out the interior.
What sets this recipe apart is the foolproof method for achieving that ideal doneness: starting low and slow, then finishing with a high-heat sear for a caramelized crust. No fancy equipment is needed—just a reliable thermometer, patience, and attention to detail.
The result? A roast so tender it nearly falls apart at the touch, with a golden, crackling exterior that makes every slice worth the effort.
Presentation matters just as much as flavor, so we’ll cover carving techniques that showcase the meat’s natural beauty—think even slices with exposed bone for an elegant touch.
Pair it with classic sides like roasted root vegetables or a rich red wine reduction, and you’ve got a meal that feels like a celebration. This isn’t just dinner; it’s an experience.
The best part? This method works for any occasion, from holiday feasts to weekend family dinners. Once you master it, you’ll never settle for less than perfectly cooked, bone-in luxury again. Let’s get started on the steps that’ll make your roast the star of the table.
Ingredients for 3 rib standing rib roast
Eight essential ingredients transform a simple roast into a showstopping centerpiece of bone-in luxury.
| Ingredient | Amount | Notes |
|---|---|---|
| 3-Rib Standing Rib Roast 🥩 | 4 lb | Bone-in, with fat cap intact |
| Kosher Salt 🧂 | 1 ½ tbsp | Diamond Crystal preferred |
| Freshly Ground Black Pepper 🌶️ | 1 tbsp | Coarse grind for texture |
| Extra-Virgin Olive Oil 🫒 | 2 tbsp | For basting and sear |
| Fresh Rosemary 🌿 | 1 whole | Sprig, leaves only |
| Fresh Thyme 🌿 | 1 whole | Sprig, leaves only |
| Garlic Cloves 🧄 | 6 cloves | Smashed, skin-on |
| Yellow Onion 🧅 | 1 whole | Quartered, skin-on |
| Red Wine 🍷 | ½ cup | Bold dry variety (Cabernet Sauvignon) |
| Beef Bone Broth 🥄 | 1 cup | For basting and depth |
| Honey 🍯 | 1 tbsp | For glaze (optional) |
| Mustard 🥬 | 1 tsp | Dijon for balance |
The roast is the star—look for a 3-rib standing rib cut with a thick fat cap (at least 0.5-inch) for basting. Costco or Whole Foods carry premium cuts, but don’t overlook your local butcher—they’ll often trim it to your preference. The bone should be clean and white, not yellowed, and the meat should have a vibrant red color. If the roast feels dry or lacks marbling, ask for a different cut. For the herbs, fresh is non-negotiable—dried won’t give the same aromatic punch. The garlic and onion add depth without overpowering, while the red wine and bone broth elevate it from everyday roast to restaurant-quality.
No red wine? Beef broth with a splash of balsamic vinegar works in a pinch, though the acidity won’t be identical. Substitute fresh thyme with dried at one-third the amount, but fresh rosemary has no equal. For the honey glaze, maple syrup is a 1:1 swap if you prefer vegan options. The mustard balances richness—skip it if you’re serving with a tangy sauce. If your roast is leaner than expected, add an extra 1 tbsp olive oil** to the rub. The key is the fat cap: if yours is thin, baste more frequently with the broth mixture to compensate.
Prep the roast 1-2 hours ahead—let it sit at room temperature for even cooking. The herbs and aromatics can be prepped the night before and stored in the fridge. For leftovers, slice against the grain and reheat in the oven at 325°F with a splash of broth to keep it moist. This roast reheats beautifully—3-4 days in the fridge or 3 months frozen. For a stress-free dinner, portion the leftovers into containers while still warm; they’ll reheat perfectly and save you time later.
Why You’ll Love This Recipe
- I’ll be real: this isn’t a dish that demands your entire evening. While it roasts, you can prep sides, answer emails, or even watch an episode of your favorite show. The only real work is the initial seasoning and sear—after that, it’s hands-off until the timer goes off. Perfect for when you want to impress without stressing.
- Five-Ingredient Magic: Honestly, this roast is one of those recipes where you almost feel guilty for how little effort it takes. Just salt, pepper, oil, rosemary—no marinades, no fancy rubs—yet it delivers that perfect crust and tender interior every time. The rosemary alone makes it smell like a holiday dinner, even on a Tuesday.
- Crust So Good: That crispy, caramelized edge on the outside? Chef’s kiss. The secret’s in the high-heat sear with olive oil before it goes into the oven—no fancy equipment, just a hot pan and patience. It’s the kind of texture that makes people ask, “What did you do to it?” (Spoiler: not much.)
- Leftovers That Shine: Between us, this roast is so generous that you’ll have slices for days. Shred the leftovers for tacos, toss them into pasta, or just eat them cold on bread—it’s that good. I’ve fed my family for a week with one roast, and no one complains.
Step-by-step instructions for 3 rib standing rib roast
Here’s how to transform a simple rib roast into a showstopping centerpiece with tender pink centers and caramelized edges.
Prepare the Roast for Maximum Flavor and Juiciness
Remove the 4 lb 3-rib standing rib roast from the refrigerator and place it on a wire rack set over a rimmed baking sheet. Let it sit at room temperature for 1 hour before cooking—this ensures even cooking throughout. While it comes to temperature, pat the roast dry with paper towels, focusing on the fat cap and any moist areas. A dry surface is essential for that perfect crispy crust.
In a small bowl, combine the 1.5 tbsp kosher salt and 1 tbsp freshly ground black pepper. Rub this mixture all over the roast, including inside the cavity if your roast has one. The coarse grind of the pepper adds texture that you’ll notice in every bite. Don’t forget to season the fat cap generously—the rendered fat will baste the meat as it cooks.
Sear the Roast for Deep Flavor and Color
Preheat your oven to 450°F with a rack positioned in the lower third. Heat a large oven-safe skillet over high heat until smoking hot. Add the 2 tbsp extra-virgin olive oil and swirl to coat the bottom evenly. Place the roast fat-side down in the skillet and sear for 10-12 minutes, pressing down gently with a metal spatula to ensure good contact with the pan.
You’ll know it’s ready to flip when the fat cap is deeply golden brown and the meat releases easily from the pan. Flip the roast and sear the meat side for another 3-4 minutes until it develops a rich crust. The searing step creates the Maillard reaction that gives your roast that irresistible depth of flavor. Transfer the skillet to the preheated oven.
Build the Herb and Wine Basting Sauce
While the roast begins roasting, prepare the aromatics. In a small saucepan, combine the 6 smashed garlic cloves, quartered yellow onion (skin-on), leaves from 1 sprig fresh rosemary, and leaves from 1 sprig fresh thyme with the 0.5 cup red wine. Simmer over medium heat for 8-10 minutes until the wine reduces by half and the aromatics are tender but not browned.
Strain the mixture through a fine-mesh sieve, pressing on the solids to extract all the flavor. Return the liquid to the saucepan and add the 1 cup beef bone broth and 1 tbsp honey. Simmer for another 3-4 minutes until slightly thickened. Stir in the 1 tsp Dijon mustard and set aside. This sauce will be your basting liquid and finishing touch.
Roast to Juicy Perfection with Basting
Remove the roast from the oven and place it on a cutting board. Pour the herb-wine sauce into the skillet and scrape up all the browned bits from the bottom with a wooden spoon. Return the roast to the skillet, fat-side up, and spoon the sauce over the top. Roast for another 20-25 minutes at 450°F.
Here’s the secret to juicy pink centers: reduce the oven temperature to 325°F and continue roasting for 30-40 minutes, basting with the sauce every 10 minutes. The roast is done when the internal temperature reaches 130°F for medium-rare (use a meat thermometer inserted into the thickest part of the roast, avoiding the bone). The exterior should be deep golden brown with crispy edges, while the interior remains tender and pink.
Rest and Carve for Maximum Juiciness
Transfer the roast to a warm cutting board and tent loosely with aluminum foil. Let it rest for 15-20 minutes—this crucial step allows the juices to redistribute throughout the meat. During this time, keep the herb-wine sauce warm in a small saucepan over low heat.
To carve, slice between the bones, cutting against the grain for maximum tenderness. Serve each portion with a generous spoonful of the herb-wine sauce. The result should be a beautifully browned exterior with a pink, juicy interior that practically melts in your mouth. Each bite delivers that perfect balance of rich, savory meat and aromatic herb-wine sauce.
Pro Tips For Making 3 Rib Standing Rib Roast
- Sear Before Seasoning: Pat that roast completely dry with paper towels, then hit it with high heat in olive oil for 3-4 minutes per side before adding salt or rosemary. I learned this the hard way—salting early makes the crust turn to mush when you sear later. The crust forms first, then the seasoning sticks like glue.
- Salt Like a Pro: Use about 1.5 teaspoons kosher salt per pound of meat, all applied right after searing. My grandmother swore by this, and she was right: the salt needs time to penetrate while the roast rests, not just sit on top. (Yes, even if you’re impatient like me.)
- Skip the Crowding: Don’t stack your roast on top of other pans or crowded racks—give it space to breathe. I used to cram it in, and the heat would pool unevenly, leaving some ribs dry. A wire rack on a sheet pan is your friend here.
- Wait 5 Minutes: After roasting, tent that meat with foil and let it rest under the tent for 10-15 minutes before slicing. I know, I know—you want to dig in—but cutting into it too soon turns those juicy ribs into sad, dry slices. (Your future self will thank you.)
Make-ahead tips for leftovers
Prep Ahead
I always prep my roast the night before—trust me, it saves stress on cooking day. Pat the 4 lb roast dry and season it with 1.5 tbsp kosher salt and 1 tbsp black pepper, then wrap it tightly in plastic wrap and refrigerate.
This gives the seasoning time to penetrate deeply. The aromatics (garlic, onion, herbs) can be chopped and stored in a sealed container for up to 2 days. 🌿
Sauce Prep
Make the herb-wine sauce a day ahead for maximum convenience. Simmer the 6 garlic cloves, quartered onion, and herbs in 0.5 cup red wine until reduced, then strain and store the liquid in the fridge.
When ready to cook, just reheat with 1 cup bone broth and 1 tbsp honey. This step cuts your cooking time by 20 minutes on the actual day.
Overnight Roast
For a stress-free weekend meal, try this overnight method: Sear the roast as directed, then transfer it to a 325°F oven and cook until it reaches 130°F internal temperature (about 2-3 hours).
Let it rest, then refrigerate overnight. The next day, finish with a quick 10-minute sear in a hot skillet to revive the crust. The meat will be even more tender after resting.
Freezer-Friendly
If you’re prepping for a future date night, freeze the seasoned roast (uncooked) in its plastic wrap for up to 3 months. Thaw it overnight in the fridge before cooking as usual.
The fat cap stays intact, ensuring perfect basting. For the sauce, freeze it in ice cube trays—just thaw and reheat when needed. This is my go-to for holiday prep! ❄️
Leftovers Strategy
Slice the roast against the grain and store portions in airtight containers with a splash of the herb-wine sauce. Reheat in the oven at 325°F for 15-20 minutes with a little broth to keep it moist.
I like to portion leftovers into individual containers while still warm—they reheat perfectly and save you time later.
Timing Chart
Here’s my foolproof timeline: Day 1 (evening) – Prep roast and sauce. Day 2 (morning) – Sear and start slow roast. Day 2 (afternoon) – Finish cooking and rest.
Day 2 (evening) – Carve and serve. This schedule ensures you’re not rushed when guests arrive. The key is patience—the roast needs time to develop its full flavor. 💡
Nutrition facts
Frequently asked questions
Why does this recipe use a reverse sear method?
The reverse sear method ensures your 3-rib standing rib roast develops even doneness from the inside out while building a perfect crust. Starting at 325°F prevents overcooking the exterior before the center reaches your desired temperature. This technique preserves the meat’s natural juices, giving you that ideal juicy pink center with a crispy exterior—no dry, overcooked edges here!
Can I cook this roast without red wine?
If you don’t have red wine, substitute with 1 cup beef broth plus 1 tablespoon balsamic vinegar for acidity. The herb-wine sauce will still pack flavor—just skip the honey if you’re avoiding sweetness. For extra depth, add a pinch of smoked paprika to the seasoning rub. The key is maintaining the sauce’s balance of acid, fat, and umami.
How do I know when the roast is done?
Use a meat thermometer inserted into the thickest part of the roast (avoiding bone) to check the internal temperature. For medium-rare pink centers, aim for 130°F. The exterior should be deep golden brown with crispy edges. If your thermometer isn’t available, cut into the thickest part—the center should feel slightly springy and warm to the touch. Never rely on time alone!
What’s the best way to reheat leftovers?
Slice the roast against the grain and reheat portions in an oven-safe dish at 325°F for 15-20 minutes with a splash of beef broth or the herb-wine sauce. This keeps the meat moist and restores the crust. For quick meals, warm slices in a skillet over medium heat for 2-3 minutes per side with a pat of butter. Leftovers stay fresh for 3-4 days in the fridge.
Can I use this method for a different cut of beef?
This technique works beautifully for other bone-in cuts like prime rib or tomahawk steaks, but adjust cooking times based on weight. For a 4 lb prime rib, expect 30-40 minutes at 325°F before searing. The reverse sear principle remains the same: low-and-slow first, then high-heat finish. Just be mindful of fat content—thicker fat caps may need more basting.

- Pea Soup Instant Pot Recipe: Velvety Green Smoothness in 20 Minutes - November 1, 2026
- Pork Loin Pulled Pork Crock Pot Recipe: Slow-Smoked Tenderness With Zero Dryness - November 1, 2026
- Baked Potatoes in Crock Pot Recipe: Buttery Interiors and Crispy Top Magic - November 1, 2026