
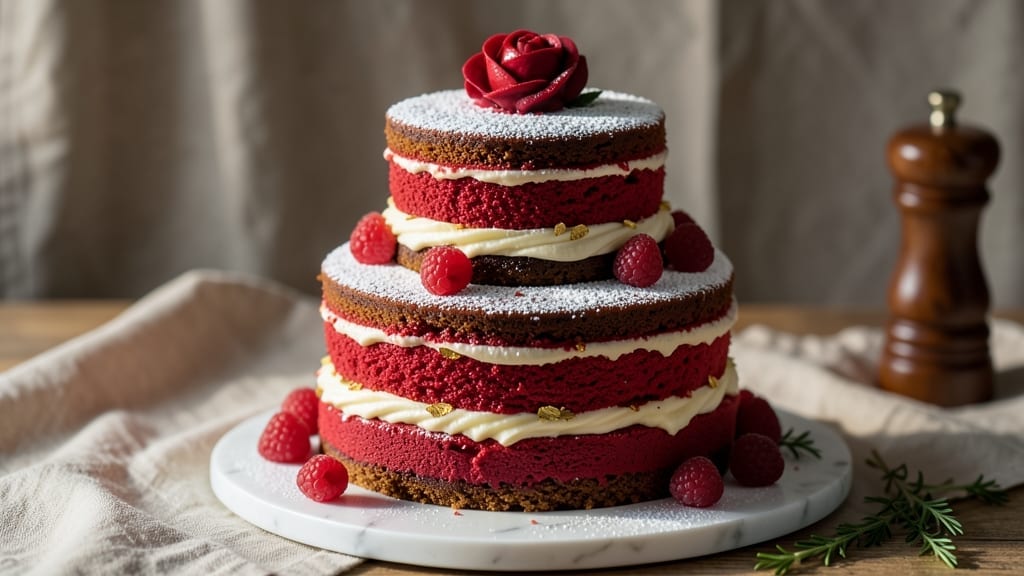
Mastering a 3-tier red velvet cake with velvety layers and a buttermilk secret transforms any celebration into a showstopper. 💛 The key lies in the batter’s moisture balance—cocoa powder, buttermilk, and vinegar create that signature tender crumb, while precise baking ensures clean layers for stacking.
This isn’t just a cake; it’s an architectural dessert that demands attention to detail at every step.
The secret begins with the batter: a blend of cocoa powder and coffee powder deepens the red hue while enhancing flavor complexity. Buttermilk, not milk, creates that signature moist texture, and a splash of vinegar ensures the layers rise just enough for clean slicing.
Meanwhile, the cream cheese frosting—rich, tangy, and perfectly sweet—becomes the glue that holds the tiers together while adding that signature red velvet contrast.
Assembling the tiers requires patience and precision: leveling each cake perfectly, layering with frosting, and stacking with dowels for stability. The result?
A cake that’s as impressive to look at as it is to eat—golden layers peeking through creamy frosting, with a texture that’s tender yet sturdy enough to slice cleanly. This is the kind of dessert that makes guests pause and take photos before the first slice.
For decorating, keep it classic with buttercream rosettes or go modern with fresh berries and edible flowers. The frosting’s tangy sweetness pairs beautifully with both, ensuring every bite delivers that perfect balance of rich chocolate and velvety smoothness. Ready to bake a cake that steals the show?
Ingredients for 3 tier red velvet cake
Twelve essential ingredients transform ordinary baking into a showstopping architectural dessert.
| Ingredient | Amount | Notes |
|---|---|---|
| All-Purpose Flour 🌾 | 3 ½ cups | Sifted for aeration and even texture |
| Granulated Sugar 🍚 | 2 ½ cups | Divided for batter and filling |
| Unsalted Butter 🧈 | 1 ½ cups | Room temperature, softened |
| Natural Red Food Coloring 🎨 | ½ tbsp | High-quality liquid for vibrant hue |
| Unsweetened Cocoa Powder 🍫 | ¾ cup | Natural, not Dutch-processed |
| Instant Espresso Powder ☕ | 2 tbsp | Enhances depth of flavor |
| Buttermilk 🥛 | 1 ½ cups | Fresh, not powdered |
| White Vinegar 🍶 | 1 tbsp | For tender crumb and rise |
| Large Eggs 🥚 | 4 whole | Room temperature, separated |
| Baking Soda 🧂 | 1 tsp | Freshly measured |
| Salt 🧂 | ½ tsp | Fine sea salt preferred |
| Vanilla Extract 🌿 | 2 tsp | Pure, high-quality |
| Cream Cheese 🧀 | 16 oz | Room temperature, full-fat |
| Powdered Sugar 🍚 | 4 cups | Sifted for smooth frosting |
| Heavy Whipping Cream 🥛 | 1 ½ cups | Cold for stability |
| Buttercream Stabilizer 🧈 | 1 tbsp | Optional for extra firmness |
The cocoa powder and instant espresso powder are non-negotiable for achieving that signature red velvet depth. Valrhona or Guittard brands deliver superior flavor intensity—worth the investment for professional results. Buttermilk must be fresh; powdered versions lack the tang needed for proper moisture balance. For the food coloring, AmeriColor or Wilton liquid dyes provide vibrant hues without altering texture. Room-temperature butter is critical for creaming; chilled butter creates dense layers. Sift your flour and cocoa powder together to eliminate lumps and ensure an even crumb structure. The cream cheese should be full-fat and at room temperature to achieve that signature velvety frosting consistency.
No buttermilk? Substitute with 1 cup milk + 1 tbsp vinegar, let sit 5 minutes. Dutch-processed cocoa powder won’t yield the same rich color—stick with natural. For a lighter cake, replace 0.5 cup flour with cornstarch. The vinegar can be swapped for lemon juice, though white vinegar provides the most neutral flavor. If you’re concerned about the cake being too dense, add 1 tsp baking powder to the dry ingredients. For the frosting, powdered sugar should be sifted to avoid graininess, and the buttercream stabilizer (like Meringue Powder) prevents melting in warm rooms. The heavy whipping cream must be cold—never warmed—to maintain stability during piping.
Store cake layers wrapped in plastic at room temperature for 2 days or refrigerated for 5 days. Frosting keeps 3 days refrigerated or 1 month frozen in an airtight container. For assembly, use dowels for support and level each tier with a serrated knife. The frosting should be piped at 68°F for optimal texture. If assembling ahead, refrigerate the stacked cake for 1 hour before decorating to set the frosting properly. Freshly baked layers develop deeper flavor when served at room temperature after refrigeration.
Why You’ll Love This Recipe
- No-Fuss Layers: I swear by this recipe because it’s three cakes with zero stress—just mix, bake, and stack. The secret’s in the cocoa and butter ratio; once you nail that creamy crumb, you’ll never go back to dry velvet again.
- Velvet Magic: That first bite? Chef’s kiss. The natural red coloring keeps it vibrant without tasting artificial, and the cocoa gives it this deep, slightly tangy richness. Honestly, the cream cheese frosting makes it taste like a hug.
- Party Ready: Birthdays, weddings, or just because—this cake looks fancy without the fuss. The tiers let you customize: add white chocolate drizzle, edible flowers, or keep it classic. My in-laws always ask for the recipe now.
- Budget-Friendly Luxury: Three layers for the price of two? Yes, please. All-purpose flour and granulated sugar stretch further than specialty mixes, and the butter makes it taste indulgent. Leftovers? They disappear in one sitting—trust me.
Step-by-step instructions for 3 tier red velvet cake
Precision matters here—follow these exact steps for velvety layers and flawless tiers.
👨🍳 Step 1: Prepare the Buttermilk Mixture
In a medium bowl, combine the 1.5 cups buttermilk and 1 tablespoon white vinegar. Stir gently and let sit for 5 minutes until slightly thickened. This acidulated buttermilk creates the cake’s signature tender crumb and subtle tang. The mixture should resemble thick buttermilk—if it curdles completely, strain it through a fine-mesh sieve.
While waiting, sift together the 3.5 cups all-purpose flour, 0.75 cup unsweetened cocoa powder, 1 teaspoon baking soda, and 0.5 teaspoon salt into a large bowl. This pre-sifting prevents lumps and ensures an even distribution of cocoa throughout the batter. Use a whisk to break up any remaining clumps in the dry ingredients.
👨🍳 Step 2: Cream Butter and Sugar for Structure
In a stand mixer fitted with the paddle attachment, beat the 1.5 cups unsalted butter and 1 cup of the 2.5 cups granulated sugar on medium speed for 3-4 minutes until light and fluffy. You’ll see the mixture nearly double in volume and become pale—this incorporates air for a tender crumb. Scrape down the sides of the bowl with a spatula to ensure even mixing.
Add the 4 whole large eggs, one at a time, mixing well after each addition. Then add the remaining 1.5 cups granulated sugar and mix until fully combined. Finally, add the 2 teaspoon vanilla extract and 2 tablespoon instant espresso powder, mixing just until incorporated. The espresso powder enhances the chocolate flavor without adding bitterness—don’t skip this step for depth of flavor.
🍳 Step 3: Combine Wet and Dry Ingredients
With the mixer on low speed, gradually add the prepared buttermilk mixture to the butter mixture, mixing just until combined. Scrape down the sides of the bowl again. Then, with the mixer on low speed, add the sifted dry ingredients in three additions, mixing just until the flour is incorporated after each addition. Avoid overmixing—stop as soon as the batter comes together.
Divide the batter evenly among the three 8-inch round cake pans (you’ll need about 1 cup batter per pan). Gently tap each pan on the counter to remove air bubbles. For vibrant color, divide the 0.5 tablespoon natural red food coloring evenly among the pans. Bake at 350°F (175°C) for 25-30 minutes, or until a toothpick inserted into the center comes out clean. Rotate the pans halfway through baking for even browning.
🥘 Step 4: Prepare Cream Cheese Filling
While the cakes bake, prepare the filling by beating the 16 oz cream cheese and 1 cup unsalted butter (softened) together until smooth. Gradually add 2 cups powdered sugar, mixing until fully combined. The mixture should be thick but spreadable—this will fill the layers between tiers. Cover and refrigerate until ready to use.
For the buttercream frosting, beat the remaining 1 cup unsalted butter (softened) until creamy. Gradually add the 4 cups powdered sugar and 1 tablespoon buttercream stabilizer, mixing on high speed for 3-4 minutes until light and fluffy. Add the 1.5 cups heavy whipping cream (cold) in two additions, mixing well after each. The frosting should hold its shape when piped—if it’s too soft, chill for 10 minutes before proceeding.
🍰 Step 5: Assemble and Decorate the Cake
Level the cakes if necessary, then place the first layer on a cake stand or plate. Spread an even layer of cream cheese filling over the top, leaving a ½-inch border. Repeat with the second and third layers, ensuring each layer is level. Chill the assembled cake for 15 minutes to firm up the filling.
Apply a thin crumb coat of buttercream to the entire cake, then chill for 10 minutes to set. Finally, apply the final layer of buttercream, smoothing with a spatula or bench scraper. For a polished finish, use a cake comb or offset spatula to create texture. Serve at room temperature for the best texture and flavor.
Pro Tips For Making 3 Tier Red Velvet Cake
- Whisk the Butter First: I learned this the hard way—mixing the dry ingredients and sugar before the butter leads to a gummy cake. Cream the butter and sugar until it’s pale, almost fluffy, before adding anything else. That’s when the texture magic happens.
- Sift the Cocoa Twice: Unsweetened cocoa powder clumps like a grumpy cat if you don’t handle it right. Sift it twice—once into the dry ingredients, then again right before mixing. No clumps means even color and no bitter pockets.
- Don’t Overmix the Batter: The second you add the buttermilk, stop folding after three strokes. Overmixing turns red velvet cake dense and tough. The batter should look streaky, not smooth—like a lazy painter’s brushstrokes.
- Chill the Pans 10 Minutes: Room-temperature pans make the bottoms burn before the centers set. Pop the pans in the fridge for 10 minutes after greasing—just enough to slow the oven’s aggression. Your tiers will bake evenly, no guessing.
Creative variations of 3 tier red velvet cake
Southern Classic Twist
For a true Southern-inspired variation, swap the cream cheese filling for a bourbon-infused buttercream. Replace ¼ cup of the powdered sugar with 2 tablespoons bourbon (like Buffalo Trace) and add 1 teaspoon vanilla bean paste for depth.
This adds a warm, caramel-like note that pairs beautifully with the cake’s chocolatey richness. 🥃
Chocolate-Dipped Layers
Take your cake to the next level by dipping the bottom of each tier in melted dark chocolate before assembling. Use a high-quality 70% Valrhona chocolate for a bittersweet contrast. Let the chocolate set slightly on parchment paper before stacking—this creates a stunning marbled effect when sliced.
The chocolate adds a sophisticated touch while keeping the signature red velvet flavor intact.
Berry-Inspired Frosting
For a fruity twist, blend ½ cup raspberry jam (like Wilton Raspberry) into the cream cheese filling. This adds a bright, tangy balance to the richness. Top with fresh raspberries and blackberries for a vibrant, seasonal look.
The jam’s acidity cuts through the sweetness, making each bite more complex. Perfect for spring or summer celebrations!
Spiced Rum Variation
Infuse the frosting with 1 teaspoon spiced rum (like Captain Morgan Original) and a pinch of cinnamon for a cozy, aromatic twist. The rum adds warmth while the cinnamon enhances the cake’s natural vanilla notes.
This variation works especially well during the holidays or for a boozy dessert that still feels light and airy. 🎄
White Chocolate Swirl
Create a stunning visual effect by swirling melted white chocolate into the cream cheese filling before assembling. Use Ghirardelli white chocolate bars for smooth texture, and pipe it in elegant spirals between layers.
The contrast of creamy white against the red velvet layers makes this a showstopper for weddings or elegant gatherings.
Gluten-Free Adaptation
For a gluten-free version, replace 1 cup of all-purpose flour with 1 cup gluten-free 1:1 baking flour (like Bob’s Red Mill). Add ½ teaspoon xanthan gum to improve structure.
The texture remains tender, though slightly denser. Pair with a dairy-free cream cheese frosting (like Kite Hill**) for a fully inclusive dessert that doesn’t compromise on flavor. 🌱
Nutrition facts
Frequently asked questions
Why does red velvet cake need buttermilk?
The buttermilk creates that signature tender, moist crumb by reacting with the baking soda to produce air pockets. Without it, the cake would be dense and dry. The acidity also enhances the cocoa flavor and helps balance the sweetness. For best results, use fresh buttermilk—never powdered or substituted with regular milk and vinegar unless you let it sit for 5 minutes first.
How do I prevent my 3-tier cake from collapsing?
Use dowels (wooden skewers) for support between layers and ensure each tier is perfectly level before stacking. Chill the cake for 15 minutes after assembling to set the frosting, then apply a crumb coat and chill again. Avoid overfilling with cream cheese—leave a ½-inch border to prevent spillage. Also, don’t skip the 10-minute chill before decorating.
Can I make this cake ahead of time?
Bake the layers up to 2 days ahead and store them wrapped at room temperature. Frosting can be made 3 days ahead and refrigerated. Assemble the cake 4 hours before serving to allow the frosting to set properly. For long-term storage, freeze the unfrosted layers for up to 1 month—thaw overnight in the fridge before assembling.
What’s the secret to vibrant red velvet color?
Use natural red food coloring (not gel) and divide it evenly among the pans. The cocoa powder and instant espresso powder also darken the batter naturally. For extra vibrancy, add 1 tsp beet powder to the dry ingredients. Avoid overmixing the batter—this can darken the color and make the cake dense. Bake just until a toothpick comes out clean to preserve the hue.
How do I decorate a 3-tier cake for beginners?
Start with a smooth buttercream base using an offset spatula. For easy designs, pipe simple rosettes or swirls with a Wilton 1M tip. Add fresh berries or edible flowers for color without stress. If piping feels tricky, use a bench scraper to create clean edges. Keep decorations minimal—focus on the cake’s natural beauty with a dusting of powdered sugar or chocolate shavings.
