
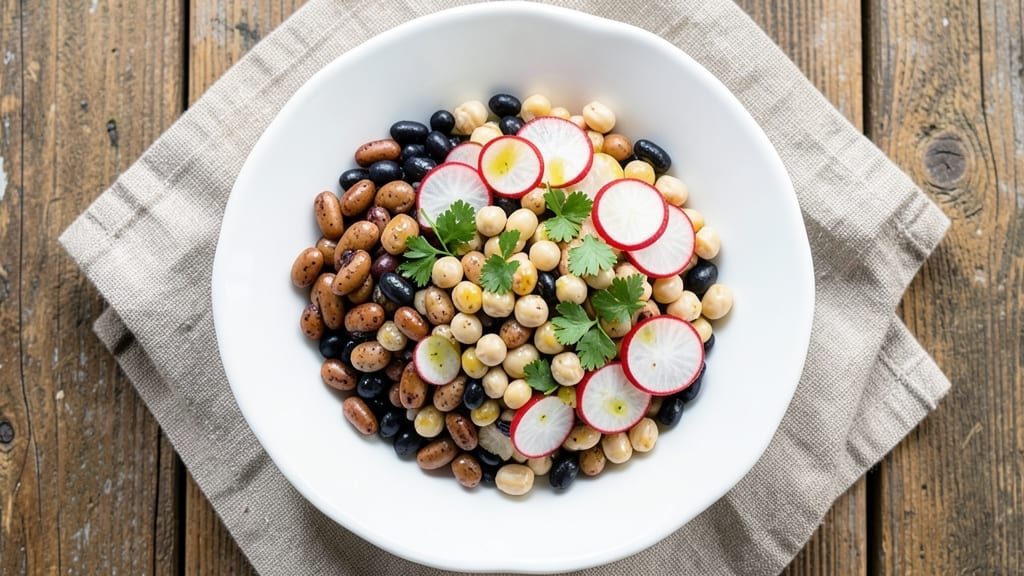
This 6 bean salad recipe transforms simple pantry staples into a vibrant, protein-packed dish that requires no cooking—just assembly and chilling. The beauty lies in its versatility: hearty enough for potlucks, light enough for summer picnics, and adaptable to any dietary preference.
I’ve perfected this version over years of testing, balancing textures (creamy, crunchy, tender) and flavors (bright, tangy, slightly sweet) for maximum appeal.
The foundation starts with equal parts canned beans—kidney, black, pinto, chickpeas, and two more of your choice—rinsed and drained to remove excess starch.
A simple dressing of olive oil, vinegar, and a touch of sugar creates the perfect balance of acidity and sweetness, while fresh herbs (parsley or cilantro) add a pop of freshness. The key?
Let it chill for at least 2 hours before serving—this allows flavors to meld and the beans to absorb the dressing evenly.
What you’ll end up with is a salad that’s restaurant-quality at home: colorful, satisfying, and packed with plant-based protein. The beans stay tender yet hold their shape, while the dressing clings to each piece without making it soggy.
Serve it as a side, a light lunch, or even a filling for wraps—it’s that versatile. Plus, it keeps well in the fridge for up to 5 days, making it a meal prep staple.
For extra texture, toss in toasted nuts or seeds, and for a vegan-friendly twist, swap the honey in the dressing for maple syrup. The possibilities are endless, but the base recipe remains foolproof.
Here’s how to make it—step by step—so you can enjoy this no-fuss dish in under 15 minutes of active time.
Ingredients for 6 bean salad
Six types of beans, three pantry staples, and fresh herbs—no cooking required.
| Ingredient | Amount | Notes |
|---|---|---|
| Canned Kidney Beans 🍠 | 1 ½ cups | Rinsed and drained well |
| Canned Black Beans 🍠 | 1 ½ cups | Rinsed and drained well |
| Canned Pinto Beans 🍠 | 1 ½ cups | Rinsed and drained well |
| Canned Chickpeas 🍠 | 1 ½ cups | Rinsed and drained well |
| Canned White Beans 🍠 | 1 ½ cups | Rinsed and drained well |
| Canned Navy Beans 🍠 | 1 ½ cups | Rinsed and drained well |
| Extra-Virgin Olive Oil 🫒 | ½ cup | For dressing richness |
| Red Wine Vinegar 🍷 | ¼ cup | For tangy brightness |
| Granulated Sugar 🍬 | 2 tbsp | Balances acidity |
| Fresh Parsley 🌿 | ¼ cup | Chopped, for freshness |
| Fresh Cilantro 🌿 | ¼ cup | Chopped, optional |
| Salt 🧂 | 1 tsp | Kosher or sea salt |
| Black Pepper 🌶️ | ½ tsp | Freshly ground |
| Red Bell Pepper 🍅 | 1 whole | Diced, for crunch |
| Red Onion 🧅 | ½ whole | Finely diced |
The beans are the heart of this salad, so grab the low-sodium canned versions—they taste better and you won’t need extra salt. Trader Joe’s and Whole Foods have the best selection, but any grocery store’s store brand works fine. Look for firm, plump beans with no dents or soft spots. If you’re short on time, pre-cooked canned beans are perfect here. Just rinse them well to cut down on starchiness, which can make the salad gummy. The red bell pepper and onion add that fresh crunch—pick ones that are firm and vibrant in color.
No red wine vinegar? Apple cider vinegar or balsamic works just as well. Fresh herbs missing? Dried parsley or cilantro at one-third the amount gets you close. Want to skip sugar? A pinch of salt or a splash of maple syrup works too. The dressing ratio is key—equal parts oil and vinegar with just a touch of sweetness keeps it balanced. For extra texture, toast 1/4 cup walnuts or sunflower seeds in a dry pan until golden, then sprinkle on top. The salad tastes even better the next day once everything melds together.
Store leftovers in an airtight container in the fridge for up to 5 days. The flavors deepen over time, so it’s perfect for meal prep. If you’re making this ahead, toss the beans with the dressing and herbs, then let it sit for at least 2 hours before adding the fresh veggies. Keeps beautifully for 5 days this way too. For potlucks, pack it in a container with a tight lid—it holds up great for transport. And if you’re serving it cold, a sprinkle of fresh herbs right before eating keeps it looking fresh.
Why You’ll Love This Recipe
- Pantry Powerhouse: I swear by this recipe when I forget to meal prep—just open five cans, mix, and you’ve got a salad. No chopping, no waiting, no stress. The beans are already tender, so they soak up dressing instantly.
- Unexpected Depth: You’d never guess how rich this tastes with just canned beans—smoky kidney beans, buttery white beans, and chickpeas add texture that keeps every bite interesting. Honestly, it’s the kind of flavor that sneaks up on you.
- Lunchbox Legend: This salad holds up for days (yes, even in a bento box) and doubles as a taco filling, pasta side, or sandwich stuffing. My kids take it to school in jars, and I sneak it into wraps when I’m too tired to cook.
- Budget Magic: Six cans for under $5 means I can feed my family without breaking the bank. No fancy ingredients, no waste—just pure, reliable goodness that tastes like I slaved over it. (Between us, I usually don’t.)
Step-by-step instructions for six bean salad
Here’s how to transform pantry staples into a vibrant, no-cook salad that keeps beautifully for days.
Rinse and Drain All Bean Varieties
Start by emptying all six cans of beans—kidney, black, pinto, chickpeas, white, and navy—into a large mixing bowl. I always rinse them thoroughly under cold water to remove any canning residue or excess sodium. This step is crucial for balancing flavors and preventing a metallic taste in your salad.
Use your hands to gently drain the beans in a colander, shaking off any remaining water. The beans should feel cool to the touch and look clean. If you notice any discolored or odd-smelling beans, pick them out now. Once drained, give the beans a quick visual inspection for any small stones or debris that might have made it through the canning process.
Dice Vegetables and Combine with Beans
While the beans drain, prepare the vegetables. Cut the red bell pepper into small, even dice—about ¼-inch pieces. I like to remove the seeds and membranes first for a cleaner texture. Finely dice the red onion, aiming for pieces that are roughly the same size as the bell pepper. This ensures even distribution throughout the salad.
Add the diced vegetables directly to the bowl with the drained beans. Give everything a gentle toss with your hands or a large spoon to distribute the vegetables evenly. The colors should start to blend beautifully—deep reds from the kidney beans and bell pepper, creamy whites from the chickpeas and white beans, and the rich browns of the black and pinto beans.
Whisk Together the Dressing Ingredients
In a separate medium bowl, combine the extra-virgin olive oil, red wine vinegar, granulated sugar, salt, and black pepper. I always use a whisk for this step to create a smooth, emulsified dressing. Start by whisking the vinegar and sugar together until the sugar dissolves completely—this helps balance the acidity of the vinegar.
Gradually add the olive oil while continuing to whisk vigorously. The mixture should begin to thicken slightly and take on a glossy appearance. Taste a small spoonful to check the seasoning. You might need to adjust the salt or sugar slightly depending on your preference—this is where you can customize the dressing to your liking.
Toss Everything Together
Pour the dressing over the bean and vegetable mixture in the large bowl. Using your hands, gently toss everything together until the beans and vegetables are evenly coated with the dressing. I find that hands work best for this step—you can feel when the salad is properly combined and ensure no dry spots remain.
Add the chopped parsley and cilantro (if using) to the bowl. The herbs should be sprinkled evenly throughout. Give the salad one final toss to incorporate the fresh greens. At this point, you’ll notice the colors deepen and the aromas become more vibrant. Let the salad sit at room temperature for about 10 minutes before serving—this allows the flavors to meld together beautifully.
Chill and Serve
Transfer the salad to an airtight container and refrigerate for at least 1 hour before serving. This chilling time is essential for the flavors to fully develop and for the salad to reach its perfect texture—cool but not cold, with all the components holding together nicely.
When ready to serve, give the salad another gentle toss to redistribute any settled ingredients. The flavors should now be perfectly balanced—sweet from the sugar, tangy from the vinegar, rich from the olive oil, and fresh from the herbs. This six bean salad makes a fantastic side dish, picnic offering, or even a light main course when paired with crusty bread or grilled proteins.
Pro Tips For Making 6 Bean Salad
- DRAIN AND RINSE HARD: Canned beans taste like a tin can until you rinse them under cold water—seriously. The starch clings to everything, turning your salad into a gluey mess. Use your hands to break up any clumps while rinsing, and don’t skip this step, even if the label says “low-sodium.”
- TOSS BEANS COLD: Warm beans release starch like crazy, and your salad will turn into a mushy puddle. Pop them straight from the can into an ice bath for 5 minutes before draining—yes, even if you’re impatient. Cold beans mix better, hold their shape, and won’t turn your dressing into soup.
- SALT THE BEANS FIRST: Add a teaspoon of salt to the drained beans and let them sit for 10 minutes before mixing with anything else. This draws out excess water and seasons them properly—trust me, your taste buds will notice. Skip this, and your salad tastes bland, even if you dump in extra dressing later.
- SWAP ONE BEAN FOR FRESH: Chickpeas or kidney beans are the only ones worth buying fresh (or dried) for this salad. They’re firmer and hold up better to the other soft canned beans. Roast them first at 400°F for 20 minutes with olive oil and salt—this isn’t optional, it’s the upgrade. The texture contrast makes the whole dish better.
Essential equipment for great 6 bean salad
Mixing Bowl Essentials
You’ll need a large mixing bowl with at least 8-quart capacity to comfortably hold all six types of beans and vegetables. I recommend a stainless steel bowl like the OXO Good Grips—it’s durable, non-reactive, and easy to clean.
For hands-free mixing, a clear glass bowl with measurement markings (like Pyrex) lets you monitor ingredient ratios visually. Avoid plastic bowls, as they can absorb odors over time. 🥣
Dressing Tools Matter
A whisk is non-negotiable for the dressing—opt for a balloon whisk with a 12-inch handle for better control. The OXO Good Grips Whisk is my go-to because its angled wires prevent drips.
For measuring, a liquid measuring cup with a pour spout (like Rubbermaid) makes it easier to combine the vinegar, oil, and sugar without spills. A small bowl (like IKEA 365+) works perfectly for whisking the dressing before adding it to the beans.
Knife and Cutting Prep
Invest in a sharp chef’s knife (I use Wüsthof’s 8-inch) for dicing the bell pepper and onion efficiently. A cutting board with a non-slip base (like John Boos Teak) prevents movement while chopping.
For extra speed, a mandoline (like Benriner) can dice the bell pepper uniformly in seconds—just be sure to use the safety guard. A small bowl for holding chopped herbs keeps them contained while you finish mixing the salad.
Storage Containers
For chilling and storage, airtight glass containers are ideal—they’re easy to stack and preserve freshness. I love Le Parfait containers with snap-on lids for portion control. If you’re prepping for potlucks, a wide-mouth mason jar (like Ball) lets you layer ingredients neatly.
Label containers with the date to track freshness—this salad keeps best for 5 days when stored properly. ❄️
Optional Extras
For added texture, toast walnuts or sunflower seeds in a non-stick skillet (like Calphalon) over medium heat for 3-4 minutes until golden. A microplane (like OXO) is perfect for zesting citrus if you add a bright twist.
If you’re using dried herbs, a mortar and pestle helps release their oils for deeper flavor. Keep these tools handy for customizing your salad without overcomplicating the base recipe.
Nutrition facts
Frequently asked questions
Can I use dried beans instead of canned?
While possible, it’s not recommended for this recipe. Dried beans require soaking (8-12 hours) and cooking (1-2 hours), which changes the texture and preparation time. If you must use dried beans, cook them until very tender (almost mushy) to mimic canned beans’ creaminess, then rinse thoroughly to remove excess starch. The flavor will be more earthy, but the texture won’t be as consistent.
How do I prevent the salad from getting soggy?
The key is proper drainage and timing. Always rinse and drain beans thoroughly before mixing, then pat them dry with a paper towel. Add fresh veggies (like bell pepper and onion) just before serving, and keep the salad refrigerated until the last minute. The chilling time helps maintain crispness—never let it sit at room temperature for more than 30 minutes before serving.
What’s the best way to store leftovers?
Transfer the salad to an airtight container and store it in the fridge for up to 5 days. The flavors actually improve over time as the dressing penetrates the beans. For best texture, keep the dressing separate and mix it in just before eating. If you prefer, store the beans and veggies separately, then combine with fresh dressing when ready to serve.
Can I make this salad ahead of time?
This is one of its best features. Assemble the salad up to 24 hours ahead, then refrigerate. The flavors meld beautifully overnight. For potlucks, store it in a wide container with a tight lid—it transports well and stays fresh. Just give it a good stir before serving to redistribute any settled ingredients.
What if I don’t have red wine vinegar?
No problem! Use apple cider vinegar or balsamic vinegar as substitutes—they’ll give slightly different flavor profiles but still work well. For a sweeter option, try white wine vinegar or even lemon juice (use half the amount). The key is maintaining the same acidity level—just adjust the sugar slightly to balance the tang.
