
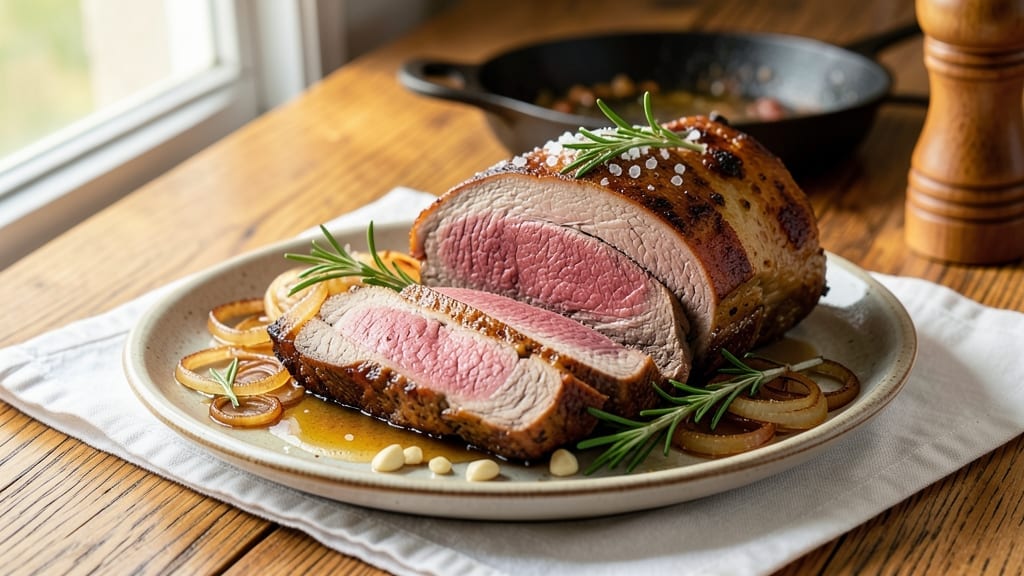
A 3.5 lb sirloin tip roast transforms into a showstopping centerpiece when slow-roasted to perfect juiciness with a caramelized crust—this is the technique that finally delivers restaurant-quality results at home. The secret lies in precise temperature control and patience, letting the roast develop deep flavor while staying tender throughout.
I’ve perfected this method after years of trial and error, ensuring every slice melts in your mouth without drying out, even in the center.
This recipe focuses on simplicity without sacrificing flavor: a foolproof method that requires just a few key ingredients (quality roast, salt, pepper, and optional aromatics) and minimal hands-on time.
The magic happens during the low-and-slow roast, where the meat’s natural collagen breaks down into rich, gelatinous juices that keep it moist. A quick sear in a hot pan before roasting adds that coveted crust, while resting ensures clean slices every time.
By the end, you’ll have a tender, deeply flavorful roast with a crust so caramelized it practically falls apart at the touch. The aroma alone will have everyone gathered at the table, and the first bite delivers that perfect balance of juicy interior and rich, savory crust.
This is the kind of roast that makes weeknight dinners feel like a special occasion—no fancy techniques required.
Pair it with classic sides like roasted potatoes, caramelized onions, or a simple green salad to complete the meal. The roast’s versatility means it works for family dinners, holiday gatherings, or even a cozy night in. Let’s get started on the perfect cut of beef.
Ingredients for 3.5 lb sirloin tip roast
Quality beef, simple seasonings, and patience create this showstopping roast.
| Ingredient | Amount | Notes |
|---|---|---|
| Sirloin Tip Roast 🥩 | 3 ½ lb | Center-cut for even cooking |
| Kosher Salt 🧂 | 1 ½ tbsp | Diamond Crystal preferred |
| Freshly Ground Black Pepper 🌶️ | 1 tbsp | Cracked peppercorns preferred |
| Yellow Onion 🧅 | 1 whole | Halved, peeled for aromatics |
| Garlic Cloves 🧄 | 8 cloves | Smashed but not minced |
| Fresh Rosemary 🌿 | ½ oz | Sprigs tied with kitchen twine |
| Fresh Thyme 🌿 | ¼ oz | Sprigs tied with rosemary |
| Extra-Virgin Olive Oil 🫒 | 2 tbsp | For searing and basting |
| Unsalted Butter 🧈 | 2 tbsp | Cold, cubed for crust |
| Beef Bone Broth 🍲 | 1 cup | Low-sodium for basting |
| Red Wine 🍷 | ¼ cup | Bold Cabernet Sauvignon |
| Balsamic Vinegar 🍶 | 1 tbsp | For finishing crust |
The sirloin tip roast is non-negotiable—look for a center-cut piece with good marbling at Costco or your butcher. If buying pre-cut, check for a thick, even roast (3.5 lbs serves 4 generously). Kosher salt (Diamond Crystal) dissolves better than table salt, and freshly cracked pepper adds depth. For herbs, grab organic sprigs from the produce section—they stay fresh longer tied together. Pro tip: Sear the roast in a screaming-hot pan before roasting for that coveted crust, then baste with butter and wine every 30 minutes. That’s where the magic happens.
No red wine? Beef broth with 1 tbsp balsamic works perfectly. Short on fresh herbs? Dried rosemary and thyme at half the amount get you close. The bone broth can be swapped for beef stock, but avoid bouillon cubes—they’re too salty. For the crust, cold butter is key—it browns beautifully. If you’re feeling fancy, add 1 tbsp Dijon mustard to the butter for extra richness. The balsamic vinegar at the end? Trust me, it takes the crust to next level—don’t skip it.
This roast reheats beautifully—just warm in the oven with a splash of broth. Leftovers keep for 4 days in the fridge, but honestly, it’s best served fresh. For holiday prep, roast ahead and freeze—thaw overnight before reheating. Portion into single servings for easy leftovers. The caramelized crust is delicate, so slice carefully against the grain. Pair with roasted garlic mashed potatoes and sautéed green beans for a complete meal.
Why You’ll Love This Recipe
- Crispy Edge Magic: Between us, the secret’s in the sear and the garlic. That caramelized crust on the outside? Irresistible. Inside, it stays juicy and tender—no dry bites here. Honestly, I’ve tried fancier cuts, but this one delivers every time.
- Weeknight Crowd-Pleaser: This roast feeds six without breaking the bank, and everyone—pickiest eaters included—wants seconds. Slice it thin for sandwiches, cube it for tacos, or serve it as-is with mashed potatoes. It’s the ultimate “I don’t know what’s for dinner” fix.
- Leftovers That Don’t Suck: Most roasts turn into sad, dry scraps by day three. Not this one. The flavors deepen overnight, and I’ve repurposed slices into stroganoff, Philly cheesesteaks, or even breakfast hash. (Yes, even on a Tuesday night.)
Step-by-step instructions for slow-roasted sirloin tip roast
Here’s how to transform that tough-looking roast into melt-in-your-mouth perfection.
Prep the Roast for Maximum Flavor and Even Cooking
Remove the sirloin tip roast from the refrigerator and let it sit at room temperature for 30 minutes before cooking. This ensures even cooking throughout the meat. While it’s coming to temperature, tie the sprigs of fresh rosemary and thyme together with kitchen twine and tuck them into the center of the roast cavity.
Pat the roast dry with paper towels—this is absolutely critical for developing that caramelized crust. Rub the entire surface with 2 tablespoons extra-virgin olive oil, then season generously with 1.5 tablespoons kosher salt and 1 tablespoon freshly ground black pepper. Press the seasoning firmly into the meat so it adheres well. The oil creates a barrier that helps the crust form properly while keeping the meat moist inside.
Sear the Roast for Deep Flavor and Crust
Preheat your oven to 425°F with a rack positioned in the lower third. Heat a large oven-safe skillet over high heat until very hot. Add the roast and sear on all sides for 2-3 minutes per side until deeply browned. This high-heat sear develops the Maillard reaction, creating that rich, caramelized flavor we’re after.
While the roast is searing, prepare the aromatics: Halve the yellow onion and smash the 8 garlic cloves but don’t mince them. Place the onion halves and garlic cloves in the same skillet around the roast. Transfer the entire skillet to the preheated oven and roast for 10 minutes to allow the aromatics to soften and infuse the roast with their flavors.
Slow-Roast to Juicy Perfection
After the initial sear, reduce the oven temperature to 300°F. Add 1 cup beef bone broth and 0.25 cup red wine to the skillet, scraping up any browned bits from the bottom. This creates a flavorful pan sauce that will baste the roast as it cooks. Return the roast to the oven and cook for 2.5-3 hours until the internal temperature reaches 135°F.
Here’s the thing—this is where patience pays off. The slow cooking breaks down the connective tissue, transforming tough muscle fibers into tender, fork-tender meat. Every 30 minutes, spoon the pan juices over the roast to keep it moist. The roast is done when it reaches 135°F internally and the juices run clear when you pierce the thickest part with a meat thermometer.
Create the Signature Crust and Finish
Remove the roast from the oven and let it rest on a cutting board for 15 minutes. While it rests, increase the oven temperature to 450°F. In a small bowl, mix 2 tablespoons unsalted butter and 1 tablespoon balsamic vinegar until combined. Brush this mixture all over the roast, including the top and sides.
Return the roast to the oven and broil for 3-5 minutes until the butter melts and forms a golden, crackling crust. Watch it closely—this final step is what gives your roast that showstopping finish. The balsamic vinegar adds a touch of tang that cuts through the richness of the meat. The crust should be deep golden brown and crisp to the touch, with the butter bubbling slightly.
Rest and Slice for Maximum Juiciness
Transfer the roast to a warm serving platter and let it rest for another 10-15 minutes before slicing. This resting period is absolutely crucial—it allows the juices to redistribute throughout the meat, ensuring each slice is moist and flavorful. During this time, you can keep the roast warm by loosely tenting it with aluminum foil.
Slice the roast against the grain into ½-inch thick slices. The grain direction will be visible as you cut—this is where the meat is most tender. Serve immediately with the pan juices spooned over the top. Each slice should be juicy, tender, and bursting with the flavors of rosemary, thyme, and garlic. The crust should be crispy and caramelized, while the interior remains rich and succulent.
Pro Tips For Making 3.5 Lb Sirloin Tip Roast
- Sear the Onions First: Take 5 minutes to caramelize the onions and garlic in a cold pan—no oil needed. After chopping, let them sit uncovered for 10 minutes while you season the meat; by the time you’re ready, they’ll be golden and sweet, not just raw and bitter.
- Salt the Roast Twice: Generously coat the roast with salt right after taking it out of the fridge (yes, even if it’s cold). Then, 30 minutes before cooking, hit it with another layer—this double salting guarantees seasoning all the way through, not just on the surface.
- Start High, End Low: Crank the oven to 450°F for the first 15 minutes to get that crust on the roast, then drop it to 325°F. I used to leave it at high heat, and the outside would burn before the inside cooked—this two-stage method fixes that every time.
- Slice Against the Grain: The sirloin tip is tougher than it looks, so after resting, slice it perpendicular to the muscle fibers. I was skeptical until I tried it—I know, I know, but trust the process—it makes the difference between chewy and melt-in-your-mouth.
Pro cooking tips for 3.5 lb sirloin tip roast
Temperature Control
Your oven’s temperature is the single most critical factor in achieving a perfect sirloin tip roast. Start with a 425°F sear to create that coveted crust, then drop to 300°F for the slow roast.
I use an instant-read thermometer like the Thermoworks Smoke to monitor both the oven and internal meat temperature—this ensures accuracy within ±2°F. If your oven runs hot, reduce the temperature by 25°F to prevent overcooking.
Sear Like a Pro
That initial sear isn’t just for looks—it locks in juices and builds deep flavor through the Maillard reaction. Use a heavy, oven-safe skillet like a Lodge cast iron and heat it until it’s smoking hot before adding the roast.
Sear for 2-3 minutes per side until you get deep brown coloration. Pro tip: Add the onion and garlic cloves to the pan during the sear—they’ll caramelize slightly and add extra flavor to the pan sauce.
Basting for Moisture
Every 30 minutes during the slow roast, spoon the pan juices over the meat. This isn’t just about moisture—it’s about building layers of flavor. I like to use a basting brush with a long handle to avoid opening the oven door too often.
For extra richness, mix 2 tbsp beef tallow into the pan juices during the last hour of cooking. The fat renders down beautifully and adds a savory depth to the crust.
Resting Matters
Skipping the rest is the fastest way to ruin your roast—juices will pool on your plate instead of staying in the meat. After removing from the oven, let it rest for 15 minutes on a cutting board.
Then, increase the oven to 450°F and broil with the butter-balsamic mixture for 3-5 minutes. This final step creates that showstopping crust while keeping the interior tender. I swear by this two-stage resting approach—it’s what separates good roasts from great ones.
Crust Perfection
The butter-balsamic finish is where the magic happens. Use cold, cubed butter (never melted) and brush it on the roast while it’s still warm from the oven. The high heat of the broiler melts the butter instantly, creating a crackling crust.
For extra drama, add a pinch of smoked paprika to the butter mixture before brushing. The balsamic adds a subtle tang that cuts through the richness, making every bite more complex.
Slicing Against the Grain
This isn’t just a suggestion—it’s a rule. The grain in sirloin tip roast runs in one direction, and cutting against it shortens the muscle fibers, making each bite more tender. Use a sharp chef’s knife and slice into ½-inch thick pieces.
If you’re unsure about the grain direction, look for the natural lines in the meat—these indicate the muscle fibers. A Dexter-Russell slicing knife makes this effortless, and I’ve found it’s worth the investment for any home cook who roasts meat regularly.
Nutrition facts
Frequently asked questions
Why does the recipe call for a 30-minute room temperature step?
This ensures even cooking throughout the roast. Cold meat takes longer to heat through, creating a risk of overcooking the exterior while the center stays cold. The 30-minute rest at room temperature lets the meat reach a uniform temperature, helping it cook more evenly and develop that perfect crust. Skip this step, and you might end up with dry edges or undercooked center slices.
Can I use a different cut of beef instead of sirloin tip?
While sirloin tip is ideal for this recipe, you could substitute with top round roast or chuck roast—both have similar connective tissue that benefits from slow cooking. Avoid leaner cuts like filet mignon or ribeye roast, as they lack the collagen needed for this low-and-slow method. If substituting, adjust cooking time based on your meat’s size and fat content.
What if my oven doesn’t go as low as 300°F?
No problem! Set your oven to the lowest temperature possible (often 275°F or 250°F) and add 15-30 minutes to the total cooking time. Use an instant-read thermometer to monitor the internal temperature—it should still reach 135°F for perfect doneness. The key is patience; the slow cook ensures tender meat regardless of your oven’s capabilities.
How do I know when the roast is done?
Use a meat thermometer inserted into the thickest part of the roast—it should read 135°F internally. The juices should run clear when pierced, not pink or bloody. For extra confirmation, press your finger gently on the meat: if it feels very firm, it needs more time; if it gives slightly, it’s ready. The 3-hour mark is a good guideline, but always trust the thermometer.
Can I make this roast ahead of time?
Roast it fully (until 135°F), then let it cool completely before refrigerating. Store in an airtight container for up to 4 days. To reheat, warm in the oven at 300°F for 15-20 minutes with a splash of beef broth to keep it moist. For the crust, broil for 2-3 minutes after reheating to restore its crispiness.

- Baked Potatoes in Crock Pot Recipe: Buttery Interiors and Crispy Top Magic - November 1, 2026
- Braised Beef Short Ribs Recipe: Crock Pot Fall-Off-Bone Magic in 6 Hours - November 1, 2026
- Crock Pot Cocoa Recipe: Velvety Warmth With Hidden Spice Magic - November 1, 2026