
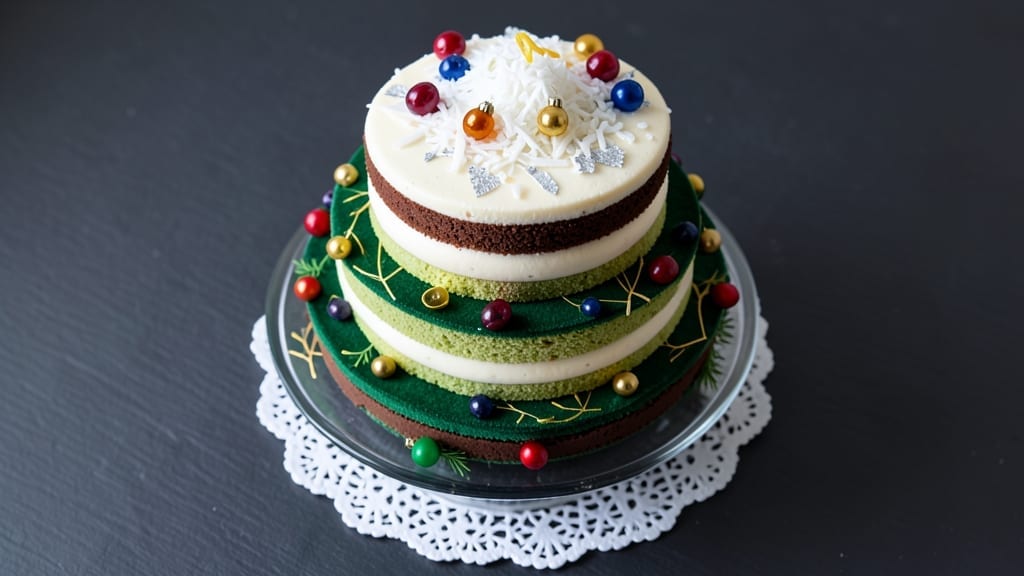
Creating a 3D Christmas tree cake transforms holiday baking into edible art—layered, textured, and dripping with festive charm. This recipe builds a sturdy, tree-shaped cake using stacked sponge layers, fondant branches, and edible glitter for that magical holiday shimmer.
The secret lies in precise leveling and a sturdy base to hold the weight of decorations without collapsing. What sets this apart is the fondant magic: hand-sculpted branches that mimic real pine needles, complete with subtle color variations for depth.
Each layer is carefully shaped to create the illusion of a lush, three-dimensional tree, while a glossy white frosting mimics snow. The result? A centerpiece that looks too stunning to eat—until you do.
The assembly process is methodical but rewarding, with tips for stabilizing each layer and securing decorations without sagging. Whether you’re a baking pro or a confident beginner, this cake delivers restaurant-quality presentation with a fraction of the effort.
The key is patience: letting fondant soften, working in small sections, and using edible glue for precision. Perfect for gifting, holiday parties, or your own festive table, this cake becomes the star of any Christmas celebration. Let’s bring the forest indoors—one delicious layer at a time.
Ingredients for 3d christmas tree cake
Festive flavors and precise techniques bring this edible Christmas tree to life.
| Ingredient | Amount | Notes |
|---|---|---|
| Vanilla Cake Mix 🍰 | 3 boxes | Boxed mix for sturdy base layers |
| Unsalted Butter 🧈 | 1 ½ cups | Softened, full-fat for richness |
| Granulated Sugar 🍚 | 1 cup | For cake layers and frosting |
| Large Eggs 🥚 | 6 whole | Room temperature for even mixing |
| Whole Milk 🥛 | 1 ½ cups | Full-fat for moist sponge |
| Vanilla Extract 🌿 | 2 tbsp | Pure, high-quality extract |
| White Fondant Icing 🎨 | 4 lbs | Store-bought or homemade |
| Green Gel Food Coloring 🎨 | 1 tbsp | For realistic tree branches |
| Edible Glitter ✨ | ½ cup | Silver or gold for shimmer |
| Toothpicks 🪥 | 24 whole | For securing fondant layers |
| Powdered Sugar 🍚 | 2 cups | For dusting cake layers |
| Shortening 🧈 | ½ cup | For extra stability in layers |
| Decorative Sprinkles 🎉 | ¼ cup | Optional for extra holiday cheer |
| Parchment Paper 📄 | 1 sheet | For shaping fondant branches |
| Aluminum Foil 📄 | 1 sheet | For cake board support |
The cake mix is your sturdy foundation—Betty Crocker Super Moist or Pillsbury work best for holding fondant weight. For the butter, Land O’Lakes or Plugrá ensure that rich, full-fat texture that prevents cracking. Room-temperature eggs are non-negotiable here; cold eggs cause uneven mixing, which leads to unstable layers. If you’re using store-bought fondant, Wilton or Sugarflower brands are ideal—they hold their shape better than homemade versions for beginners. The green gel coloring should be vibrant, not dull, so Americolor or Wilton are top choices for that realistic pine hue.
Short on fondant? Marshmallows melted with shortening can be a budget-friendly substitute, though it won’t hold as well for intricate branches. No toothpicks? Cleaned chopsticks or skewers work in a pinch, but they’re trickier to hide. The powdered sugar isn’t just for dusting—it acts as a barrier between cake layers to prevent sogginess. For the edible glitter, Luster Dust or Sugarfilm brands give the most dazzling effect without clumping. If you’re feeling adventurous, you can even tint the white frosting with a touch of green gel for subtle tree shading before adding the branches.
Fondant softens fastest in warm rooms, so work in a 68-72°F environment to prevent cracking. Store unused fondant between parchment paper in an airtight container for up to 3 months—it dries out quickly. The cake layers can be baked a day ahead and kept at room temperature, wrapped in plastic. For the fondant branches, shape them in small batches and refrigerate between uses to maintain pliability. Once assembled, this cake stays stunning for 3-4 days at room temperature, but fondant decorations may lose crispness after 24 hours—best enjoyed fresh!
Why You’ll Love This Recipe
- Box Mix Magic: The base uses classic vanilla cake mix—no fancy measuring or sifting. Mix, bake, layer, and boom: you’ve got a sturdy foundation for that showstopping tree shape, all without stressing over scratch recipes.
- Buttercream Bliss: That rich buttercream—just softened butter, sugar, and milk—melts in your mouth while keeping the layers tender. Honestly, it’s the kind of frosting that makes you want to eat the whole cake before decorating.
- Holiday Showstopper: Between us, this cake is perfect for Christmas morning, office parties, or even a last-minute gift. The 3D tree shape feels festive but isn’t fussy—just pipe the frosting in swirls and let the sprinkles do the work.
- Budget-Friendly Feast: Uses pantry staples (butter, sugar, eggs) and stretches for leftovers. I’ve sent slices to neighbors, frozen layers for later, and still had enough for seconds—no waste, all wins.
Step-by-step instructions for building your whimsical 3D Christmas tree cake
Let’s bring this festive centerpiece to life with precise layering and fondant artistry.
Bake and Assemble Sturdy Cake Layers
Preheat your oven to 350°F and prepare three 8-inch round cake pans by greasing them with 1.5 cups unsalted butter and dusting with 2 cups powdered sugar. In a large bowl, combine each box of vanilla cake mix, 1 cup granulated sugar, 6 whole large eggs, 1.5 cups whole milk, and 2 tbsp vanilla extract per batch, mixing until just combined. Divide the batter evenly among the prepared pans.
Bake for 25-30 minutes or until a toothpick inserted in the center comes out clean. Allow the layers to cool completely in their pans before removing. Once cooled, place each layer on a clean surface and level the tops if needed using a serrated knife. This foundation is critical—uneven layers will make your 3D tree wobble.
Create the Fondant Tree Trunk and Branches
Roll out about 1 pound of white fondant icing on a clean surface dusted with powdered sugar to create a sturdy base layer. Cut a rectangular trunk piece about 3 inches wide by 6 inches tall using a sharp knife or fondant cutter. For the branches, divide the remaining 3 pounds of white fondant icing and tint half with 1 tbsp green gel food coloring for the tree topper.
Roll out the green fondant to about ¼-inch thickness and cut a large triangular shape for the tree topper. For the branches, roll out the white fondant and cut several elongated ovals of varying sizes. Use the 1 sheet parchment paper to shape any curved branches by gently pressing them against the paper before removing. This step is where your tree starts taking magical form—take your time with the details.
Build the Cake Structure with Toothpick Support
Place the first cake layer on your serving board or sturdy surface. Spread a thin layer of the 0.5 cup shortening mixed with a bit of powdered sugar to create a smooth, stable base. Position the fondant trunk vertically against the back of the cake layer, securing it with 4 toothpicks inserted at angles through the cake and into the trunk.
Stack the remaining two cake layers, repeating the shortening layer between each. As you build, arrange the fondant branches horizontally across the layers, starting with the largest at the base and working upwards with progressively smaller branches. Use the remaining 20 toothpicks to secure each branch at the base, ensuring they fan out naturally. The key here is patience—each toothpick should be placed carefully to avoid piercing through to the front of the cake.
Shape and Color the Tree Topper
Roll out the remaining green fondant to create a conical tree shape about 8 inches tall at its widest point. Gently press the topper onto the highest branch of your cake structure, securing it with 4 toothpicks inserted from underneath. Use a small amount of the shortening mixture to help adhere the topper if needed. For a realistic look, lightly dust the tree with 0.5 cup edible glitter and add any final details with a small amount of white fondant for snow accents.
Finally, cover the entire cake with a thin layer of the remaining white fondant to create a smooth finish. Use a small brush to apply a light dusting of 0.25 cup decorative sprinkles around the base of the tree trunk for a snowy effect. Let the fondant set for 30 minutes before serving to ensure everything stays in place. Your 3D Christmas tree cake is now ready to be the star of your holiday celebrations!
Pro Tips For Making 3d Christmas Tree Cake
- CHILL THE BUTTER FIRST: Take that cold butter straight from the fridge—room temperature is a disaster for layer cakes. I learned this after my first tree cake collapsed like a deflated balloon because the butter melted into the mix too fast. Even in summer, give it 30-45 minutes in the fridge before creaming with sugar.
- WHISK EGGS FULLY: Don’t just crack and stir—whisk those eggs until they triple in volume. I used to skip this, and my cake layers turned out dense instead of light. Beat them for at least 2 minutes with a hand mixer or 30 seconds by hand until the ribbons hold briefly.
- DON’T OVERMIX THE BATTER: Stop mixing as soon as the flour disappears—usually 10-15 seconds after adding it. I once overmixed a batch and ended up with tough, chewy layers instead of tender ones. The second the flour is just incorporated, fold it in.
- LEVEL CAKE LAYERS LIKE A PRO: Use a serrated knife and a ruler to level each layer—no eyeballing. I tried skipping this once, and my 3D tree ended up wobbly. Press down firmly, wipe the knife clean, and repeat until each layer is perfectly flat.
Troubleshooting this recipe
Cake Layers Cracking
If your cake layers develop cracks during baking or cooling, it’s usually from overmixing the batter or using cold ingredients. To prevent this, mix just until combined and ensure your eggs, butter, and milk are all at room temperature.
If cracks appear after baking, don’t panic—simply level the tops carefully with a serrated knife to maintain an even surface for stacking. Uneven layers will make your tree wobble, so precision here is key. 💡
Fondant Too Sticky
Fondant can be stubbornly sticky, especially in humid conditions. Knead it thoroughly with a tiny bit of corn syrup or shortening (about 1 tsp) to soften it. Work quickly in a 68-72°F room—cold temperatures make fondant brittle, while warmth helps it pliable.
If it still sticks to your hands, dust with powdered sugar and use a bench scraper to clean surfaces between steps. 🧤
Branches Falling Off
Loose branches happen when toothpicks aren’t inserted deep enough or the fondant isn’t secured properly. For extra stability, use edible glue (like royal icing) to adhere branches to the cake before inserting toothpicks.
Angle the toothpicks at 45-degree angles, pushing them through both the cake layer and the fondant branch. If branches still shift, add a second toothpick at the opposite end for reinforcement. 🪥
Tree Topper Not Standing
A wobbly tree topper usually means the trunk isn’t sturdy enough or the topper isn’t properly weighted. Reinforce the trunk by rolling it thicker (about ½-inch wide) and securing it with 6 toothpicks, two at the base and four along the sides.
For the topper, press it firmly onto the highest branch and insert toothpicks from underneath at even intervals. If it still tilts, add a small fondant weight inside the topper before attaching it. ✨
Fondant Cracking While Working
Fondant cracks when it’s too dry or worked too vigorously. Keep it covered with a damp towel while you work to prevent drying. If it cracks while rolling, gently knead in 1 tsp shortening, then re-roll slowly.
Avoid stretching the fondant—cut shapes directly from the rolled sheet instead. For repairs, press cracks together with a tiny bit of water and smooth with your fingers. 🌲
Glitter Not Adhering
Edible glitter clumps or falls off when the surface isn’t properly prepared. Dust the tree with a thin layer of powdered sugar, then lightly mist with water or edible luster dust spray*. Sprinkle the glitter while the surface is still slightly tacky, then gently tap away excess.
For extra hold, mix 1 tsp edible glue***, like clear gelatin or royal icing, into the glitter before applying. 💫
Nutrition facts
Frequently asked questions
How do I make the cake layers sturdy enough to support the fondant branches?
Use a super moist cake mix like Betty Crocker or Pillsbury, and bake layers in 8-inch pans for maximum stability. Let them cool completely before stacking, and spread a thin layer of shortening mixed with powdered sugar between layers. This creates a smooth, stable base that prevents wobbling.
Can I use homemade fondant instead of store-bought?
Yes, but adjust the recipe for extra stability. Homemade fondant needs 1 extra cup of powdered sugar and 1 tsp corn syrup to prevent cracking. Knead it well and work in a 68-72°F room to keep it pliable. Store-bought fondant holds its shape better for beginners.
What if I don’t have toothpicks for securing the branches?
Use clean chopsticks or skewers instead, but trim them to size and hide the ends with fondant. For extra grip, coat the ends with edible glue (royal icing) before inserting. Angle them at 45 degrees for maximum support.
How do I make the tree topper look more realistic?
Use two shades of green fondant—darker for the base, lighter for the tips—to mimic natural shading. Add tiny fondant “pine needles” by cutting small triangles and pressing them onto the sides. Dust with edible glitter for a frosty effect.
Can I make this cake ahead of time?
Yes! Bake the cake layers 1 day ahead and store wrapped at room temperature. Assemble the fondant branches 4 hours before serving to let them set. Keep the cake in a cool, dry place (not the fridge) to prevent fondant from drying out.

- Baked Potatoes in Crock Pot Recipe: Buttery Interiors and Crispy Top Magic - November 1, 2026
- Braised Beef Short Ribs Recipe: Crock Pot Fall-Off-Bone Magic in 6 Hours - November 1, 2026
- Crock Pot Cocoa Recipe: Velvety Warmth With Hidden Spice Magic - November 1, 2026