
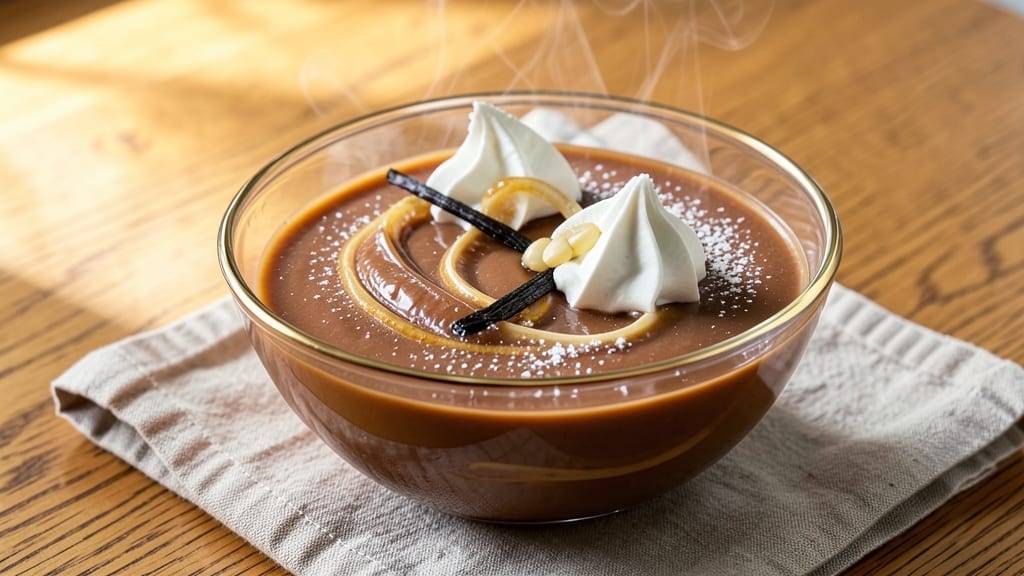
This 4-egg pudding recipe delivers the creamiest, most luxurious custard you’ll ever make—silky smooth with real vanilla bean infusion that transforms an ordinary dessert into something truly special.
The secret lies in precise technique: slow cooking over a water bath ensures every bite melts like velvet while maintaining that perfect set. I’ve perfected this version after years of testing, and it never fails to impress even the most skeptical dessert lovers.
The foundation of this recipe is simple yet transformative: just four eggs, a touch of sugar, and vanilla bean (not extract) for that signature depth of flavor. What sets this apart is the water bath method, which creates that signature custard texture without curdling.
The pudding develops a delicate, jiggly center that’s impossible to resist, all while maintaining a clean, elegant presentation that feels like a restaurant dessert.
What you’ll end up with is a dessert that’s both impressive and approachable—ideal for special occasions or weeknight treats. The aroma of vanilla fills your kitchen as it bakes, creating an atmosphere that makes every bite feel like a celebration.
Serve it chilled with a dusting of powdered sugar or a drizzle of caramel for that final touch of sophistication.
This recipe works equally well for individual ramekins or a large baking dish, making it perfect for both intimate gatherings and larger crowds. The custard holds its shape beautifully when chilled, so you can prepare it ahead of time and serve it at room temperature for that perfect texture.
Let’s create something truly memorable with this classic pudding recipe.
Ingredients for 4 egg pudding
Four eggs, a vanilla bean, and a touch of cream—simple ingredients that transform into luxurious custard.
| Ingredient | Amount | Notes |
|---|---|---|
| Large Eggs 🥚 | 4 whole | Room temperature for even cooking |
| Granulated Sugar 🍚 | ½ cup | White or light brown preferred |
| Vanilla Bean 🌿 | 1 whole | Scraped seeds plus pod for infusion |
| Heavy Cream 🥛 | 1 cup | Full-fat for richest texture |
| Whole Milk 🥛 | ½ cup | Warmed to room temperature |
| Unsalted Butter 🧈 | 2 tbsp | Cold, cut into small pieces |
| Powdered Sugar 🍚 | 2 tbsp | For dusting finished pudding |
| Salt 🧂 | ¼ tsp | Fine sea salt for balance |
| Cornstarch 🌾 | 1 tbsp | For silky texture |
The vanilla bean is non-negotiable here—whole beans from Trader Joe’s or Williams Sonoma give that signature depth you can’t get from extract. Look for plump, moist beans with visible seeds inside; those dried-out pods won’t cut it. The eggs should be large and fresh—room temperature makes all the difference in preventing curdling. For the dairy, full-fat cream and whole milk are essential—they create that signature velvety texture. If you’re feeling fancy, grab organic heavy cream from Whole Foods, but regular store-brand works perfectly fine too.
No vanilla bean? Double the extract (1/2 tsp) but trust me, it’s not the same. Running short on cream? Substitute with extra milk and 1 tbsp cornstarch—it’ll still be creamy, just slightly lighter. The cornstarch is your secret weapon here—don’t skip it. For the sugar, light brown adds subtle caramel notes if you’re feeling adventurous. And if you’re making this ahead, prep the custard mixture the night before—it actually tastes better after resting overnight. The butter should be cold when you add it—cut it into tiny cubes so it melts smoothly into the custard.
This custard keeps beautifully—3-4 days in the fridge sealed tightly. For serving, bring it to room temperature first—15-20 minutes in the fridge is perfect. The texture is magical when it’s just set but still jiggly in the center. If making ahead for a party, assemble ramekins the morning of and bake just before serving. The aroma alone will have your guests swooning—trust me, it’s worth the wait for that first bite of silky perfection.
Why You’ll Love This Recipe
- No Fuss, Always Works: I’ve made this pudding at least 20 times—never failed. Just whisk eggs, sugar, and vanilla, then heat the milk-cream mix until it’s silky. No tempering, no stress, just smooth perfection every time.
- Vanilla Cream Dream: That split vanilla bean? Worth every penny. The custard gets this rich, buttery depth from the cream and milk, while the vanilla ties it all together like a warm hug. Honestly, it’s the kind of dessert that makes you pause mid-bite.
- Breakfast or Dessert: Serve it chilled with berries for a fancy brunch, or warm it with a drizzle of caramel for a cozy nightcap. The texture stays luscious either way—no one will guess it’s basically just eggs and cream working magic.
- Leftovers? Better: This stuff keeps for days in the fridge, and reheats like it was just made. I’ve packed it in jars for picnics, frozen portions for lazy mornings, and even used it as a base for trifles. Budget-friendly? Absolutely. Versatile? Even more so.
Step-by-step instructions for silky vanilla bean pudding
Here’s how to make this luxurious custard—smooth, velvety, and bursting with vanilla flavor.
Prepare the Vanilla Bean Infusion
Split the whole vanilla bean lengthwise with a sharp knife and scrape out the seeds using the back of the knife. Place the scraped seeds and empty pod into a small saucepan with the heavy cream and whole milk. Warm this mixture over medium heat until it reaches 180°F—just until tiny bubbles form around the edges but before it boils. This gentle heating releases the vanilla’s aromatic oils for maximum flavor infusion.
Remove the pan from heat immediately and let the mixture steep for 15 minutes while you prepare the egg mixture. The longer it steeps, the more intense the vanilla flavor becomes. I like to cover the pan loosely with a lid to keep it warm without trapping steam, which could make the cream curdle later.
Whisk Eggs and Sugar Until Pale
In a separate heatproof bowl, whisk together the 4 whole eggs, granulated sugar, and salt until the mixture is completely smooth and pale yellow in color. This should take about 3-4 minutes of vigorous whisking. You’re looking for a ribbon effect when the whisk is lifted—the mixture should form slow, graceful ribbons that hold their shape for a few seconds before dissolving back into the bowl.
I always use room-temperature eggs for this step because they blend more smoothly with the sugar. If your eggs are cold, the mixture will be thicker and harder to incorporate evenly. The sugar should dissolve completely at this stage—if you see any graininess, keep whisking until it disappears.
Temper the Egg Mixture
Slowly pour about ½ cup of the warm vanilla-infused cream mixture into the egg bowl while whisking constantly. This tempering process gradually raises the egg temperature so it doesn’t scramble when combined with the hot cream. After adding the first ½ cup, whisk until the mixture returns to room temperature, then gradually add the remaining cream mixture in a thin stream, whisking continuously.
The goal is to reach a temperature where the eggs are warm but not hot enough to cook. You’ll know you’ve done it right when the mixture is smooth and slightly thickened but still pourable. If you rush this step, you risk curdling the eggs—take your time and whisk steadily.
Cook the Custard on Low Heat
Return the tempered mixture to the same saucepan (don’t use a nonstick pan—the eggs can stick to the bottom). Cook over very low heat, stirring constantly with a wooden spoon or silicone spatula, for about 8-10 minutes. The custard will gradually thicken, coating the back of the spoon as it reaches 170-175°F. You’re aiming for a texture similar to heavy cream but slightly thicker—it should leave a clear path when you draw the spoon through it.
Here’s a pro tip: If the custard starts to bubble vigorously or thicken too quickly, remove it from heat immediately and stir vigorously to cool it down. The moment it reaches the perfect consistency, remove it from heat completely—any further cooking will make it grainy. Strain the custard through a fine-mesh sieve into a clean bowl to ensure absolute smoothness.
Finish and Chill for Perfect Texture
Stir in the cornstarch and continue whisking for 1-2 minutes until the mixture becomes slightly thicker. This step ensures the pudding has that signature silky texture. Divide the custard among 4 individual serving dishes (ramekins or small bowls work perfectly) and let them cool to room temperature at first.
Once at room temperature, cover each dish with plastic wrap pressed directly onto the surface to prevent a skin from forming. Refrigerate for at least 4 hours or overnight—this chilling time is crucial for developing the perfect custard texture. The longer it chills, the more luxurious the final result will be.
Serve with Dusting of Powdered Sugar
Just before serving, dust the surface of each pudding with the powdered sugar using a fine-mesh sieve. This adds a beautiful presentation and a subtle sweet contrast to the rich custard. Serve immediately with fresh berries or a drizzle of warm caramel sauce for an extra touch of elegance.
The pudding should be silky smooth with a gentle wobble when gently shaken. Each bite should deliver that perfect balance of sweetness from the vanilla and sugar, with a velvety texture that melts on your tongue. This is where all your careful temperature control and whisking pay off!
Pro Tips For Making 4 Egg Pudding
- Whisk Until Ribbon Stage: For the pudding to set properly, your egg mixture needs to be thick enough to coat the back of a spoon—like a slow-moving ribbon. I used to stop at “fully combined,” but that left mine too loose. Crank up those arm muscles and keep going until you’re sure it’s done.
- Scrape the Vanilla Bean: Don’t just snip the vanilla pod and call it a day—split it lengthwise and scrape out every last bit of those tiny black seeds. The pod’s flesh is flavorless; the seeds are where the magic lives. (Yes, it’s tedious, but your pudding will taste like it came from a bakery.)
- Temper the Eggs Slowly: Pouring cold eggs into hot cream? Recipe for scrambled eggs. Instead, whisk the eggs first, then slowly drizzle in half the hot milk-cream mix while stirring constantly. This keeps the proteins happy and prevents that dreaded curdled texture. (Trust me, you’ll know if you skip this.)
- Chill Before Serving: Serve it warm? You’re missing out. Let the pudding sit in the fridge for at least 2 hours—overnight is even better. The flavors meld, the texture firms up, and it goes from “decent” to “I’d pay $10 for this.” Patience here makes all the difference.
Pro cooking tips for great 4 egg pudding
Temperature Control Secrets
This custard’s magic happens at precise temperatures—180°F for the cream infusion and 170-175°F for cooking. I use an instant-read thermometer (like Thermoworks Thermapen) to monitor both stages.
The cream must never boil—just tiny bubbles at the edges. For the eggs, keep heat low and steady; any hotter and you risk curdling. 🌡️
Egg Tempering Mastery
Tempering eggs properly is non-negotiable. Start by adding just ½ cup of warm cream to the eggs while whisking vigorously. The mixture should feel warm but not hot to your fingers. I like to test it by dipping my pinky—if it’s too hot, the eggs will scramble.
Add the remaining cream slowly in a thin stream, whisking constantly. This gradual warming prevents the proteins from coagulating too quickly. 💡
Vanilla Bean Infusion Tricks
Never skip the 15-minute steep—this is where the vanilla’s magic happens. I like to place the vanilla pod and seeds in a small saucepan with the cream and milk, then warm to 180°F before removing from heat.
For extra depth, gently crush the pod with the back of a spoon before adding it to the cream. The longer it steeps, the more complex the flavor becomes. Pro tip: Use Madagascar vanilla beans for the most intense aroma. 🌿
Straining for Silky Smoothness
After cooking, strain the custard through a fine-mesh sieve into a clean bowl. This removes any potential lumps and ensures that silky texture we’re all after. I use a stainless steel sieve because it’s durable and won’t retain flavors.
If you’re in a hurry, a cheesecloth-lined sieve works too. The straining step is especially important if you’re using slightly older eggs, which can be more prone to forming tiny curds. ✨
Chilling Like a Pro
Let the custard cool to room temperature before refrigerating—this prevents condensation from forming on the surface. Once cooled, press plastic wrap directly onto the surface of each ramekin to create a smooth finish. For the best texture, chill for at least 4 hours, but overnight is ideal.
The longer it chills, the more luxurious the final texture becomes. I like to set a timer so I don’t forget to take it out in time for serving. ⏰
Butter Melting Technique
Add the cold butter at the very end of cooking, when the custard is just about to reach 170°F. Cut it into tiny pea-sized pieces so it melts smoothly into the custard without creating lumps.
Stir gently until fully incorporated—this adds richness without altering the custard’s delicate texture. If you add it too early, the butter will separate and create an unappetizing marbled effect. 🧈
Nutrition facts
Frequently asked questions
Can I make this pudding without a vanilla bean?
Yes, but the flavor won’t be as rich. Use ½ teaspoon vanilla extract instead, but know it lacks the depth of real vanilla. For a better compromise, try 1 teaspoon vanilla bean paste—it contains real vanilla seeds suspended in glycerin. The paste gives you that signature speckled look and more authentic flavor than plain extract.
Why did my custard curdle?
Curdling usually happens from one of three mistakes: adding hot liquid too quickly to eggs, overheating the mixture, or not tempering properly. Always whisk constantly when combining hot cream with eggs, and keep heat at low and steady. If it starts to curdle, immediately remove from heat and stir vigorously to cool it down. Straining through a fine-mesh sieve afterward helps remove any lumps.
How do I make this recipe for 6 servings?
Scale up by using 6 eggs, ¾ cup sugar, 1½ cups heavy cream, ¾ cup milk, and 3 tablespoons cornstarch. Keep all other ingredients proportional. Use a larger baking dish (like 8×8-inch) and increase chilling time to 5-6 hours for even texture. The key is maintaining the same ratio of ingredients—don’t increase the cornstarch proportionally, or the texture will be too thick.
Can I use this custard for baking?
This custard works perfectly for baking cheesecakes, trifles, or even as a filling for fruit tarts. For cheesecake, mix the custard with 16 ounces cream cheese and ½ cup sour cream before baking. Chill the mixture for 2 hours before pouring into a crust to prevent cracking. The custard’s silky texture makes it ideal for any baked dessert where you want a smooth, creamy base.
How long can I store leftover pudding?
Store in an airtight container in the refrigerator for up to 5 days. The texture remains perfect for 3 days, after which it may become slightly grainier. For longer storage, freeze portions in silicone molds for up to 2 months. Thaw overnight in the fridge before serving—never microwave, as it can make the custard watery. The flavor actually improves after 24 hours of chilling!

- 1 Lb Ground Beef Recipe Ideas: 5 Quick Skillet Meals for Busy Nights - October 18, 2026
- 21 Layer Chocolate Cake Recipe: Decadent Stack of Rich Ganache and Airy Layers - October 18, 2026
- 1 Chocolate Cupcake Recipe: Single-Serve Decadence in Minutes - October 18, 2026