
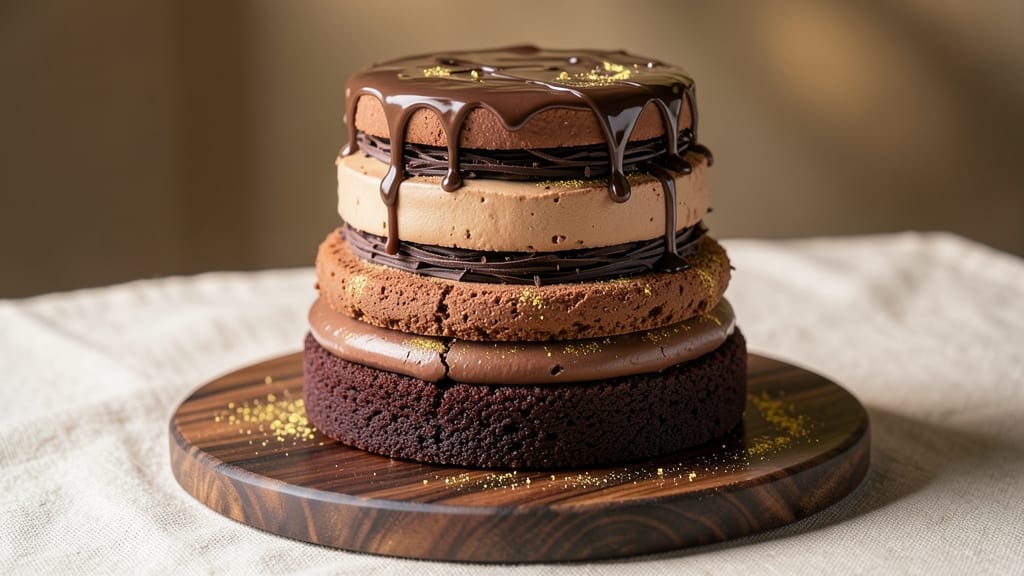
Building a 4-tier chocolate cake that looks like a showstopper and tastes even better is entirely within reach—this recipe delivers restaurant-quality results with a foolproof method. The secret lies in precise layering, perfectly balanced vanilla buttercream, and techniques that prevent common pitfalls like cracking or uneven tiers.
I’ve baked and decorated dozens of these cakes, and this version ensures every slice is moist, rich, and visually stunning.
Each tier follows the same simple yet precise approach: baked in the same pan size to maintain symmetry, cooled evenly to prevent doming, and leveled with a serrated knife for clean layers.
The vanilla buttercream isn’t just sweet—it’s rich, stable, and pipeable, designed to hold its shape while adding a creamy contrast to the deep chocolate. No fancy equipment is needed, just patience and attention to detail.
By the time you finish assembling, you’ll have a cake that’s towering, elegant, and ready for celebration—whether it’s a wedding, anniversary, or just a reason to indulge.
The layers stay moist for days, and the buttercream holds its structure, making it perfect for decorating with drips, piped rosettes, or fresh berries. Let’s get started on creating your masterpiece.
This recipe scales effortlessly for all four tiers, with clear instructions for baking, filling, and decorating each one. Troubleshooting tips address common issues like uneven layers or cracked frosting, so you can focus on the joy of building something extraordinary.
Every step is designed to make the process smoother than you’d expect.
Ingredients for 4 tier chocolate cake
Four tiers of rich chocolate perfection—here’s what you’ll need to build a showstopping masterpiece.
| Ingredient | Amount | Notes |
|---|---|---|
| Unsalted Butter 🧈 | 2 cups | Room temperature for creaming |
| Granulated Sugar 🍚 | 3 ½ cups | Superfine preferred for smooth texture |
| Dark Chocolate Chips 🍫 | 2 ½ cups | 70% cocoa minimum, high quality |
| Large Eggs 🥚 | 8 whole | Room temperature, separated |
| All-Purpose Flour 🌾 | 3 cups | Sifted, spooned and leveled |
| Baking Cocoa Powder 🍫 | ¾ cup | Dutch-processed for rich flavor |
| Baking Powder 🧂 | 1 tbsp | Aluminum-free preferred |
| Salt 🧂 | ½ tsp | Fine sea salt |
| Pure Vanilla Extract 🌿 | 2 tsp | Bourbon-infused preferred |
| Whole Milk 🥛 | 1 cup | Room temperature |
| Vanilla Buttercream Frosting 🧈 | 4 cups | Homemade or high-quality store-bought |
| Cake Boards 🍰 | 4 whole | 9-inch diameter, sturdy |
| Parchment Paper 📄 | 1 sheet | For leveling tiers |
| Fresh Berries 🍓 | 2 cups | For decorating, mixed colors |
| Chocolate Ganache 🍫 | 1 ½ cups | For drip effect, optional |
The chocolate chips and cocoa powder are non-negotiable for deep, fudgy layers. Valrhona or Ghirardelli chocolate chips make all the difference—avoid the generic supermarket brands. For cocoa, Dutch-processed like Hershey’s Special Dark or Valrhona is key for that velvety flavor. Eggs should be at room temperature, so pull them out 30 minutes before mixing. The butter needs to be room temperature but not melted—press a thumbprint in it, and it should spring back slowly. Flour gets sifted with the dry ingredients to avoid dense layers, and I always use King Arthur or Gold Medal for reliable results.
No vanilla extract? Vanilla bean paste works perfectly, or scrape seeds from a vanilla bean. Running short on milk? Heavy cream or buttermilk both work in a pinch, but whole milk gives the best crumb. For the buttercream, homemade is worth it—store-bought lacks the stability for tiered cakes. Need to substitute flour? King Arthur Measure for Measure works 1:1, but it won’t be as light. The ganache for drips can be made with white or dark chocolate, depending on your preference—just adjust the cocoa percentage to match your chocolate chips. And if you’re worried about cracking, bake at 325°F instead of 350°F for slightly slower cooking.
Store cake boards and parchment paper in a cool, dry place—they’ll last indefinitely. Fresh berries should be used within 3 days of purchase for decorating, but you can freeze them for up to 3 months if needed. The buttercream can be made 2 days ahead and stored in the fridge—just rewhip before using. For the cake layers, wrap each tier tightly in plastic and store at room temperature for up to 3 days. If assembling ahead, keep the tiers refrigerated and bring them to room temperature before decorating to prevent condensation and soggy frosting.
Why You’ll Love This Recipe
- I’ll be real: you’re going to make this twice in a week. The first batch disappears faster than I can say “second slice,” but the good news? Those leftovers stay fresh for days. Wrap them tightly, and the chocolate flavor only gets better with time. Budget-friendly? Absolutely. Worth it? Even more so.
- Four-Tier Magic: I’ve never met a chocolate cake this impressive that doesn’t require a PhD in baking. Just four simple layers—each one richer than the last—built with that buttery-sugar base and melted dark chocolate. The eggs bind it all together while you’re still deciding whether to watch the next episode or check the oven.
- Decadence in Every Bite: Honestly, the moment that dark chocolate melts into the warm cake? That’s when you realize you’ve made something special. The sugar doesn’t just sweeten—it caramelizes just enough to give each slice that almost too-good-to-share texture. And the butter? It’s the secret weapon making this cake dangerously moist.
- Party-Proof Perfection: Between us, this is the cake that actually impresses guests without you stressing. Four tiers mean you can serve it at birthdays, weddings, or just because someone walked into the room. The layers stack effortlessly, and the flour-to-butter ratio keeps it sturdy enough to cut cleanly—no crumbly messes here.
Step-by-step instructions for building a 4-Tier chocolate cake masterpiece
Here’s how to assemble layers that wobble-free and frosting that stays put.
Bake the Chocolate Cake Layers
Preheat your oven to 350°F and grease four 9-inch round cake pans with the 2 cups unsalted butter, reserving ½ cup for later. Line the bottoms with parchment paper to ensure clean removal. In a stand mixer fitted with the paddle attachment, cream the remaining 1½ cups unsalted butter with the 3.5 cups granulated sugar on medium speed for 5 minutes until light and fluffy.
Add the 8 whole large eggs one at a time, mixing well after each addition. Stir in the 2 tsp pure vanilla extract, then sift in the 3 cups all-purpose flour, 0.75 cup baking cocoa powder, 1 tbsp baking powder, and 0.5 tsp salt. Gently fold in the 2.5 cups dark chocolate chips using a spatula. Divide the batter evenly among the prepared pans.
Bake for 25-30 minutes or until a toothpick inserted in the center comes out clean. Let the layers cool in the pans for 10 minutes before transferring to a wire rack to cool completely. The layers should be moist but not sticky—this is key for clean slicing later. I like to level the tops with a serrated knife if needed for even tiers.
Prepare the Cake Boards and Level the Tiers
Place each of the 4 whole cake boards on a flat surface and cover each with a sheet of parchment paper. This prevents the frosting from sticking to the boards and makes assembly easier. Once the cake layers are completely cool, use a long serrated knife to trim any uneven edges, ensuring each layer is perfectly level.
Place the first layer on its board and spread a thin layer of the reserved ½ cup unsalted butter (melted) to help it adhere. This butter layer creates a “glue” between tiers that’s stronger than frosting alone. Repeat this process for all four layers, stacking them in order of size from largest to smallest. Chill the assembled cake in the refrigerator for 30 minutes to firm up before frosting.
Create the Vanilla Buttercream Towers
Using the 4 cups vanilla buttercream frosting, pipe or spread a thin crumb coat around the outside of the cake and between each layer. Return the cake to the refrigerator for 15 minutes to set. This initial layer prevents crumbs from mixing into the final frosting. Once set, apply a final layer of frosting, creating smooth sides and sharp edges with a bench scraper or offset spatula.
For the dramatic towers, pipe additional buttercream into small mounds around the base of the cake, creating a sturdy foundation. Use a toothpick to gently shape the sides of each tower, ensuring they’re stable enough to support the weight of the cake. The key here is patience—build the towers gradually to avoid collapse. I find it helpful to work in sections, smoothing each one before moving to the next.
Decorate with Berries and Chocolate Ganache
Arrange the 2 cups fresh berries on a parchment-lined tray and lightly brush them with a bit of the melted 1.5 cups chocolate ganache to help them stick. Gently press the berries onto the sides and top of the cake, creating a natural, colorful contrast against the vanilla frosting. For the ganache drip, carefully pour the remaining ganache over the edge of a cake board, allowing it to cascade down the sides in an even layer.
Use a small offset spatula to smooth any uneven drips and create a clean, professional finish. The ganache should be slightly warm but set enough to hold its shape—if it’s too runny, chill it for 5 minutes before applying. Let the cake sit at room temperature for 1 hour to allow the ganache to fully set and the frosting to firm up. This final step transforms your cake from beautiful to show-stopping.
Pro Tips For Making 4 Tier Chocolate Cake
- Melt Butter Slowly: I learned this the hard way—dumping cold butter into hot sugar makes a greasy mess that never emulsifies properly. Warm the butter in the microwave for 20 seconds before adding it to the sugar, then stir on low heat until it’s just melted and smooth. The cake will be lighter, not dense.
- Sift the Flour Twice: Skimping on this step means lumps hiding in your batter, and those turn into dry spots in every tier. Sift the flour once into the bowl, then sift it again right before folding it in. Yes, it’s extra work, but the texture makes it worth it—especially for a showstopper like this.
- Check Doneness Early: The second tier is always the traitor—it bakes faster than the first. Start testing with a toothpick at the earliest time the recipe suggests, not the latest. A slightly underbaked center evens out as it cools, but overbaking turns your cake into a brick. Pull it when it’s just set.
- Chill the Batter: I was skeptical until I tried it—letting the batter rest for 30 minutes in the fridge before baking cuts down on cracks and makes the tiers rise more evenly. Just pop the bowls back in the fridge while you prep the next one. Your future self will notice the difference in height and texture.
Storing and reheating this 4 tier chocolate cake
Refrigerator Storage
Store your 4-tier chocolate cake in the refrigerator for up to 3 days if you’re not serving it immediately. Wrap each tier individually in plastic wrap and place them in an airtight container to prevent drying.
I like to stack the tiers on top of each other in the fridge—just make sure to place a parchment-lined tray between them to avoid sticking. Let the cake sit at room temperature for 30 minutes before serving to soften the frosting slightly. 🧊
Freezer Storage
For longer storage, freeze your cake for up to 3 months. Assemble the cake fully (including frosting and decorations) and wrap it tightly in plastic wrap, followed by a layer of aluminum foil. Place it in a freezer-safe airtight container to protect it from freezer burn.
When ready to serve, thaw in the refrigerator overnight, then bring to room temperature for 1-2 hours before slicing. The frosting may soften slightly, but it’ll still hold its shape beautifully. ❄️
Reheating Slices
If you’ve stored individual slices in the fridge, reheat them in the microwave for 10-15 seconds on 50% power to warm the frosting without melting it completely. For a more even heat, place the slice on a microwave-safe plate and cover it with a damp paper towel to prevent drying.
Alternatively, warm slices in a 200°F oven for 5-7 minutes—this keeps the cake moist and the frosting intact. 🔥
Reviving Dried Layers
If your cake layers start to dry out, brush them lightly with simple syrup (equal parts sugar and water, heated until dissolved) or a thin layer of melted butter. For frosting that’s lost its shine, gently repipe or spread a thin layer of warmed buttercream over the top.
This trick works wonders for cakes that have been stored too long—just be sure to let the syrup or buttercream set for 10 minutes before serving. 💫
Decorations After Storage
Fresh berries and ganache drips won’t hold up well after refrigeration, so I recommend adding them 1-2 hours before serving if you’ve stored the cake. For a quick fix, swap berries for edible flowers or chocolate-covered nuts, which stay fresh longer.
If your ganache drip has hardened, gently warm it in 10-second bursts in the microwave and reapply with a spatula. The cake itself will still taste amazing—it’s all about presentation! 🍓
Nutrition facts
Frequently asked questions
How do I prevent my 4-tier cake from collapsing?
Use the butter trick! Spread a thin layer of melted butter between each tier before frosting—it creates a stronger bond than frosting alone. Also, chill the cake for 30 minutes after stacking to firm up the layers. Build buttercream towers gradually to distribute weight evenly.
Can I bake all four tiers at once?
Yes, but rotate pans halfway through baking for even cooking. Use the same pan size (9-inch) for all tiers to maintain symmetry. Preheat your oven for 30 minutes first to ensure consistent temperatures. This prevents doming and cracking when cooling.
What’s the best way to level cake tiers?
Use a long serrated knife and a parchment paper guide for perfect flat tops. Place parchment over the cake, then slice through both layers at once. For stubborn domes, chill the cake for 10 minutes first to firm up the crumb. This ensures clean layers for stacking.
How do I make my buttercream hold its shape for towers?
Chill your buttercream for 30 minutes before piping, and use a piping bag with a small round tip. Work in cool environments (below 70°F) to prevent melting. For extra stability, add 1 teaspoon cornstarch to the buttercream mixture. Build towers in sections to avoid collapse.
Can I substitute the chocolate chips in the recipe?
Yes, but use equal amounts of high-quality dark chocolate bars (70% cocoa) chopped into chunks. Avoid milk chocolate—it melts differently and affects the cake’s texture. For a richer flavor, try chocolate chunks with sea salt or orange zest. Just melt them slightly before folding into batter.

- 12 Bean Chili Recipe: Hearty Slow-Cooked Depth With 12 Legumes - October 17, 2026
- 5 Seed Bread Recipe: Nutty Crunch and Artisan Flavor in One Loaf - October 17, 2026
- 1 Lb Macaroni Salad Recipe: Bold, Crunchy, and Crowd-Pleasing - October 17, 2026