
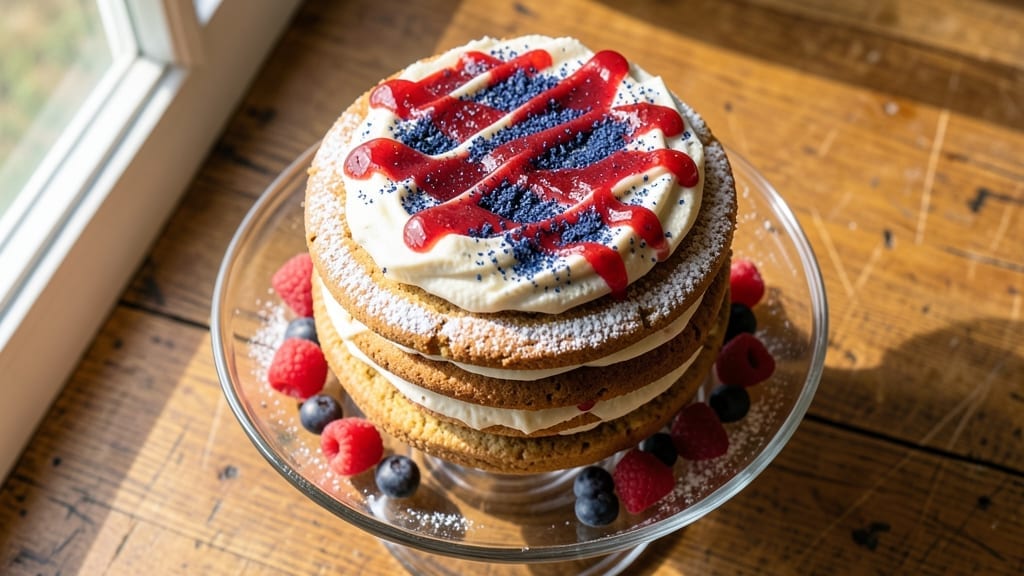
This 4th of July cookie cake transforms a classic dessert into a showstopping centerpiece that captures the spirit of American celebrations. The secret lies in baking rich vanilla cookie layers, then swirling them with vibrant red and white frosting for a striking patriotic effect that’s both festive and foolproof.
I’ve perfected this recipe over years of holiday baking, ensuring every slice delivers the perfect balance of buttery cookie and creamy frosting—no fancy decorating skills required.
The assembly process is where the magic happens: after baking sturdy cookie layers, you’ll spread a smooth vanilla buttercream between them, then pipe bold red and white swirls on top for that iconic red, white, and blue look.
The cake stays moist for days, making it ideal for prepping ahead, and the bold colors make it a conversation starter at any gathering. This isn’t just dessert—it’s a celebration in every bite.
What you’ll end up with is a three-layer cookie cake that’s sturdy enough to slice neatly, with a glossy frosting finish that reflects the holiday’s vibrant energy.
The red swirls are made with natural food coloring (or strawberry jam for a fruity twist), while the white layers stay pure vanilla—simple yet striking. Each forkful combines the warmth of freshly baked cookies with the cool sweetness of frosting, creating a texture that’s impossible to resist.
Perfect for Independence Day parties, family gatherings, or even a festive dessert at work, this cookie cake serves 12–15 and scales easily for larger crowds. The recipe includes tips for keeping the layers intact and decorating with edible flags or stars for extra flair.
Let’s get baking—your 4th of July just got a whole lot sweeter.
Ingredients for 4th of july cookie cake
Here’s what you’ll need to bake this showstopping patriotic cookie cake—simple ingredients for a dessert that’s anything but ordinary.
| Ingredient | Amount | Notes |
|---|---|---|
| All-Purpose Flour 🌾 | 3 cups | Sifted for light texture |
| Unsalted Butter 🧈 | 1 ½ cups | Cold, cubed for cookies |
| Granulated Sugar 🍚 | 1 ½ cups | Superfine preferred |
| Light Brown Sugar 🍚 | ½ cup | Packed firmly |
| Large Eggs 🥚 | 2 whole | Room temperature |
| Pure Vanilla Extract 🍯 | 2 tsp | High-quality preferred |
| Baking Soda 🧂 | 1 tsp | Freshly measured |
| Salt 🧂 | ½ tsp | Fine sea salt |
| Vanilla Buttercream Frosting 🍰 | 3 cups | Homemade or store-bought |
| Red Food Coloring 🎨 | 1 tsp | Natural or gel-based |
| Strawberry Jam 🍓 | ½ cup | For natural red color |
| Powdered Sugar 🍚 | 1 cup | For dusting layers |
| Candied Red & White Sprinkles 🎉 | ½ cup | Optional for extra flair |
| Edible Glaze 💧 | ¼ cup | For shine (optional) |
The butter and sugars are the backbone of these cookies, so don’t cut corners. Crisco or vegetable shortening works if you’re avoiding butter, but the flavor difference is noticeable. For the best texture, chill your dough for at least 30 minutes before baking. I always grab Land O’Lakes unsalted butter from the grocery store—it’s reliable and melts smoothly. If you’re using superfine sugar, you’ll need about 1/4 cup extra compared to regular granulated. The vanilla extract? Nothing cheap here—the good stuff makes a difference in flavor.
No red food coloring? Strawberry jam or raspberry puree works beautifully for that natural red hue. The white frosting stays pure vanilla, but you can add a pinch of salt to balance sweetness. If you’re making the buttercream from scratch, use powdered sugar instead of granulated—it dissolves better. For a shortcut, Betty Crocker or Duncan Hines boxed frosting works in a pinch, but homemade tastes worlds better. The edible glaze? Wilton or Americolor are my go-tos—they’re easy to find and give that glossy finish.
Keep your baked cookie layers in an airtight container with parchment between them for up to 3 days—they’ll stay fresh and sturdy. The frosting can be made a day ahead and stored in the fridge. Assemble the cake just before serving so the layers stay crisp. For extra flair, pipe white frosting stars or edible flags on top. This cake holds up beautifully for 4 days in the fridge, making it perfect for prepping ahead of your 4th of July gathering.
Why You’ll Love This Recipe
- No Mixer Needed: I swear by this recipe when my stand mixer’s on vacation—just cream the butter and sugars by hand while chatting with someone. The eggs and brown sugar do all the heavy lifting, so you’re basically folding dough while watching a movie.
- Red, White & Crunch: That perfect sugar cookie crunch with just enough chew? It’s the brown sugar’s fault—it keeps everything tender without getting gummy. Add sprinkles or red/blue food coloring, and suddenly your cake’s a patriotic showstopper.
- Party in a Pan: Between us, this is my secret weapon for potlucks or BBQs. Bake it ahead, slice it up, and no one will guess it’s just one big cookie. Honestly, the leftovers disappear faster than the fireworks at midnight.
- Dollar Stretch Wonder: Flour, butter, sugar—these are pantry staples that won’t break the bank. One batch feeds a crowd, and the rich, buttery flavor makes it feel fancy without the grocery bill. My kids call it “magic cake,” but I call it smart baking.
Step-by-step instructions for patriotic cookie cake layers
Here’s how to create a showstopping cookie cake with bold red, white, and vanilla layers.
Prepare the Vanilla Cookie Cake Base
Preheat your oven to 350°F and line three 8-inch round cake pans with parchment paper. In a large mixing bowl, combine the 3 cups all-purpose flour, 1.5 cups granulated sugar, 0.5 cup light brown sugar, 1 tsp baking soda, and 0.5 tsp salt. Whisk until evenly distributed.
Cut in the 1.5 cups cold cubed butter using a pastry cutter or fork until the mixture resembles coarse crumbs with pea-sized butter pieces. Add the 2 room-temperature eggs one at a time, mixing just until combined. Stir in the 2 tsp vanilla extract until fully incorporated. The dough should be soft but not sticky.
Create the Red and White Layers
Divide the dough into three equal portions. For the red layer, mix 1 tsp red food coloring with 0.5 cup strawberry jam in a small bowl until smooth. Gradually add this mixture to one portion of dough, mixing until evenly colored. For the white layer, simply use one portion of the vanilla dough as-is.
Spread half of the vanilla dough evenly into one prepared pan, pressing gently to create a smooth base. Top with all of the red dough, then finish with the remaining vanilla dough. Use the back of a spoon to create gentle swirls between the layers for that classic cookie cake look. Bake for 12-15 minutes or until edges are lightly golden and centers spring back when pressed.
Assemble the Frosted Cookie Cake
Allow the baked layers to cool completely in the pans for 10 minutes, then transfer to a wire rack. Once completely cool, level the tops if needed with a serrated knife. Spread 1 cup vanilla buttercream frosting between each layer, pressing gently to create a smooth surface.
For the final exterior frosting, spread the remaining 2 cups vanilla buttercream frosting evenly over the entire cake. Dust the sides with 1 cup powdered sugar using a fine-mesh sieve for a snowy white finish. Chill in the refrigerator for 30 minutes to set the frosting before decorating.
Add Patriotic Decorations
Once the frosting is set, spread the 0.25 cup edible glaze over the top and sides of the cake for a glossy finish. Immediately sprinkle the 0.5 cup candied red and white sprinkles evenly over the glaze while it’s still wet. Use a toothpick to gently press any loose sprinkles into place.
For extra flair, pipe additional white buttercream rosettes around the base or create star patterns on top using a piping bag fitted with a star tip. Serve chilled for the best texture and presentation—this cake looks stunning and tastes even better!
Pro Tips For Making 4th Of July Cookie Cake
- Cream Butter & Sugars First: I learned this the hard way—skipping this step means your cookie cake will taste like a sad, greasy brick. Beat the butter, brown sugar, and granulated sugar together for a solid 3-4 minutes until the mixture is pale and fluffy. That’s when the magic happens, and your cake won’t be dense or crumbly.
- Don’t Overmix the Dough: Yes, it’s tempting to get it all incorporated, but overmixing turns your cookie cake into a chewy, tough mess. Mix the wet and dry ingredients just until combined—lumps are fine. Stop when the dough holds together when pressed, and you’ll get that perfect tender-crisp texture.
- Chill the Dough Longer: I used to rush this, and my cookie cake would spread like wildfire in the oven, leaving me with a thin, crispy pancake instead of a thick, cakey masterpiece. Wrap the dough and refrigerate it for at least 24 hours (or overnight). Your future self will thank you—it’s the thing that actually changes the outcome.
- Rotate the Pan Mid-Bake: Even if your oven claims to be “perfectly even,” it’s not. Rotate the pan halfway through baking to ensure your cookie cake bakes uniformly. I skip this when I’m lazy, but the edges end up noticeably better when I don’t—no one wants a lopsided patriotic dessert.
Dietary considerations for these flavors
Gluten-Free Adaptation
For a gluten-free version, swap the all-purpose flour for a 1:1 gluten-free baking flour blend like Bob’s Red Mill or King Arthur. You’ll need about 3 cups of the blend, and I recommend adding ½ tsp xanthan gum to help bind the dough.
Chill the dough for 45 minutes longer than usual—gluten-free dough can be stickier. 🌾
Dairy-Free Options
Replace the 1.5 cups unsalted butter with 1.5 cups dairy-free butter (like Earth Balance) or vegetable shortening. For the frosting, use a dairy-free buttercream made with vegan butter and powdered sugar.
The texture stays rich, but expect a slightly softer crumb. Always check labels—some dairy-free butters contain milk solids.
Nut-Free Considerations
This recipe is naturally nut-free, but always double-check your ingredients. The vanilla extract and food coloring should be nut-free brands like McCormick or Wilton. For extra safety, bake in a nut-free kitchen or on a separate tray if sharing equipment.
The strawberry jam should also be nut-free—check labels for cross-contamination warnings.
Sugar-Free Version
For a sugar-conscious twist, use 1.5 cups granulated sugar substitute (like Swerve or monk fruit sweetener) and ½ cup erythritol for the brown sugar. Reduce the liquid in strawberry jam by 2 tbsp to compensate for moisture changes.
The frosting can be made with powdered erythritol instead of powdered sugar. Taste as you go—sugar substitutes vary in sweetness.
Vegan Adaptations
To make this vegan, replace the 2 eggs with 2 flax eggs (2 tbsp ground flaxseed + 6 tbsp water, mixed and rested for 5 minutes). Use vegan butter and dairy-free vanilla extract.
For the red layer, raspberry puree works better than jam for binding. Chill the dough for 1 extra hour—vegan dough needs more time to firm up. 💚
Nutrition facts
Frequently asked questions
Can I make this cookie cake without a stand mixer?
This recipe works perfectly with just a hand mixer or even a sturdy wooden spoon. For the butter and sugars, use a fork or pastry cutter to cut in the butter until crumbly, then mix in the wet ingredients by hand. The dough doesn’t need to be perfectly smooth—just evenly combined. For the frosting, a hand mixer works great for whipping the buttercream.
How do I keep the layers from falling apart when slicing?
Chill the assembled cake in the refrigerator for at least 2 hours before slicing to let the frosting set completely. Use a sharp, serrated knife and warm it slightly by running it under hot water, then wipe it dry before each cut. This helps create clean slices without tearing the layers. A toothpick dipped in rum or vanilla extract can also help stabilize the layers.
Can I make this cake ahead of time for my party?
Yes! Bake the cookie layers up to 3 days ahead and store them in an airtight container with parchment between each layer. Assemble the cake with frosting up to 24 hours ahead and refrigerate. Decorate with sprinkles and glaze just before serving to keep everything looking fresh. The flavors actually improve overnight!
What’s the best way to make the red frosting look vibrant?
For the most vibrant red, use gel food coloring instead of liquid—it mixes more evenly without thinning the frosting. For a natural option, blend strawberry jam with a little water to create a smooth puree, then mix it into the frosting. Add the coloring gradually and let the frosting rest for 10 minutes before using to deepen the color.
How do I make this recipe kid-friendly?
Let the kids help with the fun parts! They can spread the frosting between layers, sprinkle the toppings, or use cookie cutters to shape the cake. For extra safety, use non-toxic food coloring and let them decorate with sprinkles or edible markers. You can also make mini versions using 6-inch pans for easier handling.

- Baked Potatoes in Crock Pot Recipe: Buttery Interiors and Crispy Top Magic - November 1, 2026
- Braised Beef Short Ribs Recipe: Crock Pot Fall-Off-Bone Magic in 6 Hours - November 1, 2026
- Crock Pot Cocoa Recipe: Velvety Warmth With Hidden Spice Magic - November 1, 2026