
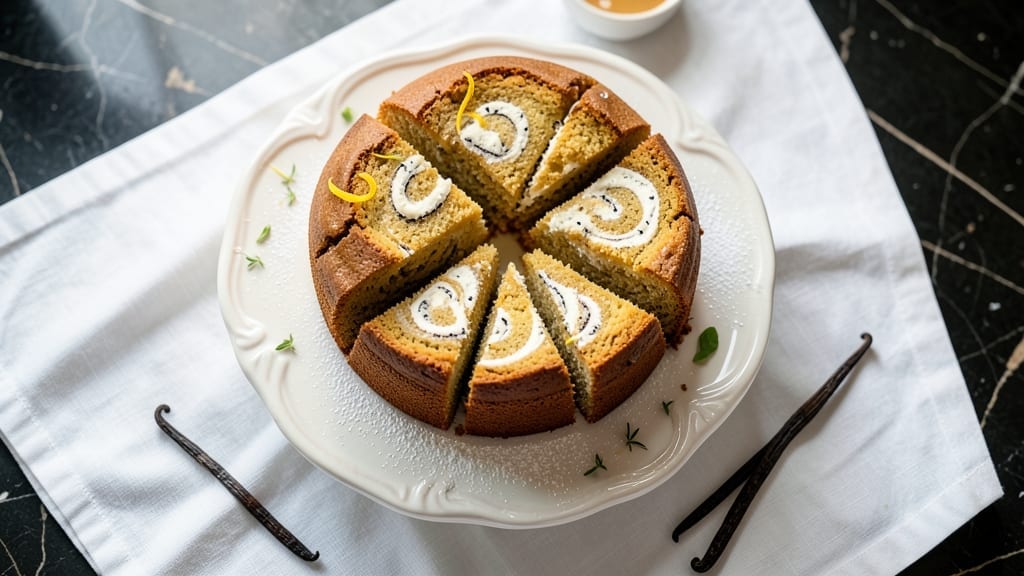
A 12 egg yolk pound cake delivers the kind of ultra-moist crumb that makes every slice worth savoring—no dry crumb in sight. The secret lies in those extra yolks, which create a tender, velvety texture while keeping the cake rich and flavorful.
This isn’t your average pound cake; it’s a game-changer for anyone who’s ever struggled with dry, crumbly results.
The recipe balances precision with simplicity: 325°F for 50–60 minutes in a conventional oven (adjust for convection) yields a golden dome with a crackly top. The vanilla bean swirls infuse each bite with aromatic depth, while the butterfat from the yolks ensures moisture that lasts for days.
Perfect for special occasions or when you want to impress without fuss.
What sets this apart is the foolproof technique—no special equipment, just careful layering and baking. The cake rises evenly, with a fine crumb that’s neither too dense nor too airy.
Serve warm with whipped cream or a dusting of powdered sugar, or save slices for days when they’ll still taste freshly baked.
Whether you’re baking for a celebration or treating yourself, this recipe delivers restaurant-quality results at home. The key is patience—letting the cake cool gradually ensures the perfect texture. Ready to master this classic with a modern twist?
Ingredients for 12 egg yolk pound cake
Twelve yolks and a few simple staples transform into a restaurant-quality pound cake—rich, moist, and perfect for celebrations.
| Ingredient | Amount | Notes |
|---|---|---|
| Large Egg Yolks 🥚 | 12 whole | Freshly separated from whites |
| Unsalted Butter 🧈 | 1 ½ cups | Cold, cubed for even melting |
| Granulated Sugar 🍚 | 2 ½ cups | Superfine preferred for smoothness |
| All-Purpose Flour 🌾 | 2 ½ cups | Sifted, spooned lightly |
| Vanilla Bean 🍃 | 2 whole | Seeds scraped for maximum flavor |
| Vanilla Extract 🍯 | 1 tbsp | Pure vanilla for depth |
| Baking Powder 🌶️ | 1 tbsp | Aluminum-free preferred |
| Salt 🧂 | ½ tsp | Fine sea salt |
| Heavy Cream 🥛 | ½ cup | Cold, for swirls |
| Powdered Sugar 🍚 | ½ cup | For dusting |
| Large Egg Whites 🥚 | 4 whole | Optional for extra moisture |
| Lemon Zest 🍋 | 1 tbsp | Freshly grated |
The butter and yolks are the heart of this cake. European-style butter like Plugrá or Land O’Lakes has higher fat content, which ensures maximum moisture. Buy it cold and cube it yourself—pre-sliced packs melt unevenly. For the yolks, separate them carefully, especially if you’re using the optional egg whites later. Freshness matters: yolks should be vibrant orange, not pale or watery. If you’re nervous about separating, buy pre-separated yolks from the refrigerated section at Whole Foods—they’re worth the splurge for this recipe. The vanilla bean is non-negotiable; Madagascar beans from Penzeys deliver the best aromatic depth, but a quality Madagascar from Trader Joe’s works too.
No vanilla bean? Double the vanilla extract, but you’ll miss that floral complexity. Short on butter? Substitute with equal parts coconut oil, though texture will be slightly different. The heavy cream swirls can be made with whipped topping if you’re in a hurry, but real cream gives that professional touch. If you skip the egg whites, reduce the flour by 1 tbsp to maintain moisture. For the sugar, superfine dissolves faster, but if you only have granulated, pulse it in a food processor for 30 seconds. The lemon zest brightens the whole cake—Meyer lemons have the best flavor, but regular lemons work in a pinch.
This cake keeps beautifully. Wrap tightly in plastic wrap, then foil, and store at room temperature for 3 days—it actually improves overnight. For longer storage, refrigerate for up to 1 week, bringing to room temp before serving. Freezes perfectly for 3 months; wrap each slice individually in plastic wrap, then place in a freezer bag. To reheat, warm slices at 300°F for 5-10 minutes wrapped in foil. The vanilla swirls are delicate, so slice carefully with a serrated knife—dip it in hot water between cuts for clean edges. Leftovers? Toast them lightly the next morning for a breakfast treat.
Why You’ll Love This Recipe
- No Mixer Needed: I swear by this recipe when my mixer’s on the fritz—just fold those yolks into butter and sugar by hand until it’s pale and fluffy. The vanilla bean paste cuts through the richness, so you’re not stuck with a heavy batter that needs elbow grease to lighten.
- Rich Without Overpowering: Twelve yolks mean a cake that’s moist but not greasy, thanks to the butter-to-sugar ratio. It’s got that classic pound cake density but with a whisper of vanilla that makes every slice feel like a treat—not a chore.
- Weeknight Hero: Between us, this is my go-to when I need something impressive but low-stress. Bake it in the morning, and it’s still perfect for dinner—no reheating required. Slice it thin for tea or thick for dessert, and no one will guess it’s not from a bakery.
- Budget-Friendly Luxury: I use store-brand butter and skip the fancy vanilla extract—just a scraped-out pod—and it’s still ridiculously good. The yolks are the star, but the flour and sugar stretch the richness, so you’re not breaking the bank for a cake that tastes like a splurge.
Step-by-step instructions for ultra-moist vanilla bean pound cake
Here’s the precise method for baking a tender, rich pound cake with signature vanilla swirls.
Prepare the Vanilla Bean Swirl Filling
Split each of the 2 whole vanilla beans lengthwise and scrape out the seeds using the tip of a knife. In a small bowl, combine the seeds with the 0.5 cup heavy cream and 0.5 cup powdered sugar. Whisk until smooth and set aside. This filling will create those beautiful swirls throughout the cake.
I like to use a piping bag fitted with a small round tip for even distribution. If you don’t have one, a plastic bag with a tiny corner snip works perfectly. Keep this mixture cold until you’re ready to use it in Step 3.
Cream Butter and Sugar for Maximum Moisture
In a stand mixer fitted with the paddle attachment, beat the 1.5 cups unsalted butter and 2.5 cups granulated sugar on medium speed for 3-4 minutes. You’re looking for a light, fluffy texture that nearly doubles in volume. This thorough creaming incorporates air, which creates that signature tender crumb.
Scrape down the sides of the bowl occasionally to ensure even mixing. The mixture should be pale and slightly thickened. If using superfine sugar, this process will go even faster. Don’t rush this step—properly creamed butter and sugar form the foundation of a moist cake.
Add Egg Yolks and Vanilla for Rich Flavor
Add the 12 whole large egg yolks one at a time, mixing well after each addition. Then stir in the 1 tbsp vanilla extract and the scraped vanilla bean pods (no need to remove them—they’ll infuse flavor as the cake bakes). Mix until fully combined and the batter is smooth and slightly thickened.
Here’s the thing—adding the vanilla bean pods whole gives you that authentic vanilla flavor that extract alone can’t match. The pods will soften and release their aromatic oils during baking, creating layers of vanilla flavor throughout each slice.
Combine Dry Ingredients and Fold Gently
In a separate bowl, whisk together the 2.5 cups all-purpose flour, 1 tbsp baking powder, and 0.5 tsp salt. Sift the flour mixture directly into the wet ingredients and gently fold together using a spatula, mixing just until combined. Overmixing develops gluten, which can make the cake dense.
Add the 1 tbsp lemon zest and mix just until incorporated. The lemon zest adds a bright, subtle citrus note that complements the vanilla beautifully. Fold in the 4 whole large egg whites if using, being careful not to deflate the batter too much. This step should take no more than 15-20 strokes with the spatula.
Layer and Bake for Perfect Rise
Preheat your oven to 350°F. Grease and flour two 9-inch round cake pans or line them with parchment paper. Divide the batter evenly between the pans, filling each about two-thirds full. Using a spoon or offset spatula, carefully pipe or spread dollops of the vanilla cream filling throughout each layer.
Bake for 35-40 minutes, or until a toothpick inserted in the center comes out clean. Rotate the pans halfway through baking for even browning. The cake should be golden on top with slightly domed sides. For extra insurance, tent the pans with foil if the tops begin to brown too quickly.
Cool and Finish for Optimal Texture
Remove the cakes from the oven and let them cool in the pans for 10 minutes. Then transfer to a wire rack to cool completely. This gradual cooling prevents cracking and allows the cake to set properly for clean slicing.
Once completely cool, dust the tops with an additional 1-2 tablespoons of powdered sugar if desired. The cake will keep well at room temperature in an airtight container for up to 3 days, or you can freeze it for up to 3 months. Each slice should be tender with a fine crumb and those beautiful vanilla swirls throughout.
Pro Tips For Making 12 Egg Yolk Pound Cake
- Check Yolk Temperature: The yolks should be at room temperature when you start—no cold, straight-from-the-fridge shock. I used to skip this and end up with a cake that was dense and unevenly baked. Pop them in a bowl of warm water for 10 minutes if you’re in a rush, but don’t overdo it (they shouldn’t feel warm to the touch).
- Use European-Style Butter: This isn’t just a marketing trick—European-style butter has 82% fat, which means richer flavor and better texture in a yolk-heavy cake. Skip the margarine or low-fat versions; the extra fat keeps the crumb tender and the cake moist longer. I learned this after a dry, crumbly disaster with a “light” butter substitute.
- Don’t Overmix the Batter: Once you fold in the flour, stop after 10 strokes max—just until combined. Overmixing develops gluten, and you’ll end up with a tough, chewy cake instead of that silky, fine crumb you’re after. I used to go full-on mixer until the batter looked “smooth,” only to get a sad, dense loaf.
- Scrape the Vanilla Bean: Split the vanilla bean lengthwise and scrape out every last bit of those little black seeds—don’t just snip the end and call it a day. The seeds pack the most flavor, and skipping them means your cake tastes like vanilla extract, not a real vanilla bean. I was lazy about this for years until I tasted the difference.
Make-ahead tips for this recipe
Prep Ahead Strategy
Start by preparing the vanilla cream filling up to 24 hours in advance—store it in an airtight container in the fridge. The flavors meld beautifully overnight, and it stays perfectly stable.
I like to make this the night before so I can focus solely on mixing the batter the next day. 💫
Batter Prep Timeline
Mix the cake batter the morning of baking and refrigerate it for up to 12 hours before baking. This chilling step prevents overmixing and helps the cake rise more evenly.
When ready to bake, let the batter sit at room temperature for 30 minutes to balance the temperature before dividing into pans.
Filling and Layering
Pipe the vanilla cream filling into the batter just before baking—don’t mix it in too early, or it’ll lose its swirl integrity. Use a piping bag with a ½-inch round tip for even distribution. For extra efficiency, set up your piping station with all tools within reach before starting.
Baking in Advance
Bake the cake 1 day ahead if possible—it develops deeper flavors as it sits. Wrap the cooled cake tightly in plastic wrap, then foil, and store at room temperature. The texture improves overnight, making each slice even more tender. Reheat slices at 300°F for 5-10 minutes if serving warm.
Freezer-Friendly Slices
For maximum convenience, slice the fully baked and cooled cake into individual portions, wrap each slice tightly in plastic wrap, and freeze in a single layer.
Store in a freezer bag for up to 3 months. Thaw at room temperature for 1-2 hours before serving—no reheating needed for this make-ahead method.
Serving Prep
Set out serving plates, whipped cream, and powdered sugar the night before a gathering. Pre-slice the cake and arrange on a platter with a dusting of powdered sugar.
This ensures a polished presentation with minimal last-minute effort. The cake’s rich flavor and moist texture make it perfect for stress-free entertaining. ✨
Nutrition facts
Frequently asked questions
Why does this recipe use 12 egg yolks instead of whole eggs?
The extra yolks create an ultra-moist, velvety crumb that’s impossible with fewer yolks. Each yolk adds fat and emulsifiers that keep the cake tender for days. For a lighter texture, you could replace 4 yolks with 4 stiffly beaten egg whites, but the richness would be slightly different.
Can I make this cake in a single 9×13-inch pan instead of two 9-inch rounds?
Yes, but expect a denser texture. Reduce baking time to 40-45 minutes at 325°F and cover loosely with foil if browning too quickly. The cake will be more like a sheet cake than a traditional pound cake. For best results, stick with the round pans for that classic tall dome shape.
What’s the secret to getting that crackly top without drying out the cake?
Bake at 350°F for 35-40 minutes until a toothpick comes out clean, then immediately tent with foil if the top starts browning too quickly. The crackly top comes from proper baking time and temperature – don’t overbake! For extra insurance, brush the top with simple syrup after baking while still warm.
How do I know when the cake is fully cooled before slicing?
Let the cake cool completely in the pan for 10 minutes, then transfer to a wire rack. It’s ready when the center feels cool to the touch (about 1-2 hours total). Slicing too soon causes crumbs and uneven pieces. The vanilla swirls will hold their shape better when fully cooled.
Can I substitute butter with oil for this recipe?
Not recommended – the butterfat is crucial for that signature rich flavor and moisture. If you must substitute, use 1.25 cups melted coconut oil (cooled slightly) plus 0.25 cups melted butter. The texture will be slightly different but still delicious. For best results, stick with the full butter amount for authentic pound cake flavor.

- Baked Potatoes in Crock Pot Recipe: Buttery Interiors and Crispy Top Magic - November 1, 2026
- Braised Beef Short Ribs Recipe: Crock Pot Fall-Off-Bone Magic in 6 Hours - November 1, 2026
- Crock Pot Cocoa Recipe: Velvety Warmth With Hidden Spice Magic - November 1, 2026