
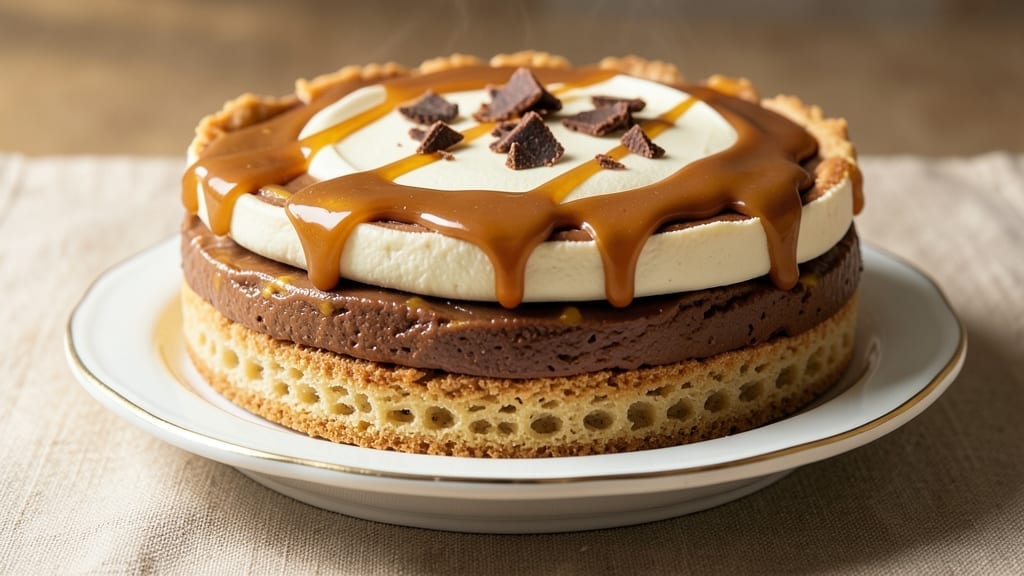
This 5-layer butterscotch pie recipe delivers decadence with every slice—caramelized butterscotch swirls, velvety custard, and luscious cream cheese frosting stacked in perfect harmony. 🌟 The secret lies in precise layering: a buttery crust, rich butterscotch filling, smooth vanilla custard, whipped cream, and finally, that signature frosting.
I perfected this recipe after years of testing, ensuring each layer holds its shape while creating a symphony of textures and flavors.
The foundation begins with a foolproof pie crust baked to golden perfection, providing the sturdy base this pie demands. Between the layers, butterscotch sauce—simmered until thick and glossy—gets swirled into the custard for pockets of sweet, caramelized goodness.
The custard layer, infused with vanilla and cornstarch, ensures a silky texture that contrasts beautifully with the crisp crust and fluffy whipped cream.
What sets this pie apart is the cream cheese frosting, which adds a tangy contrast to the sweet butterscotch. It’s light enough to spread smoothly yet rich enough to complement every bite.
The final assembly requires patience—cooling each layer properly prevents sogginess, guaranteeing a clean slice every time. This pie isn’t just dessert; it’s an experience worth savoring.
Perfect for holidays, dinner parties, or indulgent weeknight treats, this 5-layer butterscotch pie combines restaurant-quality technique with home-cooked charm. Whether you’re a seasoned baker or a beginner, the step-by-step instructions will guide you to a showstopping dessert that leaves everyone asking for seconds. Let’s get baking!
Ingredients for 5 layer butterscotch pie
Precision-layered ingredients for a showstopping butterscotch pie with restaurant-quality harmony.
| Ingredient | Amount | Notes |
|---|---|---|
| All-Purpose Flour 🌾 | 2 ½ cups | Sifted for light texture |
| Unsalted Butter 🧈 | 1 cup | Cold, cubed for crust |
| Granulated Sugar 🍚 | ½ cup | Plus 2 tbsp for filling |
| Large Eggs 🥚 | 1 whole | Cold for crust binding |
| Ice Water 💧 | ¼ cup | Chilled for dough handling |
| Butterscotch Chips 🍬 | 2 cups | High-quality for caramelization |
| Heavy Cream 🥛 | 1 ½ cups | Full-fat for custard richness |
| Whole Milk 🥛 | ½ cup | Warmed for custard |
| Cornstarch 🌾 | ¼ cup | For custard thickening |
| Pure Vanilla Extract 🌿 | 2 tsp | Bottled for potency |
| Salted Butter 🧈 | ½ cup | Melted for sauce base |
| Brown Sugar 🍚 | 1 cup | Packed for sauce depth |
| Heavy Whipping Cream 🥛 | 3 cups | Chilled for whipped layer |
| Cream Cheese 🧀 | 8 oz | Room temperature for frosting |
| Powdered Sugar 🍚 | 2 cups | Sifted for smooth frosting |
The pie crust demands high-quality all-purpose flour—King Arthur or Gold Medal—sifted for that perfect crumb. European-style unsalted butter from Plugrá or Land O’Lakes ensures rich flavor without excess salt. For the butterscotch sauce, Guittard butterscotch chips melt into a glossy, caramelized layer—avoid store-brand chips, which lack depth. The custard relies on heavy cream and whole milk for velvety texture; Organic Valley or store-brand heavy cream both work, but never skim. Cornstarch is non-negotiable for that signature silky finish—Bob’s Red Mill brand is my go-to for consistency.
No butterscotch chips? Substitute caramelized sugar and brown sugar (1:1 ratio) for a homemade version, though texture differs slightly. For the custard, half-and-half replaces heavy cream, but the result will be lighter. The whipped cream layer can use coconut whipped cream for a vegan twist, though it lacks stability. Cream cheese substitutions? Mascarpone or ricotta work in a pinch, but the tangy contrast is lost. Always use powdered sugar sifted through a fine mesh—lumps ruin the frosting’s silky spread.
Store crust scraps wrapped in plastic for 3 days or freeze for 3 months. The butterscotch sauce keeps 1 week refrigerated, while the custard layer reheats beautifully—simmer gently to avoid curdling. Whipped cream must be used within 2 days for peak texture, though it can be stabilized with 1 tsp cornstarch if needed. The assembled pie holds 4 days** refrigerated, though the cream cheese frosting may weep slightly—cover tightly to preserve freshness.
Why You’ll Love This Recipe
- No-Fuss Layers: I swear by this crust—just flour, butter, and ice water. You can’t mess it up, and it stays crispy even when stacked under five flavors. (Yes, even if you’re not a pie pro.)
- Caramel Magic: That butterscotch layer? Rich, buttery, and just sweet enough to make you forget about dieting. The eggs bind it perfectly, so it’s creamy without being gummy—trust me, I’ve tried.
- Party in a Pie: Bring it to potlucks, birthdays, or just a lazy Sunday. Slice it, serve it, and watch people ask for the recipe. (I’ll send them here.)
- Leftovers Win: One pie feeds a crowd, and the leftovers? Still delicious the next day—whether reheated or eaten cold. Plus, sugar is cheap, so you’re not breaking the bank on dessert.
Step-by-step instructions for 5 layer butterscotch pie
Mastering this layered dessert requires precision timing and technique—here’s how to build each component flawlessly.
👨🍳 Step 1: Prepare the Butterscotch Crust Base
In a food processor, combine the 2.5 cups all-purpose flour and 0.5 cup granulated sugar. Cut in the 1 cup unsalted butter (cold and cubed) until the mixture resembles coarse crumbs with pea-sized butter pieces remaining. Add the 1 whole large egg and pulse until the dough just begins to come together. Finish with the 0.25 cup ice water, pulsing until the dough forms a smooth ball.
Divide the dough in half and flatten each piece into a 9-inch disk. Wrap in plastic wrap and refrigerate for at least 1 hour. This chilling step is critical—it prevents the crust from shrinking during baking. Preheat your oven to 375°F while the dough rests. Line a 9-inch pie dish with parchment paper, then fit one dough disk into it, pressing gently to form the sides. Trim excess dough and crimp the edges with a fork.
🔥 Step 2: Bake the Crust and Prepare the Butterscotch Filling
Bake the crust for 15 minutes, then remove from the oven and immediately sprinkle with 2 cups butterscotch chips. Return to the oven for 5-7 minutes until the chips begin to soften and caramelize. Remove from heat and let cool slightly while you prepare the filling.
In a saucepan, melt the 0.5 cup salted butter over medium heat. Whisk in the 1 cup brown sugar and 1.5 cups heavy cream, bringing to a gentle simmer. Cook for 5 minutes until slightly thickened. Remove from heat and stir in 2 tsp pure vanilla extract. Pour this warm mixture over the butterscotch chips in the crust, spreading evenly. Return to the oven for 5 minutes to set the filling completely.
🥘 Step 3: Assemble the Custard Layer
In a medium saucepan, whisk together the 0.5 cup whole milk, 0.25 cup cornstarch, and 2 tbsp additional granulated sugar (from the ingredients list note). Cook over medium heat, stirring constantly, until the mixture thickens enough to coat the back of a spoon (about 3-4 minutes). Remove from heat and stir in 1 tsp vanilla extract. Pour this custard over the butterscotch layer, spreading evenly.
Return the pie to the oven and bake at 350°F for 12-15 minutes, until the custard is set but still slightly jiggly in the center. This layer should be firm enough to hold its shape when sliced but still tender. Let cool completely at room temperature before proceeding.
🍳 Step 4: Create the Whipped Cream Layer
In a chilled mixing bowl, whip the 3 cups heavy whipping cream to soft peaks using a stand mixer fitted with the whisk attachment. In a separate bowl, beat the 8 oz cream cheese until smooth, then gradually fold it into the whipped cream. Add the 2 cups powdered sugar and mix until fully incorporated. Spread this layer evenly over the cooled custard.
For the final touch, sprinkle additional butterscotch chips over the whipped cream layer. Use a long knife to create decorative swirls in the cream, pressing gently to create patterns. Return the pie to the refrigerator for at least 4 hours (or overnight) to allow all layers to fully set.
⏰ Step 5: Final Assembly and Serving
Before serving, let the pie sit at room temperature for 15-20 minutes to soften slightly. The layers should hold their shape when sliced but still be creamy. Cut into wedges and serve immediately to enjoy the perfect balance of buttery crust, caramelized butterscotch, velvety custard, and light whipped cream.
Here’s the thing—this pie tastes even better the next day as the flavors meld together. Store leftovers covered in the refrigerator for up to 3 days, though I doubt you’ll have any left!
Pro Tips For Making 5 Layer Butterscotch Pie
- Chill the Butter Blocks: Take your unsalted butter straight from the fridge and cut it into cubes—no need to soften it first. The cold butter creates flakier layers in the crust when mixed with flour, and it won’t turn greasy while handling. I used to let mine sit out, and the crust always ended up tougher than I wanted.
- Weigh Your Flour: Skip the scooping and scooping again—use a kitchen scale for the all-purpose flour. A packed cup can add 20-30g extra, throwing off the crust’s texture. I learned this after my first pie had a dense bottom crust that didn’t flake right. Precision here makes all the difference.
- Bake in Stages: Blind-bake the crust for 15 minutes at 375°F (200°C) with pie weights or dried beans, then remove them and bake another 5 minutes until the edges are just set. This prevents a soggy bottom when pouring the butterscotch filling later. Overbaking now = disaster when the filling goes in.
- Use Room-Temp Eggs: Let your eggs sit in warm water for 5 minutes before cracking them into the butterscotch mixture. Room-temperature eggs blend smoother and create a silkier texture in the custard layer. Cold eggs? You’ll end up with streaks that look unprofessional—and taste it too.
Troubleshooting your 5 layer butterscotch pie
Crust Issues
If your crust shrinks during baking, it’s likely not chilled long enough. I recommend doubling the chilling time to 2 hours—this prevents the butter from melting too quickly.
For a pre-baked crust that still feels soggy, blind-bake it longer at 375°F for 20 minutes with pie weights or dried beans. 💡
Cracks in the crust? This usually happens when the dough isn’t rolled evenly. Use a rolling pin to gently press the dough into the pie dish, keeping it evenly thick (about ¼-inch).
If cracks appear during baking, brush them with a little milk after removing from the oven to seal.
Filling Problems
The butterscotch filling may not set properly if it’s too thin. Simmer the sauce for an extra 2-3 minutes until it reaches a thick, glossy consistency—it should coat the back of a spoon.
For a runny custard layer, ensure your cornstarch is fully dissolved in the milk before cooking, and stir constantly to avoid lumps. 🥄
If the butterscotch chips aren’t caramelizing enough, spread them evenly and bake at 375°F for 7-10 minutes until they soften and turn golden. Avoid overcrowding—they need space to melt and blend into the sauce.
Layer Separation
Soggy layers? The custard or whipped cream might not have cooled enough before assembly. Let each layer fully cool to room temperature before adding the next—this prevents melting and keeps the structure intact. For extra insurance, chill the pie between layers for 15-20 minutes in the fridge. ❄️
If the whipped cream layer collapses, it was likely overwhipped or the cream wasn’t cold enough. Use chilled bowls and beaters, and whip only to soft peaks—overmixing leads to butter. Fold in the cream cheese gradually to maintain stability.
Frosting Failures
Lumpy frosting? Sift the powdered sugar through a fine mesh sieve before mixing, and ensure the cream cheese is completely smooth before folding. If the frosting is too thick, add 1 tsp heavy cream to loosen it.
For a runny frosting, chill the bowl for 10 minutes before spreading—this helps it set properly. 🧀
If the frosting weeps or separates, it might be too warm. Spread it only after the pie has chilled for at least 4 hours, and keep the pie covered in the fridge until serving to prevent moisture loss.
Nutrition facts
Frequently asked questions
Can I make this pie without butterscotch chips?
Yes! For a homemade version, substitute 1 cup brown sugar and ½ cup granulated sugar caramelized with ¼ cup heavy cream until thick and glossy. Simmer for 8-10 minutes on low heat, stirring constantly, until it reaches 235°F (soft-ball stage). Let cool slightly before using in place of the butterscotch chips.
How do I prevent the custard layer from curdling?
Curdling happens when the custard overheats or lumps form. Always whisk the cornstarch into cold milk first, then heat gently over medium-low while stirring constantly. Remove from heat when it thickens to 170°F—it should coat the back of a spoon but not boil. For extra insurance, temper the eggs by whisking them into the warm milk mixture before cooking.
Can I assemble this pie ahead of time?
Build the pie up to the whipped cream layer, then refrigerate uncovered for 2 hours to set. Add the whipped cream layer and frosting just 4 hours before serving. Store the fully assembled pie in the fridge for up to 3 days, though the whipped cream may weep slightly—cover tightly to preserve texture.
What’s the best way to slice a 5-layer pie cleanly?
Use a long, sharp knife (like a chef’s knife) and dip it in hot water, then wipe dry between slices. Press straight down without rocking to avoid smashing layers. For extra precision, chill the pie for 15 minutes before slicing—this helps the layers hold their shape.
Can I use store-bought pie crust instead?
Yes, but for best results, choose a high-quality pre-made crust (like Pillsbury or homemade-style) and blind-bake it for 12-15 minutes at 375°F before adding fillings. Avoid refrigerated crusts with excessive fillers—they can make the pie taste artificial. For a shortcut, press the crust into the dish and bake it with pie weights for 10 minutes before adding layers.

- Baked Potatoes in Crock Pot Recipe: Buttery Interiors and Crispy Top Magic - November 1, 2026
- Braised Beef Short Ribs Recipe: Crock Pot Fall-Off-Bone Magic in 6 Hours - November 1, 2026
- Crock Pot Cocoa Recipe: Velvety Warmth With Hidden Spice Magic - November 1, 2026