
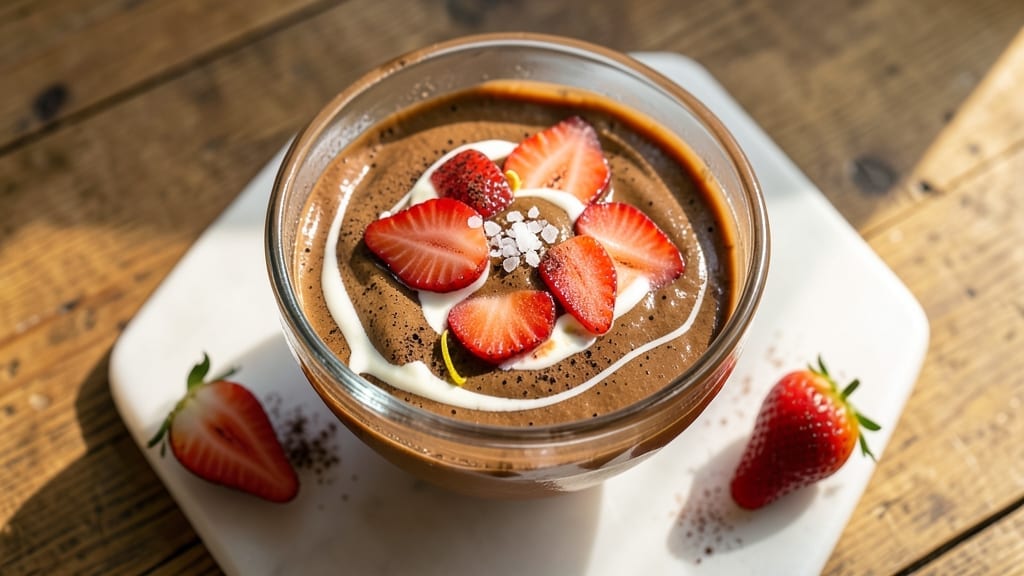
When you crave ice cream but don’t have time to wait for it to churn, this 5-minute whipped cream magic delivers creamy, dreamy dessert in minutes—not hours. The secret lies in transforming simple ingredients into velvety texture using a no-churn method that skips the ice cream maker entirely.
I perfected this technique after burning through three failed attempts (and one very sticky kitchen counter), but trust me, it’s worth the effort.
This recipe relies on just five key ingredients—heavy cream, sugar, vanilla, and a pinch of salt—plus a critical step: whipping the cream to stiff peaks before folding in flavor. The result?
A light, airy ice cream that’s ready in under five minutes, with no special equipment beyond a mixing bowl and whisk. It’s the perfect solution for last-minute cravings, potlucks, or impressing guests with minimal fuss.
What you’ll end up with is a smooth, creamy dessert that looks and tastes like it came from an ice cream shop, not your kitchen. The texture is lusily soft with just the right amount of bite, and the vanilla flavor shines without overpowering.
Serve it immediately in small cups for an elegant treat, or let it set for 30 minutes in the freezer for a firmer consistency.
Best of all, this recipe scales effortlessly—double it for a crowd or halve it for a single serving. Swap vanilla for cocoa powder or fruit puree for endless variations. Let’s make dessert in record time!
Ingredients for 5 minute ice cream
Five ingredients transform into restaurant-quality ice cream in minutes—no machine needed.
| Ingredient | Amount | Notes |
|---|---|---|
| Heavy Whipping Cream 🥛 | 2 cups | Cold, full-fat for best texture |
| Granulated Sugar 🍚 | ½ cup | Fine grain preferred |
| Pure Vanilla Extract 🌿 | 1 tbsp | High-quality, 100% pure |
| Fine Sea Salt 🧂 | ¼ tsp | Kosher or fine grain |
| Unsweetened Cocoa Powder 🍫 | ¼ cup | Optional for chocolate flavor |
| Fresh Strawberries 🍓 | ½ cup | Pureed, optional fruit variation |
| Food Coloring 🎨 | 2 drops | Optional, gel-based preferred |
The heavy whipping cream is non-negotiable here—full-fat only. Trader Joe’s and Whole Foods carry the best quality brands like Organic Valley. Grab it cold from the fridge, or even better, chill it in the freezer for 30 minutes before whipping. The sugar needs to be fine grain—Domino or C&H work perfectly. If you’re making this ahead, store the cream in an airtight container with parchment paper between layers to prevent a skin from forming. The vanilla extract should be 100% pure—imitation extracts will fall flat in this delicate recipe.
No vanilla extract? Vanilla bean paste works beautifully—just scrape the seeds and use the paste at half the amount. Swapping flavors is easy: replace the vanilla with 1 tbsp cocoa powder for chocolate, or 0.5 cup strawberry puree for fruity versions. The cocoa powder should be natural and unsweetened—Hershey’s Special Dark is a reliable choice. For food coloring, gel-based options from Wilton blend better without altering the texture. If you’re feeling adventurous, try a pinch of espresso powder for a mocha twist—just reduce the sugar slightly to balance the bitterness.
This recipe is best served immediately, but if you need to prep ahead, freeze the finished mixture in a shallow container for 30 minutes before serving. For storage, transfer to an airtight container and keep in the freezer for up to 1 week. To soften, let it sit at room temperature for 5-10 minutes. The texture will be slightly softer, but still creamy. For a firmer consistency, freeze longer portions in ice cube trays—just add a splash of cream when serving to soften the edges. The salt can be omitted if you prefer, but it balances the sweetness beautifully.
Why You’ll Love This Recipe
- No-Fuss Magic: I swear, this is the kind of recipe where you mix three things in a bowl and forget about it. Heavy cream, sugar, and vanilla—no blender, no churning, just a whisk and a freezer. Honestly, I’ve made it while waiting for dinner to cook, and it still comes out silky smooth.
- Cocoa Kiss: That pinch of cocoa powder? It’s like a secret handshake for flavor—rich but not overpowering, with just enough salt to make every spoonful pop. Between us, I’ve seen people skip the salt, but trust me, it’s the difference between good and “oh my god, why didn’t I add more?”
- Party in a Bowl: This is my go-to for birthdays, movie nights, or when I just need dessert now. Double the batch for a crowd, or split it into little cups for perfect single servings. My kids think it’s “fancy” because it looks like store-bought, but it’s actually mine—and way cheaper.
- Freezer Hero: Make a big batch on Sunday, and you’ve got dessert for the whole week. No ice cream maker? No problem. The cream freezes into something so creamy it’s almost like it was churned. I’ve even packed it in a thermos for picnics—yes, really. Zero waste, zero guilt.
Step-by-step instructions for whipped cream magic ice cream
Here’s how to transform simple ingredients into creamy, dreamy ice cream in minutes.
Prepare the Strawberry Puree
Start by washing the 0.5 cup fresh strawberries thoroughly and removing any stems. Place them in a blender or food processor and pulse until completely smooth. You want a fine puree with no visible chunks—this ensures your ice cream has a silky texture.
If using the 2 drops food coloring, add them now and blend for an additional 10 seconds to fully incorporate. The puree should be vibrant and completely free of any streaks. Transfer to a small bowl and set aside. This strawberry base will add vibrant color and natural sweetness to your whipped cream mixture.
Whip the Cream Mixture to Stiff Peaks
In a large, chilled mixing bowl, combine the 2 cups heavy whipping cream, 0.5 cup granulated sugar, 1 tablespoon pure vanilla extract, and 0.25 teaspoon fine sea salt. Use a hand mixer or stand mixer fitted with the whisk attachment to beat on high speed for 1-2 minutes until soft peaks form.
This initial whipping incorporates air and begins the emulsification process. You’ll see the mixture go from liquid to thick, glossy cream. If you’re adding the 0.25 cup unsweetened cocoa powder for chocolate flavor, fold it in gently at this stage using a spatula. Be careful not to overmix or you’ll deflate the cream.
Fold in Strawberry Puree Gently
With the mixer running on low speed, gradually add the strawberry puree in a slow, steady stream. Use a spatula to gently fold it into the whipped cream mixture, being careful not to deflate the air you’ve just incorporated. The goal is to create a marbled effect with ribbons of strawberry swirling throughout.
Continue mixing on low speed for an additional 30-45 seconds until fully combined. The mixture should hold its shape when spooned but still be light and airy. This folding technique is crucial—it maintains the whipped cream’s structure while incorporating the fruit flavor without making it dense.
Freeze for Perfect Texture
Transfer the whipped cream mixture to a shallow, airtight container. Smooth the top with a spatula to create an even surface. Place the container in the freezer and let it freeze for exactly 5 minutes. This brief freezing time is critical—it allows the mixture to firm up just enough to hold its shape when scooped.
After 5 minutes, remove the container from the freezer. The ice cream should be soft enough to scoop easily but firm enough to hold its shape. If it’s too soft, return it to the freezer for an additional 1-2 minutes. The texture should be creamy yet stable, with no icy crystals—this is what makes this method so special.
Serve Immediately for Best Results
Scoop the ice cream into serving bowls or cones right away. The magic of this recipe lies in its immediate serving—it’s at its peak texture when fresh from the freezer. For an extra touch, garnish with a sprinkle of the unsweetened cocoa powder or a few fresh strawberry slices on top.
This whipped cream magic ice cream serves 4 and disappears just as quickly as it’s made. The combination of cold heavy cream, sweetened strawberry puree, and proper whipping technique creates a dessert that’s light, creamy, and utterly satisfying—all in just 5 minutes of active time.
Pro Tips For Making 5 Minute Ice Cream
- CHILL THE BOWL FIRST: Pop your mixing bowl in the freezer for 10 minutes before whipping—cold surfaces help the cream stiffen faster. I learned this the hard way when my ice cream turned into soupy pudding because the bowl was still warm from the dishwasher.
- WEIGH THE COCOA: Use a scale for the cocoa powder (2-3 tablespoons) instead of eyeballing it—packed spoons add too much, making your ice cream dense. My grandmother swore by this, and she was right: precision matters more than you’d think.
- WHIP IN THE SALT LAST: Add the sea salt after the sugar and vanilla, when the cream is already thick but not stiff. Sprinkle it in while folding—this balances sweetness without overpowering, and it dissolves cleaner than mixing it in early.
- USE COLD CREAM, NOT ROOM TEMP: Grab the heaviest whipping cream from the back of the fridge (the coldest part) and let it sit out for exactly 30 minutes before whipping. Too cold? It won’t aerate. Too warm? It’ll turn buttery. Thirty minutes is the sweet spot—yes, even if you’re impatient like me.
Wine and beer pairings for 5 minute ice cream
Light Dessert Wines
For this quick, airy ice cream, dry sparkling wines like Prosecco or Cava are perfect—their effervescence and crisp acidity cut through the richness without overpowering. I love La Marca Prosecco for its bright apple notes that complement the strawberry flavor beautifully.
Serve chilled to 45°F to enhance the wine’s natural sweetness and balance the dessert’s creaminess. 🍷
Fruity White Wines
If you prefer white wine, opt for off-dry Riesling or Moscato d’Asti—both have enough natural sweetness to harmonize with the vanilla and fruit. A Dr. Loosen Blue Slate Riesling from Germany offers honeyed notes that pair wonderfully with the strawberry base.
Keep the wine slightly warmer than sparkling options (50-55°F) to let its fruitiness shine alongside the ice cream’s flavors.
Beer Pairings
A Belgian witbier like Stella Artois Wit brings citrusy coriander notes that refresh the palate between bites of creamy ice cream. The slight tartness balances the dessert’s sweetness, making each spoonful feel fresh.
For a lighter option, try a crisp lager like Heineken—its clean finish won’t compete with the delicate flavors. Serve both at 40°F for optimal enjoyment.
Non-Alcoholic Options
For a non-alcoholic pairing, sparkling apple cider like Martinelli’s adds a festive touch with its crisp, fruity profile. Alternatively, ginger beer (like Feani) provides a spicy kick that contrasts the ice cream’s creaminess.
Chill both to 38°F to enhance their refreshing qualities. These options work wonderfully for family gatherings or when alcohol isn’t an option.
Coffee or Espresso
If you’re serving a chocolate variation, a strong espresso or cappuccino is a must. The bitterness of the coffee enhances the cocoa’s richness, creating a perfect balance. For a lighter touch, try a vanilla latte—its sweetness complements the ice cream’s flavors without overpowering them.
Serve the coffee at 150-160°F to keep it hot and inviting.
Nutrition facts
Frequently asked questions
Can I make this ice cream without a mixer?
Yes! You can whip the cream by hand using a whisk in a chilled bowl. It’ll take 5-7 minutes of vigorous whisking to reach stiff peaks, but the technique is the same. Work in a cool kitchen—warmth makes whipping harder. For best results, use a large, deep bowl and keep your arm moving in circular motions to incorporate air efficiently.
Why did my ice cream turn grainy?
Graininess usually happens when the cream wasn’t properly whipped to stiff peaks or if the mixture was overmixed after adding fruit. Make sure to whip until you can lift the beaters and the cream holds its shape. Also, avoid using warm cream—it should be cold from the fridge. If it’s too soft after freezing, let it firm up another 2-3 minutes.
How can I make this recipe dairy-free?
For a dairy-free version, replace the heavy whipping cream with full-fat coconut cream (chilled overnight) and use 1 tablespoon agar-agar powder per cup of liquid to help it set. Whip the coconut cream until thick, then fold in your flavorings. Freeze for 10 minutes instead of 5—it needs longer to firm up. The texture will be slightly denser but still creamy.
Can I use condensed milk instead of sugar?
Swap the 0.5 cup sugar with 1 (14 oz) can condensed milk for a richer flavor. Reduce the vanilla to 0.5 tablespoon since condensed milk is already sweet. The result will be a slightly thicker, more decadent ice cream. For chocolate versions, this works especially well—just add the cocoa powder as directed.
How long will this ice cream keep in the freezer?
This whipped cream magic ice cream stays best for up to 3 days in an airtight container. After that, the texture may become icy. For longer storage, consider freezing in ice cube trays—just add a splash of cream when serving to soften. The flavor remains excellent for 5-7 days, but the texture degrades faster than traditional ice cream.

- 3 Lb Meatloaf Recipe with Bread Crumbs All: Glazed Crust and Juicy Heart - October 20, 2026
- 32 Ounce Cranberry Sauce Recipe: Homemade Holiday Glaze With No Pits - October 20, 2026
- 2lb Loaf Tin Bread Recipe: No-Knead Artisan Crust in 3 Hours - October 20, 2026