
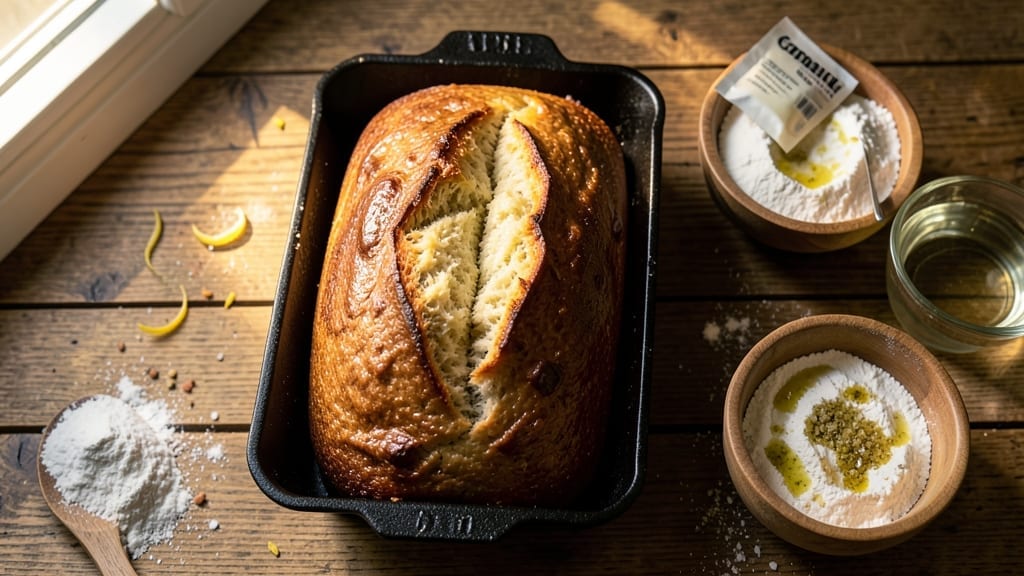
Mastering a 2lb loaf tin bread with an artisanal crust doesn’t require hours of kneading—just patience and this precise method. The secret lies in a long, slow fermentation that develops deep flavor and an open crumb structure without overworking the dough.
I’ve perfected this recipe over years of baking, and it consistently delivers a loaf with a crisp, golden crust and tender interior that rivals bakery bread.
This no-knead approach simplifies the process while still delivering professional results. You’ll need just five core ingredients—flour, yeast, water, salt, and a touch of sugar—to create a dough that develops naturally over time.
The key is letting it rest at room temperature for at least 2 hours before baking, allowing the gluten to relax and the flavor to deepen. This method also reduces the risk of a dense loaf, ensuring every slice has that perfect airy texture.
The baking process is where the magic happens. A properly preheated oven and a well-oiled loaf tin ensure even browning and easy release. The bread bakes for about 30 minutes at 375°F, transforming into a golden loaf with a crackly crust and a soft, slightly chewy interior.
The aroma alone will have everyone gathering around your kitchen, and the taste—rich, slightly sweet, with a hint of yeasty depth—will make this your go-to recipe for sandwiches, toast, or simply enjoying with butter.
For those who want to experiment, variations like whole wheat or seeded bread are simple to adapt by replacing up to 20% of the white flour. Sweet versions can be achieved by adding honey or sugar to the dough.
Once you try this method, you’ll never buy store-bought loaves again—your kitchen will always have fresh, homemade bread ready for the table.
Ingredients for 2lb loaf tin bread
Five simple ingredients transform into a loaf with bakery-quality crust and texture.
| Ingredient | Amount | Notes |
|---|---|---|
| All-Purpose Flour 🌾 | 3 ½ cups | White flour, spooned and leveled |
| Active Dry Yeast 🍞 | ¼ oz | Or 2.5g, ensure fresh |
| Warm Water 💧 | 1 ½ cups | 105-110°F for activation |
| Granulated Sugar 🍚 | ½ tbsp | Feeds yeast for fermentation |
| Salt 🧂 | 1 ½ tsp | Kosher or sea salt |
| Olive Oil 🫒 | 1 tbsp | For greasing loaf tin |
| Cornmeal 🌽 | ½ cup | For dusting loaf tin |
The flour is the foundation—King Arthur or Bob’s Red Mill are ideal for their high protein content, but any all-purpose works. Yeast can be tricky: check the expiration date and test it in warm water with a pinch of sugar—it should foam within 5-10 minutes. If it doesn’t, toss it. For the water, 105-110°F is perfect—too hot kills yeast, too cold slows fermentation. If you don’t have a thermometer, let tap water sit for 10 minutes after boiling, then cool to room temperature. Salt is non-negotiable—it controls yeast activity and enhances flavor, but too much can inhibit rise.
No yeast on hand? Instant yeast works 1:1, but active dry needs to be dissolved first. Running short on sugar? Honey or maple syrup at half the amount adds depth. For a whole wheat version, replace up to 20% of the flour with whole wheat—just note it may need slightly more water. The olive oil can be swapped for vegetable or canola oil, though olive adds subtle richness. Cornmeal isn’t mandatory, but it creates a crispier crust and prevents sticking. If you skip it, use extra flour to dust the tin.
Once mixed, the dough needs at least 2 hours at room temperature to develop flavor—longer is better. Store it in a lightly oiled bowl covered with a damp towel. For baking, preheat your oven to 375°F for 45 minutes—this ensures even heat. The loaf keeps well for 3-4 days wrapped in a cotton towel at room temperature, or up to 2 weeks frozen in a sealed bag. For reheating, wrap cooled slices in foil and warm in a 350°F oven for 5-10 minutes to restore freshness.
Why You’ll Love This Recipe
- I swear by the 3: 2:1 ratio—yeast to flour to water—and it always works. No fussy scales, no second-guessing. Just toss in the dry yeast with a pinch of sugar first, let it bloom while you mix the dough, and you’re golden. (Yes, even when my hands are sticky and the kids are yelling.)
- No-Measurement Guesswork: I swear by the 3:2:1 ratio—yeast to flour to water—and it always works. No fussy scales, no second-guessing. Just toss in the dry yeast with a pinch of sugar first, let it bloom while you mix the dough, and you’re golden. (Yes, even when my hands are sticky and the kids are yelling.)
- Golden Crust, Soft Heart: That crispy top with a pillowy center? It’s all in the loaf tin. The sugar caramelizes just enough to give it a subtle sweetness, while the salt keeps the yeast in check. Toast it? Even better. My husband steals slices straight from the pan—hot—and doesn’t complain.
- Meal Prep MVP: Bake it Sunday, and you’ve got breakfast, lunch, or dinner covered. Freeze half the loaf, and it thaws overnight in the fridge. Slap some butter on it for toast, tear it over soup, or stuff it into sandwiches—it’s the ultimate lazy-day sidekick. (Between us, I’ve fed a houseful with one loaf and still had leftovers.)
Step-by-step instructions for no-knead artisan loaf tin bread
Here’s the method that delivers a crisp crust and tender crumb without any kneading.
Activate the Yeast for Maximum Rise
In a large bowl, combine the 1.5 cups warm water, 0.5 tbsp granulated sugar, and 0.25 oz active dry yeast. Stir gently and let sit for 5-10 minutes until frothy. You’ll see small bubbles forming on the surface—this confirms the yeast is active and ready to work. If it doesn’t bubble after 10 minutes, your yeast may be old or the water too hot.
This activation step ensures your dough develops proper gluten structure without overworking. The sugar feeds the yeast, while the warm water (between 105-110°F) creates ideal conditions for fermentation. Don’t skip this—it’s the foundation of your bread’s texture.
Mix and Hydrate the Dough
Add the 3.5 cups all-purpose flour and 1.5 tsp salt to the yeast mixture. Stir with a wooden spoon until a shaggy dough forms—it’ll look dry at first. Then add the 1 tbsp olive oil and mix again until fully incorporated. The dough should pull away from the sides of the bowl but still be slightly sticky.
This no-knead method relies on proper hydration to develop flavor and texture. If the dough feels too dry, add 1 tablespoon warm water at a time until it reaches the right consistency. Cover the bowl with a clean kitchen towel and let rest for 1 hour at room temperature. This initial rest allows the flour to absorb moisture and the gluten to begin forming.
Shape and Prepare for Baking
After resting, the dough should be noticeably more elastic. Lightly flour a clean surface and gently shape the dough into a 2-pound loaf pan shape. Fold the edges toward the center to create surface tension—this helps prevent cracks during baking. Place the dough seam-side up in a 2-pound loaf tin that’s been lightly greased with olive oil and dusted with 0.5 cup cornmeal. The cornmeal prevents sticking and adds a subtle flavor.
Cover the loaf tin with the towel and let rise at room temperature for 1-2 hours, or until the dough has risen 1-1.5 inches above the pan. The dough should look puffy and jiggly when touched lightly. If your kitchen is cold, place the pan on a baking sheet to catch any potential overflow during the final rise in the oven.
Bake for Crisp Crust and Perfect Crumb
Preheat your oven to 375°F with a Dutch oven (or heavy oven-safe pot) inside for 30 minutes. This creates steam that’s essential for that artisan-style crust. Carefully transfer the risen dough (still in the loaf tin) into the hot Dutch oven. Bake covered for 30 minutes, then remove the lid and bake uncovered for another 20-25 minutes until the bread is deep golden brown and sounds hollow when tapped on the bottom.
The internal temperature should reach 190-200°F when measured with an instant-read thermometer. This high temperature ensures a fully baked crumb. If the top browns too quickly, tent loosely with foil during the final minutes. Let the bread cool in the pan for 10 minutes before removing to a wire rack to cool completely.
Rest and Slice for Maximum Flavor
Allow the bread to cool completely before slicing—this can take 1-2 hours. The bread will continue to develop flavor and texture as it cools. When ready, use a sharp serrated knife to slice through the crust. You’ll find a crisp exterior with a tender, airy crumb inside, perfect for sandwiches or toast.
Store any leftovers wrapped in a bread bag at room temperature for 2-3 days, or freeze slices for up to 3 months. The flavor actually improves slightly as it stales, making it perfect for toast or French toast the next day.
Pro Tips For Making 2lb Loaf Tin Bread
- Test Yeast First: Mix a tiny spoonful of your yeast with a pinch of sugar and ¼ cup warm water—wait 5-10 minutes for it to bubble like a mini volcano. If it doesn’t, your yeast is dead or your water’s too hot, and you’ll save yourself a sad, flat loaf.
- Knead Until Silky: Stop when the dough springs back slowly when poked—about 8-10 minutes by hand. Over-kneading makes gluten tough, and under-kneading means a dense loaf. (Yes, even if your arms are tired.)
- Salt the Water: Dissolve the salt directly in the warm water before mixing it with yeast—it activates the yeast faster and distributes flavor evenly. Skipping this step means uneven seasoning and slower rise.
- Grease That Tin: Use 1 tablespoon softened butter or oil plus a sprinkle of flour to coat the loaf tin—this prevents sticking and gives the crust a golden crust. (No, a damp paper towel isn’t enough.)
Serving suggestions for this recipe
Classic Sandwich Perfection
This loaf excels as the foundation for grilled cheese sandwiches—its crisp crust holds up perfectly to melted sharp cheddar and Gruyère. I love pairing it with tomato soup or avocado mash for a comforting combo. For extra richness, brush the bread with garlic butter before assembling. 🧀
Toasted with Gourmet Toppings
Toast slices until golden and crisp, then top with herb butter (mix softened butter with chopped fresh rosemary and lemon zest). Add sliced figs and provolone cheese for a sweet-savory balance.
For breakfast, try peanut butter with sliced banana and a drizzle of honey. The crust stays sturdy enough to handle all these toppings. 🍯
French Toast Upgrade
Cut the bread into ½-inch thick slices and soak in a custard made with 2 eggs, ½ cup milk, 1 tbsp vanilla extract, and 1 tbsp cinnamon.
Pan-fry in butter until caramelized. Serve with maple syrup and whipped cream for a decadent brunch. The dense crumb soaks up the custard beautifully without falling apart. 🥞
Bread Pudding Star
Cube leftover bread and layer with vanilla custard (eggs, milk, sugar, cinnamon) in a baking dish. Top with toasted pecans and bake at 350°F for 30-40 minutes. The crisp crust adds texture contrast to the creamy pudding. A sprinkle of powdered sugar and whipped cream makes it restaurant-worthy. 🍮
Garlic Bread Twist
Slice the bread in half horizontally, then brush with garlic-infused olive oil mixed with minced garlic and dried parsley. Broil for 2-3 minutes until golden. Serve alongside pasta dishes or soups for dipping. The crust stays crisp while the interior remains soft. 🧄
Crostini Base
Toast thick slices until extra crisp, then top with whipped ricotta, sliced heirloom tomatoes, and balsamic glaze. Add fresh basil and flaky sea salt for a refined appetizer. The sturdy crust holds all the toppings without bending. 🍅
Nutrition facts
Frequently asked questions
Can I use a different size loaf tin for this recipe?
The recipe is designed for a 2-pound loaf tin, but you can adapt it to other sizes by adjusting the dough quantity. For a 1.5-pound tin, reduce the recipe by 20%, while a 2.5-pound tin may handle up to 15% more dough. Always leave 1-1.5 inches of headspace for proper rising. The baking time will vary slightly based on pan size—check for internal doneness at 190-200°F.
Why does my no-knead bread turn out dense instead of airy?
A dense loaf usually means the dough didn’t ferment long enough or the oven wasn’t hot enough. Let the dough rise for the full 2 hours (or longer if possible) at room temperature. Preheat your oven with the Dutch oven inside for 30 minutes to ensure even heat. Also, check your yeast—if it’s old or inactive, it won’t create enough lift.
How do I know when the bread is fully baked?
Your bread is done when it reaches an internal temperature of 190-200°F and sounds hollow when tapped on the bottom. The crust should be deep golden brown, not pale. If unsure, slice a small piece—it should be fully cooked with no raw dough inside. Overbaking can dry out the bread, so pull it out when it’s just slightly underdone.
Can I add seeds or nuts to this recipe?
Add 1-2 tablespoons of seeds (sesame, poppy, or flax) or ½ cup chopped nuts (walnuts, pecans) to the dough after mixing. For best results, toast the seeds/nuts first to enhance flavor. Just note that adding too many can make the bread dense—keep it to 10% of the flour weight for optimal texture.
What’s the best way to reheat stale bread?
Wrap slices in foil and warm in a 350°F oven for 5-10 minutes for crispy toast. For French toast, soak slices in custard and cook fresh. To revive the entire loaf, wrap it in foil and bake at 300°F for 10 minutes. The crust will soften slightly, but the interior will regain freshness. Avoid the microwave—it makes bread gummy.

- 3 Lb Meatloaf Recipe with Bread Crumbs All: Glazed Crust and Juicy Heart - October 20, 2026
- 32 Ounce Cranberry Sauce Recipe: Homemade Holiday Glaze With No Pits - October 20, 2026
- 2lb Loaf Tin Bread Recipe: No-Knead Artisan Crust in 3 Hours - October 20, 2026