
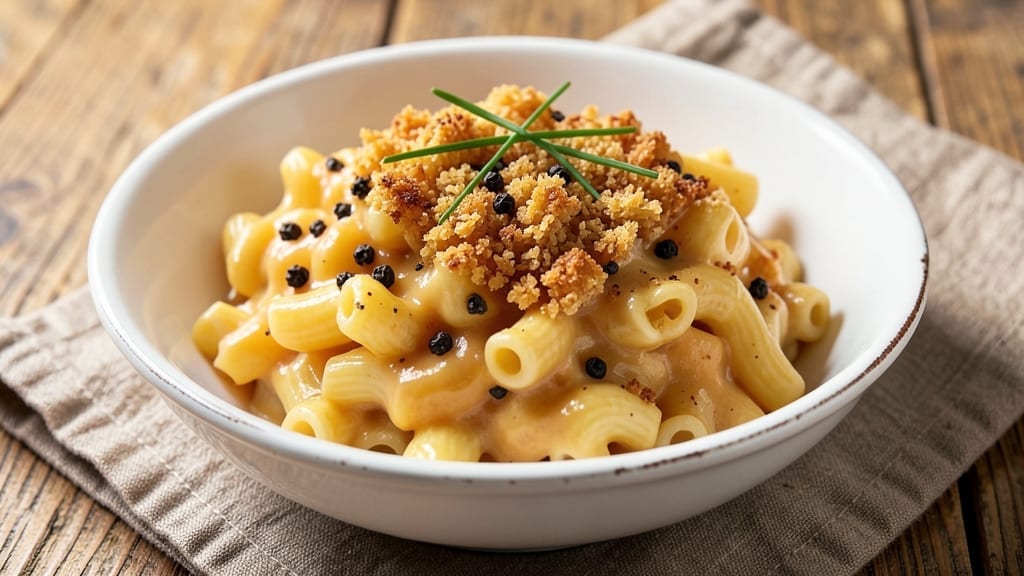
This 5-minute mac and cheese recipe delivers restaurant-quality comfort in record time—no waiting for water to boil or cheese to melt forever. The secret lies in a foolproof technique that turns pantry staples into velvety, cheesy perfection with crispy breadcrumbs on top.
I developed this after years of testing shortcuts, and it never fails to impress, even with picky eaters.
What makes this recipe work is the two-stage process: cook the pasta directly in the cheese sauce (no pre-boiling needed) and toast the breadcrumbs separately for maximum crunch. The result? A creamy, stretchy cheese sauce that coats every noodle, with golden-brown breadcrumbs that add texture without sacrificing speed.
It’s the kind of dish that transforms a simple weeknight into a cozy meal.
By the time you’re done, you’ll have a standalone meal that’s rich, satisfying, and ready in under five minutes—no sides required. The pasta absorbs the cheese perfectly, while the breadcrumbs stay crispy even after baking. This is comfort food at its fastest, with zero compromise on flavor. Let’s get started.
Pro tip: Use pre-shredded cheese to save time, and keep an eye on the breadcrumbs—they crisp up quickly. The 5-minute promise is achievable, but the taste is anything but basic. This mac and cheese is the ultimate quick-fix dinner that still feels special.
Ingredients for 5 minute mac and cheese
Pantry staples transformed into velvety perfection with crispy contrast in under five minutes.
| Ingredient | Amount | Notes |
|---|---|---|
| Elbow Macaroni 🍝 | 8 oz | Dry, uncooked pasta |
| Sharp Cheddar Cheese 🧀 | 2 cups | Pre-shredded, medium sharp |
| Milk 🥛 | 1 ½ cups | Whole milk for richness |
| Unsalted Butter 🧈 | 4 tbsp | Cold, cubed for even melting |
| All-Purpose Flour 🌾 | 2 tbsp | For thickening sauce |
| Panko Breadcrumbs 🍞 | ½ cup | For crispy topping |
| Garlic Powder 🧄 | ½ tsp | Enhances flavor depth |
| Onion Powder 🧅 | ½ tsp | Balances cheesy richness |
| Kosher Salt 🧂 | ½ tsp | Diamond Crystal preferred |
| Black Pepper 🌶️ | ¼ tsp | Freshly ground preferred |
| Extra-Virgin Olive Oil 🫒 | 1 tbsp | For crisping breadcrumbs |
| Freshly Grated Parmesan Cheese 🧀 | ¼ cup | For finishing touch |
The sharp cheddar is non-negotiable here—Kraft 2% or Cabot deliver consistent melt and flavor. Pre-shredded saves time, but if you’re feeling fancy, grate your own for better texture. Milk matters too: whole milk creates a richer sauce than reduced-fat versions. For the pasta, elbow macaroni holds up best to the two-stage cooking process, though any short pasta shape works. The unsalted butter should be cold when you add it—this prevents the sauce from breaking. I always grab European-style butter from Whole Foods or Trader Joe’s for higher fat content, which enhances creaminess.
No sharp cheddar? Monterey Jack or Gouda work in a pinch, though the flavor profile shifts. Substituting milk? Heavy cream makes it richer, but half-and-half keeps it lighter. The flour is critical for thickening—all-purpose works, but pastry flour creates a silkier sauce. For the breadcrumbs, panko is ideal, but regular breadcrumbs toasted with extra olive oil work too. The garlic and onion powders are optional but elevate the dish significantly. If you skip them, add an extra pinch of salt. For a dairy-free version, nutritional yeast can replace the Parmesan, though the texture will differ.
This reheats beautifully—just add a splash of milk to restore creaminess. Store leftovers in an airtight container for up to 3 days in the fridge. For longer storage, freeze portions for up to 2 months. The breadcrumb topping crisps best when made fresh, but you can prep it a day ahead and reheat at 350°F for 3-4 minutes. Double the recipe for meal prep—it keeps well and reheats perfectly. The sauce thickens as it cools, so don’t overmix when combining with pasta. A quick stir before serving restores that velvety consistency.
Why You’ll Love This Recipe
- Five-Ingredient Magic: I swear by this—just pasta, cheese, butter, milk, and flour. That’s it. No fancy gadgets, no 20-step process. Honestly, I’ve made it while waiting for the oven to preheat for something else.
- Creamy Sharp Edge: The sharp cheddar melts into a velvety sauce with that perfect crispy-butter finish on the noodles. Between us, the first bite always gets a little sigh—it’s that good.
- Leftovers That Don’t Suck: Unlike some mac recipes, this reheats like a dream. Throw it in the microwave or pop it in the oven, and it’s just as good the next day. (Yes, even on a Tuesday night.)
- Budget Dinner for Everyone: Five bucks, 20 minutes, and enough to feed four. I’ll be real: my college roommates and I lived on this. It’s the kind of dish that makes you feel like you’re cooking a feast without breaking the bank.
Step-by-step instructions for 5-Minute mac and cheese
Here’s how to make velvety, restaurant-quality mac and cheese in record time.
Cook the Elbow Macaroni Al Dente
Bring a large pot of water to a rolling boil and add 8 oz elbow macaroni. Cook for 2 minutes less than package instructions (usually 8 minutes total) for perfect al dente texture. This ensures the pasta finishes cooking in the cheese sauce without becoming mushy.
While cooking, taste the pasta water periodically—it should be well-seasoned. Reserve ½ cup of starchy pasta water before draining. This liquid is essential for creating a silky sauce. Drain the pasta in a colander and return it to the pot, shaking gently to break up any clumps.
Create the Velvety Cheese Sauce
In a separate saucepan, melt 4 tbsp unsalted butter over medium heat until foaming. Whisk in 2 tbsp all-purpose flour to form a roux, cooking for 1 minute until golden. This creates the foundation for our smooth sauce.
Gradually whisk in 1.5 cups milk and 2 cups sharp cheddar cheese, stirring constantly until the cheese melts completely and the sauce thickens. If the sauce becomes too thick, add reserved pasta water 1 tablespoon at a time until it reaches a creamy, pourable consistency. The sauce should coat the back of a spoon smoothly.
Combine Pasta and Sauce
Add the drained elbow macaroni to the cheese sauce and stir vigorously for 1-2 minutes until every strand is fully coated. The residual heat from the pasta will help melt any remaining cheese and create that signature velvety texture. Taste and adjust seasoning with 0.5 tsp kosher salt and 0.25 tsp black pepper.
For added depth, stir in 0.5 tsp garlic powder and 0.5 tsp onion powder. These spices enhance the cheesy flavor without overpowering it. Keep the mixture warm over low heat while you prepare the crispy topping.
Prepare the Crispy Breadcrumb Topping
In a small bowl, combine 0.5 cup panko breadcrumbs, 1 tbsp extra-virgin olive oil, and 0.25 cup freshly grated parmesan cheese. Mix until evenly coated, then spread the mixture in an even layer on a small baking sheet or pie plate.
Bake at 400°F for 3-4 minutes until the breadcrumbs are golden brown and crispy. Watch closely—they burn quickly. Remove from oven and set aside while you assemble the final dish.
Assemble and Serve Immediately
Transfer the macaroni and cheese to a serving dish and sprinkle the crispy breadcrumb topping evenly over the surface. The contrast between the velvety cheese and crispy topping is what makes this dish special.
Serve immediately while the breadcrumbs are still crispy and the cheese maintains its perfect melt. Each bite should deliver that creamy, cheesy texture with a satisfying crunch on top. This dish stays hot for about 15 minutes, so enjoy it while it’s fresh!
Pro Tips For Making 5 Minute Mac And Cheese
- Boil Water First: I learned this the hard way—starting the pasta in cold water and waiting for the pot to heat up just adds unnecessary time. Fill your pot with water, bring it to a rolling boil, then add the macaroni. That way, the water’s already hot when the pasta hits, and you’re shaving critical seconds off your timeline.
- Grate Cheese Fresh: Pre-shredded cheese is coated in anti-caking agents that make your sauce grainy. Skip the bag and grate sharp cheddar yourself—it melts smoother and tastes richer. If you’re in a rush, at least shake the bag to break up clumps before measuring.
- Whisk Like You Mean It: The roux (butter + flour) is where the magic happens, so don’t stir it half-heartedly. Use a whisk and keep it moving over medium heat until it’s a deep, nutty gold—about 2 minutes. Lumps here mean a lumpy sauce later, and no one wants that.
- Use Whole Milk, Not Skim: Whole milk adds creaminess without making the sauce greasy, and it’s the only way to get that velvety texture in 5 minutes. Skim milk works in a pinch, but the sauce will taste thinner and less satisfying. If you’re out, a splash of heavy cream makes a noticeable difference.
Perfect pairings for this 5 minute mac and cheese
Crispy Bread Toppings
Skip the breadcrumbs and try crushed pork rinds for a keto-friendly crunch—toss ½ cup with 1 tbsp olive oil and ¼ tsp garlic powder, then bake at 400°F for 3 minutes.
For a smoky twist, swap in crumbled bacon bits (cook first to render fat) and bake until crispy. Both toppings stay crunchy longer than breadcrumbs. 🌟
Protein Add-Ins
Turn this into a full meal by stirring in ½ cup cooked bacon or ½ cup diced ham during the final mixing step. For vegetarians, add ½ cup sautéed mushrooms or ¼ cup corn kernels for texture. The protein absorbs the cheese sauce beautifully without overpowering it.
Vegetable Boosts
Fold in ½ cup steamed broccoli florets or ½ cup diced bell peppers when combining pasta and sauce. For extra richness, add ¼ cup sautéed onions to the roux before adding milk. These veggies soften quickly in the hot sauce, keeping prep under 5 minutes total.
Spicy Variations
Add ½ tsp smoked paprika and ¼ tsp cayenne pepper to the cheese sauce for a smoky kick. For heat lovers, stir in 1 tbsp hot sauce (like Frank’s RedHot) when mixing the pasta. Top with chopped jalapeños for extra spice. The heat cuts through the richness perfectly.
Sauce Swaps
Replace milk with ½ cup heavy cream + 1 cup whole milk for ultra-creamy texture. For a tangy twist, stir in ¼ cup sour cream after removing from heat. Both versions keep the 5-minute promise while adding depth. The cream version stays richer when reheated.
Dessert Twist
Transform this into a sweet treat by swapping cheddar for 2 cups white cheddar and adding ¼ cup brown sugar to the sauce. Top with toasted pecans** and a drizzle of honey. The caramelized cheese creates a decadent dessert that’s still quick to make. 🍯
Nutrition facts
Frequently asked questions
Can I make this mac and cheese without pre-shredded cheese?
Yes, but it takes slightly longer. If using block cheese, grate 2 cups sharp cheddar yourself and melt it over low heat while whisking constantly. Pre-shredded cheese is designed to melt faster and more evenly, which is why we recommend it for the 5-minute promise. If you choose to grate your own, add the cheese gradually to prevent clumping.
Why does my cheese sauce get grainy?
Graininess usually happens when cheese melts too quickly or the sauce gets too hot. Always melt cheese over low heat and whisk constantly. If the sauce thickens too much, add reserved pasta water 1 tablespoon at a time until smooth. Using lower-fat cheese or adding milk too fast can also cause separation. Stick to the recipe’s ratio of 2 cups cheese to 1.5 cups milk for best results.
Can I use a different type of pasta?
Elbow macaroni works best because it holds up well to the two-stage cooking process, but you can substitute with other short pasta shapes like penne or shells. Avoid long pasta like spaghetti or linguine—they won’t coat evenly in the cheese sauce. If using shells, reduce cooking time by 1 minute to prevent overcooking. The key is al dente pasta that finishes cooking in the sauce.
How do I keep the breadcrumb topping crispy?
Bake the breadcrumbs at 400°F for exactly 3-4 minutes—no longer, or they’ll burn. For extra crispiness, spread them in a single layer on a baking sheet and avoid overcrowding. If reheating leftovers, sprinkle fresh breadcrumbs on top and broil for 1-2 minutes until golden. The secret is high heat and quick cooking time.
Can I make this mac and cheese ahead of time?
Yes, but assemble it without the breadcrumb topping. Store the macaroni and cheese in an airtight container in the fridge for up to 3 days. Reheat gently with a splash of milk to restore creaminess. When ready to serve, toast fresh breadcrumbs separately and sprinkle on top. For longer storage, freeze portions for up to 2 months. The texture stays creamy when reheated properly.
