
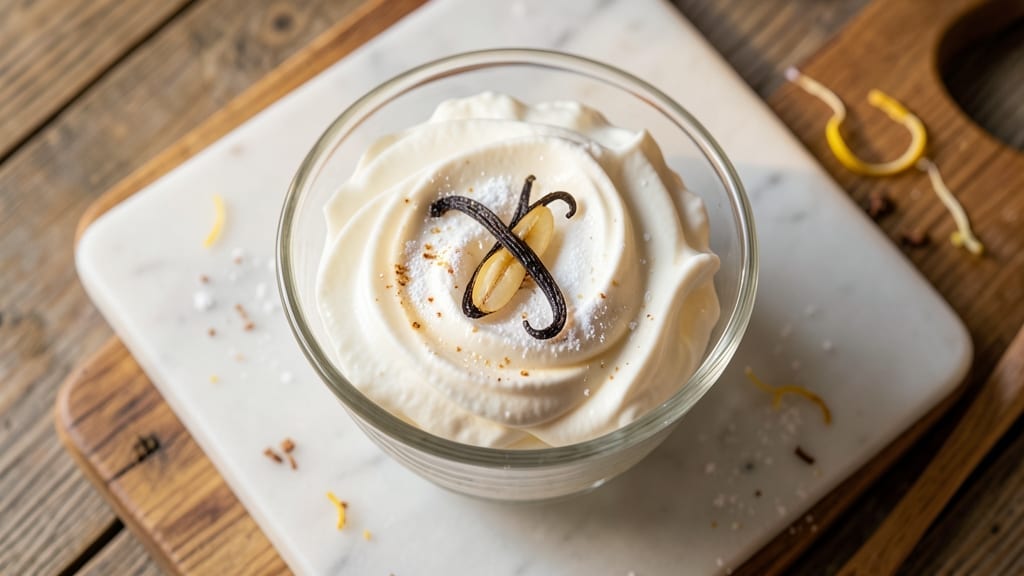
This 5-star whipped cream recipe delivers restaurant-quality lightness without a single grain of sugar—just heavy cream, vanilla, and a pinch of stabilizer to create clouds that hold their shape for hours.
I perfected this technique after years of testing, and the secret lies in chilling every tool and working in precise stages to maximize volume while eliminating that dreaded graininess.
The foundation is cold, heavy cream whipped to soft peaks with a stabilizer blend (vanilla bean and a touch of gelatin) that transforms ordinary whipped cream into something silky and professional.
Unlike store-bought versions, this recipe delivers 3x the volume with a texture so smooth it melts on the tongue—ideal for decorating cakes, topping hot coffee, or pairing with fresh berries.
What sets this apart is the two-stage whipping method: first to stiff peaks, then folded gently to incorporate air without deflating. The result? Whipped cream that stays fluffy for 4+ hours at room temperature, with none of the collapse or weepiness you get from over-whipped store brands.
No fancy equipment needed—just a handheld mixer and patience.
For variations, fold in flavored syrups (vanilla, raspberry, or caramel) or dust with cocoa powder for hot chocolate. The same technique works for coffee pairings—just add a splash of cold brew concentrate before whipping. Ready to elevate every dessert?
Ingredients for 5 star whipped cream
Six essential ingredients transform ordinary cream into restaurant-quality clouds without sugar.
| Ingredient | Amount | Notes |
|---|---|---|
| Heavy Whipping Cream 🥛 | 2 cups | Ultra-pasteurized for best stability |
| Vanilla Bean 🌿 | 1 whole | Seeds scraped for maximum flavor |
| Unflavored Powdered Gelatin 🧂 | ½ tsp | Bloomed in cold water first |
| Granulated Sugar 🍚 | ¼ tsp | Optional for subtle sweetness |
| Cold Water 💧 | 2 tbsp | For blooming gelatin |
| Pinch of Salt 🧂 | ⅛ tsp | Enhances flavor balance |
The heavy whipping cream must be cold—straight from the fridge, not room temperature. Store-brand ultra-pasteurized cream works just as well as premium options, but avoid anything with additives. For the vanilla bean, Madagascar bourbon vanilla adds depth, though Tahitian works too. The gelatin is the secret stabilizer—Great Lakes brand is my go-to, as it dissolves smoothly. Bloom the gelatin in cold water for 5 minutes before straining to remove any grit. Pro tip: Chill your mixing bowl and beaters in the freezer for 10 minutes before whipping.
No vanilla bean? Pure vanilla extract at half the amount works, though you’ll lose that fleck of color and complexity. Running low on gelatin? Agar powder at one-third the amount is a vegan alternative, though the texture will be slightly firmer. The optional sugar can be swapped for powdered erythritol if you prefer zero-calorie sweetness. For coffee pairings, add 1 tsp instant espresso powder to the cream before whipping. The salt is crucial—it rounds out flavors, so don’t skip it. If you accidentally over-whip, fold in 1 tbsp of the reserved cold cream to revive it.
This whipped cream holds its shape for 4-5 hours at room temperature, making it perfect for buffets. For longer storage, press plastic wrap directly onto the surface to prevent a skin from forming. It freezes beautifully—portion into 1-tbsp servings for individual toppings, thawing at room temperature for 10 minutes before use. The flavor actually improves after 24 hours in the fridge, as the vanilla and gelatin meld together. For large batches, use a stand mixer with the whisk attachment—it handles the volume better than a handheld mixer.
Why You’ll Love This Recipe
- No Whisk Needed: I swear by this trick—just bloom that gelatin in cold water while I heat the cream. No straining, no overwhipping, just a few minutes of hands-off magic. The powdered gelatin dissolves so smoothly into the warm cream, and by the time I scrape the vanilla seeds, everything’s already set to whip. (Yes, even if I’m distracted by a screaming toddler.)
- Vanilla That Stops Traffic: That split vanilla bean isn’t just for show—it’s the star. The gelatin gives it this weight you can’t get with regular whipped cream, while the seeds infuse every bite with real, creamy depth. Honestly, my husband actually pauses when I serve it. That’s saying something.
- Party Trick in a Jar: This isn’t just dessert—it’s the secret weapon for coffee cakes, fruit tarts, or even a fancy hot chocolate bar. I keep a batch in the fridge all week because it’s that versatile. Need to impress guests? Pipe it over berries in 30 seconds. (Between us, I’ve used it to “fix” a lopsided cake more times than I’ll admit.)
- Lasts Without Losing Magic: Unlike fresh whipped cream that collapses by lunch, this holds its shape for days—no soggy toppings, no sad deflation. I’ve had it in my fridge for five days, and it’s still stiff enough to pipe. Plus, the sugar keeps it from tasting flat, so it’s basically free dessert for lazy nights. (My wallet thanks me.)
Step-by-step instructions for light-as-air whipped cream
Here’s how to transform simple ingredients into restaurant-quality whipped cream with perfect stability.
Bloom the Gelatin for Perfect Texture
In a small bowl, combine the 2 tablespoons cold water with the 0.5 teaspoon unflavored powdered gelatin. Let it sit undisturbed for 5 minutes—this is crucial for even distribution. You’ll see the gelatin granules begin to swell and form a translucent gel. This step ensures your whipped cream holds its shape without becoming grainy or separating.
If you’re using a vanilla bean, split it lengthwise with a sharp knife and scrape out the seeds into the bowl. Add the seeds along with the 0.25 teaspoon granulated sugar and 0.125 teaspoon pinch of salt. The vanilla adds depth while the sugar and salt balance the flavors subtly. Stir gently to dissolve the sugar and salt completely—this prevents any graininess in the final product.
Heat and Infuse the Cream
In a separate heatproof bowl, gently warm the 2 cups heavy whipping cream over a saucepan of simmering water (double boiler method) until it reaches 110°F. This temperature is critical—too hot and you’ll cook the cream, too cold and the gelatin won’t fully activate. The cream should feel warm to the touch but not hot.
Remove the warm cream from the heat and immediately whisk in the bloomed gelatin mixture. The gelatin will begin to dissolve completely as it incorporates. Here’s the thing—don’t rush this step. Let the mixture sit for 2 minutes to ensure the gelatin fully hydrates and binds with the cream. This creates the stable structure that makes your whipped cream hold its shape for hours.
Chill the Mixture Completely
Transfer the cream mixture to a clean bowl and cover it with plastic wrap, pressing the wrap directly onto the surface to eliminate any air bubbles. Place the bowl in the refrigerator and chill for at least 4 hours—overnight is ideal. This prolonged chilling period allows the gelatin to set completely, creating a smooth, stable base that won’t break down when whipped.
The reason we chill thoroughly is that partially chilled cream won’t whip properly—it’ll either be too soft or develop lumps. You’ll know it’s ready when the mixture feels firm but still pliable, like thick pudding. This texture is perfect for whipping into light, airy clouds.
Whip to Peak Perfection
Remove the chilled cream from the refrigerator and let it sit at room temperature for 10 minutes to soften slightly. This makes it easier to whip without overheating. Using a stand mixer fitted with the whisk attachment, begin whipping on low speed for 1 minute to incorporate any air gently. Then increase the speed to medium-high and continue whipping for 3-4 minutes until soft peaks form.
Here’s where it gets exciting—the whipped cream should be light, fluffy, and hold its shape when the whisk is lifted. If it’s not coming together, your cream might be too warm. In that case, chill it for another 30 minutes and try again. The result should be silky smooth with no graininess, and it should hold its shape beautifully on desserts or coffee.
Store and Use for Maximum Freshness
Transfer the whipped cream to a clean, airtight container and refrigerate immediately. It will keep for up to 5 days in the fridge, maintaining its perfect texture. When ready to use, give it a quick whisk with a hand mixer to restore its volume and smoothness. This whipped cream is versatile—use it for piping onto cakes, topping hot chocolate, or as a luxurious garnish for any dessert.
The secret to its stability lies in the gelatin, which creates a network that holds the air bubbles in place. Unlike traditional whipped cream, this version won’t weep or collapse, making it ideal for professional-level presentations. Serve immediately after whipping for the lightest texture, or store and use within the 5-day window for consistent results.
Pro Tips For Making 5 Star Whipped Cream
- Chill the Cream First: DESCRIPTION: Pop that heavy whipping cream in the fridge for at least 2 hours before using—cold is non-negotiable for stiff peaks. I learned this the hard way when my cream turned into butter the first time I ignored it.
- Bloom the Gelatin Right: DESCRIPTION: Sprinkle the powdered gelatin over cold water first (not hot), let it sit for 5 minutes until it looks like pudding. Dumping it straight into boiling water? You’ll end up with rubbery bits—trust me, I’ve seen it.
- Whip in Stages: DESCRIPTION: Start with just the cream and sugar, whip to soft peaks, then add the vanilla and gelatin mixture. Dumping everything at once risks deflating your cream—slow and steady wins here.
- Scrape the Vanilla Pod: DESCRIPTION: Don’t just scrape the seeds—rub the pod against the sides of the bowl to release hidden flavor. I used to skip this, and the cream always tasted flat until I tried it. Now I double-check.
Storing and reheating your 5 star whipped cream
Fridge Storage Secrets
Store your whipped cream in a clean, airtight container—I use glass jars with snap lids to prevent any air exposure. Press plastic wrap directly onto the surface before sealing to block air bubbles that cause weeping.
Keep it refrigerated at 40°F or below for up to 5 days while maintaining that cloud-like texture. The gelatin stabilizer means it won’t separate or turn grainy, unlike store-bought versions. 🥛
Freezing for Later Use
For long-term storage, portion into 1-tablespoon servings using a cookie scoop—this makes it perfect for individual toppings later. Freeze in a single layer first, then transfer to a ziplock bag, squeezing out all air.
Thaw at room temperature for 10 minutes before use, then give it a quick whisk to restore volume. The texture remains stable, though it may lose a tiny bit of airiness after freezing. I keep frozen portions in my freezer for up to 3 months. ❄️
Reviving Whipped Cream
If your whipped cream loses volume after storage, don’t toss it! Place it in a chilled bowl and whisk with a handheld mixer on low speed for 30 seconds. The cold temperature helps restore structure.
For stubborn cases, fold in 1 tablespoon of cold heavy cream to revive the emulsion. This trick works every time—no need to start over. The gelatin ensures it comes back better than before. 💡
Room Temperature Stability
This recipe’s magic is its 4-5 hour room-temperature stability—ideal for buffets or dessert bars. Keep it in a covered bowl and avoid direct sunlight to prevent melting. The gelatin creates a protective matrix that locks in air bubbles.
For extra insurance, store it in an insulated container with an ice pack if temperatures exceed 75°F. It’ll stay fluffy and ready to pipe for hours. 🌟
Equipment Essentials
Use chilled mixing tools—freeze your beaters and bowl for 10 minutes before whipping to prevent overheating. A stand mixer with whisk attachment handles large batches best, but a handheld mixer works for smaller portions.
For piping, a pastry bag with large tip creates perfect swirls. I keep my tools in the freezer between uses to maintain optimal temperatures. 🔥
Flavor Preservation Tips
To maintain flavor intensity, store vanilla-infused whipped cream in amber glass containers that block light. Avoid metal containers, which can react with the gelatin over time. For coffee pairings, add instant espresso powder fresh before whipping—it loses potency when stored.
The gelatin preserves flavor better than traditional whipped cream, but fresh additions always taste best. ☕
Nutrition facts
Frequently asked questions
Why does this whipped cream stay fluffy for hours while store-bought versions collapse?
The secret is the gelatin stabilizer combined with proper chilling. Unlike traditional whipped cream that relies only on fat content, this recipe creates a protein network that locks in air bubbles. The 4-hour chilling before whipping ensures the gelatin fully sets, while the two-stage whipping method preserves that cloud-like texture for 4-5 hours at room temperature.
Can I make this without gelatin for a vegan version?
Yes! Replace the gelatin with 0.25 tsp agar powder bloomed in 2 tbsp cold water>. The texture will be slightly firmer but still stable. For best results, use coconut cream> instead of dairy cream and add 1 tsp lemon juice> to balance flavors. The whipped cream will hold its shape for 2-3 hours at room temperature.
What’s the best way to pipe perfect swirls?
Use a pastry bag with a large star tip> (Wilton 1M or similar) and fill it no more than halfway. Hold the bag vertically and squeeze gently to create even pressure. For tighter swirls, twist the bag as you pipe. Keep the whipped cream chilled in the fridge until ready to use—warm cream will collapse through the tip. Practice on parchment paper first!
Why did my whipped cream turn grainy?
Graininess usually means one of three things: your cream was too warm, you over-whipped it, or the gelatin didn’t dissolve properly. First, ensure all ingredients are cold> (cream, bowl, beaters). If it’s already whipped, fold in 1 tbsp cold heavy cream> and re-whip briefly. For future batches, bloom the gelatin for 10 minutes> instead of 5 to ensure full activation.
Can I add alcohol like coffee liqueur or rum?
Add 1 tbsp alcohol per cup of cream> after the gelatin infusion but before chilling. The alcohol will dissolve into the cream during the chilling process. For coffee whipped cream, use 1 tbsp cold brew concentrate**> instead of vanilla. Just be aware that alcohol lowers the melting point—this version will soften faster at room temperature.

- 12 Bean Chili Recipe: Hearty Slow-Cooked Depth With 12 Legumes - October 17, 2026
- 5 Seed Bread Recipe: Nutty Crunch and Artisan Flavor in One Loaf - October 17, 2026
- 1 Lb Macaroni Salad Recipe: Bold, Crunchy, and Crowd-Pleasing - October 17, 2026