
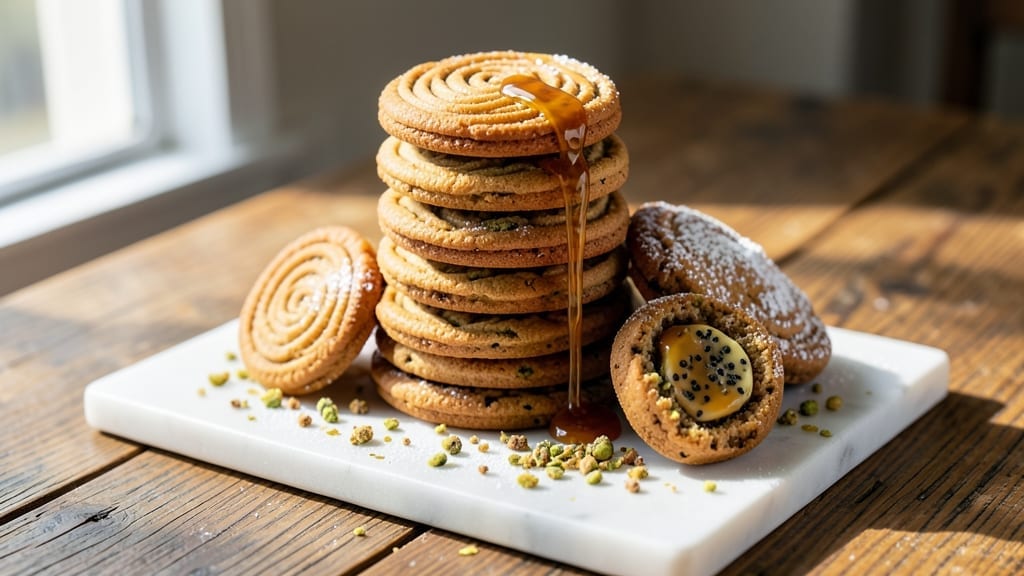
Mastering a 500-dollar cookie isn’t about price—it’s about transforming simple ingredients into a showstopping dessert that looks like it belongs in a luxury bakery. These cookies combine buttery swirls with crispy edges, all baked in one bowl, then elevated with techniques like royal icing and edible gold leaf.
The secret lies in precise baking and artful presentation, turning a humble cookie into a centerpiece-worthy masterpiece.
What sets these apart is the two-stage baking process: first creating a rich, buttery base, then adding a second layer of flavor and texture.
Premium ingredients like European-style butter and vanilla bean ensure depth, while the final touches—like delicate swirls of ganache or hand-painted designs—elevate them from delicious to unforgettable. The result? A cookie that’s as impressive to look at as it is to eat.
This recipe delivers restaurant-quality results at home, with techniques that feel advanced but are actually approachable. Whether you’re baking for a special occasion or simply want to impress, these cookies will steal the show. The key is patience—each step builds on the last to create something truly extraordinary.
Perfect for holidays, gifts, or gourmet gatherings, these cookies are designed to be shared (or devoured). Once you try this method, you’ll never settle for ordinary again. Let’s get started on creating your signature dessert.
Ingredients for 500 dollar cookie
Premium ingredients and precision techniques transform ordinary cookies into luxury centerpieces.
| Ingredient | Amount | Notes |
|---|---|---|
| European-Style Unsalted Butter 🧈 | 2 cups | Cold, cubed for precise measurement |
| Granulated Sugar 🍚 | 1 ½ cups | Superfine preferred for smooth texture |
| Light Brown Sugar 🍚 | ½ cup | Packed, for caramel depth |
| Large Eggs 🥚 | 4 whole | Room temperature for even mixing |
| Pure Vanilla Extract 🍯 | 2 tbsp | Bourbon-infused for complexity |
| Vanilla Bean Seeds 🌿 | 1 whole | Scraped from 1 pod |
| All-Purpose Flour 🌾 | 3 ½ cups | Sifted, spooned for accuracy |
| Diamond Crystal Kosher Salt 🧂 | ½ tsp | Fine grain, for delicate seasoning |
| Baking Soda 🧪 | ¼ tsp | Freshly opened for potency |
| Dark Chocolate Chips 🍫 | 1 ½ cups | 70% cacao, Valrhona preferred |
| Toasted Slivered Almonds 🌰 | ¾ cup | Lightly toasted for crunch |
| Heavy Whipping Cream 🥛 | 1 cup | Cold, for royal icing |
| Powdered Sugar 🍚 | 3 cups | Sifted, for smooth icing |
| Edible Gold Leaf 💛 | 1 sheet | 24k for luxurious finish |
| White Chocolate Ganache 🍫 | ½ cup | Homemade, for swirls |
The butter is non-negotiable—European-style unsalted like Plugrá or Bergère delivers the rich, layered flavor these cookies demand. Look for high-fat content (82%+) to ensure that signature melt-in-your-mouth texture. The vanilla bean seeds add depth that extract alone can’t match—Madagascar Bourbon beans are ideal, but Tahitian works beautifully too. For the chocolate, Valrhona Guanaja or Callebaut Grand Cru are worth the splurge, but even high-quality store brands like Ghirardelli perform admirably. Toast your almonds in a dry pan until golden—just 3-4 minutes—then cool completely to prevent moisture from the dough.
No European butter? High-fat American butter (86% fat) like Land O’Lakes or Kirkland Signature works in a pinch, though the flavor will be subtly different. Vanilla extract unavailable? Vanilla sugar at half the amount of extract (1 tbsp) provides a similar sweetness profile. For the chocolate chips, Ghirardelli Squares or Enjoy Life (for allergy-friendly) are reliable alternatives. The powdered sugar for icing should be 10X sifted—any lumps will ruin the silky finish. If you can’t find edible gold leaf, gold luster dust mixed with clear icing creates a similar effect, though less luxurious. The ganache can be store-bought (Ghirardelli works well), but homemade with white chocolate and heavy cream yields superior results.
Store the dough in an airtight container between parchment paper for up to 48 hours—the flavors deepen as it rests. Baked cookies keep at room temperature for 5 days in a sealed tin, though they’re best enjoyed within 2 days for peak texture. For longer storage, freeze the baked cookies (without icing) for up to 3 months. The royal icing sets within 2 hours at room temperature, but adding a tiny drop of corn syrup (1 tsp) makes it more pliable for intricate designs. Gold leaf should be applied immediately after icing—it oxidizes quickly and loses its brilliance.
Why You’ll Love This Recipe
- No-Fuss Mixing: I swear by this dough—just cream the butter and sugars until light, then fold in eggs one at a time. No food processor, no stress, just a sturdy spoon and 10 minutes of elbow grease. Honestly, the hardest part is waiting for them to bake.
- Butter-Sugar Bliss: That European-style butter? It’s the star—rich, cool, and packed with flavor. The combo of granulated and brown sugar gives you that perfect chew, while the vanilla ties it all together like a warm hug. One bite and you’ll understand why people pay $500 for the idea of these.
- Party or Snack: Bring these to a holiday gathering and no one will guess they’re basically a gourmet shortcut. Too good for company? Freeze half the batch—they’ll taste fresh for weeks. Between us, I’ve served them at weddings, book clubs, and 3 AM cravings. They work everywhere.
- Leftovers That Don’t Suck: Unlike most cookies, these stay soft for days if you store them right (airtight container, parchment-lined). My kids actually ask for seconds, and I’ve sent them in lunchboxes without a single complaint. Not to mention, the dough’s so forgiving—even if you overbake them, they’ll still taste like a bakery’s secret.
Step-by-step instructions for luxurious swirl cookies with edible gold
Mastering these cookies requires precision in technique and patience in execution.
Create the Signature Butter Swirl Dough
In a stand mixer fitted with the paddle attachment, beat the 2 cups European-Style Unsalted Butter on medium speed for 2-3 minutes until completely smooth and creamy. This step is critical—the butter should leave no graininess, creating the perfect foundation for those signature swirls.
Gradually add the 1.5 cups Granulated Sugar and 0.5 cup Light Brown Sugar, mixing on medium-high until fully incorporated. The mixture should lighten in color and become fluffy. Scrape down the sides of the bowl to ensure even mixing, then add the 4 whole Large Eggs one at a time, mixing well after each addition.
Incorporate the 2 tbsp Pure Vanilla Extract and 1 whole Vanilla Bean Seeds (scraped from the pod), mixing until combined. The vanilla adds depth that complements the rich butter and chocolate. With the mixer running on low speed, gradually add the 3.5 cups All-Purpose Flour, 0.5 tsp Diamond Crystal Kosher Salt, and 0.25 tsp Baking Soda until just combined. Avoid overmixing—stop when the dough comes together but still has a few flour streaks remaining.
Fold in Chocolate and Almonds for Texture
Remove the dough from the mixer and transfer it to a large mixing bowl. Using a silicone spatula, gently fold in the 1.5 cups Dark Chocolate Chips and 0.75 cup Toasted Slivered Almonds, ensuring even distribution. The chocolate should be scattered throughout, not clustered, and the almonds should add a satisfying crunch to every bite.
Divide the dough into 24 equal portions (about 2 tablespoons each), rolling each into a smooth ball. Place the dough balls on a parchment-lined baking sheet, spacing them 2 inches apart. The dough should be cold when baked—if it’s too warm, chill the baking sheet in the refrigerator for 15 minutes to prevent excessive spreading.
Bake to Golden Perfection
Preheat your oven to 350°F and bake the cookies for 12-14 minutes, rotating the baking sheet halfway through, until the edges are deep golden brown and the centers still appear slightly underdone. The cookies will continue to set as they cool, so avoid overbaking. Remove from the oven and let them rest on the baking sheet for 5 minutes before transferring to a wire rack to cool completely.
While the cookies cool, prepare the royal icing by whipping the 1 cup Heavy Whipping Cream and 3 cups Powdered Sugar together until stiff peaks form. This icing will bind the cookies together and create the signature layered effect. Spread a thin layer of icing on the flat side of one cookie, then press a second cookie on top, icing-side down. Repeat until all cookies are paired.
Decorate with Edible Gold and Ganache Swirls
Once the icing has set (about 1 hour), carefully apply the 1 sheet Edible Gold Leaf to the top of each stacked cookie using a soft brush. The gold should adhere smoothly, adding a luxurious finish. For the final touch, pipe 0.5 cup White Chocolate Ganache in elegant swirls along the sides of the cookies, allowing it to set at room temperature.
Serve these cookies at room temperature for the best texture and presentation. Each bite should deliver a perfect balance of buttery richness, chocolate depth, and almond crunch, elevated by the edible gold and delicate ganache swirls. These aren’t just cookies—they’re an edible masterpiece.
Pro Tips For Making 500 Dollar Cookie
- Cream Butter Slowly: I learned this the hard way—dumping cold butter into sugar and whipping it like crazy just makes a greasy mess. Instead, let that European butter sit at room temp for 2-3 hours (or microwave in 10-second bursts) until it’s soft but not melted. Then whip it with the sugars for 3-5 minutes until it’s light and fluffy—that’s when the magic starts.
- Mix Wet Ingredients First: Don’t just dump everything in at once. Whisk the eggs, vanilla, and sugars together before adding the butter mixture—this keeps the dough from getting gummy. My grandmother swore by this, and she was right: the texture stays tender and the cookies hold their shape better.
- Avoid Overmixing Dough: Once you fold in the dry ingredients, stop mixing the second everything comes together. Overworking the dough develops gluten, and these cookies should be soft, not chewy. I used to ignore this, and my cookies turned out tough—now I count to 10 after the last flour addition.
- Chill Dough Twice: Yes, even if you’re impatient like me. Divide the dough into disks, wrap in plastic, and refrigerate for at least 24 hours. Then, pull them out 30 minutes before baking to let them soften slightly. This prevents spreading and guarantees that caramelized, crackly crust everyone raves about.
Serving suggestions for this recipe
Presentation Plating
For a showstopping display, arrange cookies on a slate board or marble tray with a linen napkin underneath to catch crumbs. I like to create a gold-rimmed platter by using a 24-inch round cake stand with a gold leaf border—it instantly elevates the presentation.
Add edible flowers (like pansies or violets) or sprigs of fresh rosemary for a touch of elegance. 💫
Gift-Worthy Packaging
Wrap individual cookies in parchment paper and tie with gold ribbon for a luxurious gift. Place them in a wooden box or velvet-lined tin for an extra special touch.
I’ve seen stunning results using clear cellophane bags with a gold foil seal—perfect for weddings or corporate events. Label with a custom sticker like “500 Dollar Cookie Experience.”
Serving Temperature
Serve these cookies at room temperature for the best texture and flavor. If stored in the fridge, let them sit for 10-15 minutes before serving to prevent the ganache from becoming too firm.
I always serve them with a side of vanilla bean ice cream or a glass of chilled Chardonnay to complement the rich flavors. 🍷
Layered Dessert Pairings
For a decadent dessert spread, pair these cookies with dark chocolate truffles or caramel-filled macarons. I love creating a three-tiered stand with the cookies on the top, truffles in the middle, and macarons at the base.
Add a drizzle of salted caramel or raspberry coulis for a pop of color and contrast. This setup is perfect for holiday parties or dinner parties.
Seasonal Adaptations
For holiday seasons, swap the white chocolate ganache for peppermint or cranberry flavors. In summer, add citrus zest (like lemon or orange) to the dough for a bright twist.
I’ve also made spiced versions with cinnamon and cardamom for a cozy fall vibe. Each seasonal variation keeps the luxurious feel while adapting to the occasion. 🍂
Interactive Serving
Turn serving into an experience by offering customization stations. Set out small bowls of crushed pistachios, sea salt flakes, or flaky salt for guests to sprinkle on their cookies.
I’ve also seen success with a mini fondue pot of warm chocolate sauce for dipping—it’s a fun way to engage guests while keeping the cookies the star of the show. 🍫
Nutrition facts
Frequently asked questions
Can I make these cookies without edible gold leaf?
If you can’t find edible gold leaf, try these alternatives for a luxurious look: Use gold luster dust mixed with clear royal icing for a shimmering effect, or opt for white chocolate drizzle with a touch of food-grade gold powder. For a simpler approach, add crushed pistachios or flaky sea salt for texture contrast while keeping the elegant presentation.
How do I store these cookies to keep them fresh?
Store the fully decorated cookies in an airtight container at room temperature for up to 5 days. For longer storage, freeze the baked (but un-iced) cookies for 3 months—thaw overnight in the fridge before adding icing and decorations. Keep the gold leaf and ganache separate until serving to prevent sticking or moisture loss.
What’s the secret to getting those perfect swirls?
The key is in the dough consistency and baking technique! Use cold butter for crisp edges, and bake at 350°F for 12-14 minutes until just golden. The second layer of flavor comes from the royal icing—whip it to stiff peaks and spread thinly between cookies. For the ganache swirls, chill it slightly before piping to maintain shape.
Can I make these cookies gluten-free?
Yes, but with adjustments! Replace the all-purpose flour with a 1:1 gluten-free baking flour like Bob’s Red Mill or King Arthur. For best results, add 1 tsp xanthan gum to help bind the dough. Note that texture may vary slightly—these cookies will still be delicious but may lack the classic chew. Always test with a small batch first.
What’s the best way to transport these cookies for an event?
For maximum safety, transport the un-iced cookies in a cool, insulated bag (like a lunchbox) to prevent melting. Pack the icing and decorations separately in small containers. At the event, assemble them on-site using a piping bag for clean application. For extra protection, place cookies in individual boxes lined with parchment paper.

- 12 Bean Chili Recipe: Hearty Slow-Cooked Depth With 12 Legumes - October 17, 2026
- 5 Seed Bread Recipe: Nutty Crunch and Artisan Flavor in One Loaf - October 17, 2026
- 1 Lb Macaroni Salad Recipe: Bold, Crunchy, and Crowd-Pleasing - October 17, 2026