
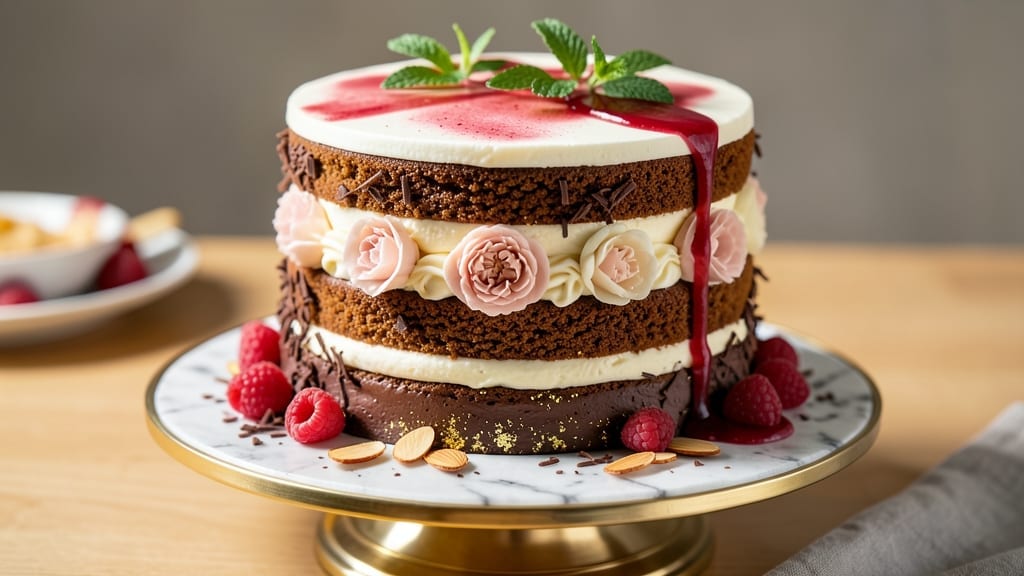
Celebrating a 50th birthday deserves a cake that’s as memorable as the milestone itself—this vanilla bean swirl tower delivers layers of buttery vanilla cake, luscious buttercream, and a showstopping swirl design that feels custom-made.
The secret lies in the vanilla bean paste for depth of flavor and the high-ratio cake batter, which bakes up tender yet sturdy enough to support multiple tiers.
I’ve perfected this recipe over years of baking for milestone birthdays, and it never fails to impress—whether you’re going for classic elegance or playful flair.
This recipe combines three classic cake layers with a smooth, pipeable buttercream that holds its shape for clean swirls and elegant borders. The vanilla bean extract infuses every bite with aromatic richness, while the cream cheese frosting adds a tangy contrast that balances the sweetness.
No fondant or advanced decorating skills required—just a few simple piping techniques and a steady hand to create a cake that looks as stunning as it tastes.
By the time you’re done assembling, you’ll have a three-tiered masterpiece with crisp edges, moist layers, and a frosting so creamy it melts in your mouth. The swirl design adds movement and texture, making it feel special without requiring professional decorating skills.
Serve it with a side of warm berries or chocolate shavings for extra flair, and watch as everyone reaches for seconds.
Perfect for a half-century celebration, this cake scales beautifully for large gatherings or intimate family dinners. The recipe includes tips for flavor variations (think raspberry filling or caramel drizzle) and design customization, so you can make it uniquely yours. Let’s get baking!
Ingredients for 50th birthday cake
Twelve ingredients for a three-tiered masterpiece that feels custom-made every time.
| Ingredient | Amount | Notes |
|---|---|---|
| All-Purpose Flour 🌾 | 4 cups | Sifted for light texture |
| Granulated Sugar 🍚 | 2 ½ cups | Superfine preferred for smoothness |
| Unsalted Butter 🧈 | 2 cups | Cold, cubed for creaming |
| Large Eggs 🥚 | 6 whole | Room temperature for even mixing |
| Vanilla Bean Paste 🌿 | 2 tbsp | High-quality for authentic flavor |
| Baking Powder 🧂 | 2 tsp | Fresh for proper rise |
| Salt 🧂 | ½ tsp | Fine sea salt preferred |
| Whole Milk 🥛 | 1 cup | Room temperature for smooth batter |
| Buttercream Frosting 🧁 | 4 cups | Stabilized with meringue powder |
| Cream Cheese 🧀 | 8 oz | Room temperature for smooth mixing |
| Powdered Sugar 🍚 | 3 cups | Sifted for smooth texture |
| Vanilla Extract 🌿 | 2 tsp | Pure Madagascar preferred |
| Lemon Juice 🍋 | 1 tbsp | Freshly squeezed for tang |
| Raspberry Jam 🍓 | ½ cup | For filling between layers |
| Fresh Raspberries 🍓 | 1 ½ cups | For garnish and flavor |
The vanilla bean paste is non-negotiable here—it’s what transforms this from good to extraordinary. Walmart’s Great Value brand is surprisingly solid, but if you’re feeling fancy, Madagascar bourbon vanilla beans from Williams Sonoma elevate it further. The butter? Plugrá or Land O’Lakes unsalted are my go-tos, but keep it cold—the last thing you want is melted butter in your batter. For the flour, King Arthur or Gold Medal brands give the most consistent results. The cream cheese should be full-fat (none of that low-fat nonsense)—Philadelphia or Kraft work perfectly. Pro tip: let everything sit at room temperature for at least 1 hour before mixing—this ensures your batter and frosting come together like a dream.
No vanilla bean paste? Double the vanilla extract and add a pinch of cinnamon for depth. Short on raspberry jam? Apricot or strawberry preserves work just as well—just thin them slightly with lemon juice. The buttercream can be made ahead (it actually improves overnight), so don’t stress if you’re prepping the day before. Need a color boost for the swirls? Add a drop of gel food coloring to the frosting—just a tiny bit goes a long way. The raspberries for garnish can be fresh or frozen (thawed), but if you’re using frozen, toss them in a bit of powdered sugar to keep them looking pretty. And if you’re worried about the cake being too sweet? Reduce the sugar by 0.25 cups—trust me, the vanilla and cream cheese balance it perfectly.
This cake keeps beautifully—assembled tiers stay fresh for 3 days at room temperature, covered loosely with plastic wrap. For longer storage, freeze the fully assembled cake (unfrosted) for up to 2 months—just thaw it overnight in the fridge before decorating. The buttercream can be refrigerated for up to 5 days or frozen for 3 months (thaw at room temp before using). If you’re making this ahead, bake the layers 2 days in advance and store them in an airtight container with parchment between them. The frosting can be piped directly onto the cooled layers, or you can spread it with a spatula for a smoother finish before piping the swirls. Garnish with fresh berries right before serving—they add a pop of color and keep the cake feeling fresh.
Why You’ll Love This Recipe
- No Mixer Needed: I swear by this recipe because it’s all about the creaming method—just a bowl and a wooden spoon. The butter and sugar get so light and fluffy without any fuss, and honestly? That’s half the battle won right there.
- Vanilla-Packed Magic: That little jar of vanilla bean paste makes all the difference—it’s richer than extract, with actual flecks of vanilla. The cake tastes like you slaved over it, even though you didn’t.
- Double-Duty Cake: Bake it once, celebrate twice. This recipe makes two layers easily, so you’ve got a backup slice (or two) for later—or even a second dessert for the next gathering. No waste, just wins.
- Budget-Friendly Luxury: Five ingredients, one showstopper. You’re getting that buttery, golden crumb without breaking the bank, and the vanilla paste stretches the flavor further than any cheap extract ever could.
Step-by-step instructions for a vanilla bean swirl tower cake
Here’s how to create a showstopping birthday cake with perfect layers and swirls.
Prepare the Cake Batter
Preheat your oven to 350°F and grease three 8-inch round cake pans, lining the bottoms with parchment paper. In a stand mixer fitted with the paddle attachment, beat the 2 cups unsalted butter and 2.5 cups granulated sugar on medium speed for 3-4 minutes until light and fluffy. This creaming process incorporates air, ensuring a tender crumb.
Add the 6 whole large eggs, one at a time, mixing well after each addition. Stir in the 2 tbsp vanilla bean paste, scraping down the sides of the bowl as needed. In a separate bowl, whisk together the 4 cups all-purpose flour, 2 tsp baking powder, and 0.5 tsp salt. With the mixer on low speed, gradually add the dry ingredients to the wet, alternating with the 1 cup whole milk. Mix just until combined—overmixing develops gluten and makes the cake dense.
Bake the Layers Evenly
Divide the batter evenly among the prepared pans. Bake for 25-30 minutes, or until a toothpick inserted into the center comes out clean. Rotate the pans halfway through baking for even browning. Let the cakes cool in the pans for 10 minutes before transferring to a wire rack to cool completely. This gradual cooling prevents cracking.
While the cakes cool, prepare the filling by combining 8 oz cream cheese, 1 cup buttercream frosting, and 2 tsp vanilla extract in a bowl. Beat until smooth and creamy. Spread this mixture evenly over the first cake layer, then repeat with the remaining layers. This ensures every slice has that signature swirl and flavor.
Assemble the Cake Tower
Place the first cake layer on a cake stand or plate. Spread 1 cup raspberry jam evenly over the top, leaving a ½-inch border to prevent sogginess. Add the second layer and repeat the jam step. Top with the final layer, ensuring each layer is level for a stable tower.
To create the signature swirl, use an offset spatula to apply a thin layer of buttercream frosting over the entire cake. Insert a piping bag fitted with a large star tip into the center of the cake and pipe a spiral of frosting, starting from the bottom and working your way up. This technique creates that stunning swirl effect.
Decorate with Elegance
Cover the entire cake with the remaining buttercream frosting, using the offset spatula to create smooth, even sides. For a polished finish, use a bench scraper to level the frosting. Decorate the top with fresh 1.5 cups raspberries, arranging them in a circular pattern or scattered for a natural look.
For added flair, pipe small rosettes or swirls around the base of the cake using the leftover frosting. Let the cake sit at room temperature for 30 minutes before slicing to allow the frosting to set. This cake is perfect for celebrating a milestone—every bite is as beautiful as it is delicious.
Pro Tips For Making 50th Birthday Cake
- MEASURE FLOUR BY SPOONING: Dump that flour into your measuring cup straight from the bag? Stop. Spoon it in first—lightly tap the cup to settle it, then level with a knife. I learned this the hard way when my cake turned out dense and dry; the extra flour packed in was hiding in plain sight.
- SOFTEN BUTTER AT ROOM TEMP: Unsalted butter straight from the fridge? Nope. Let it sit out for about an hour until it’s soft enough to press a fingerprint into it—no melting, no guesswork. I used to eyeball it, and half the time my cake batter turned out greasy or grainy.
- WHISK EGGS UNTIL FROTHY: Crack those eggs in, give them a quick stir, and call it good? Wrong move. Whisk them until they’re light and frothy—about 30 seconds with a hand mixer. This adds air to your cake, making it tender and less likely to sink in the middle.
- SCRAPE THE VANILLA BEAN: Vanilla bean paste is fancy, but don’t just pour it in. Scrape out the seeds and add them to the butter and sugar first—let them bloom for 5 minutes. The rest of the paste goes into the wet ingredients. This makes a real difference in flavor depth.
Serving suggestions for this 50th birthday cake
Presentation Plate
Use a gold-rimmed cake stand or a marble slab to elevate the cake and make it the centerpiece of your dessert table. For a rustic touch, place it on a wooden cake board with a linen napkin underneath to catch any crumbs.
If you’re serving outdoors, opt for a clear acrylic stand to keep the cake protected from the elements while still looking elegant. 💛
Garnish Ideas
Fresh raspberries or blackberries add a pop of color, but you can also use edible flowers like violets or pansies for a sophisticated touch. For a metallic shimmer, sprinkle gold leaf flakes or pearl sugar over the frosting.
If you prefer chocolate, drizzle melted dark chocolate in a zigzag pattern around the base. Always add garnishes just before serving to keep them looking fresh.
Serving Style
For a classic touch, serve slices on gold-rimmed cake plates with a small silver cake server. If you’re going for a casual vibe, use white paper plates with a gold ribbon tied around the edge.
For a themed party, match the serving style to the decor—pastel colors for a spring celebration or deep jewel tones for an evening event. Always label the cake with a chalkboard sign or calligraphy card to add a personal touch.
Pairing Suggestions
Serve the cake with a side of warm vanilla bean ice cream or a raspberry coulis for an extra layer of flavor. For a non-dairy option, offer chilled coconut milk or sparkling berry-infused water.
If you’re serving coffee or tea, include flavored syrups like vanilla or caramel to complement the cake’s sweetness. A small chocolate truffle platter can also add variety to your dessert spread. 🍷
Guest Experience
Encourage guests to take photos by setting up a dedicated photo spot near the cake with a backdrop (like a balloon arch or elegant tablecloth). Provide mini cake stands for guests to take home slices as party favors.
For a fun twist, offer flavor variations like a chocolate-dipped slice or a caramel-drizzled bite to cater to different preferences. Always have extra napkins and dusting powder on hand for quick fixes. 💫
Nutrition facts
Frequently asked questions
Can I make this cake in a single layer instead of three tiers?
For a half-birthday celebration with fewer guests, bake just one 10-inch round pan and double the batter recipe. Use the same frosting and decorating techniques, but scale down the raspberry garnish to 1 cup. The swirl design will still look stunning on a single layer—just adjust the piping bag size to fit the smaller surface.
How do I store leftovers without drying out the cake?
Slice the cake and store individual portions in an airtight container with parchment paper between layers. Keep it at room temperature for 2 days or refrigerate for up to 5 days. For longer storage, freeze slices (without frosting) for 2 months. To refresh, rewarm slices at 300°F for 5-10 minutes and reapply frosting if needed.
What’s the best way to transport this cake to a party?
Assemble the cake on a removable cake board and cover it tightly with plastic wrap, then secure with a rubber band. Place it in a large cardboard cake box (available at party stores) with padding on all sides. Keep it in a cool, dry place until serving. For long trips, transport the unfrosted layers separately in individual boxes and frost at your destination.
Can I substitute the raspberry jam filling?
Yes! Try strawberry preserves, apricot jam, or even chocolate ganache for a richer flavor. For a lighter option, use lemon curd or coconut cream. Just ensure your filling is at room temperature before spreading to prevent soggy layers. The key is to keep a ½-inch border to maintain structure.
Why did my cake crack on top while baking?
This usually happens from rapid cooling or overmixing the batter. Let cakes cool in pans for 10 minutes before removing, and avoid opening the oven door too early. Also, ensure your butter and eggs are at room temperature—cold ingredients cause uneven baking. If cracks appear after baking, cover with extra frosting to disguise them.

- Crock Pot Peanut Clusters Recipe: Warm, Gooey Bites in 2 Hours - November 1, 2026
- Pea Soup Instant Pot Recipe: Velvety Green Smoothness in 20 Minutes - November 1, 2026
- Pork Loin Pulled Pork Crock Pot Recipe: Slow-Smoked Tenderness With Zero Dryness - November 1, 2026