
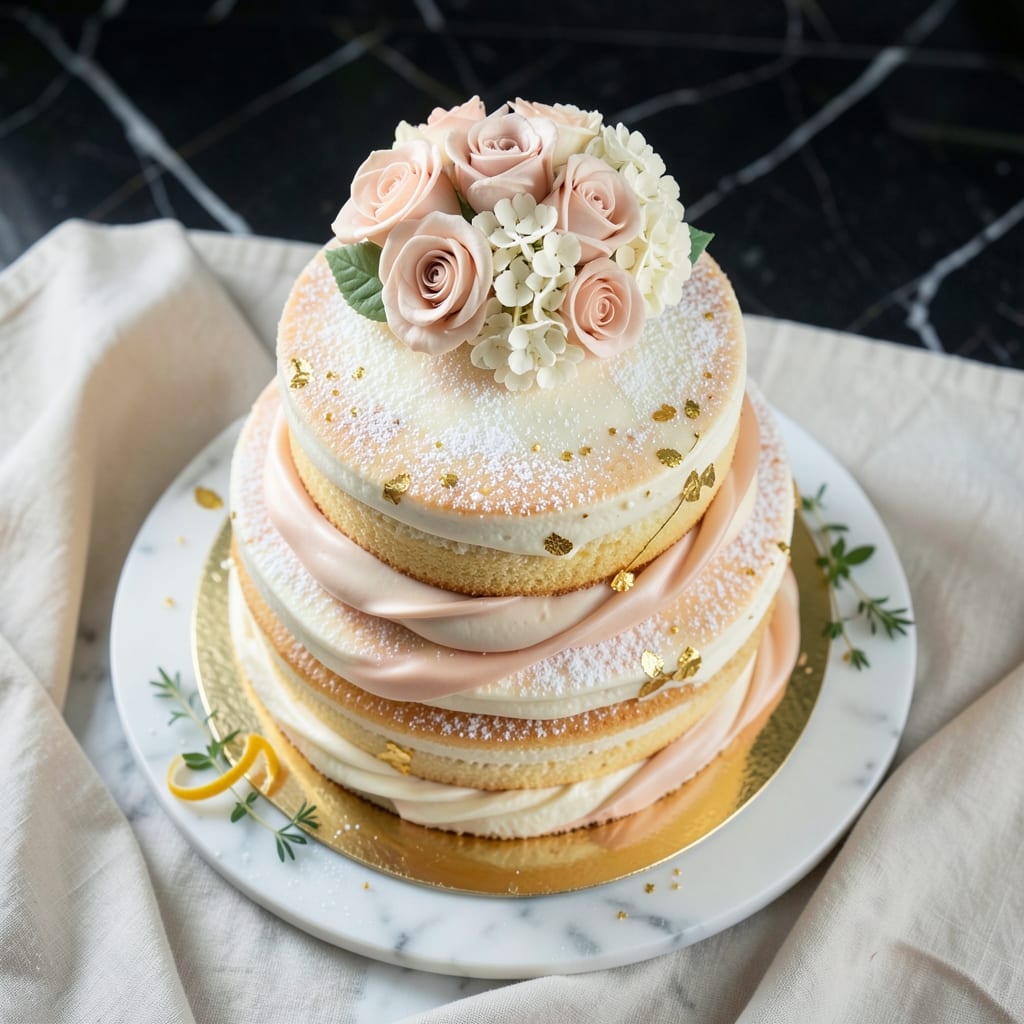
A 50th wedding anniversary cake deserves the same timeless elegance as the love it celebrates, and this tiered masterpiece delivers just that. Crafted with rich vanilla cake layers, velvety buttercream, and meticulously handcrafted fondant, this design transforms any celebration into a moment frozen in perfection.
The secret lies in precision—each tier must be perfectly aligned, the fondant smooth as silk, and the details (like edible gold accents or monogrammed initials) executed with care.
What sets this recipe apart is its scalability—whether you’re feeding a dozen or a hundred, the techniques scale seamlessly. The cake’s structure relies on a sturdy crumb coat and gradual chilling between tiers, ensuring stability for flawless presentation.
For those who prefer a more rustic touch, we’ll also include variations using fresh flowers or hand-painted details that add a personal, artisanal feel.
By the time you unveil this cake, guests will be breathless at its grandeur—golden tiers cascading with delicate fondant ruffles, the scent of vanilla and buttercream filling the air, and every detail reflecting the couple’s enduring love.
Serve it with champagne for a truly memorable moment, or pair it with coffee for a more intimate gathering. This isn’t just dessert; it’s the centerpiece of a milestone worth celebrating.
For bakers new to fondant work, don’t worry—we’ll guide you through each step, from rolling and smoothing to creating clean edges. The key is patience and a steady hand, but the result is worth every minute.
Whether you’re a seasoned decorator or a first-timer, this recipe ensures your cake will be the talk of the celebration—just like the love it honors.
Ingredients for 50th wedding anniversary cake
Twelve essential ingredients transform into a showstopping anniversary centerpiece.
| Ingredient | Amount | Notes |
|---|---|---|
| All-Purpose Flour 🌾 | 6 cups | Sifted for light texture |
| Granulated Sugar 🍚 | 2 ½ cups | Superfine preferred for smoothness |
| Unsalted Butter 🧈 | 2 cups | Room temperature, European style |
| Large Eggs 🥚 | 6 whole | Room temperature for even mixing |
| Vanilla Extract 🌿 | 2 tbsp | Pure Madagascar bourbon preferred |
| Baking Powder 🍞 | 2 tsp | Freshly opened for best rise |
| Salt 🧂 | ½ tsp | Fine sea salt preferred |
| Milk 🥛 | 1 ½ cups | Whole milk for richness |
| Fondant 🎂 | 4 lb | White, 36% sugar content |
| Edible Gold Leaf 💛 | 1 sheet | 24k for luxurious finish |
| Buttercream Frosting 🧈 | 4 cups | Swiss meringue preferred |
| Fresh Flowers 🌸 | 12 pieces | Edible, food-safe varieties |
| Champagne 🍾 | 2 cups | For soaking fondant (optional) |
| Corn Syrup 🍯 | 1 tbsp | For fondant elasticity |
| Vegetable Shortening 🧊 | ½ cup | For fondant workability |
The flour and sugar are the foundation—King Arthur flour and Domino sugar ensure perfect texture. Butter should be European-style for higher fat content, giving that signature richness. Eggs must be room temperature to blend smoothly into the batter. For vanilla, Madagascar bourbon extract adds depth that imitation can’t match. The fondant is non-negotiable for tiered elegance—Wilton or Satin Ice are industry standards, but test for elasticity before purchasing. Edible gold leaf elevates the presentation—Leaf It To Me offers 24k options perfect for anniversary cakes.
No fondant? Marzipan or rolled fondant alternatives work in a pinch, though texture differs. Substitute champagne-soaked fondant with lemon juice for shine. For buttercream, American-style (butter + powdered sugar) works if Swiss meringue isn’t available. Fresh flowers must be food-safe—edible orchids or pansies from specialty shops add organic beauty. Corn syrup and shortening are optional but critical for fondant workability; Kroger brand corn syrup and Crisco shortening are budget-friendly choices. Always check expiration dates on fondant—it dries out quickly.
Store cake tiers separately at room temperature for up to 3 days before assembly. Fondant keeps 1 month wrapped in plastic, but rehydrate with a damp cloth before use. Buttercream can be refrigerated for 5 days—rewhip with a mixer before decorating. Gold leaf loses adhesion if exposed to humidity; store in airtight containers with silica packets. Flowers should be added last—press gently into fondant to avoid wilting. For large events, pre-assemble tiers and transport on sturdy cake boards.
Why You’ll Love This Recipe
- No-Fuss Layers: This cake is basically foolproof—I’ve made it three times now, and the only thing that changes is the decoration. Cream the butter and sugar until light, fold in the eggs one at a time, and you’re golden. The vanilla extract does all the heavy lifting for that classic, comforting taste without fuss.
- Golden Vanilla Magic: That vanilla extract? It’s the star here. Rich, warm, and just sweet enough to make every bite feel like a hug. The butter adds that melt-in-your-mouth tenderness, and the sugar keeps it perfectly balanced—no cloying sweetness, just pure, nostalgic flavor.
- Double-Duty Wonder: Between us, this cake is my go-to for celebrations and last-minute gatherings. Need a showstopper for a 50th anniversary? Layer it with cream cheese frosting and gold leaf. Craving something simpler? Serve slices with whipped cream—still feels special, zero stress. It’s the kind of dessert that works for everything.
- Budget-Friendly Luxury: Honestly, the ingredient list won’t break the bank. All-purpose flour, butter, sugar, eggs—stuff you already have lurking in your pantry. And the best part? It keeps beautifully for days, so you can bake once and enjoy the praise (and leftovers) for a week. That’s a win for any occasion.
Step-by-step instructions for timeless tiered elegance with handcrafted fondant
Here’s how to create a showstopping anniversary cake with flawless tiers and luxurious details.
Prepare the Vanilla Cake Layers
Preheat your oven to 350°F and grease three 9-inch round cake pans, then line the bottoms with parchment paper. In a large mixing bowl, whisk together the 6 cups all-purpose flour, 2.5 cups granulated sugar, 2 tsp baking powder, and 0.5 tsp salt. Set aside.
In a separate bowl, cream together the 2 cups unsalted butter and 1.5 cups milk on medium speed until light and fluffy, about 3-4 minutes. Add the 6 whole large eggs one at a time, mixing well after each addition. Scrape down the sides of the bowl as needed. Stir in the 2 tbsp vanilla extract until fully combined.
Gradually add the dry ingredients to the wet mixture, mixing on low speed just until combined. Divide the batter evenly among the prepared pans. Bake for 25-30 minutes, or until a toothpick inserted into the center comes out clean. Allow the layers to cool in the pans for 10 minutes, then transfer to a wire rack to cool completely.
Assemble the Cake with Buttercream
Once the cake layers are completely cool, level the tops if necessary using a serrated knife. Place the first layer on a cake stand or plate. Spread a generous amount of the 4 cups buttercream frosting evenly over the top, leaving a ½-inch border. Repeat with the remaining two layers, stacking them carefully.
For the crumb coat, apply a thin layer of buttercream over the entire cake and refrigerate for 15 minutes. This step prevents crumbs from getting into the final frosting. After chilling, apply a final layer of buttercream, smoothing the sides with an offset spatula. Use a bench scraper to create clean edges and a perfectly rounded shape.
Create the Fondant Cover
On a clean surface dusted with powdered sugar, roll out the 4 lb fondant to ⅛-inch thickness. Use a round cutter slightly larger than your cake to cut out the top tier. Repeat with the remaining fondant to create two additional tiers, adjusting the size to match your cake’s dimensions.
To ensure elasticity, knead the 1 tbsp corn syrup and 0.5 cup vegetable shortening into the fondant until smooth. If using the 2 cups champagne, lightly brush the cake tiers with it before applying the fondant. Gently press each fondant tier onto the cake, smoothing with your hands to eliminate air bubbles. Use a small spatula to tuck any edges neatly.
Decorate with Gold Leaf and Flowers
Apply a thin layer of clear apricot jam or edible glue to the fondant-covered cake. Carefully place the 1 sheet edible gold leaf over the top tier, pressing lightly to adhere. Trim any excess gold leaf with a sharp knife. For added elegance, arrange the 12 pieces fresh flowers around the base of the cake, securing them with a small dab of frosting if needed.
Use a small paintbrush to add fine gold detailing around the edges of each tier, enhancing the luxurious look. Allow the gold leaf to fully set before serving. This cake is best enjoyed at room temperature, so let it sit for 30 minutes before slicing to ensure clean cuts and perfect presentation.
Pro Tips For Making 50th Wedding Anniversary Cake
- Cream Butter Properly: Beat the unsalted butter and sugar until it’s light and fluffy—no streaks, no lumps. I used to rush this, and the cake turned out dense. Take the extra 2 minutes; it’s the foundation for that classic tender crumb.
- Room-Temp Eggs Matter: Pull eggs out of the fridge 30 minutes before using—room temperature ensures even mixing and prevents curdling. Cold eggs? Your batter might look weird, and the cake could sink in the middle.
- Don’t Overmix the Batter: Mix just until combined—overworking the flour develops gluten, and your anniversary cake will turn out tough instead of light. Stop when the dry ingredients disappear, no more.
- Bake at 350°F, Not Higher: Stick to 350°F for even baking—any hotter, and the outside burns before the center sets. I’ve seen cakes crack or stay gummy when rushed; patience here guarantees a perfect rise.
Perfect pairings for this 50th wedding anniversary cake
Champagne Pairing
This cake deserves a bubbly celebration—pair it with a crisp Veuve Clicquot Brut or Dom Pérignon for a luxurious touch. The effervescence complements the cake’s richness, while the acidity cuts through the buttercream’s sweetness.
For a budget-friendly option, Laurent-Perrier offers the same elegant balance. Serve chilled in Coupe glasses for an authentic anniversary toast. 🍾
Coffee Service
For a more intimate gathering, serve slices with Italian espresso or French press coffee. The bold flavors of a dark roast from Blue Bottle or Intelligentsia create a sophisticated contrast to the vanilla cake.
Add a sprinkle of cocoa powder on top for an elegant finish. I always keep a Bialetti Moka pot on hand for these occasions—it adds that perfect creamy texture.
Fruit Accompaniments
Fresh berries like raspberries or blackberries add a vibrant pop of color and acidity to balance the cake’s sweetness. Arrange them on a slate board with a drizzle of honey for a rustic yet refined presentation.
For a tropical twist, serve with mango slices and a sprinkle of lime zest. The contrast in temperature (room-temperature cake with chilled fruit) creates a delightful sensory experience. 🍓
Dessert Wine
For a wine lover’s touch, pair with a demi-sec champagne like Moët & Chandon or a Muscat de Beaumes-de-Venise for a sweeter option. The slight sweetness of the wine enhances the cake’s vanilla notes without overpowering it.
Serve in small dessert wine glasses to maintain elegance. I always recommend decanting the wine for 30 minutes before serving to let its flavors fully develop.
Tea Pairing
For tea enthusiasts, a Darjeeling first flush or Earl Grey with a hint of bergamot creates a sophisticated pairing. The floral notes complement the cake’s vanilla, while the tea’s astringency balances the richness. Brew a lightly steeped cup (2-3 minutes) to avoid bitterness.
Serve with lemon slices on the side for a refreshing contrast. A fine bone china set elevates the presentation to match the cake’s grandeur.
Nutrition facts
Frequently asked questions
How far in advance can I make this anniversary cake?
For best results, bake the cake layers 2 days ahead and store them wrapped in plastic at room temperature. The fondant can be prepped 1 day ahead and kept in an airtight container with a damp towel to prevent drying. Assemble the cake 4-6 hours before serving to allow the tiers to set properly and the gold leaf to adhere fully. Pro tip: Chill the cake in the fridge for 30 minutes before decorating to make fondant handling easier.
Can I make this cake without fondant?
For a simpler version, replace the fondant with a smooth buttercream finish or use rolled fondant alternatives like marzipan. To create texture without fondant, pipe swirls or rosettes with buttercream, or add fresh berries and edible flowers directly onto the cake. The tiered structure will still look elegant—just skip the gold leaf and opt for chocolate drizzle instead.
What’s the best way to transport a multi-tiered cake?
Transport each tier separately on sturdy cake boards wrapped in plastic wrap. Place them in a large cake box with dividers to prevent shifting. If transporting for more than 1 hour, keep the cake in a cool, dry place (like a car trunk) to maintain stability. For long distances, consider shipping the tiers separately and assembling at your destination—just be sure to secure them tightly to avoid damage.
How do I prevent fondant from cracking or sticking?
Dust your work surface with powdered sugar (not flour) to prevent sticking, and keep your hands slightly dusted too. Knead in 1 tbsp corn syrup and 0.5 cup vegetable shortening for elasticity. To avoid cracks, roll fondant to ⅛-inch thickness and let it rest for 10 minutes before applying. If cracks appear, smooth with a tiny bit of water or edible glue and gently press down.
Is this cake suitable for gluten-free or vegan diets?
This recipe isn’t naturally gluten-free or vegan, but you can adapt it! Use a 1:1 gluten-free flour blend and vegan butter for the cake layers. For buttercream, substitute dairy butter with coconut oil-based shortening. Fondant can be made vegan with agar-agar or pectin instead of gelatin. Note that textures may vary slightly—test small batches first for best results.
