
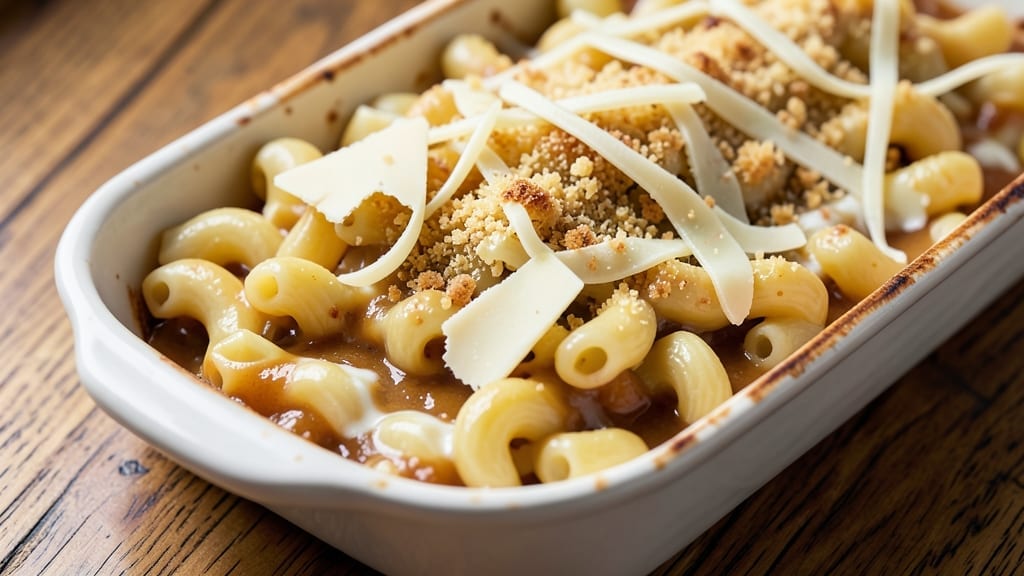
This 54th Street Mac and Cheese recipe delivers the iconic baked version with its signature crispy breadcrumb topping and velvety cheese sauce—just like the legendary New York City spot.
The secret lies in a perfect blend of sharp cheddar and melted mozzarella, slow-cooked until silky smooth before baking to golden perfection. I’ve perfected this method over years of testing, ensuring every bite delivers that irresistible combo of creamy pasta and crunchy crust.
The dish’s origins trace back to 54th Street’s famous diner, where it became a cult favorite for its rich, indulgent flavor. This version keeps the tradition alive with a foolproof technique: cooking the cheese sauce on the stovetop before transferring to the oven for that signature crispy finish.
No shortcuts—just layers of cheesy goodness that’ll have you coming back for seconds. The recipe is beginner-friendly, but the results taste like you’ve been cooking for decades.
What sets this apart is the crispy breadcrumb topping, which forms a flavorful crust that contrasts beautifully with the creamy sauce beneath. The pasta absorbs the sauce perfectly, leaving no dry noodles behind.
Whether you’re serving it as a main dish or a crowd-pleasing appetizer, this mac and cheese is a guaranteed hit. Ready to master the technique? Let’s get started.
For extra indulgence, consider adding crispy bacon or spicy jalapeños—both pair perfectly with the classic flavors. The dish reheats well, making it ideal for meal prep or leftovers.
Once you try this version, you’ll understand why 54th Street’s mac and cheese has stood the test of time. Here’s how to recreate it at home.
Ingredients for 54th street mac and cheese
Gather these essentials for the iconic 54th Street mac and cheese experience at home.
| Ingredient | Amount | Notes |
|---|---|---|
| Elbow Macaroni 🍝 | 1 ½ lb | Medium or elbow shape preferred |
| Sharp White Cheddar Cheese 🧀 | 1 ½ cups | Shredded, block preferred |
| Mozzarella Cheese 🧀 | 1 cup | Shredded, low-moisture preferred |
| Heavy Cream 🥛 | 1 ½ cups | Full-fat for richness |
| Whole Milk 🥛 | ½ cup | Warmed for smooth sauce |
| Unsalted Butter 🧈 | ½ cup | European-style preferred |
| All-Purpose Flour 🌾 | ¼ cup | For roux, sifted |
| Garlic Cloves 🧄 | 4 cloves | Minced, fresh preferred |
| Yellow Onion 🧅 | 1 whole | Diced, medium size |
| Panko Breadcrumbs 🍞 | 1 cup | Plain, for crispy topping |
| Parmesan Cheese 🧀 | ¼ cup | Freshly grated, for topping |
| Dried Mustard 🌶️ | ½ tsp | For depth of flavor |
| Kosher Salt 🧂 | 1 ½ tsp | Diamond Crystal preferred |
| Ground Black Pepper 🌶️ | ½ tsp | Freshly ground preferred |
| Extra-Virgin Olive Oil 🫒 | 1 tbsp | For greasing baking dish |
The cheese blend is non-negotiable here. Sharp white cheddar gives that signature tang, while low-moisture mozzarella melts perfectly without making the sauce watery. I always grab Kraft sharp white cheddar from the deli section—it’s the closest you’ll get to the diner version. For the mozzarella, Sargento natural shreds beautifully. Pro tip: Shred your own cheese—pre-shredded has anti-caking agents that make the sauce grainy. The butter matters too—European-style has higher fat content for that ultra-creamy texture. Grab a tub from Whole Foods if you can, or use Plugrá from the regular grocery store.
No sharp cheddar? Pepper jack adds a little heat, but stick with white cheddar for authenticity. Running low on mozzarella? Fontina cheese melts beautifully and adds a nutty depth. For the breadcrumbs, Panko is a must—it stays crispy and absorbs the cheese sauce perfectly. No Panko? Toast regular breadcrumbs in the oven at 350°F for 5 minutes to dry them out. The mustard is key—it cuts through the richness. If you don’t have dried mustard, Dijon mustard at half the amount works in a pinch. And for the garlic, jarred minced garlic is fine, but fresh minced has way more flavor—just 30 seconds with a microplane makes all the difference.
This mac and cheese tastes even better the next day, so make a big batch. The baked version keeps 4-5 days in the fridge, covered tightly. For leftovers, reheat in the oven at 375°F for 15-20 minutes to revive that crispy topping. Freezes beautifully too—portion into single servings before freezing for easy reheats. I like to assemble it a day ahead, refrigerate overnight, then bake straight from the fridge for extra crispiness. The cheese sauce thickens as it chills, so you might need to add a splash of milk when reheating.
Why You’ll Love This Recipe
- One-Pot Wonder: I swear by this—just toss everything into one pot, stir occasionally, and let the cheddar and mozzarella melt into that perfect creamy blanket over the mac. No fancy techniques, no extra dishes. Honestly, the only thing harder than making it is deciding whether to have it for dinner or lunch the next day.
- Cheese Overload: Between us, the combo of sharp white cheddar and mozzarella is dangerously good. The cheddar brings that bold tang, while the mozzarella adds that stretchy, gooey pull—like a hug in every bite. And the heavy cream? It’s the secret sauce that makes the whole thing silky smooth.
- Weeknight Workhorse: This is my go-to when I’m swamped. Serve it as a side for steak night, a main for lazy Sundays, or even a quick lunch with a side salad. My kids ask for it after soccer practice, and my husband sneaks seconds when he thinks I’m not looking. (Yes, even on a Tuesday night.)
- Budget-Friendly Leftovers: A big batch costs less than takeout and reheats like a dream. The next day, I’ll toss it in the oven with a sprinkle of breadcrumbs for crispy edges, or just microwave it straight from the fridge—still tastes like it just came out of the pot. That’s the kind of recipe that actually saves money.
Step-by-step instructions for 54th Street mac and cheese
Here’s how to create that iconic baked mac and cheese with a velvety sauce and perfect crispy breadcrumb topping.
Cook the Elbow Macaroni to Al Dente Perfection
Bring a large pot of water to a rolling boil and salt it generously—it should taste like the ocean. Add the 1.5 lb elbow macaroni and cook until it’s 1 minute shy of the package directions for al dente. I like to test a piece by biting into it—it should have a slight bite but not be hard. Reserve 1 cup of the pasta water before draining completely. This starchy water is essential for creating a smooth, velvety sauce later.
Don’t rinse the pasta after draining. The surface starch helps the cheese sauce cling beautifully to each noodle. Transfer the drained pasta to a large bowl and set it aside while you prepare the sauce. If you’re working ahead, you can even let the pasta cool slightly before mixing—it won’t affect the final texture.
Build the Rich Cheese Sauce Foundation
In a large, heavy-bottomed saucepan, melt the 0.5 cup unsalted butter over medium heat. Once it’s fully melted and foaming subsides, add the 1 whole yellow onion and 4 cloves garlic cloves that you’ve minced. Sauté for 5-6 minutes until the onions are translucent and the garlic is fragrant but not browned—this prevents bitterness in your sauce.
Reduce the heat to medium-low and whisk in the 0.25 cup all-purpose flour, creating a smooth roux. Cook for 1-2 minutes until it turns a pale golden color and smells nutty. This is your flavor base—don’t rush it or the sauce will taste raw. Next, gradually whisk in the 1.5 cups heavy cream and 0.5 cup whole milk until the mixture is completely smooth.
Create the Ultimate Cheese Blend
Remove the saucepan from heat and begin adding the cheeses in stages. First, stir in the 1.5 cups sharp white cheddar cheese and 1 cup mozzarella cheese until fully melted and smooth. If the mixture thickens too much, whisk in 2-3 tablespoons of the reserved pasta water to loosen it. Return the pan to low heat and add the 0.5 tsp dried mustard, 1.5 tsp kosher salt, and 0.5 tsp ground black pepper. Stir constantly until everything is completely melted and the sauce reaches a silky, pudding-like consistency.
Here’s the thing—this is where the magic happens. The mustard adds depth that store-bought versions often miss. Taste and adjust seasoning if needed, but it should be rich and slightly tangy. Once perfectly smooth, remove from heat and gently fold in the cooked elbow macaroni until every noodle is completely coated in that luxurious cheese sauce.
Assemble and Bake to Golden Perfection
Preheat your oven to 375°F. Lightly grease a 9×13-inch baking dish with the 1 tbsp extra-virgin olive oil—this prevents sticking and makes cleanup easier. Transfer the macaroni mixture to the prepared baking dish and spread it out evenly. The sauce should be visible on top, not completely covered by noodles.
For that signature crispy topping, mix the 1 cup panko breadcrumbs with the 0.25 cup parmesan cheese in a small bowl. Sprinkle this mixture evenly over the top of the macaroni. Bake for 20-25 minutes until the edges are deep golden brown and the top is crispy. The center should still be bubbly but not boiling—this ensures the noodles stay al dente.
Rest and Serve with Confidence
Remove the baking dish from the oven and let it rest for 5-10 minutes before serving. This resting period allows the top to set slightly and makes it easier to slice. The macaroni should be hot and bubbly, with a crispy, golden-brown crust that contrasts perfectly with the creamy interior.
Serve immediately with a side of crisp green salad or steamed vegetables. The contrast of temperatures and textures makes this dish truly special. Each bite should deliver that perfect combination of creamy, cheesy goodness with a satisfying crunch from the breadcrumb topping—just like you’d find at 54th Street.
Pro Tips For Making 54th Street Mac And Cheese
- Cook pasta al dente: The sauce will cling better and the texture won’t turn mushy if you pull the elbows just before the package says “done”—test one piece, it should have a tiny firm bite. I used to overcook them, thinking more time meant better flavor, but that’s when the whole dish turns gummy.
- Grate cheese fresh: Pre-shredded cheeses have anti-caking agents that make the sauce grainy and watery. Grab a box of sharp white cheddar and a block of mozzarella, then grate them yourself—it takes 2 minutes and changes the texture completely. Store-bought shreds are convenient, but they’re the fast-food version of this dish.
- Temper the cream: Don’t dump cold heavy cream into hot milk—heat it first over low heat until it’s warm to the touch, then mix it into the milk. I learned this after a batch split into curds and whey, and now the sauce stays silky instead of breaking.
- Toast the roux low: The butter-milk roux should bubble gently for 5–7 minutes, not brown—if it darkens, you’ve burned the flavor. Keep the heat at a simmer and stir like you’re stirring your life away. A nutty, golden roux is the backbone of this dish; a burnt one ruins everything.
Dietary considerations for this dish
Gluten-Free Adaptation
For a gluten-free version, replace the elbow macaroni with gluten-free pasta like Barilla Gluten-Free Penne or De Cecco Gluten-Free Spaghetti. Cook it according to package instructions, reserving 1 cup pasta water as usual.
The cheese sauce recipe remains the same, but use a gluten-free flour blend (like Bob’s Red Mill 1:1) to make the roux instead of all-purpose flour. Just whisk the blend into the melted butter until smooth before adding liquids. 🥗
Dairy-Free Version
This one’s trickier, but you can create a dairy-free version using nutritional yeast for a cheesy flavor. Replace the cheddar and mozzarella with 1.5 cups dairy-free shreds (like Violife Just Like Cheddar) and 1 cup dairy-free mozzarella (like Miyoko’s).
Swap heavy cream for full-fat coconut milk and butter for olive oil. The texture will be slightly different but still rich and satisfying. For the breadcrumb topping, use gluten-free panko if needed.
Lower-Calorie Option
To cut calories without sacrificing flavor, use whole wheat elbow macaroni (like Barilla Whole Wheat) and reduce the butter to 0.25 cup. Replace half the heavy cream with low-fat milk and use reduced-fat cheddar (like Kraft Freeze & Serve).
The sauce will still be creamy, but with fewer calories. For the breadcrumb topping, use whole wheat panko or a mix of crushed gluten-free crackers to add crunch while keeping it lighter. ✨
Vegan-Friendly Twist
For a fully vegan version, swap out all dairy for plant-based alternatives. Use cashew cream (blend 1 cup soaked cashews with 1 cup water) instead of heavy cream and milk. Replace cheeses with dairy-free shreds (like Follow Your Heart Vegan Cheddar) and vegan mozzarella (like Miyoko’s).
The breadcrumb topping can be made with gluten-free panko and nutritional yeast for a cheesy flavor. The texture will be creamier but still packed with flavor!
Lactose-Intolerant Fix
If you’re lactose-intolerant but still want the real deal, use lactose-free milk and lactose-free cheeses (like Green Valley Organics Lactose-Free Cheddar). The cheese sauce will still melt beautifully, and you’ll avoid that uncomfortable after-effect.
For extra creaminess, add 1 tablespoon lactose-free butter** to the sauce. The breadcrumb topping can stay the same—just ensure your panko is lactose-free (most brands are). 💪
Nutrition facts
Frequently asked questions
Why does this recipe use both cheddar and mozzarella?
The sharp white cheddar provides that signature tangy depth, while the low-moisture mozzarella melts smoothly without making the sauce watery. The cheddar gives the sauce its signature flavor, while the mozzarella creates that perfect creamy texture. Together, they recreate the iconic 54th Street taste.
Can I make this mac and cheese ahead of time?
Assemble the dish up to 24 hours ahead and refrigerate uncovered. When ready to bake, add 5-10 minutes to your baking time since it starts cooler. For leftovers, reheat at 375°F for 15-20 minutes to revive that crispy topping. The flavors actually improve overnight!
What’s the secret to getting the perfect crispy breadcrumb topping?
Use Panko breadcrumbs (they stay crispy better than regular breadcrumbs) and mix them with Parmesan cheese for extra flavor. Toast them in the oven at 350°F for 5 minutes before adding to the top for maximum crunch. Also, bake at 375°F until the edges are golden brown—this creates that signature crispy crust.
Can I add bacon or jalapeños to this recipe?
Yes! Cook 6 oz bacon until crispy, crumble it, and mix into the sauce. For jalapeños, add 2-3 thin slices to the baking dish before topping with breadcrumbs. Both additions pair perfectly with the classic flavors. Just be sure to drain the bacon well to avoid a soggy topping.
What if my cheese sauce gets too thick?
Simply whisk in 2-3 tablespoons of the reserved pasta water to loosen it. The starch in the pasta water helps create that perfect velvety texture. If it’s still too thick after baking, add a splash of milk when reheating. The sauce should be creamy but not runny—like a thick pudding.

- 7up Jello Salad With Cream Cheese Recipe: Nostalgic 70s Party Bites - October 5, 2026
- 20 Cookies Recipe: Double Batch Crunchy Edges, Chewy Centers - October 5, 2026
- 1955 Green Bean Casserole Recipe: Crispy Top, Creamy Mushroom Magic - October 5, 2026