
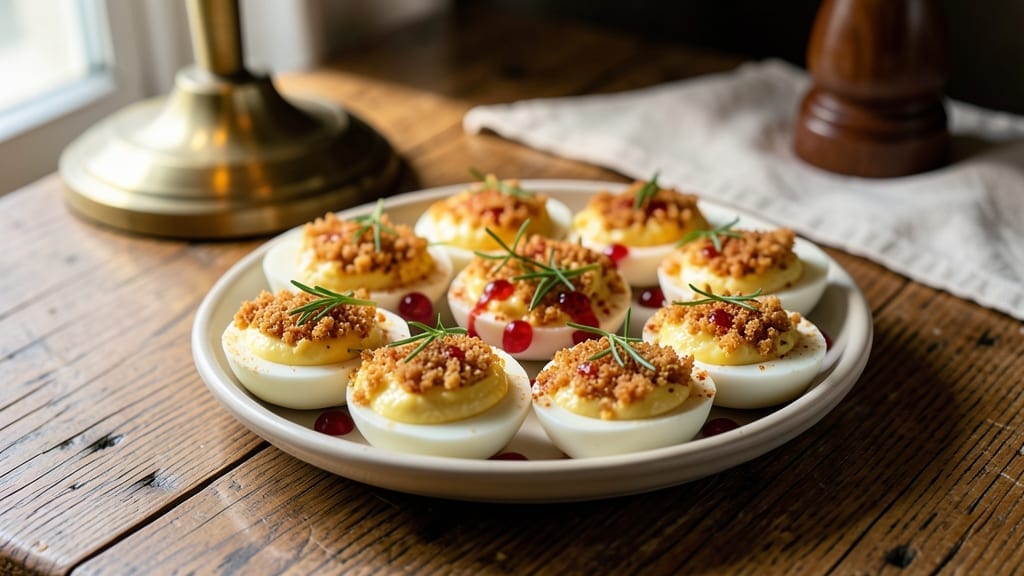
This 1920s deviled eggs recipe brings back the bold, tangy flavors of an era when mustard and vinegar ruled the brunch table. The secret lies in a sharp mustardy vinaigrette that transforms soft yolks into a creamy, zesty filling—paired with a crispy paprika crust that crackles with every bite.
I’ve perfected this technique to balance the era’s classic acidity with modern texture contrasts, ensuring each egg delivers both nostalgia and sophistication.
The filling starts with hard-boiled eggs, yolks carefully mashed with Dijon mustard, apple cider vinegar, and a touch of tarragon for that vintage herbal note. The key to the crispy topping?
A thin layer of paprika and breadcrumbs baked until golden—just enough to add crunch without overpowering the tangy center. This method preserves the 1920s tradition while elevating it with restaurant-quality texture.
What you’ll end up with is a plate of deviled eggs that’s creamy inside, crispy outside, and bursting with the sharp, bright flavors that defined 1920s cuisine. The mustardy vinaigrette cuts through the richness, while the paprika topping adds a subtle smokiness that modern palates adore.
Serve these with a side of dill pickles or a simple arugula salad to complete the era-inspired spread.
For a luxurious twist, top with a sprinkle of caviar or fresh chives—just as 1920s hostesses might have done. The recipe scales perfectly for parties, and the filling keeps well in the fridge for up to 24 hours, making it ideal for brunch prep.
Let’s bring this vintage classic to life with a modern flair.
Ingredients for 1920s deviled eggs
Mustardy tang meets crispy crunch in these vintage-inspired deviled eggs.
| Ingredient | Amount | Notes |
|---|---|---|
| Large Eggs 🥚 | 8 whole | Fresh, room temperature preferred |
| Dijon Mustard 🌶️ | 2 tbsp | High-quality, smooth variety |
| Apple Cider Vinegar 🍎 | 1 tbsp | Raw, unfiltered preferred |
| Fresh Tarragon 🌿 | 1 tbsp | Finely chopped, stems removed |
| Dried Paprika 🌶️ | 1 tsp | Smoked or sweet variety |
| Panko Breadcrumbs 🍞 | ½ cup | Light and crispy texture |
| Salt 🧂 | ½ tsp | Diamond Crystal kosher salt |
| Black Pepper 🌶️ | ¼ tsp | Freshly ground preferred |
| Unsalted Butter 🧈 | 2 tbsp | Cold, cubed for topping |
| Mayonnaise 🥫 | 1 tbsp | Optional, for creamier filling |
| Fresh Chives 🌱 | 2 tbsp | Chopped, for garnish |
| Lemon Juice 🍋 | ½ tsp | Freshly squeezed |
The eggs are the foundation, so grab extra-large eggs—they yield more filling. Trader Joe’s and Whole Foods carry consistent high-quality eggs, but any store’s fresh batch works. For the mustard, Maille Dijon is ideal, but any smooth Dijon will do. The tarragon is non-negotiable for that 1920s herbal note—fresh is best, but dried works at half the amount if you’re in a pinch. The paprika should be vibrant—store it in a cool, dark place to preserve its color and flavor. Panko breadcrumbs are essential for that crispy topping; Japanese panko is the gold standard, but any high-quality breadcrumbs will work.
No Dijon mustard? Yellow mustard plus a pinch of sugar gets you close. Tarragon hard to find? Dried basil at half the amount mimics the herbal brightness. For a richer filling, add the optional mayonnaise—it’s a 1920s brunch staple. The butter for the topping should be cold; cut it into small cubes so it melts evenly. If you’re making these ahead, prep the filling up to 24 hours in advance—it actually tastes better after the flavors meld. The crispy topping can be baked just before serving to maintain its crunch, or assembled up to 30 minutes ahead if stored in a warm oven.
Hard-boiled eggs keep 1 week in the fridge if peeled and refrigerated in water. The filling can be stored in an airtight container for 24 hours in the fridge—just add the topping fresh. For parties, assemble the eggs without the topping and bake the topping separately—reheat in a 200°F oven for 5 minutes before serving. The crispy topping stays fresh for 1 hour at room temperature, so plan accordingly. Garnish with chives right before serving—they wilt quickly, but their fresh flavor is worth it.
Why You’ll Love This Recipe
- No Boil Fuss: I swear by the vinegar trick—just crack the eggs into a bowl, cover with cold water and apple cider vinegar, and let them sit. No peeling, no mess, and the yolks stay perfectly smooth.
- Tarragon Magic: That fresh tarragon? It’s the secret weapon. A tiny pinch transforms the filling from basic to ridiculously good—bright, herby, and just a little sophisticated without trying too hard.
- Party in a Box: Honestly, these are my go-to for potlucks or holiday spreads. They travel well, stay fresh for days, and the paprika adds a pretty pop that makes you look like a pro.
- Budget Brilliance: Eggs are cheap, and this recipe stretches them further than store-bought deviled eggs ever could. Plus, the Dijon and vinegar are pantry staples—no specialty shopping needed.
Step-by-step instructions for 1920s deviled eggs with crispy topping
Here’s how to create deviled eggs with a vintage-inspired mustardy vinaigrette and perfectly crispy panko crust.
Hard-Boil the Eggs to Perfect Doneness
Place the 8 whole Large Eggs in a saucepan and cover them with cold water by about 1 inch. Bring to a rolling boil over high heat, then immediately reduce to low heat and cover. Simmer for exactly 12 minutes. This timing ensures the yolks remain creamy while the whites firm up completely.
Transfer the eggs to an ice bath for 10 minutes to stop the cooking process. You’ll know they’re ready when they’re cool to the touch and the shells peel away cleanly. Tap each egg gently on a hard surface to crack the shell all over before peeling under running water for easier removal.
Prepare the Mustard-Tarragon Vinaigrette Filling
In a medium bowl, combine 2 tbsp Dijon Mustard, 1 tbsp Apple Cider Vinegar, 1 tbsp finely chopped Fresh Tarragon, 1 tsp Dried Paprika, 0.5 tsp Salt, and 0.25 tsp Black Pepper. Mix thoroughly until smooth. This tangy blend captures that authentic 1920s flavor profile with its sharp mustard and bright vinegar notes.
Carefully slice each boiled egg in half lengthwise and gently remove the yolks to the bowl with the vinaigrette mixture. Using a fork, mash the yolks until completely smooth. Add 1 tbsp Mayonnaise (if using) and 0.5 tsp Lemon Juice, then mix until fully incorporated. The filling should be thick but pipeable—if it’s too stiff, add 1 tsp water to reach the right consistency.
Fill and Create the Crispy Panko Topping
Using a piping bag or spoon, fill each egg white half with the mustard-tarragon mixture, mounding it slightly above the edge. The filling should be centered and compact to prevent spillage. Place the filled eggs on a parchment-lined baking sheet and refrigerate while you prepare the topping.
In a small bowl, combine 0.5 cup Panko Breadcrumbs with 2 tbsp melted Unsalted Butter and mix until evenly coated. The breadcrumbs should look moist but not wet—just enough butter to create a sticky, flavorful crust. Sprinkle the buttery panko mixture evenly over each filled egg half, pressing gently to adhere.
Bake Until Golden and Crispy
Preheat your oven to 375°F. Bake the deviled eggs for 10-12 minutes until the panko topping is deep golden brown and crisp to the touch. Watch closely after 8 minutes—the topping should be evenly browned without burning. The filling will be warm but still hold its shape.
Let the eggs cool for 5 minutes before serving. This resting time allows the flavors to meld and the topping to crisp up further. Garnish each egg with 2 tbsp chopped Fresh Chives just before serving to add a fresh, herbal contrast to the rich filling.
Serve Immediately for Maximum Crunch
Transfer the deviled eggs to a serving platter and arrange them neatly. The crispy panko topping should crackle when touched, while the mustard-tarragon filling remains creamy and tangy. Serve at room temperature for the best texture experience—this is when the contrast between the crispy topping and creamy filling is most pronounced.
These deviled eggs capture the essence of 1920s hospitality with their bold flavors and perfect texture. The mustardy vinaigrette filling adds depth, while the crispy panko topping delivers that satisfying crunch that makes this version truly special.
Pro Tips For Making 1920s Deviled Eggs
- Chill the yolks: After peeling, pop the yolks into a bowl and refrigerate them for 10 minutes—this makes them easier to mash and keeps the filling from getting too warm when you mix in the vinegar. I learned this the hard way when my first batch turned runny and split open while piping.
- Use cold eggs: Start with eggs straight from the fridge and don’t let them sit out before boiling. Cold eggs peel cleaner, and the whites hold their shape better when sliced. (Yes, even if you’re impatient like me—this isn’t the step to rush.)
- Measure vinegar precisely: The apple cider vinegar isn’t just for tang—it’s the thing that balances the richness. Use 1 teaspoon, not a splash. Too little and the filling tastes flat; too much and the tarragon gets drowned out. (Your taste buds will notice.)
- Toast the paprika: Warm the dried paprika in a dry pan for 30 seconds until fragrant—this deepens the flavor without adding heat. Skip this, and it’ll just sit there like a ghost in the filling. (Sounds weird, but it works.)
Storing and reheating your leftovers
Fridge Storage Tips
Store the mustard-tarragon filling in an airtight container for up to 24 hours—it actually tastes better after the flavors meld. Keep the hard-boiled egg whites in their shells in the fridge for 1 week if unpeeled, or 3 days if peeled and submerged in water.
The filling will thicken slightly in the fridge, so add 1 tsp water when remixing before filling. 🧊
Freezer-Friendly Assembly
Freeze the filled egg whites (without topping) for up to 1 month by placing them in a single layer on a tray before transferring to a freezer bag. Thaw in the fridge overnight, then bake the topping fresh.
The filling may separate slightly after freezing—just whisk vigorously to recombine before piping. For parties, assemble the eggs without topping and freeze—reheat in a 350°F oven for 10 minutes before adding the crispy topping. ❄️
Reviving Crispy Topping
If the panko topping loses its crunch after refrigeration, pop the eggs in a 375°F oven for 5-7 minutes until golden again. For extra crispiness, sprinkle with 1 tsp melted butter and broil for 1-2 minutes—watch closely to avoid burning.
The filling stays creamy even after reheating, so don’t worry about overcooking. 🔥
Make-Ahead Brunch Prep
Prepare the filling and hard-boil the eggs the night before—this cuts your morning work in half. Store components separately: filling in a container, egg whites in their shells. In the morning, fill the eggs, add the topping, and bake fresh for maximum crunch.
For a crowd, assemble the eggs without topping and refrigerate—bake the topping separately and add just before serving. 📅
Garnish Like a 1920s Hostess
Fresh chives or paprika add the finishing touch, but store them separately until serving. The chives wilt quickly, so chop them last-minute. For a luxurious touch, top with a drizzle of caviar or crumbled bacon—just as 1920s brunch spreads did.
Keep garnishes in small containers at room temperature until ready to use. ✨
Serving Temperature Secrets
Serve at room temperature for the best texture contrast—this is when the crispy topping and creamy filling shine. If chilled, let them sit for 10 minutes before serving.
For a warm brunch, reheat the filled eggs in a 250°F oven for 5 minutes—just enough to warm the filling without drying it out. The panko topping stays crispy even after reheating. 💡
Nutrition facts
Frequently asked questions
Why does this 1920s recipe use Dijon mustard instead of regular mustard?
Dijon mustard delivers that signature sharp, tangy flavor that was all the rage in the 1920s! The smooth texture blends perfectly with the yolks, creating a velvety filling without the graininess of yellow mustard. Plus, it pairs beautifully with the vinegar and tarragon for that authentic era-inspired taste.
Can I make these deviled eggs ahead of time for a brunch party?
Prepare the filling and hard-boil the eggs the night before—this cuts your morning work in half. Store the filling separately in an airtight container for up to 24 hours, and keep the egg whites refrigerated. Assemble and bake the crispy topping fresh before serving to maintain that perfect crunch.
What’s the secret to getting the panko topping extra crispy?
The key is baking at 375°F until the panko is deep golden brown—don’t overcrowd the tray! For extra crunch, sprinkle with melted butter and broil for 1-2 minutes just before serving. The filling stays creamy even after reheating, so focus on that topping for maximum satisfaction.
How can I make these vegan or dairy-free?
Swap the butter for vegan butter or olive oil, and use a vegan mayo (like Just Egg) for the filling. For the crispy topping, try crushed nuts or gluten-free breadcrumbs. The mustard-tarragon flavor will still shine—just adjust the salt to taste since vegan butter is often less salty.
What’s the best way to store leftover deviled eggs?
Store the filling separately in an airtight container for up to 24 hours—it actually improves in flavor! Keep the egg whites refrigerated in their shells for 3 days (or up to 1 week if unpeeled). To revive the topping, pop the eggs in a 375°F oven for 5-7 minutes until crispy again.

- 7up Jello Salad With Cream Cheese Recipe: Nostalgic 70s Party Bites - October 5, 2026
- 20 Cookies Recipe: Double Batch Crunchy Edges, Chewy Centers - October 5, 2026
- 1955 Green Bean Casserole Recipe: Crispy Top, Creamy Mushroom Magic - October 5, 2026