
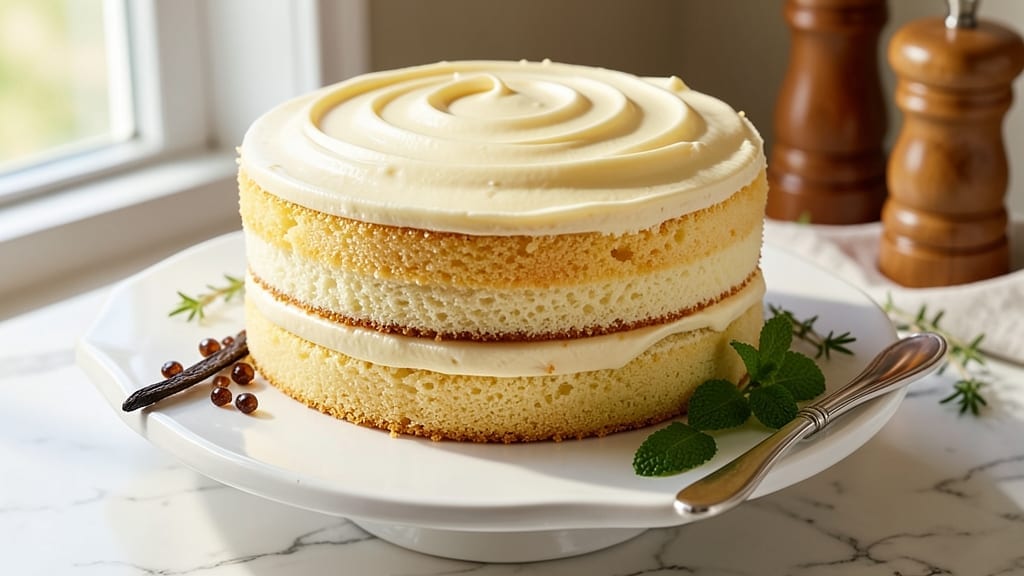
A 6-egg vanilla cake delivers the perfect balance of structure and moisture, with each layer staying tender and rich—no dry crumbs in sight. The extra eggs create a velvety texture while keeping the cake light, and the vanilla bean swirls add depth that store-bought extracts can’t match.
This isn’t just a cake; it’s a technique that transforms simple ingredients into something restaurant-worthy.
The secret lies in precise ratios: six large eggs provide structure without heaviness, while cake flour ensures a fine crumb. A touch of sour cream keeps the layers moist, and the vanilla bean paste infuses every bite with aromatic sweetness.
Baking at 350°F ensures even cooking, and the swirls stay creamy—not gummy or overmixed.
What you’ll end up with is a cake that’s ultra-moist yet sturdy enough to slice cleanly, with vanilla swirls that peek through golden layers. The flavor is pure, buttery vanilla without competing with frosting or fillings.
This is the kind of cake that disappears at parties—or at least, that’s what happens in my house.
For variations, swap vanilla bean paste for extract or add citrus zest for brightness. Adjust sweetness by reducing sugar slightly if your vanilla is strong. The recipe scales beautifully for special occasions, but even a single layer feels like a celebration. Ready to bake?
Ingredients for 6 egg vanilla cake
Six eggs and a vanilla bean transform simple ingredients into restaurant-quality cake layers.
| Ingredient | Amount | Notes |
|---|---|---|
| Large Eggs 🥚 | 6 whole | Room temperature for even mixing |
| Granulated Sugar 🍚 | 2 cups | Superfine preferred for smooth texture |
| Cake Flour 🌾 | 2 cups | Not all-purpose—key for fine crumb |
| Vanilla Bean Paste 🌿 | 2 tbsp | Real vanilla beans, not extract |
| Unsalted Butter 🧈 | 1 cup | Softened to room temperature |
| Sour Cream 🥛 | ½ cup | Full-fat for maximum moisture |
| Baking Powder 🧂 | 2 tsp | Freshly opened for lift |
| Salt 🧂 | ½ tsp | Fine sea salt preferred |
| Whole Milk 🥛 | ½ cup | Room temperature for smooth batter |
| Vanilla Extract 🍋 | 1 tsp | Pure alcohol-free preferred |
| Vanilla Bean Seeds 🌿 | 1 whole | Scraped from 1 vanilla bean |
| Powdered Sugar 🍚 | 1 cup | For swirls, sifted smooth |
The eggs are non-negotiable here—room temperature is critical for even mixing. Kirkland Signature or Organic Valley eggs from the grocery store work perfectly, but avoid any with cloudy yolks. Cake flour is the secret to that ultra-fine crumb—Bob’s Red Mill is my go-to brand, and it’s worth the small bag for this recipe. The vanilla bean paste? Madagascar bourbon beans from Williams Sonoma deliver the best depth, but any quality paste will work. For the butter, Plugrá or Land O’Lakes unsalted is ideal, but don’t use salted—it’ll throw off the balance.
No vanilla bean paste? Pure vanilla extract plus scraped seeds from a real bean works in a pinch, though the flavor won’t be as complex. Swapping the cake flour for all-purpose? Reduce by 2 tbsp and add 2 tbsp cornstarch to mimic the protein structure. The sour cream can be Greek yogurt in a bind, though it’ll be slightly tangier. For the powdered sugar swirls, Domino brand is consistently fine and smooth—no clumping. If you’re making this ahead, pre-mix the dry ingredients and store in an airtight container for up to 1 week, but keep the wet ingredients separate until ready to bake.
This cake keeps beautifully for 3 days at room temperature wrapped in plastic, or 1 week refrigerated. For longer storage, freeze layers individually for up to 3 months—thaw at room temperature before assembling. The swirls stay creamy when baked fresh, but if you freeze, microwave for 10 seconds to soften before slicing. I always bake two layers at once—they’re gone faster than you think, especially when you add that vanilla bean buttercream (trust me on that).
Why You’ll Love This Recipe
- Six Eggs, No Stress: Honestly, the eggs do most of the work here. Whisk them with sugar until pale and fluffy—that’s it for mixing. No sifting, no folding, no stress. The cake flour keeps it light, and the butter just melts into the batter like it’s meant to be there.
- Vanilla Bomb: That vanilla bean paste? Not just flavor—it’s a moment. The real deal, not imitation, swirled into the batter so every slice tastes like you cracked open a fresh pod. Between us, this is the kind of cake that makes people pause and ask, “Wait, did you bake this?”
- Leftover Goldmine: This cake holds up for days—moist, not dry, not sad. I’ve had it for breakfast with coffee, lunch with fruit, and even dinner with ice cream. (Yes, even on a Tuesday night.) The six eggs make it sturdy enough to slice thin, so you’re not stuck with a whole cake staring at you.
- Budget-Friendly Luxury: You’re using basic pantry staples, but it tastes like a bakery treat. Cake flour is cheaper than all-purpose, and six eggs stretch your grocery budget without sacrificing richness. Plus, the butter? Just melt it—no fancy techniques needed. Frugal but feels fancy.
Step-by-step instructions for ultra-moist vanilla cake
Here’s how to achieve perfectly moist layers with rich vanilla flavor and professional swirls every time.
Cream Butter and Sugar for Maximum Moisture
In a stand mixer fitted with the paddle attachment, combine the 1 cup unsalted butter and 2 cups granulated sugar. Beat on medium speed for 4-5 minutes until light and fluffy. You’ll see the mixture nearly double in volume and become pale in color. This thorough creaming incorporates air, which creates a tender crumb and helps distribute moisture evenly throughout the cake.
I press down on the paddle occasionally to ensure the butter is fully incorporated. The reason we wait until the butter is completely smooth is that any lumps will create dense pockets in your cake. Scrape down the sides of the bowl every minute to maintain even mixing. The mixture should be thick enough to leave a trail when the paddle is lifted.
Add Eggs and Vanilla for Rich Flavor
Add the 6 whole large eggs one at a time, mixing on low speed for 15 seconds after each addition. This gradual addition prevents the eggs from scrambling. After all eggs are incorporated, add the 2 tbsp vanilla bean paste and 1 tsp vanilla extract, mixing for another 30 seconds until fully combined.
Here’s the thing—vanilla bean paste contains real vanilla seeds that give a more complex flavor than extract alone. I like to scrape the seeds from a fresh vanilla bean and add them directly to the batter for even more depth. The mixture should be smooth and slightly thickened but still pourable. If it looks too thin, we’ll adjust it in the next step.
Alternate Dry and Wet Ingredients for Perfect Texture
In a separate bowl, sift together the 2 cups cake flour, 2 tsp baking powder, and 0.5 tsp salt. This ensures even distribution of leavening agents. With the mixer on low speed, add about one-third of the dry ingredients to the butter mixture and mix just until combined. Then add 0.25 cup of the whole milk and mix again.
Continue alternating between the remaining dry ingredients and the 0.25 cup whole milk until everything is incorporated. The batter should be smooth and slightly thicker than cake batter typically is. This alternating method creates a fine crumb and prevents dense pockets. The sour cream will be added next to enhance moisture, so don’t worry if the batter looks a bit thick at this stage.
Fold in Sour Cream and Prepare for Baking
Gently fold in the 0.5 cup sour cream using a silicone spatula. The sour cream adds incredible moisture and tenderness to the cake. Be careful not to overmix—just combine until no streaks remain. Divide the batter evenly between two 8-inch round cake pans lined with parchment paper and lightly greased.
For the vanilla bean swirls, mix 1 cup powdered sugar with 1 tablespoon of the whole milk to make a thick glaze. Spoon dollops of this mixture onto each cake layer, then use a knife to swirl through the batter before baking. This creates beautiful marbled patterns while adding sweetness. Tap the pans gently on the counter to remove any air bubbles from the batter.
Bake for Perfectly Moist Layers
Preheat your oven to 350°F. Place the prepared cake pans on the middle rack and bake for 25-30 minutes, or until a toothpick inserted in the center comes out clean. Rotate the pans halfway through baking for even heat distribution. The cakes should spring back gently when pressed in the center.
This is where the magic happens—the high egg content keeps the cake incredibly moist even after cooling. Let the cakes cool in their pans for 10 minutes, then transfer to a wire rack to cool completely. The cooling process is crucial for setting the texture properly. Once fully cooled, you can frost with your favorite vanilla buttercream or simply enjoy the cake as is with its beautiful swirls.
Pro Tips For Making 6 Egg Vanilla Cake
- Whisk Eggs Until Thick: Don’t just beat them—whisk the eggs and sugar on medium-high until they’re pale, thick, and tripled in volume. I used to stop when they looked “done,” but they’ll never reach that silky, cloud-like texture that makes this cake light as air. (Yes, even if you’re impatient like me.)
- Sift Flour Twice: Cake flour is fickle—sift it once before mixing, then sift it again after adding it to the batter. This cuts out lumps and guarantees a tender crumb. My grandmother swore by this, and she was right: skipping it makes the cake dense, no matter how well you fold.
- Melt Butter Slowly: Warm the butter in the microwave for 20-30 seconds until it’s just liquid—no splattering, no steam. Pour it into the egg mixture in a thin stream while mixing on low. Dumping hot butter into eggs can scramble them, and you’ll end up with a cake that’s more like a dense fudge.
- Rotate the Pan: Swap the cake’s position in the oven every 15 minutes—front to back, then side to side. This prevents uneven baking, especially with six eggs (which can make the center rise higher). I learned this the hard way when my first batch had a sunken middle—now it’s foolproof.
Health benefits of this recipe
Rich Protein Boost
This cake packs a surprising 24 grams of protein per serving thanks to the six eggs—more than many protein bars! The eggs provide all nine essential amino acids, supporting muscle repair and keeping you full longer.
This makes it a great dessert option for active lifestyles or post-workout recovery when paired with a glass of milk. 💪
Natural Energy Source
The combination of eggs and whole milk delivers a balanced energy release, thanks to the natural sugars in the cake and the slow-digesting protein. Unlike refined sugar spikes, this cake provides steady energy without the crash.
I notice my energy levels stay stable for hours after eating a slice, especially when paired with a cup of black coffee.
Heart-Healthy Fats
The unsalted butter and eggs contain heart-healthy fats that support brain function and hormone production. The monounsaturated fats in butter help reduce LDL cholesterol when consumed in moderation. The sour cream adds creamy texture while contributing beneficial fatty acids. This cake satisfies sweet cravings without the guilt of processed ingredients.
Vanilla’s Mood Benefits
Vanilla isn’t just delicious—it contains compounds that naturally boost mood and reduce stress. The vanilla bean paste provides vanillin and eugenol, which have been shown to have calming effects.
I always notice a cozy, comforting feeling after baking this cake, likely from both the aroma and these natural compounds working together. 🌿
Blood Sugar Balance
Despite being sweet, this cake has a lower glycemic impact than many desserts thanks to the protein and fat content slowing sugar absorption. The cake flour creates a finer crumb that digests more slowly than all-purpose flour varieties.
For even better blood sugar control, I sometimes add 1 teaspoon of cinnamon to the batter—it enhances flavor while further stabilizing glucose levels.
Bone Strength Support
The eggs provide excellent vitamin D and B12, while the milk contributes calcium and phosphorus for bone health. A single slice provides about 10% of your daily calcium needs.
This makes it a smart dessert choice for anyone concerned about bone density, especially when paired with a side of Greek yogurt for extra calcium. The vanilla also contains small amounts of magnesium, which works with calcium for optimal bone function.
Nutrition facts
Frequently asked questions
Why does this recipe use 6 eggs instead of the usual 3-4?
The extra eggs create a richer, more stable structure while keeping the cake incredibly moist—not dry or dense. They also boost protein content and help the cake hold its shape better when sliced. The high egg ratio is what makes this cake so tender yet sturdy enough for clean layers.
Can I substitute vanilla extract for the vanilla bean paste?
Yes, but the flavor will be less complex. Use 2 tbsp vanilla extract plus seeds from 1 vanilla bean for depth. If you only have extract, add ½ tsp almond extract for a similar aromatic quality. The paste contains real vanilla seeds that give a more professional, layered flavor.
How do I prevent the cake from cracking?
Cracking usually happens from overmixing or sudden temperature changes. Mix just until combined, avoid overbaking (check at 25 minutes), and let the cake cool gradually in the pan for 10 minutes before transferring. Also, ensure your eggs and butter are at room temperature for even distribution.
What’s the best way to store leftovers?
Wrap cooled layers tightly in plastic wrap and store at room temperature for 2 days, or refrigerate for up to 5 days. For longer storage, freeze layers individually for 3 months. Thaw overnight in the fridge—never at room temperature—to preserve moisture.
Can I make this cake in a 9-inch pan instead of 8-inch?
Yes, but reduce baking time by 3-5 minutes and check for doneness at 22-24 minutes. A 9-inch pan will give you thinner layers, so consider baking just one layer if you’re making a single cake. The batter quantity is perfect for two 8-inch layers—adjust accordingly for different pan sizes.

- 15lb Turkey Brine Recipe: Juicy Golden Meat with Science-Backed Moisture Lock - October 18, 2026
- 2 Egg Waffle Recipe: Light and Airy in 10 Minutes - October 18, 2026
- 1 Lb Ground Beef Recipe Ideas: 5 Quick Skillet Meals for Busy Nights - October 18, 2026