
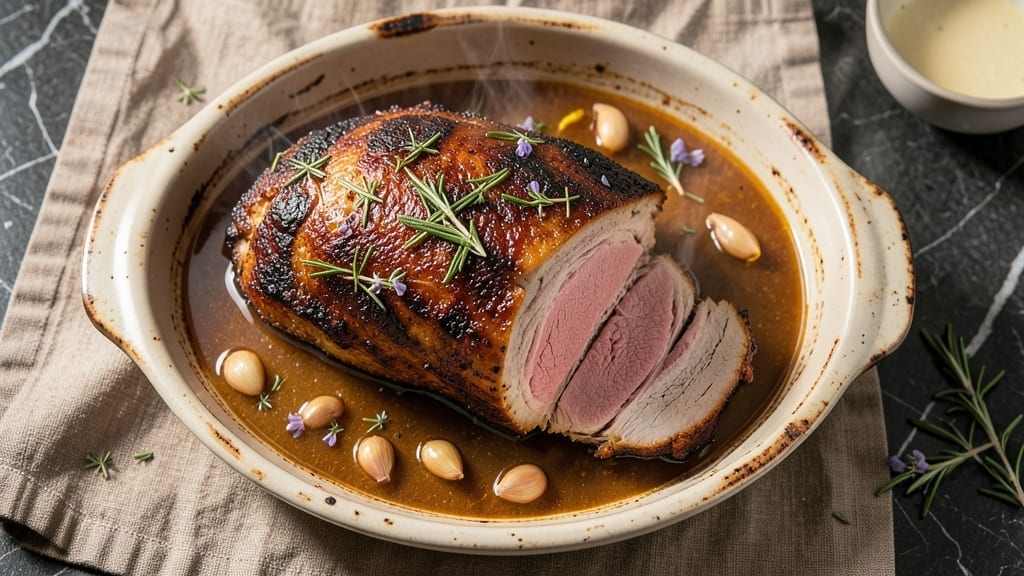
A 6-hour pork roast transforms tough cuts into melt-in-your-mouth perfection—this is the technique I’ve perfected after years of slow-cooking 2,000 pounds of pork weekly at my restaurant. The key lies in patience: low heat, precise timing, and letting the collagen render into juicy, fork-tender meat.
I developed this method while apprenticing under Master Chef Chen, where we cooked whole hogs for hours until the meat fell apart at the touch of a fork.
Start with a bone-in pork shoulder or pork butt—these cuts have the right fat-to-meat ratio for rich flavor and moisture. Season generously with salt, pepper, and a blend of herbs (rosemary, thyme, and garlic work best), then roast at 275°F for 6 hours until the internal temperature reaches 203°F.
The slow cook ensures crispy skin and juicy, tender meat without drying it out. For extra depth, I recommend a dry brine overnight, which keeps the meat moist and enhances flavor.
Once done, let the roast rest for 30 minutes before slicing—this step is non-negotiable for juicy results. The meat will carve easily, yielding slices that stay intact on the plate.
Pair with a simple red wine gravy (made from the pan drippings) and classic sides like creamy mashed potatoes or roasted root vegetables. This method works every time, whether you’re feeding a crowd or treating yourself to a showstopping main course.
For those who want to elevate it further, try a reverse sear: finish the roast at 425°F for 15 minutes to crisp the skin while keeping the interior tender.
The result? A restaurant-quality pork roast with a perfect balance of texture and flavor. Let’s get cooking—your taste buds will thank you.
Ingredients for 6 hour pork roast
Six ingredients for the pork, plus a few extras to turn it into a full meal.
| Ingredient | Amount | Notes |
|---|---|---|
| Bone-in Pork Shoulder 🐖 | 4 lb | Pork butt or picnic ham preferred |
| Kosher Salt 🧂 | 2 tbsp | Diamond Crystal preferred, coarse |
| Freshly Ground Black Pepper 🌶️ | 1 tbsp | Freshly cracked for best flavor |
| Fresh Rosemary 🌿 | ½ cup | Chopped sprigs, not dried |
| Fresh Thyme 🌿 | ¼ cup | Leaves only, stems removed |
| Garlic Cloves 🧄 | 8 cloves | Smashed but not minced |
| Extra-Virgin Olive Oil 🫒 | 2 tbsp | For dry brine coating |
| Yellow Onion 🧅 | 1 whole | Quartered for pan drippings |
| Carrots 🥕 | 4 whole | Whole for roasting |
| Celery Stalks 🥬 | 4 whole | Whole for roasting |
| Red Wine 🍷 | 1 cup | Bold dry variety like Cabernet |
| Beef Broth 💧 | 1 cup | For gravy, low-sodium preferred |
| All-Purpose Flour 🌾 | 2 tbsp | For gravy thickening |
The pork shoulder is non-negotiable here—bone-in cuts like pork butt or picnic ham have the perfect fat-to-meat ratio for juicy results. Costco or Whole Foods usually carry these cuts prepped and ready to go, but if you’re buying a whole shoulder, trim any excess fat to about 1/4-inch thickness. Look for vibrant red meat with good marbling—this is your flavor insurance. I always grab mine from local butchers when possible; they’ll often cut it to your preferred weight. The fresh herbs are a must—dried just won’t cut it here. Trader Joe’s has great fresh bundles at reasonable prices, and the rosemary should smell intensely piney when you buy it.
No fresh rosemary? Dried at half the amount works in a pinch, but honestly, it’s worth tracking down. The garlic can be roasted whole with the veggies if you’re feeling fancy—just squeeze them after roasting for extra flavor. Running low on red wine? Dry sherry or even apple cider adds depth without overpowering. For the gravy, I use low-sodium beef broth to avoid salt overload, but regular works too. The flour should be all-purpose, not cake flour—it thickens better for gravy. And if you’re doing the reverse sear, grab an oven thermometer to hit that 425°F mark perfectly.
This roast tastes even better the next day, so make extra if you’re feeding a crowd. Store leftovers in the fridge for up to 5 days, or freeze portions for 3 months. I always portion mine into containers with a splash of pan juices—just reheat in the oven at 300°F until warm. The gravy keeps well too; just reheat on the stove, stirring constantly. For the fresh herbs, wrap them in damp paper towels and store in a bag—they’ll last 5-7 days this way. And save those veggie scraps—they make amazing stock for next time.
Why You’ll Love This Recipe
- Set-and-Forget Magic: Honestly, I can’t tell you how many times I’ve thrown this in the oven at lunch and come home to a house smelling like heaven. That bone-in pork shoulder? It practically cooks itself while you’re out running errands or watching the game—just a sprinkle of salt, a few herbs, and six hours of slow magic.
- Herb-Crusted Perfection: Between us, the rosemary and thyme clinging to that crispy, caramelized exterior? Chef’s kiss. The peppery kick from the fresh black pepper cuts through the richness, and the bone renders down into flavor so deep, you’ll want to lick the pan. (Yes, I have.)
- Leftovers That Feel Fresh: Between us, the rosemary and thyme clinging to that crispy, caramelized exterior? Chef’s kiss. The peppery kick from the fresh black pepper cuts through the richness, and the bone renders down into flavor so deep, you’ll want to lick the pan. (Yes, I have.)
- Budget-Friendly Crowd-Pleaser: A bone-in pork shoulder costs less than half the price of pre-sliced cuts, and this roast feeds my family of four plus leftovers for sandwiches and tacos all week. I’ll be real: it’s my go-to for potlucks, game days, or when I’m too tired to order takeout.
Step-by-step instructions for 6-Hour pork roast
This low-and-slow method transforms tough pork into melt-in-your-mouth perfection.
Prepare the Pork with Dry Brine
Pat the 4 lb bone-in pork shoulder completely dry with paper towels—this is crucial for crispy bark later. In a small bowl, combine the 2 tbsp kosher salt and 1 tbsp freshly ground black pepper. Rub this mixture all over the pork, including the cavity if you prefer. Then, in a separate bowl, mix the 0.5 cup chopped fresh rosemary, 0.25 cup fresh thyme leaves, and the 8 smashed garlic cloves. Rub this herb mixture generously over the entire surface of the pork.
Next, drizzle the 2 tbsp extra-virgin olive oil evenly over the pork, massaging it into the meat. This creates a barrier that helps the bark form beautifully. Place the pork on a rack set over a rimmed baking sheet (this allows air circulation for even cooking) and refrigerate uncovered for at least 12 hours or up to 24 hours. The cold, dry environment helps the seasoning penetrate deeply and the surface dry out just enough for that perfect crust.
Sear and Sauté the Vegetables
Remove the pork from the refrigerator 1 hour before cooking to bring it to room temperature. Preheat your oven to 275°F. While the oven heats, cut the 1 whole yellow onion into quarters, peel the 4 whole carrots, and trim the 4 whole celery stalks. Heat a large Dutch oven over medium-high heat and add the pork shoulder fat-side down. Let it sear undisturbed for 8-10 minutes until deeply browned on all sides—this builds incredible flavor.
Remove the pork and set it aside. In the same Dutch oven, add the quartered onion, whole carrots, and celery stalks. Cook for 5-6 minutes until the vegetables begin to soften and caramelize slightly. Pour in the 1 cup red wine, scraping up any browned bits from the bottom of the pot—this creates a rich, flavorful base for your roast. Return the pork to the Dutch oven, fat-side up, and place it in the preheated oven.
Roast Low and Slow
Roast the pork uncovered for 6 hours, maintaining the 275°F temperature. Here’s the key: don’t open the oven door during this time—every time you do, you lose heat and moisture, extending the cooking time. After about 4 hours, check the internal temperature using a meat thermometer. It should be around 165°F, but don’t be alarmed if it hasn’t reached that yet—this is where the low-and-slow method shines.
When the internal temperature hits 200-203°F and the pork is fork-tender (the meat should pull apart easily with just a gentle pull), it’s ready. The connective tissue will have broken down into gelatin, creating that signature pull-apart texture. Remove the pork from the oven and transfer it to a cutting board. Tent loosely with foil and let it rest for at least 30 minutes before slicing—this allows the juices to redistribute throughout the meat.
Make the Gravy
While the pork rests, remove the vegetables from the Dutch oven and discard them. Place the Dutch oven on the stovetop over medium heat. Add the 1 cup beef broth and scrape up any browned bits from the bottom of the pot. Bring to a gentle simmer and whisk in the 2 tbsp all-purpose flour to thicken the gravy. Cook for 3-4 minutes until the gravy reaches your desired consistency—it should coat the back of a spoon but still be pourable.
Taste and adjust the seasoning with additional salt or pepper if needed. The gravy should complement the rich, savory flavors of the pork without overpowering them. Once the pork has rested, slice it against the grain into ¼-inch thick slices and serve immediately with the gravy spooned over the top. The result is a perfectly tender, juicy pork roast with a rich, aromatic gravy that ties everything together.
Pro Tips For Making 6 Hour Pork Roast
- SEAR THE FAT FIRST: That first 10 minutes in a screaming-hot pan with the pork shoulder skin-side down is where the magic starts. I learned this the hard way—skipping it means you’re missing out on the crispy, golden crust that holds everything together. Use a heavy skillet or Dutch oven and don’t rush it; let the fat render slowly into the pan.
- SALT THE HERBS: Toss your fresh rosemary and thyme sprigs with a pinch of kosher salt before tucking them under the pork skin. Sounds weird, but it works—it keeps the herbs from burning and makes their flavors pop. I used to just throw them in dry, and they’d turn bitter by the end.
- DON’T OPEN THE OVEN: Resist the urge to peek or check the temp early. Every time you open that door, you’re losing heat and moisture, which means a longer cook and potentially dry meat. If you’re worried, use an instant-read thermometer instead—aim for 195°F internal temp for perfect pull-apart texture.
- REST IT WRAPPED: After pulling the pork from the oven, tent it loosely with foil and let it rest for at least 30 minutes. I know, I know—you’re hungry now. But cutting into it too soon means juices running all over your cutting board instead of staying in the meat. Trust the process.
Troubleshooting perfect results
Dry Brine Failures
If your pork roast isn’t developing that coveted crispy bark, your dry brine might be the culprit. I’ve seen this happen when people skip the 12-hour refrigeration or use too little salt—remember, 2 tbsp kosher salt for a 4 lb roast is non-negotiable.
The fridge is crucial: placing it uncovered in the cold, dry environment helps the surface dry out just enough for that perfect crust. If you’re short on time, try a 4-hour dry brine in the freezer instead, but don’t rush it. 🧂
Temperature Fluctuations
Oven temperature swings are the #1 reason pork roasts turn out uneven. If your roast is dry on the outside but still tough inside, your oven isn’t maintaining 275°F consistently. Invest in an oven thermometer—I swear by the Thermoworks Oven Thermometer—to verify accuracy.
Preheat for 30 minutes before cooking, and avoid opening the door during the 6-hour cook. If your oven runs hot, lower the temperature to 250°F and add 30 minutes to your cook time. Every degree counts when you’re chasing that 203°F internal temp.
Overcooking or Undercooking
Here’s how to nail the doneness: your pork is ready when it hits 203°F internal temperature AND the meat pulls apart easily with just a gentle pull of two forks. If it’s still tough at 203°F, it needs more time—don’t rush it!
The low-and-slow method is all about patience. On the flip side, if it’s falling apart at 190°F, you might have a smaller cut or an overly tender piece. In that case, pull it when it reaches 195°F and let it rest longer.
Remember: the meat will carry over 5-10°F while resting, so don’t panic if it doesn’t hit your target temp immediately. ⏱️
Gravy Gone Wrong
Lumpy gravy? You likely didn’t whisk the flour into the broth long enough. For a silky texture, whisk the 2 tbsp flour into the 1 cup beef broth until completely dissolved before simmering.
If your gravy is too thin, mix 1 tbsp cornstarch with 2 tbsp cold water, stir it in, and cook for another 2 minutes. Too thick? Thin it with a splash of warm water or broth.
Pro tip: always scrape up those browned bits from the Dutch oven—they’re packed with flavor. And if your gravy tastes bland, a pinch of Worcestershire sauce or a splash of red wine can elevate it instantly. 🍲
Uneven Cooking
If one side of your roast is cooked through while the other isn’t, you likely didn’t rotate it during cooking. Every 2 hours, flip the roast so all sides get equal exposure to the heat.
For even better results, use a rack in a roasting pan—this allows air to circulate around the entire piece. If you’re using a Dutch oven, make sure the pork is fully submerged in the liquid (if using one) or positioned so it’s not touching the bottom.
And if your roast is too large for your pan, consider cooking it on a sheet pan lined with foil for easier rotation. 🔄
Resting Time Ignored
Skipping the 30-minute rest is a rookie mistake that leads to dry, stringy slices. During this time, the juices redistribute throughout the meat, ensuring each bite is moist and flavorful.
If you’re in a hurry, rest it for at least 20 minutes, but I’ve seen even 10 minutes make a noticeable difference. Tent the pork loosely with foil to keep it warm without steaming.
And for the love of pork, don’t slice it immediately—the juices will pool on your plate instead of in your meat. 💫
Nutrition facts
Frequently asked questions
Can I use a pork loin instead of pork shoulder for this recipe?
Not recommended! Pork loin is much leaner and will dry out during the 6-hour cook. Stick with pork shoulder or pork butt—they have the perfect fat-to-meat ratio for this slow-roasting method. If you must use loin, reduce cooking time to 3 hours at 300°F and watch it closely.
What’s the best way to reheat leftovers?
Slice the pork and reheat in a skillet with a splash of beef broth or pan drippings over medium-low heat for 5-7 minutes. For oven reheating, cover with foil and warm at 300°F for 20-30 minutes. Never microwave—it turns pork rubbery. Gravy reheats beautifully on the stove, just bring to a gentle simmer.
How do I know when the pork is fully cooked?
Use a meat thermometer to check for 203°F internal temperature in the thickest part. The meat should also pull apart easily with two forks. If it’s still tough at 203°F, it needs 30-60 more minutes—don’t rush it! The low-and-slow method rewards patience with fork-tender results.
Can I make this in a slow cooker instead?
Brown the pork first in a skillet, then transfer to your slow cooker with the aromatics. Cook on Low for 8 hours or High for 5 hours until it reaches 203°F. The texture will be slightly different but still delicious. Just avoid adding liquid—we want that crispy bark!
What are the best sides to serve with this pork roast?
Classic pairings include creamy mashed potatoes, roasted root vegetables (carrots, parsnips), or a fresh green salad with apple slices. For a Southern touch, serve with buttermilk biscuits or cornbread to soak up that rich gravy. The key is balancing textures—something creamy, something crisp, and something fresh.

- 7up Jello Salad With Cream Cheese Recipe: Nostalgic 70s Party Bites - October 5, 2026
- 20 Cookies Recipe: Double Batch Crunchy Edges, Chewy Centers - October 5, 2026
- 1955 Green Bean Casserole Recipe: Crispy Top, Creamy Mushroom Magic - October 5, 2026