
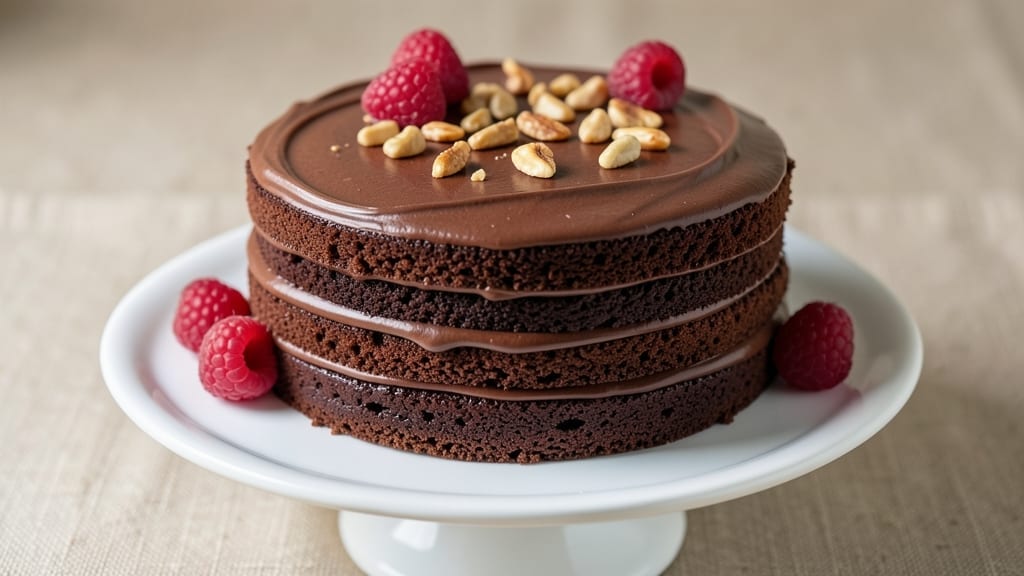
This 6-inch chocolate sponge cake recipe delivers layers of rich cocoa flavor with a light, airy texture that’s impossible to resist. 💛 The secret lies in properly whipped eggs and melted chocolate that infuse every bite with deep, velvety sweetness—no dense, heavy cake here.
I’ve perfected this recipe to ensure moist layers that hold up beautifully when stacked, making it ideal for special occasions or everyday indulgence.
What sets this recipe apart is the balance of ingredients: just enough butter for richness without heaviness, and a precise mix of cocoa powder and chocolate for that signature chocolate flavor.
The cake bakes at 350°F for about 25-30 minutes, yielding layers that are tender yet sturdy enough to support silky frosting. No special equipment is needed—just a standard 6-inch round pan and a few essential pantry staples.
By the time you’re done, you’ll have a cake with a fudgy yet light crumb that practically melts in your mouth, topped with a smooth, velvety frosting that ties everything together. The layers are perfectly moist, not soggy, and the chocolate flavor shines through without being overpowering.
This is the kind of cake that makes you feel like a baking pro, even if you’re just starting out.
The best part? This recipe is completely adaptable. Swap out the frosting for ganache, dust with powdered sugar, or add fresh berries for a pop of color. Whether you’re celebrating a birthday or simply craving something sweet, this chocolate sponge cake delivers every time. Let’s get baking!
Ingredients for 6 inch chocolate sponge cake
Light layers, rich cocoa, and velvety frosting—just these essential ingredients transform into decadent chocolate cake.
| Ingredient | Amount | Notes |
|---|---|---|
| Unsalted Butter 🧈 | ¾ cup | Softened to room temperature |
| Granulated Sugar 🍚 | 1 ½ cups | Superfine preferred for smooth texture |
| Cocoa Powder 🍫 | ½ cup | Dutch-processed for rich flavor |
| Large Eggs 🥚 | 4 whole | Room temperature for best whipping |
| All-Purpose Flour 🌾 | 1 ¼ cups | Sifted for lightness |
| Baking Powder 🧂 | 1 tbsp | Aluminum-free preferred |
| Salt 🧂 | ¼ tsp | Fine sea salt |
| Vanilla Extract 🌿 | 1 tsp | Pure Madagascar bourbon |
| Dark Chocolate 🍫 | 4 oz | 70% cacao, chopped fine |
| Whole Milk 🥛 | ¼ cup | Room temperature |
| Powdered Sugar 🍚 | 2 cups | For frosting |
| Heavy Cream 🥛 | ½ cup | Cold for stiff peaks |
| Butter 🧈 | ¼ cup | Softened for frosting |
The cocoa powder and dark chocolate are where the magic happens. Dutch-processed cocoa delivers that deep, velvety flavor without bitterness, while the 70% cacao chocolate adds richness without overpowering. For the best results, grab Valrhona or Ghirardelli brands—they melt beautifully and keep the cake moist. The butter needs to be room temperature but not greasy; press it between two pieces of parchment if it’s too soft. Superfine sugar dissolves better, but if you only have regular granulated, pulse it in a food processor for a few seconds. Eggs should be at room temperature too—cold eggs won’t whip as well.
No Dutch-processed cocoa? Natural cocoa powder works at the same amount, but expect a slightly tangier flavor. Out of dark chocolate? Chocolate chips melt just fine, though they won’t be as smooth. The milk can be swapped for almond milk or heavy cream if needed, but whole milk keeps the crumb tender. For the frosting, if you can’t find powdered sugar, confectioners’ sugar is the same thing—just make sure it’s sifted. The heavy cream should whip to stiff peaks before folding; if it doesn’t, chill the bowl for another 10 minutes. And trust me on the vanilla extract—the good stuff makes all the difference.
This cake keeps beautifully for 3 days at room temperature, wrapped tightly in plastic. For longer storage, freeze the layers (without frosting) for up to 1 monthchocolate shavings or a sprinkle of flaky sea salt for contrast.
Why You’ll Love This Recipe
- No Mixer Needed: I swear by this recipe when my stand mixer’s on strike—just cream butter and sugar by hand until light and fluffy. The eggs and cocoa powder blend in like magic, and the result? A cake that’s actually tender, not dense.
- Rich Without Overpowering: That first bite? Pure chocolate euphoria, but not cloyingly sweet. The cocoa powder’s deep notes shine through thanks to the butter’s richness, and the eggs keep it moist without tasting eggy. (Yes, even my coffee-loving husband grabs seconds.)
- Birthday or Breakfast: Slice it for a single-serving treat or bake two for a crowd—it’s the same effort. Honestly, I’ve served it warm with whipped cream for dessert, chilled with jam for brunch, and even as a quick snack with just a dusting of powdered sugar. It does it all.
- Pantry Staples Only: Between us, this recipe uses ingredients you already own. No weird substitutes or specialty items—just butter, sugar, cocoa, eggs, and flour. And if you halve the batter? You’ve got leftovers that stay fresh for days, perfect for lazy mornings or impromptu guests.
Step-by-step instructions for decadent chocolate layers
Here’s the precise method for silky sponge layers and velvety frosting.
👨🍳 Step 1: Whip Eggs and Butter for Lightness
In a stand mixer fitted with the whisk attachment, beat the 4 whole large eggs and 1.5 cups granulated sugar on medium-high speed for 5-6 minutes until the mixture triples in volume, becomes pale, and ribbons form when the whisk is lifted. This process incorporates air for a light texture.
Reduce speed to low and gradually add the 0.75 cup softened unsalted butter, mixing just until fully combined. The butter should blend smoothly without breaking the airy structure. I press down gently on the mixture to check consistency—it should spring back slowly, like thick pudding.
👨🍳 Step 2: Fold in Dry Ingredients
In a separate bowl, sift together the 1.25 cups all-purpose flour, 0.5 cup cocoa powder, 1 tbsp baking powder, and 0.25 tsp salt. Gently fold this dry mixture into the egg-butter combination in three additions, using a spatula to cut through the center and fold until just combined. Overmixing develops gluten, which makes the cake dense.
Add the 1 tsp vanilla extract and 0.25 cup whole milk, folding until evenly distributed. The batter should be thick but pourable. Here’s the thing—don’t worry if it looks slightly lumpy. The folding technique preserves the air incorporated earlier, which is crucial for that signature sponge texture.
🍳 Step 3: Bake Three Thin Layers
Preheat your oven to 350°F. Grease three 6-inch round cake pans with nonstick spray and line the bottoms with parchment circles. Divide the batter evenly among the pans and smooth the tops with an offset spatula.
Bake for 12-14 minutes until the edges are set and a toothpick inserted in the center comes out clean. The tops should be slightly domed but not cracked. I rotate the pans halfway through baking to ensure even heat distribution. Let the cakes cool in the pans for 10 minutes before transferring to a wire rack to cool completely.
🥘 Step 4: Prepare the Silky Chocolate Frosting
In a medium bowl, beat the 0.5 cup cold heavy cream with an electric mixer until it forms soft peaks. In a separate bowl, beat the 0.25 cup softened butter and 2 cups powdered sugar until light and fluffy. Gradually add the whipped cream, mixing until combined.
Fold in the 4 oz chopped dark chocolate until fully melted and incorporated. The frosting should be smooth and thick enough to hold its shape but still pipeable. Here’s where it gets fun—taste a small amount and adjust sweetness if needed. If it’s too sweet, add a pinch more cocoa powder; if too tart, add a bit more powdered sugar.
🥘 Step 5: Assemble and Chill for Maximum Flavor
Place one cake layer on a serving plate. Spread a thin layer of frosting (about ¼ cup) on top, then repeat with the remaining layers. Frost the entire cake, then chill in the refrigerator for at least 2 hours before serving. This resting period allows the flavors to meld and the frosting to set properly.
The cake should have a moist, fudgy crumb with a rich chocolate flavor from the cocoa powder and dark chocolate. The frosting should be velvety smooth with a perfect balance of sweetness and bitterness. Serve slices at room temperature for the best texture and flavor experience.
Pro Tips For Making 6 Inch Chocolate Sponge Cake
- Whip Butter & Sugar Slowly: You’re not trying to make whipped cream here—beat the butter and sugar on medium for 3-4 minutes until it’s just pale and fluffy, not stiff or grainy. I used to crank it up high for speed, but that traps air unevenly, and the cake turns out dense. Let the mixer do the work; this is where the lightness starts.
- Sift the Cocoa Twice: Cocoa powder clumps like a grumpy cat, and those lumps sink to the bottom of your batter, making dry pockets. Sift it once into the dry ingredients, then sift it again right before folding it into the wet mix. Yes, it’s extra steps, but your cake will be smooth as silk—not like you’re eating a chocolate brick with crumbly bits.
- Don’t Overmix the Eggs: Separate those eggs carefully, and once the yolks are fully incorporated, stop mixing the moment the batter looks uniform. Overworking the eggs adds gluten, and your sponge will turn out tough instead of tender. I’ve ruined batches this way—trust me, you’ll taste the difference when it’s just right.
- Use Room-Temp Everything: Cold butter? Cold eggs? Your cake’s texture will suffer. Take the butter out 1.5 hours before baking and let the eggs sit in warm water for 10 minutes. Cold ingredients = uneven crumb and potential cracks. I know, waiting is boring, but it’s the thing that matters most for that perfect, even rise.
Wine and beer pairings for this recipe
Red Wine Pairings
For this rich chocolate sponge cake, I reach for a medium-bodied red wine like Pinot Noir from Oregon or Chianti Classico from Italy. The acidity in these wines cuts through the cake’s sweetness while complementing the deep cocoa notes.
A glass of Pinot Noir with its bright cherry and earthy undertones enhances the chocolate’s complexity without overwhelming it. 🍷
If you prefer something lighter, a Cabernet Franc from the Loire Valley offers a perfect balance—its herbal notes and moderate tannins pair beautifully with the cake’s velvety texture. Avoid heavy, tannic reds like Cabernet Sauvignon, as they can clash with the dessert’s delicate sweetness.
White Wine Pairings
A dry Riesling from Germany or Alsace is my go-to white wine pairing. Its crisp acidity and subtle honeyed notes create a refreshing contrast to the chocolate’s richness. The wine’s slight sweetness also mirrors the cake’s frosting without competing for attention. Chill it well—45-50°F is ideal. 🍷
For a more aromatic option, try a Gewürztraminer from Alsace. Its lychee and spice notes add an exotic twist that elevates the chocolate’s depth. Serve it slightly cooler than Riesling—around 42-45°F—to preserve its delicate flavors.
Beer Pairings
When it comes to beer, I love pairing this cake with a Belgian Dubbel like Westmalle Dubbel or Chimay Blue. The beer’s caramel and dark fruit notes harmonize beautifully with the chocolate, while its moderate alcohol content cleanses the palate.
The slight bitterness in these beers also balances the cake’s sweetness. 🍺
For a lighter option, a dry stout like Guinness works surprisingly well. The roasted malt flavors in the beer complement the cake’s cocoa depth, creating a sophisticated contrast. Serve the beer at 45-50°F to enhance its smoothness and avoid overpowering the dessert.
Non-Alcoholic Options
If you’re skipping alcohol, a sparkling apple cider like Martinelli’s is a fantastic choice. Its crisp acidity and subtle sweetness mirror the cake’s frosting, making it a refreshing match. Serve it well-chilled—38-42°F—to highlight its bright flavors. 🍎
For something more exotic, try a sparkling pomegranate juice like Pom Wonderful. The tartness of the pomegranate cuts through the cake’s richness, while its floral notes add an elegant touch. Chill it thoroughly before serving to enhance its refreshing qualities.
Nutrition facts
Frequently asked questions
Why does this recipe call for three 6-inch layers instead of one larger cake?
Three thin layers create a lighter, more elegant cake with better texture and easier slicing. The layers also allow for perfect frosting distribution, preventing a heavy top. Plus, it’s easier to bake three smaller pans at once than one large cake that might overbake in the center.
Can I make this cake in a 9-inch pan instead of 6-inch pans?
Yes, but you’ll need to adjust baking time and reduce oven temperature to 325°F for 30-35 minutes. The cake will be thicker, so check doneness with a toothpick. For best results, bake a single layer in a 9-inch pan rather than trying to make multiple layers.
What if my cake turns out dense instead of light and airy?
Overmixing the batter or underwhipping the eggs are the most common culprits. Make sure to fold dry ingredients gently and whip eggs until pale and ribbons form. Also, ensure your butter and eggs are at room temperature—cold ingredients prevent proper air incorporation.
How can I make this cake gluten-free?
Replace the all-purpose flour with a 1:1 gluten-free baking flour blend (like Bob’s Red Mill) and add 1 tsp xanthan gum to improve texture. You may also need to reduce milk by 1 tbsp since gluten-free flours absorb differently. Test the cake immediately after baking.
Can I use melted chocolate instead of chopped dark chocolate in the frosting?
Yes, but for best results, use 70% cacao chocolate bars melted gently over a double boiler. Let it cool slightly before folding into the frosting to prevent melting the butter. Chopped chocolate creates better texture and visual appeal in the finished frosting.

- Pea Soup Instant Pot Recipe: Velvety Green Smoothness in 20 Minutes - November 1, 2026
- Pork Loin Pulled Pork Crock Pot Recipe: Slow-Smoked Tenderness With Zero Dryness - November 1, 2026
- Baked Potatoes in Crock Pot Recipe: Buttery Interiors and Crispy Top Magic - November 1, 2026