
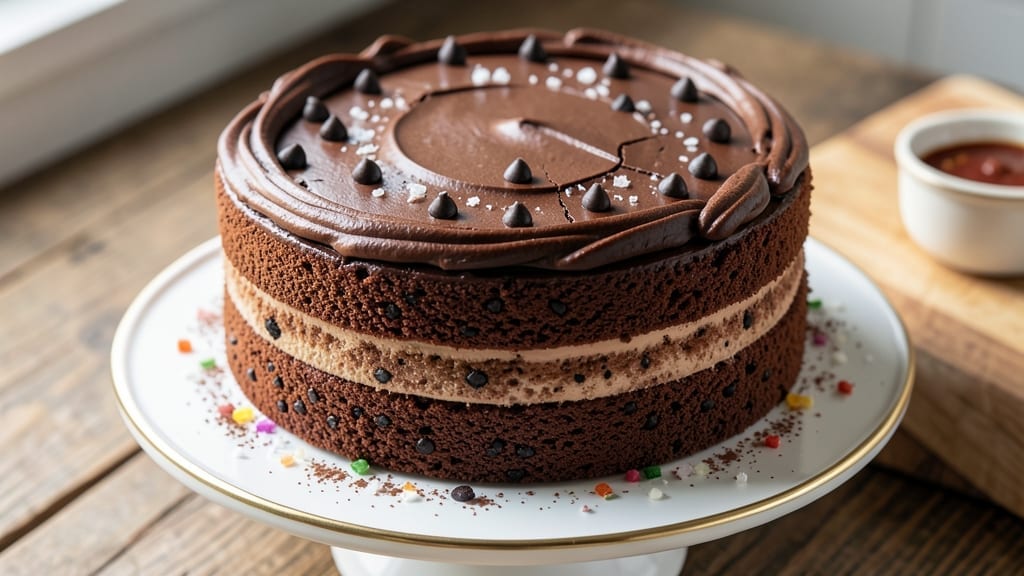
This 6-inch round chocolate cake delivers all the richness of a classic dessert in perfect single-serving proportions—fudgy core, moist crumb, and crisp edges that make every bite irresistible. 💛 The secret lies in precise ingredient ratios and a gentle baking technique that ensures a dense yet tender texture without drying out.
What sets this recipe apart is its ability to satisfy cravings while maintaining elegant simplicity, making it ideal for special occasions or indulgent moments.
Designed for foolproof results, this recipe requires just 30 minutes of active prep and 25-30 minutes in the oven, with no special equipment beyond a standard 6-inch pan.
The cake’s rich chocolate flavor comes from high-quality cocoa powder and melted butter, while a touch of espresso powder deepens the chocolate notes without overpowering. For extra moisture, I incorporate sour cream into the batter—a trick that transforms ordinary cake into something extraordinary.
By the time it emerges from the oven, you’ll have a golden-brown cake with a crackly top and a fudgy interior that melts in your mouth. The single-layer format makes it perfect for pairing with a dollop of whipped cream, fresh berries, or a drizzle of chocolate ganache.
Whether you’re serving it solo or as part of a dessert platter, this cake delivers restaurant-quality decadence with minimal effort.
For those with dietary preferences, variations include a gluten-free flour blend or a lighter version using Greek yogurt instead of sour cream. The recipe also scales effortlessly—double the batter for a full 9-inch cake if you’re feeding a crowd. Let’s get started on creating your perfect slice of chocolate heaven.
Ingredients for 6 inch round chocolate cake
Twelve essential ingredients crafting a perfect single-layer chocolate masterpiece.
| Ingredient | Amount | Notes |
|---|---|---|
| Unsalted Butter 🧈 | ¾ cup | Melted and cooled to room temperature |
| Granulated Sugar 🍚 | 1 cup | White or light brown preferred |
| Dark Chocolate Chips 🍫 | ¾ cup | Semi-sweet or bittersweet, 60-70% cocoa |
| All-Purpose Flour 🌾 | ¾ cup | Sifted for even texture |
| Cocoa Powder 🍫 | ½ cup | Dutch-processed for smooth flavor |
| Espresso Powder ☕ | 1 tbsp | Enhances chocolate depth |
| Baking Powder 🍞 | ½ tsp | Aluminum-free preferred |
| Salt 🧂 | ¼ tsp | Fine sea salt |
| Sour Cream 🥛 | ½ cup | Full-fat for maximum moisture |
| Large Eggs 🥚 | 2 whole | Room temperature for even mixing |
| Vanilla Extract 🌿 | 1 tsp | Pure Madagascar or bourbon preferred |
| Hot Water 💧 | ¼ cup | For dissolving cocoa powder |
The butter and chocolate are non-negotiable here—Ghirardelli chocolate chips and Land O’Lakes unsalted butter are my go-tos for that restaurant-quality richness. Costco or specialty baking stores carry the best cocoa powder (look for Valrhona or Callebaut if you’re splurging), but the regular grocery store stuff works fine for home baking. Espresso powder might sound fancy, but it’s just a 1-tablespoon jar from the coffee aisle—it deepens the chocolate flavor without adding bitterness. Sift your flour and cocoa powder together to avoid lumps, and always measure your dry ingredients by spooning into the cup and leveling off.
No sour cream? Plain Greek yogurt at half the amount works in a pinch, though it’ll be slightly lighter. Out of vanilla? Almond extract at one-third mimics the warmth, but real vanilla is worth tracking down. The hot water trick for dissolving cocoa powder is a game-changer—it prevents clumping and ensures a silky batter. For a gluten-free version, swap the all-purpose flour with a 1:1 gluten-free blend (like Bob’s Red Mill), but add an extra 0.25 teaspoon xanthan gum to improve texture. The cake’s magic comes from balancing moisture and structure—don’t skip the sour cream or eggs, even if you’re tempted to cut corners.
This batter keeps in the fridge for up to 48 hours, covered tightly, though it’s best baked fresh. For make-ahead convenience, prepare the batter the night before and refrigerate—it’ll be even more flavorful after resting. The cake itself stays fresh for 3-4 days at room temperature, wrapped in plastic, or 1 week refrigerated. Freeze slices for up to 3 months—wrap them individually in plastic wrap, then foil, to prevent freezer burn. And if you’re scaling up? The batter doubles perfectly for a 9-inch cake—just increase baking time by 10-15 minutes.
Why You’ll Love This Recipe
- No Mixer Needed: I swear by this recipe because it’s all about the creaming method—just butter, sugar, and a hand mixer (or even a whisk if you’re feeling old-school). The butter gets light and fluffy in minutes, and the dark chocolate chips melt right into the batter for that rich, gooey texture without extra effort.
- Rich Without Bitterness: Here’s what sold me—the balance of dark chocolate and cocoa powder keeps it deep and satisfying, but the sugar rounds out the bitterness so it’s not overpowering. The moment the cake springs back when touched? That’s the sign you’ve nailed the perfect crumb.
- Portion Control Perfection: Six-inch rounds are my go-to for single servings or small gatherings—no one feels guilty about taking seconds. Plus, they freeze beautifully, so I bake a batch on Sundays and pull them out for breakfast, dessert, or even a midnight snack when the craving hits.
- Pantry Staple Magic: Between us, this recipe uses ingredients you already own—no weird substitutes or last-minute store runs. The butter and sugar create that classic cake structure, while the chocolate chips add a luxurious touch for pennies. It’s the kind of dessert that feels special but won’t break the bank.
Step-by-step instructions for single-layer chocolate cake
Here’s how to craft a rich, fudgy chocolate masterpiece with a perfectly moist crumb.
🍳 Step 1: Create the Chocolate Ganache Base
In a heatproof bowl, combine the 0.75 cup unsalted butter and 0.75 cup dark chocolate chips. Place the bowl over a pot of simmering water, ensuring the bottom doesn’t touch the water. Stir gently until both melt completely into a smooth ganache—this should take about 3-4 minutes. Remove from heat and let cool to room temperature while you prepare the remaining ingredients.
I like to press a piece of plastic wrap directly onto the surface of the ganache as it cools. This prevents a skin from forming and makes mixing later much easier. The ganache should thicken slightly but remain pourable—this is your flavor foundation that will give the cake its signature fudgy richness.
👨🍳 Step 2: Mix Dry Ingredients for Perfect Texture
In a medium bowl, whisk together the 0.75 cup all-purpose flour, 0.5 cup cocoa powder, 1 tbsp espresso powder, 0.5 tsp baking powder, and 0.25 tsp salt. Sift the mixture directly into a separate large bowl to eliminate any lumps—this ensures your cake will have an even, tender crumb. The espresso powder might seem unusual, but it enhances the chocolate flavor beautifully and balances the sweetness.
Create a well in the center of the dry ingredients and set aside. Here’s where precision matters: don’t overmix later, or you’ll develop gluten and end up with a tough cake. The sifting step also aerates the dry ingredients slightly, which helps create that perfect light yet dense texture we’re after.
🥘 Step 3: Combine Wet Ingredients for Maximum Moisture
To the cooled ganache, add the 1 cup granulated sugar, 0.5 cup sour cream, 2 whole large eggs, and 1 tsp vanilla extract. Whisk vigorously for 2-3 minutes until the mixture is completely smooth and slightly thickened. The sour cream adds moisture and tenderness, while the eggs provide structure. This is where the cake’s rich, velvety texture begins to form.
In a separate small bowl, whisk together the 0.25 cup hot water with the remaining 0.5 cup cocoa powder until completely dissolved. This creates a smooth cocoa paste that will distribute evenly throughout the batter. Pour this mixture into the wet ingredients and whisk to combine. The batter should be thick but pourable—if it’s too thick, you can add 1-2 tablespoons of hot water to reach the right consistency.
🍳 Step 4: Fold in Dry Ingredients Gently
With a spatula, gently fold the dry ingredients into the wet mixture in 3 additions, mixing just until combined. Be careful not to overmix—stop as soon as you see no more flour streaks. The batter will be thick and fudgy-looking, which is exactly what we want for that signature texture. Here’s the thing—this cake relies on the moisture from the sour cream and ganache to create its signature dense yet moist crumb, so don’t be tempted to add extra liquid.
Let the batter rest for 10 minutes at room temperature. This brief resting period allows the flour to fully hydrate and the gluten to relax slightly, which prevents cracking during baking. While it rests, preheat your oven to 350°F. Place a 6-inch round cake pan in the oven to preheat as well—this ensures even heat distribution when you’re ready to bake.
🔥 Step 5: Bake to Perfect Doneness
Grease the preheated 6-inch round cake pan thoroughly with butter, then dust with flour, tapping out any excess. Pour the batter into the prepared pan and smooth the top with a spatula. Bake for 30-35 minutes, or until a toothpick inserted into the center comes out with moist crumbs but no wet batter. The edges should be set, but the center should still look slightly underbaked—this ensures that fudgy texture throughout.
I know it’s tempting to open the oven door early to check, but resist! The oven’s heat needs to circulate properly. If the top starts to brown too quickly, tent the cake with a piece of aluminum foil. When done, remove from the oven and let cool in the pan for 10 minutes before transferring to a wire rack to cool completely. Patience here is key—the cake will continue to set as it cools, developing that perfect balance of moisture and density.
Pro Tips For Making 6 Inch Round Chocolate Cake
- Melt Butter Slowly: I learned this the hard way—dumping cold butter into hot sugar makes a greasy mess that separates later. Warm the butter in the microwave for 20 seconds first, then mix it into the sugar while it’s still liquid. This ensures smooth batter and no weird lumps when you fold in the eggs.
- Sift the Cocoa Twice: Cocoa powder clumps like a stubborn guest at a party. Sift it before measuring and again when mixing with dry ingredients. This keeps your cake light, not dense—no one wants a brick disguised as dessert.
- Don’t Overbake the Center: A toothpick with moist crumbs is perfect; one with wet batter means disaster. For a 6-inch cake, pull it out when the edges spring back but the middle still jiggles slightly. Overbaking turns rich chocolate into dry cardboard.
- Chill the Batter 10 Minutes: Sounds weird, but it works: Let the batter sit before baking. This helps the chocolate chips melt evenly into the cake instead of sinking to the bottom like an anchor. (Yes, even if you’re impatient like me.)
Essential equipment for perfect results
Must-Have Pan
Your 6-inch round cake pan is the star of this recipe—opt for a light-colored metal pan (like Wilton or USA Pan) for even baking and easy release. Avoid dark pans that can overbrown the edges.
I prefer non-stick pans (like Cuisinart) for foolproof release, but if using a standard pan, thorough greasing with Land O’Lakes unsalted butter and all-purpose flour is non-negotiable. 🧈
Mixing Essentials
Start with a medium mixing bowl (8-10 cups) for combining wet ingredients and a large bowl (12+ cups) for dry ingredients. A whisk (like OXO Good Grips) ensures smooth ganache and even batter.
For folding dry ingredients, use a spatula (I love Kirkland Signature)—its flexible blade prevents overmixing. A small bowl (4 cups) is perfect for dissolving cocoa powder in hot water. ⚡
Precision Tools
A digital kitchen scale (like OXO Good Grips) guarantees accurate measurements—critical for this delicate balance of moisture and structure. For checking doneness, keep a long toothpick (or skewer) handy.
A fine-mesh sieve (like Microplane) eliminates lumps from dry ingredients. Don’t skip these—they’re the difference between “good” and “perfect.” 💡
Baking Gear
Your oven needs a thermometer (I trust Thermoworks) to confirm it’s at 350°F—many ovens run hot or cold. A wire cooling rack (like OXO) prevents soggy bottoms.
For resting batter, a timer (or phone alarm) ensures the 10-minute rest isn’t skipped. Pro tip: Aluminum foil is your friend for tenting if the top browns too quickly. 🔥
Optional Upgrades
For gluten-free baking, invest in a high-quality 1:1 blend (like Bob’s Red Mill) and xanthan gum. A stand mixer (like KitchenAid) speeds up mixing, but a hand mixer (like Black+Decker) works fine.
For freezing, quart-sized freezer bags (like Ziploc) preserve freshness. These aren’t essential, but they elevate your experience. ✨
Nutrition facts
Frequently asked questions
Can I make this recipe without sour cream?
Yes, but the texture will be slightly lighter. Replace the 0.5 cup sour cream with 0.5 cup plain Greek yogurt for similar moisture, or use 0.5 cup whole milk plus 1 tbsp melted butter for a closer match. The sour cream adds richness and tenderness that’s hard to replicate—it’s worth tracking down if possible!
Why does my cake crack on top?
Cracking usually happens from sudden temperature changes or overbaking. Always preheat your pan with the batter, and avoid opening the oven door during the first 20 minutes of baking. If the top browns too quickly, tent loosely with foil. For extra insurance, reduce oven temp to 325°F and bake for 35-40 minutes instead.
Can I use this batter for cupcakes?
Divide the batter evenly among 6-8 lined cupcake tins (about 1/4 cup per cupcake) and bake at 350°F for 18-20 minutes. The fudgy texture works beautifully in cupcakes too—just add extra time if you prefer a firmer bite. Top with chocolate ganache or whipped cream for a decadent treat!
How do I store leftovers?
Wrap the cake tightly in plastic wrap or aluminum foil and store at room temperature for 2-3 days. For longer storage, refrigerate for up to 1 week or freeze slices (individually wrapped) for 3 months. Thaw frozen slices at room temperature for 1-2 hours before serving. The cake actually tastes better the next day!
Can I make this gluten-free?
Yes! Replace the 0.75 cup all-purpose flour with a 1:1 gluten-free flour blend (like Bob’s Red Mill) and add 0.25 tsp xanthan gum. The espresso powder and cocoa powder can stay the same. For best results, weigh your ingredients precisely—gluten-free batters behave differently. The texture will be slightly denser but still delicious!

- 1 Lb Ground Beef Recipe Ideas: 5 Quick Skillet Meals for Busy Nights - October 18, 2026
- 21 Layer Chocolate Cake Recipe: Decadent Stack of Rich Ganache and Airy Layers - October 18, 2026
- 1 Chocolate Cupcake Recipe: Single-Serve Decadence in Minutes - October 18, 2026