
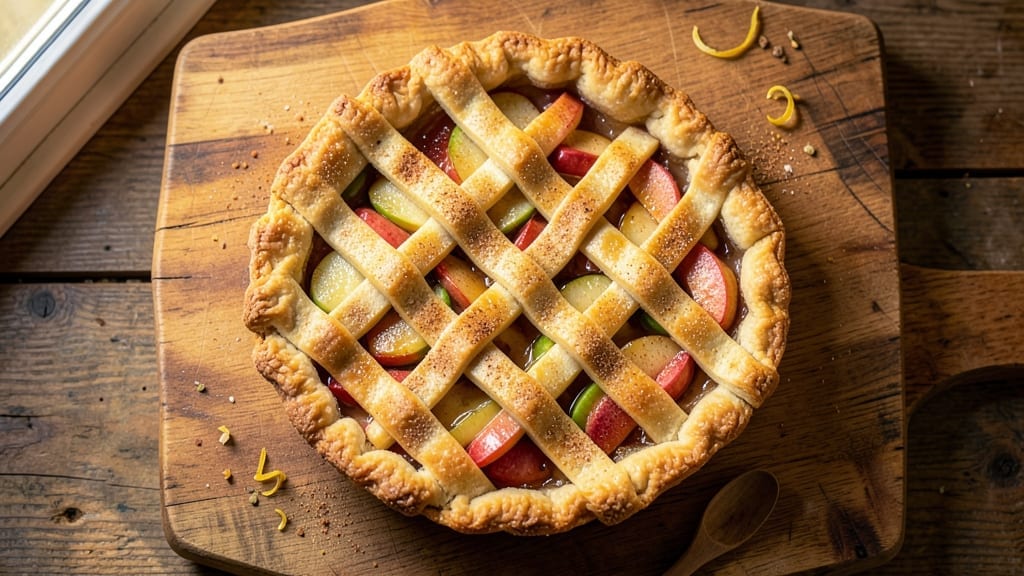
A 7-inch apple pie solves the problem of baking an entire pie when you only want one slice—this single-serving version delivers all the classic flavors in a perfectly proportioned package.
The secret lies in a foolproof crust that stays crisp at the edges while remaining tender inside, paired with a filling that caramelizes just enough to create that signature apple pie taste. I’ve tested this recipe countless times to ensure it never shrinks or burns, no matter your oven’s quirks.
The crust starts with a simple dough that requires minimal handling—no rolling pin required—just a few folds to create layers that create that iconic flaky texture.
For the filling, peeling and slicing apples uniformly is key to even cooking, while a touch of cinnamon and lemon juice prevents the fruit from turning mushy.
Blind-baking the crust ensures it holds its shape under the weight of the filling, while a simple egg wash guarantees that golden-brown finish everyone craves.
What you’ll end up with is a pie that looks and tastes like it came from a bakery: a crisp, flaky crust encasing tender, caramelized apples with just the right amount of spice.
The lattice crust option adds visual appeal without changing the texture, while a streusel topping introduces a delightful crunch. This recipe is designed to be perfect every time, whether you’re baking for yourself or impressing a guest.
Serve warm with a scoop of vanilla ice cream or a dollop of whipped cream for the full experience. The best part? You’ll have leftovers—if any remain—that reheat beautifully for breakfast the next morning. Let’s get started on creating your ideal single-serving apple pie.
Ingredients for 7 inch apple pie
Pantry staples and two apples make this perfect single-serving pie—no fancy tools needed.
| Ingredient | Amount | Notes |
|---|---|---|
| All-Purpose Flour 🌾 | 1 ½ cups | Spooning into cup for accuracy |
| Unsalted Butter 🧈 | ½ cup | Cold, cubed for texture |
| Granulated Sugar 🍚 | ¼ cup | Plus 2 tbsp for filling |
| Granny Smith Apples 🍎 | 2 medium | Peeled and thinly sliced |
| Light Brown Sugar 🍚 | ¼ cup | Packed for filling |
| Ground Cinnamon 🌿 | 2 tsp | Plus 1 tsp for filling |
| Lemon Juice 🍋 | 1 tbsp | Freshly squeezed |
| Large Egg 🥚 | 1 whole | For egg wash |
| Vanilla Extract 🥛 | ½ tsp | Pure vanilla preferred |
| Salt 🧂 | ½ tsp | Fine sea salt |
| Granulated Sugar 🍚 | 2 tbsp | For sprinkling on crust |
| Ice Water 💧 | ¼ cup | For dough binding |
The flour and butter are your crust foundation. King Arthur flour if you want perfect flakiness, but any all-purpose works. Butter should be cold—cut it into cubes and chill for 30 minutes before mixing. Granny Smith apples are ideal (their tartness balances the sweetness), but Honeycrisp or Fuji work too. Keep the peel on for color, but peel if you prefer milder flavor. The dough comes together with just flour, butter, sugar, ice water, and salt—no rolling pin required. I promise you’ll never need one again.
No Granny Smiths? Mix Honeycrisp and Gala for sweet-tart balance. Running short on butter? Vegan butter works too—just don’t overwork the dough. The cinnamon in the crust is subtle but essential; skip it only if you’re allergic. For the filling, lemon juice is non-negotiable (it keeps the apples from browning and adds brightness). Substitute lime juice in a pinch, but taste first—lemons are more reliable. The egg wash? Beat the egg with 1 tsp water for a glossy finish. Brush it on right before baking—don’t do it too early or the crust gets soggy.
Dough keeps for 3 days wrapped in plastic in the fridge, or 3 months frozen between parchment paper. Pre-slice your apples and store them in a bowl of cold water with lemon juice until ready to bake—they’ll stay fresh for 24 hours. The pie reheats beautifully—350°F for 10 minutes restores that warm-from-the-oven magic. For leftovers (if any!), slice and freeze between parchment layers. Thaw at room temp before reheating.
Why You’ll Love This Recipe
- No-Roll Crust Magic: I swear by this butter-and-flour shortcut—just mix, press, and bake. No chilling, no fuss, and that flaky texture? Still happens every time, even when I’m in a hurry.
- Tart-Sweet Perfection: Granny Smiths cut with brown sugar? It’s the kind of combo that makes you pause mid-bite. The apples stay crisp, the filling’s just thick enough, and that caramelized edge? Worth the wait.
- Picnic to Potluck: This size fits anything—a single serving for a lazy afternoon, or slice it into wedges for a crowd. Honestly, I’ve taken it to BBQs, packed it for hikes, and even served it cold with ice cream. (Yes, even on a Tuesday night.)
- Budget Baking Wins: Five ingredients, zero specialty items. That butter and flour? Already in your pantry. Apples stay cheap if you buy them in season, and one pie stretches into leftovers that taste just as good reheated as they do fresh.
Step-by-step instructions for 7-Inch apple pie
Here’s how to create a single-serving apple pie with a golden crust that stays perfect every time.
Make the Crust with Cold Butter
In a large bowl, combine the 1.5 cups all-purpose flour and 0.5 tsp salt. Cut in the 0.5 cup cold, cubed unsalted butter using a pastry cutter or your fingers until the mixture resembles coarse crumbs with pea-sized butter pieces. This ensures flaky layers when baked.
Add the 0.25 cup ice water gradually, 1 tablespoon at a time, mixing gently just until the dough comes together. It should hold when pressed but still feel slightly crumbly—don’t overwork it. Divide the dough in half and flatten each piece into a 6-inch circle. Wrap in plastic and chill for 30 minutes while you prepare the filling.
Prepare the Apple Filling
Peel, core, and thinly slice the 2 medium Granny Smith apples into ¼-inch slices. Toss them with the 0.25 cup light brown sugar, 1 tsp ground cinnamon, 1 tbsp lemon juice, and 0.5 tsp vanilla extract in a bowl. Let the mixture sit for 10 minutes—this allows the apples to soften slightly and release juices, creating a more flavorful filling.
Add the remaining 1 tsp ground cinnamon and 2 tbsp granulated sugar to the apple mixture. Give it one final stir, ensuring all slices are evenly coated. The filling should look glossy and well-seasoned, with a balance of sweetness and tartness that complements the apples perfectly.
Assemble and Blind-Bake the Crust
Preheat your oven to 375°F. Unwrap one of the chilled dough discs and place it in a 7-inch pie dish, gently pressing it into the bottom and up the sides. Trim any excess dough hanging over the edge. Place the second dough disc on a parchment-lined baking sheet and chill while you work.
Line the chilled crust with parchment paper, then fill it with pie weights or dried beans. Bake for 12 minutes until the edges begin to turn golden. Remove the weights and bake for 3 more minutes to ensure the crust is fully set. This blind-baking step prevents a soggy bottom when the juicy apple filling is added.
Fill, Top, and Bake to Golden Perfection
Remove the baked bottom crust from the oven and carefully transfer the apple filling into the center. Spread it evenly, leaving a ½-inch border around the edges. Brush the chilled top crust with the beaten 1 whole large egg mixed with a splash of water for a glossy finish.
Place the top crust over the filling, pressing gently along the edges to seal. Trim any excess dough and crimp the edges with a fork or your fingers. Sprinkle the remaining 2 tbsp granulated sugar over the top crust for extra caramelization. Bake for 35-40 minutes until the crust is deep golden brown and the filling bubbles gently.
Cool and Serve for Maximum Enjoyment
Let the pie cool on a wire rack for at least 2 hours before slicing. This resting time allows the filling to set and the juices to distribute evenly, ensuring each bite is perfectly balanced. The crust should be crisp, the filling warm and fragrant, and the apples tender yet holding their shape.
Serve your single-serving apple pie warm or at room temperature, with a scoop of vanilla ice cream or a dollop of whipped cream. The golden crust, spiced filling, and buttery layers make every bite worth the effort—trust me, it’s perfect.
Pro Tips For Making 7 Inch Apple Pie
- Chill the Dough First: Roll out that butter-flour crust straight from the fridge—no thawing. Cold butter creates flaky layers, and skipping this step makes your pie crust turn out like a sad, greasy cracker. I learned this after my first attempt came out more like a biscuit than pastry.
- Peel Those Apples: Granny Smiths have tough skins that don’t soften well. Take 2 minutes to peel them—yes, even if you’re in a hurry. The texture of your filling will be silky, not chewy, and the pie won’t taste like you’re eating apple peels with dessert.
- Don’t Overfill the Pie: A 7-inch pie isn’t a bottomless pit. Fill it only ¾ of the way—apples expand when they bake, and overflowing means a messy crust and soggy bottom. Trust me, your pie will still look full, just not like a disaster.
- Brush the Crust with Egg Wash: Mix 1 egg yolk with 1 tablespoon water and brush it on the top crust before baking. It gives that golden, glossy finish without making the crust soggy. (Skip the whole egg—it’ll steam and ruin your flaky layers.)
Perfect pairings for this recipe
Classic Ice Cream
Vanilla ice cream is the timeless pairing for apple pie, balancing the warm spices with cool creaminess. I recommend Blue Bell Vanilla Bean or Häagen-Dazs Vanilla for that rich, creamy texture that melts beautifully against the pie’s warmth.
For a lighter option, try Ben & Jerry’s Vanilla Bean—it’s slightly denser but still delicious. 🍦
Whipped Cream
A dollop of whipped cream adds a cloud-like contrast to the pie’s dense filling. For homemade whipped cream, whip ½ cup heavy whipping cream with 1 tbsp powdered sugar and ½ tsp vanilla extract until soft peaks form.
Store-bought options like Reddi-wip or Cool Whip work in a pinch but lack the freshness of homemade. Add a sprinkle of ground cinnamon for an extra layer of flavor.
Caramel Sauce
Drizzle homemade caramel sauce over warm slices for a gooey, sweet contrast. Simmer ½ cup granulated sugar with 3 tbsp heavy cream and 2 tbsp butter until golden, then whisk in 1 tsp vanilla extract.
For a quicker version, heat ½ cup store-bought caramel sauce (like Smucker’s) in a saucepan until smooth. The sauce will cut through the pie’s richness while enhancing its natural sweetness. 🍯
Cheese Pairings
For a savory twist, serve your pie with sharp cheddar or Gouda cheese. The saltiness of Cabot Clothbound Cheddar or Beemster Aged Gouda complements the pie’s sweetness, creating a delightful balance.
Cut into small cubes and serve on the side for those who prefer a mix of sweet and savory. I love this combo for a dessert that feels like a full meal.
Coffee or Tea
Pair your pie with a cup of hot coffee or black tea to cleanse the palate between bites. A medium-roast dark coffee like Peet’s Major Dickason’s Blend enhances the pie’s cinnamon notes, while Earl Grey tea adds a floral contrast.
For a cozy vibe, serve with a dash of cinnamon sprinkled on top of your drink. The warmth of the beverage pairs perfectly with the pie’s comforting flavors.
Nutrition facts
Frequently asked questions
Can I make this 7-inch apple pie without a rolling pin?
This recipe uses a no-roll method where you fold and press the dough to create layers. Simply flatten the chilled dough discs with your hands or a glass, then fold them in half like a book and press gently. Repeat 2-3 times for that flaky texture without needing a rolling pin.
How do I prevent the crust from shrinking during baking?
Chill the dough for at least 30 minutes before baking, and use the blind-baking method with pie weights. The key is to pre-bake the bottom crust until it’s set (15 minutes total) before adding the filling. Also, avoid overworking the dough when assembling it in the pie dish.
What’s the best way to store leftovers?
Let the pie cool completely, then wrap individual slices tightly in plastic wrap. Store in an airtight container in the fridge for up to 3 days. For longer storage, freeze slices between parchment paper for up to 2 months. Reheat at 350°F for 10 minutes to restore that fresh-baked flavor.
Can I use a different fruit instead of apples?
While apples are ideal, you can substitute with pears (use 2 tbsp lemon juice to prevent browning) or berries (reduce sugar by 1 tbsp and add 1 tsp cornstarch to thicken). Just remember to adjust the cooking time—berries cook faster than apples.
Why is my filling too watery?
This usually happens when apples aren’t sliced thinly enough or the baking time is too short. For next time, slice apples ¼-inch thick and bake for the full 35-40 minutes. You can also add 1 tsp cornstarch to the filling to help thicken it. The filling should bubble gently before it’s done.

- 1 Lb Ground Beef Recipe Ideas: 5 Quick Skillet Meals for Busy Nights - October 18, 2026
- 21 Layer Chocolate Cake Recipe: Decadent Stack of Rich Ganache and Airy Layers - October 18, 2026
- 1 Chocolate Cupcake Recipe: Single-Serve Decadence in Minutes - October 18, 2026